Member postings for Nicholas Farr
Here is a list of all the postings Nicholas Farr has made in our forums. Click on a thread name to jump to the thread.
| Thread: Building a hand drill press |
| 11/05/2011 19:48:47 |
Hi Steve, I have dismantled my 2 speed auto drill this afternoon, and will clean all the parts in my small parts cleaner tomorrow and take some photos of them.
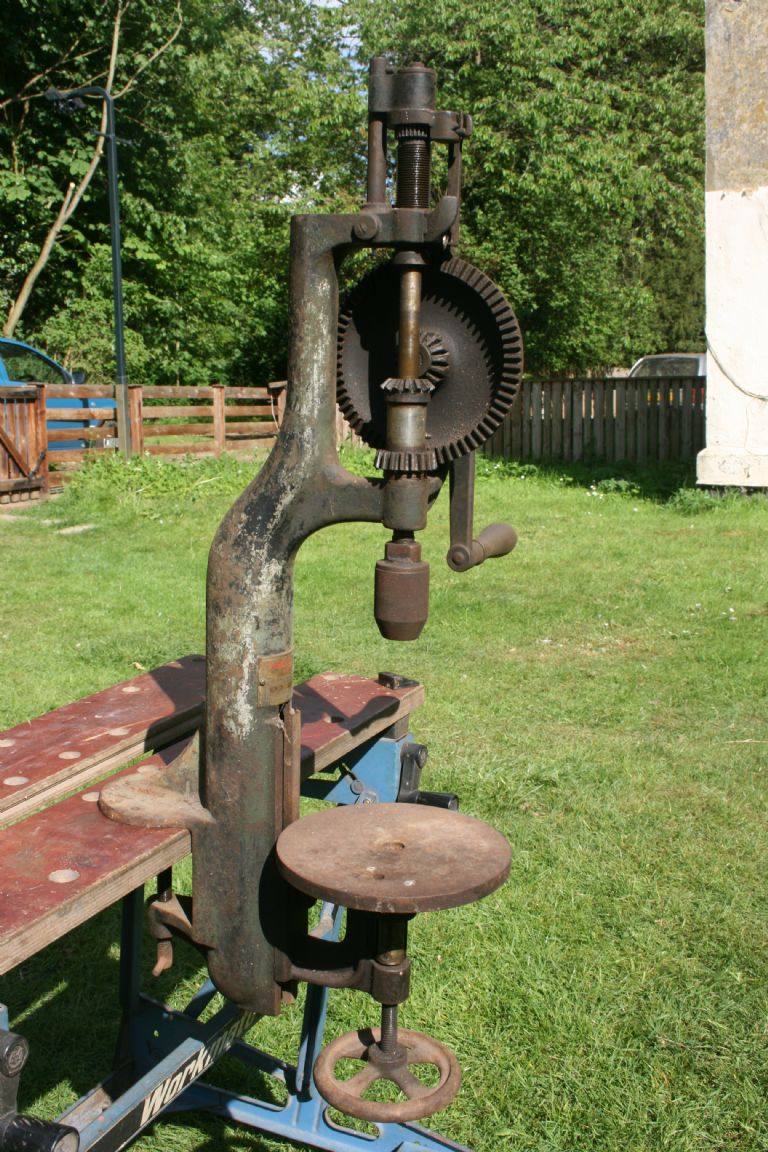
In the meantime I'll tease you with a photo of another auto-feed drill that originated on the other side of our western lake, Philadelphia to be more precise.
I was given this one several years ago for doing a simple 5 minuite job.
One like this, in much the same condition sold on eBay in Illinois for $250 just a while ago. If you Google Yankee drill press 1005, you should be able to view it, it's five or six down on the results page.
Regards Nick.
Edited By Nicholas Farr on 11/05/2011 20:18:31 |
| 08/05/2011 23:09:53 |
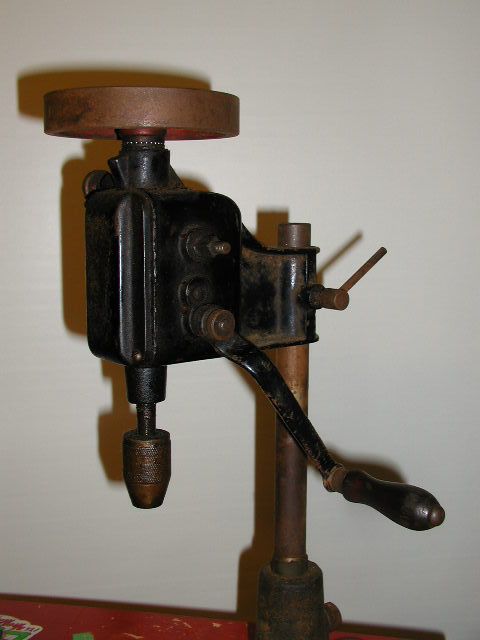
Hi Steve, I haven't actually used this drill, I bought it at an auction last October with a couple of others along with a some other tools, some which I have resold. The drill is in fact married up to a different base for some reason, maybe the previous owner broke the original. I haven't even used the other drill either, that was also bought at an auction some years ago and is still waiting, as can be seen, for a clean up and restore.
I used a breast drill like the one in your picture where I first started working after leaving school back in 1968. You have utilised it very well by the look of it, I presume that is padding on the breast plate, for better comfort during use. Adaptable tools are always much more versatile.
Regards Nick. |
| 07/05/2011 23:54:02 |
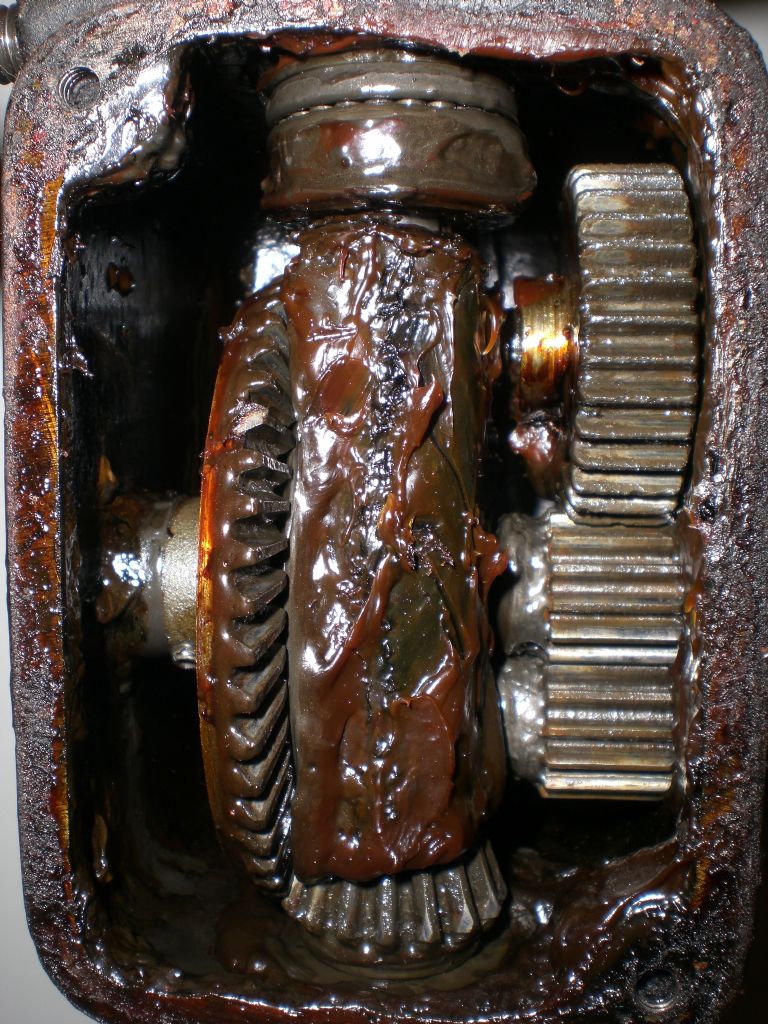
Hi Steve, please give me two or three days for more photos, as I'll be a bit tied up, if I get the chance towards the middle of the week, I'll strip this one down and clean it to get a better view of things. However I have taken the front cover off and taken a photo of the inside.
The driving mechanism is fairly straight forward in that the drill spindle is driven by the bevel gear at the bottom which is driven by the crown wheel on the left hand side, this in turn is driven by the middle shaft running left to right, which has a small gear on it on the right hand side. The bottom shaft on the right hand side also has a small gear on it with which it meshes with the middle shaft. This bottom shaft extends out of the right hand side of the case, and is the slow speed one that the operating handle is attached to. The top shaft on the right hand side has a larger gear and is like wise extended out of the right hand side, and is the fast speed one that the handle is attached to.
The drill spindle is all one piece on these type of machines and a threaded portion passes through the fly wheel at the top. They work on a kind of differential friction, and a sort of feedback pressure from the piece that is being drilled. They have, apparently. got the tendency to break small twist drills, because it isn't possible to reduce pressure enough to stop the drill from pushing downwards during drilling, However, a guy by the name of E. J. Szlumper came up with a solution to this problem, in which he wrote an article about with a design that he describes in The Model Engineer April 1939.
 Ian, I do have a few earlier issues of ME and I have seen the T. Bradley advert before, it looks like a precursor design to the Union one that I have. Regards Nick. |
| 06/05/2011 22:14:04 |
Posted by Ian S C on 06/05/2011 14:59:07: The machines I am thinking of come from a period between the end of the 19th century, and the 1930s, the one in your photo is modern by comparason, it looks like a useful tool. The old ones have exposed gearing, although my one has a rather crude gaurd over the gears. Ian S C Hi Ian, Steve picture may seem to be a modern one however, the drill in the picture below is not unlike the advert from S. Tyzack and Son Ltd., London, placed in Model Engineer & Practical Electrician July 5th 1934.
Regards Nick Edited By Nicholas Farr on 06/05/2011 22:14:24 |
| Thread: MEW digital |
| 06/05/2011 10:49:27 |
Hi, when you have a page that you have zoomed in on, and while still in zoom, you can zoom in further up to about 230% by using a wheeled mouse, just twiddle the wheel forward for zooming in further and twiddle the wheel backwards to zoom out again, you can also zoom in and out using the +/- keys on the number panel. The wheel will also turn the pages when you don't have them in zoom mode.
Regards Nick. Edited By Nicholas Farr on 06/05/2011 11:04:54 |
| Thread: Building a hand drill press |
| 05/05/2011 08:43:18 |
Hi Terry, very interesting site you found there, thanks for sharing it with us.
Regards Nick. |
| 05/05/2011 08:12:12 |
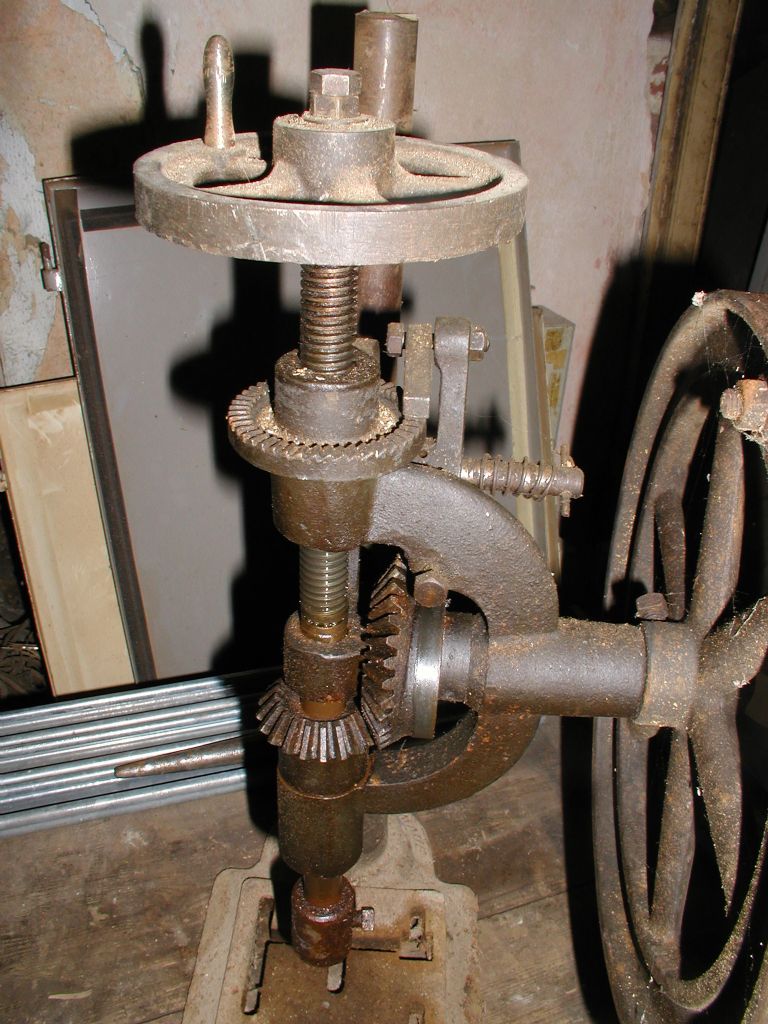
Hi Steve, the drill shaft and feed screw are two seperate items. The screw thread is hollow, and the drill shaft from the thrust bearing upwards is reduced down to a sliding fit inside the hollow of the screw thread, it terminates on top of the feed screw handle with the double nuts, as seen in the last photo.
Regards Nick. |
| 04/05/2011 12:35:58 |
Hi Steve, if you do it here, others may also benifit as well. But you may PM me if you wish.
Regards Nick. |
| 04/05/2011 12:05:23 |
Hi Steve, have uploaded some more photo into my Autofeed Hand Bench Drill album. Hope these give you a better idea, but feel free to ask any questions about them.
Regards Nick. Edited By Nicholas Farr on 04/05/2011 12:06:22 |
| Thread: Removing needle roller bearings ? |
| 04/05/2011 00:16:16 |
Hi Philip, how about trying two or three maybe, weld beads on the outer part of the bearing, and then letting them cool and shrink. I appreciate you don't have much room inside to get much of a weld in, but with care it should work as long as you don't have it too hot and burn through and welding it in forever. Or you may be able to spot tack a bolt head onto the inside and fix some kind of slide hammer to the bolt to tap it out.
Another approach could be to get it in the lathe and boring it thin enough for it to collapse, providing it's not too hard of course.
Regards Nick.
Edited By Nicholas Farr on 04/05/2011 00:21:03 |
| Thread: Building a hand drill press |
| 03/05/2011 19:59:41 |
Hi Steve, the two pictures below show what Richard has explaned, although this is only a single speed version. The pawl is lifted and swung back when you wish to back off the drill or if you just use hand feed.
Regards Nick.
PS if you would like a few close up pictures from different angles, just let me know. Edited By Nicholas Farr on 03/05/2011 20:07:15 |
| Thread: Hobbymat lathe speed control. |
| 02/05/2011 14:58:02 |
Hi Steve, it is No: 107S Sunshine Yellow in the 100ml spray cans at about £2.49 each when I bought them. Not sure if they were on offer at the time, but it took almost four of these. They weren't to bad to use, but they don't like the cold too much, so I stood them on my oil filled radiater for a while before use, as it was just a little before Chrismas time when I did It, however I did prime the Ally with Hammerite Special Metal Primer first, which I allready had, and the saddle and tailstock had a coat of grey Plasti-Kote primer which I also already had. No real effort was made as it was only intended to be a tidy up job, I'm no painting expert.
 The colour match wasn't exact, but it looked pretty close and good enough for me. Regards Nick. |
| 02/05/2011 01:27:34 |
Hi Chippychap, I'm glad that you have found something usfull from my H/M lathe refurb album, but as I've said there is a little more to do when time allows.
Steve, I have added two drawings of the spindle plate, to my H/M album that I made with the measurements that I took at the time, which seemed to be closer to imperial than metric, with the exception of the two pin holes that hold the leadscrew gaurd, although all measurement are in decimal imperial on the drawings. I have got a write up in M/S Word of the brief proceedure with photos of making mine if you are at all interested, I can e-mail them if you like.
Regards Nick. |
| 01/05/2011 14:24:15 |
Hi Steve, the ally was for the change wheel apron, see pic at top of this thread. The leadscrew support was originally Bakelite but I made a new one from part of a cast iron bearing housing, but I suppose ally would do for that, its just that the scrap bearing housing cost me zero cash.
Regards Nick. Edited By Nicholas Farr on 01/05/2011 14:38:45 |
| 01/05/2011 13:47:51 |
Hi, I agree with both what Ady and Steve say, and as you may have seen my photo album about the Hobbymat refurb that I am slowly doing, 7 years so far, but to be honest it sat in my garage taking a somewhat back seat for most of that time. It was bought second hand of ebay and had some modifications done to it by a previous owner. I like Steve don't intend to throw very much money at it, about £20.00 so far for paint and a new piece of Ally and that will be about the limit. But on the question of £60/70 for adding a slow drive to the V belts I would think is quite a small amount compared to the cost of a three phase motor and converter.
I don't consider the Hobbymat as a serious lathe, but are a good budget one, and probably got a lot of people started in this wonderful world of ME who wouldn't otherwise been able to afford it, when they first arrived on the scene. They still seem to attract a good price second hand though.
Regards Nick. |
| Thread: cutting BMS, filing edges of cut BMS |
| 30/04/2011 19:30:22 |
Posted by Steve Garnett on 30/04/2011 19:23:29:
I used to have a pair of 4" fibre vice jaw grips that were pretty good until they wore out. These mounted onto a bit of ally sheet that you could bend around the backs of the existing jaws. I believe they're still available if you look around - I found a few on eBay. Hi Steve, Warco sell fibre ones on ally bases with magnets in them to hold them in place. Just look in the work holding section on thier online site.
Regards Nick. |
| Thread: Marking out |
| 29/04/2011 23:25:09 |
Hi, I don't have a optical punch, but what I do when I need to be fussy, is to use my autopunch on minimum and feel for the scribed lines and lightly put a small dot into position. I then look at it through a loupe, make any correction needed and then give it a decent dot for the drilling process.
Regards Nick. |
| Thread: cutting BMS, filing edges of cut BMS |
| 29/04/2011 23:07:29 |
Hi Colin, I'll just add to steve's post by saying that once you have made a start on the cut with the blade against your thumb, continue sawing but hold the front of the saw frame steady with your other hand, this will also help stop the blade bouncing out on the backstroke, but like Steve says, don't put any pressure on the backstroke, just allow it to glide over. One other thing is having the blade quite taut in the frame, because if it is allowed to do a twisting action as you saw, it will tend to wander. You will also find it will need adjusting now and again, as it will stretch during use.
Filing does take practice, but one other way to stop you getting a hill on the ends of your plates, is to file the edges from one corner to the opposite corner for a short period, and then go between the other two corners and watching the different shade in the filing marks, so you can adjust the pressure more evenly. Just keep swapping for short periods of time until you have your desired result. Try not to get to impatient to get it finished in a hurry.
Regards Nick. Edited By Nicholas Farr on 29/04/2011 23:09:49 |
| Thread: Marking out |
| 29/04/2011 18:04:59 |
Hi Colin, I use one of those 4" combination type squares for marking out on a typical job like the one you have, and even if you don't get a line from each side to exactly match up they are normally close enough to dot in between for your holes to be central.
Regards Nick. |
| Thread: Bought a mill to go with the lathe |
| 27/04/2011 10:16:59 |
Hi Dusty, whoops! the decimal point slipped.
Regards Nick. |


Magazine Locator
Want the latest issue of Model Engineer or Model Engineers' Workshop? Use our magazine locator links to find your nearest stockist!
Sign up to our Newsletter
Sign up to our newsletter and get a free digital issue.
You can unsubscribe at anytime. View our privacy policy at www.mortons.co.uk/privacy
Latest Forum Posts
- hemingway ball turner
04/07/2025 14:40:26 - *Oct 2023: FORUM MIGRATION TIMELINE*
05/10/2023 07:57:11 - Making ER11 collet chuck
05/10/2023 07:56:24 - What did you do today? 2023
05/10/2023 07:25:01 - Orrery
05/10/2023 06:00:41 - Wera hand-tools
05/10/2023 05:47:07 - New member
05/10/2023 04:40:11 - Problems with external pot on at1 vfd
05/10/2023 00:06:32 - Drain plug
04/10/2023 23:36:17 - digi phase converter for 10 machines.....
04/10/2023 23:13:48 - More Latest Posts...
- View All Topics
Support Our Partners


Shopping Partners
Subscription Offer

Latest "For Sale" Ads
- Reeves** - Rebuilt Royal Scot by Martin Evans
by John Broughton
£300.00 - BRITANNIA 5" GAUGE James Perrier
by Jon Seabright 1
£2,500.00 - Drill Grinder - for restoration
by Nigel Graham 2
£0.00 - WARCO WM18 MILLING MACHINE
by Alex Chudley
£1,200.00 - MYFORD SUPER 7 LATHE
by Alex Chudley
£2,000.00 - More "For Sale" Ads...
Latest "Wanted" Ads
- D1-3 backplate
by Michael Horley
Price Not Specified - fixed steady for a Colchester bantam mark1 800
by George Jervis
Price Not Specified - lbsc pansy
by JACK SIDEBOTHAM
Price Not Specified - Pratt Burnerd multifit chuck key.
by Tim Riome
Price Not Specified - BANDSAW BLADE WELDER
by HUGH
Price Not Specified - More "Wanted" Ads...
Get In Touch!
Do you want to contact the Model Engineer and Model Engineers' Workshop team?
You can contact us by phone, mail or email about the magazines including becoming a contributor, submitting reader's letters or making queries about articles. You can also get in touch about this website, advertising or other general issues.
Click THIS LINK for full contact details.
For subscription issues please see THIS LINK.
Digital Back Issues


Donate

 Register
 Log-in
Model Engineer Magazine
- Percival Marshall
- M.E. History
- LittleLEC
- M.E. Clock

ME Workshop
- An Adcock
- & Shipley
- Horizontal
- Mill

Subscribe Now
- Great savings
- Delivered to your door

Pre-order your copy!
- Delivered to your doorstep!
- Free UK delivery!