Member postings for Ramon Wilson
Here is a list of all the postings Ramon Wilson has made in our forums. Click on a thread name to jump to the thread.
| Thread: Stuart Twin Victoria (Princess Royal) Mill Engine |
| 23/06/2022 07:40:51 |
Thanks for that Doc, I'm going to give that a try on the marine engine glands. There is one thing to consider with PTFE as a packing material and that is if the model is run on steam then PTFE can swell and tighten things up. Like you though I only build to run on air and as friction, or rather lack of it, is important for low speed running at low air pressure then 'every little helps' as they say!
|
| 22/06/2022 18:31:51 |
Yes it's the square section type I use on pistons Jason but I'm not sure there's anything corded/braided that would be small enough to use directly on rod glands - I'm not aware of any that is. |
| 22/06/2022 18:27:28 |
Whatever you are happy with Doc. I haven't tried it so can't really comment but if Jason has used it successfully then carry on - one things for certain it'll be a lot cleaner than using graphited yarn! I like the braiding BTW but I did you have to use a fair bit of tape to get that bulk? Best
|
| 22/06/2022 11:15:51 |
Though a small annular gap is desirable I would just ream it a standard 5mm - you could buy a special 5.01/02 but it's hardly worth it - if it does need opening up slightly it could easily be lapped to give a looser fit As said before I always use PTFE impregnated braided yarn as a piston seal but always use the string like graphited packing on the piston and valve rods. Though I have no experience in using the PTFE tape as you describe I feel there could be a possibility that 'strands' of it could find their way between rod and hole which is very unlikely with the coarser graphite packing. I unwind the basic graphite 'string' to give (still quite coarse) individual strands that makes for easier packing, especially on small glands, but have used fine cotton line with graphite which works just as well. As always it's a matter of choice though Regards - R Edited By Ramon Wilson on 22/06/2022 11:16:01 |
| 21/06/2022 22:27:44 |
Ha, Commiserations! I remember doing that just after starting a new job - very embarrassing and it quickly lead to the practice of mic-ing the drill as soon as it's selected, something I still do even to right up to today!
You should get away with leaving as is and allowing the packing to take up the discrepancy - the annular gap after all will only be just under .003" The slope on the mating faces will squeeze the packing inwards equally. Personally I would use a fine thread loaded with graphite than the traditional graphite packing which can be quite coarse and usually requires stripping into the individual stands for ease of packing. I have a good supply of Graphite if you need some BTW You could use 5mm ground stainless rod too - just ream the two parts at the same time after assembly to suit. Either will easily overcome this slight setback.
Edited By Ramon Wilson on 21/06/2022 22:28:17 |
| 21/06/2022 08:01:11 |
Yes, of course Doc, if you want the two parts to match that's a different matter. Full size of course it's very unlikely so I've never attempted to make them the same but I agree it does look neater Incidentally the plate clamp method of work holding is perfect for doing the eccentrics - makes the job very simple indeed and everyone identical. Perhaps something to bear in mind when you get to that stage. My rotary table was one of the first tools, the first I think, I made when starting out. It was from the old MES castings and has done me proud over the years. I added a degree ring at some stage but the best mod was, without a doubt, to fit dead stops to it - takes away that ever present potential of over movement! All sounds good so looking forwards to seeing your engine grow
Regards - R |
| 20/06/2022 09:32:37 |
"Then remembered I’ve not yet made the brass blanks for the gland collars…doh!" Ha! you won't be the first to get ahead of yourself Doc - know the feeling. I like your idea of using the JBW before machining - a much better way of taking care of low spots rather than afterwards. Apart from the glands what's the next in line? Best - R
|
| 19/06/2022 09:58:33 |
As an after thought Doc, my comment referring to a 'spigot' was such that you should have between the RT and the chuck - to align the chuck to the table - not the aluminium spigot used in the part. Forgive me stating the obvious but it goes without saying really - once you have the R/T truly aligned with the spindle and the DRO/dials zeroed anything else bolted to the RT has to have the same reference. I have a stub of steel that locates into the 1.00inch hole in the RT which then registers into the back of the chuck. Also have a 6" diameter sub-plate that does the same. Once the R/T is set then the part is set to the same reference - it should then all be in alignment. If of course the chuck has a considerable run out then the only way round that is to have the chuck float and align the part - which is why a simple plate is sooo much easier Hope I'm not offending your sense of understanding of this situation |
| 18/06/2022 19:45:43 |
If that's the case then the relationship between the four jaw (I assume it's a self centering one?) and the RT is awry somewhere - If the R/T is true to the spindle and the R/T hole is running true and the four jaw chuck is reasonably accurate (much better that 9.5 thou) I think mine is around 2-3 at worst then the only thing left to influence it is the aligning spigot, the plane of the RT or the bolting tension. You could check this by removing the spigot and let the chuck float on the RT. Repeat your exercise with a bar in the collet clamping the chuck to it with everything 'on centre'. Clamp the chuck just sufficiently tight enough and test for run out - then tighten up and recheck. Check there's no detritus under the chuck too
|
| 18/06/2022 19:19:48 |
Ah, I didn't read that right. Once the R/T is positioned under the spindle and running true that's finite so if the spigot is running out - and you are confident that it's true to the OD of the cover - then the four jaw must be influencing it in some way - slightly tilting it perhaps. Try holding something round, smooth and straight in the four jaw that you can test with the dti to see how much run out you get - near and away from the jaws |
| 18/06/2022 19:09:07 |
Good result Doc Don't know if you've checked my thread I put up for you yet but you'll see that a simple plate will do just as well as the chuck and give you a lot more head room to boot. That's my biggest issue on the Linley when the RT and chuck are together. I have a small DTI articulated mount that fits directly in the drill chuck - a real boon when space is at a premium. Heavily distracted into a 32nd scale Phantom at the mo but your posts are having the opposite effect! Keep it coming
Edited By Ramon Wilson on 18/06/2022 19:10:37 |
| Thread: Diamond shaped steam piston glands/pipe glands |
| 18/06/2022 08:24:33 |
Ah, but the difference is Jason, a simple piece of steel plate or CNC - depends what's available to most eh Love that green BTW Jeff, apart from an oscillator that Twin Vic was my first steam engine built sometime in the eighties I think. I sold it via 'Old Glory' mag quite some time ago to a lovely old boy who obviously was going to appreciate it. I expect he's gone know - wonder what happened to it? As always Hopper there are many ways of skinning that cat usually all born from trying to simplify matters without losing the precision.
Best - Tug
|
| 17/06/2022 23:09:12 |
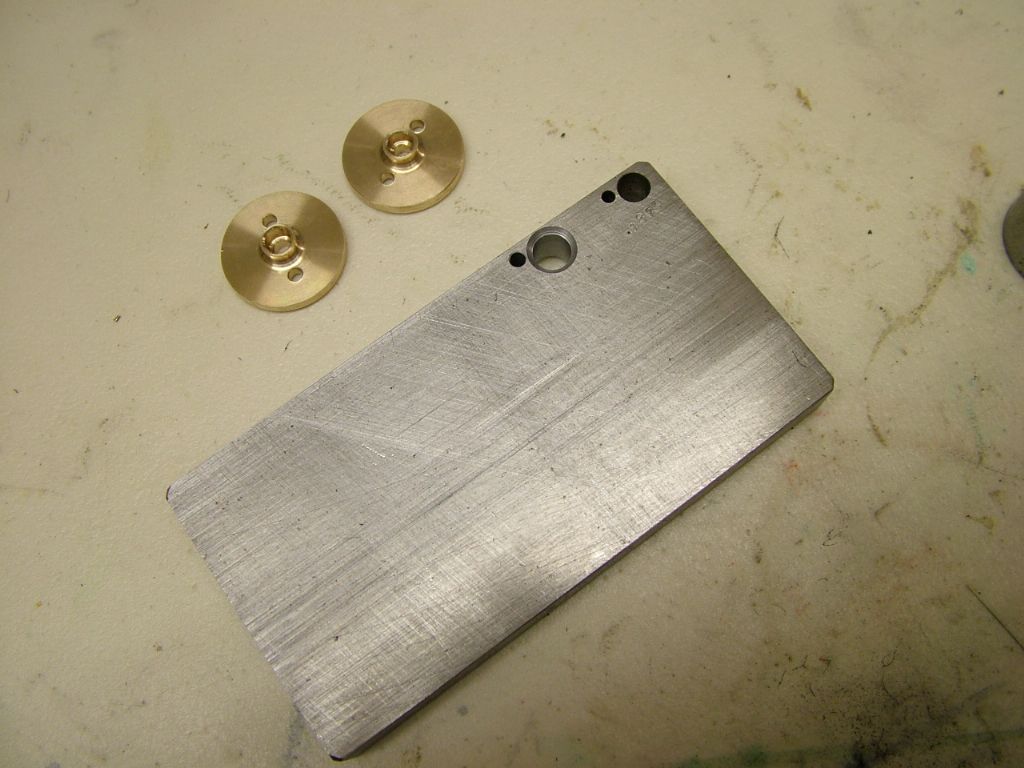
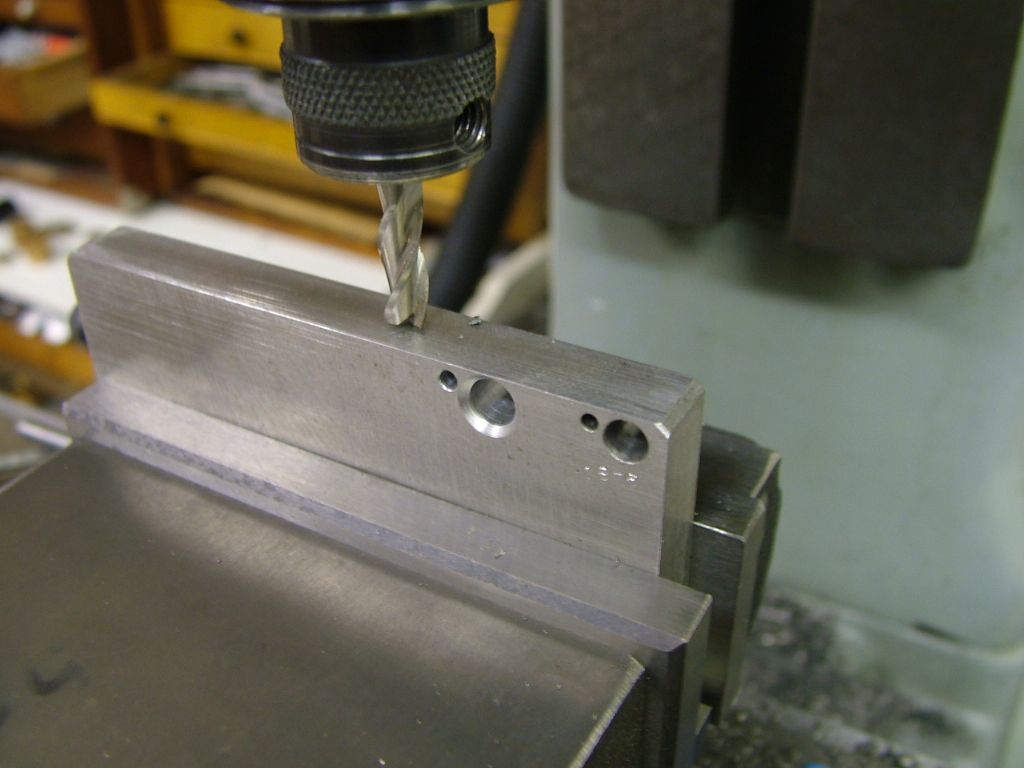
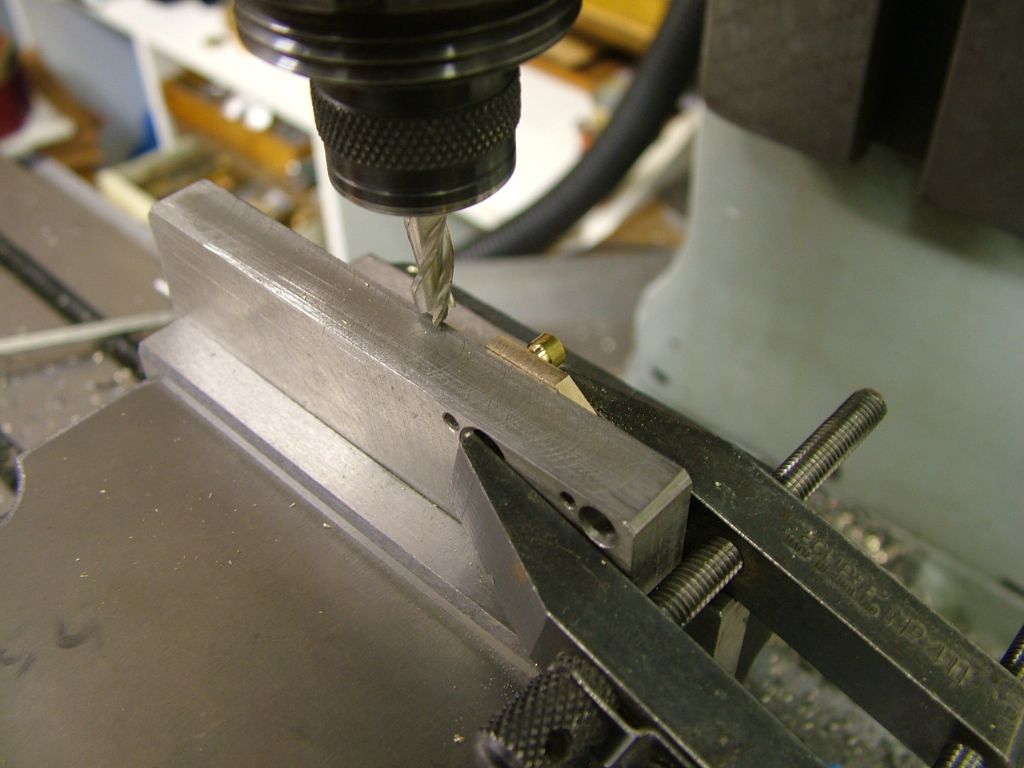
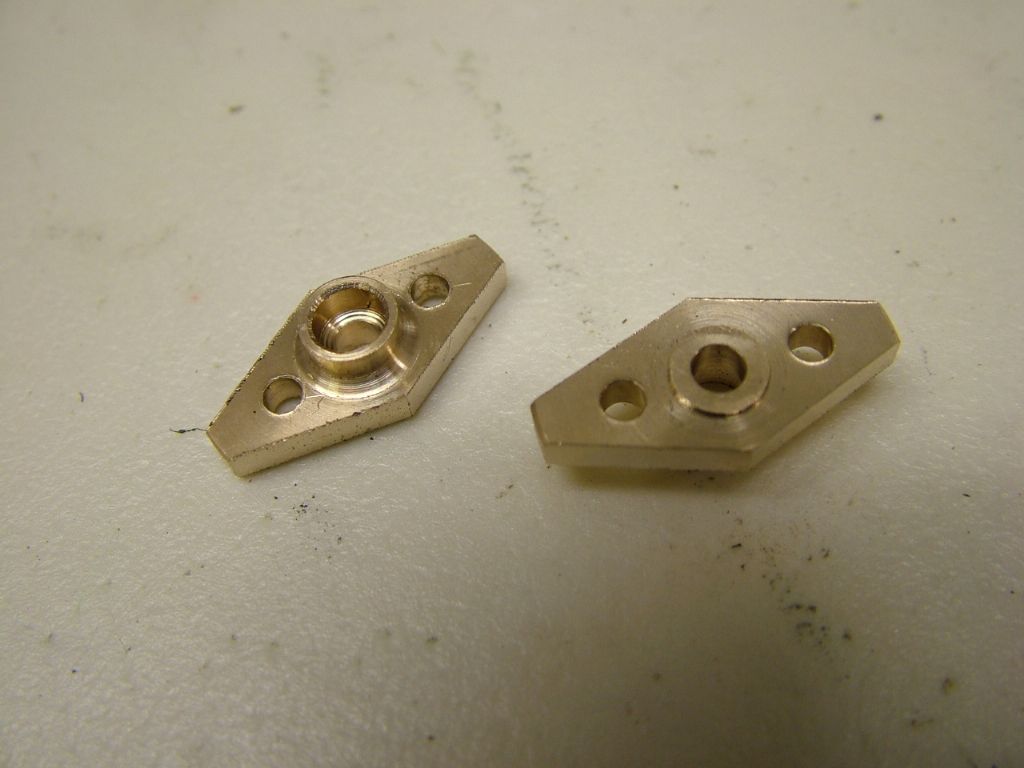
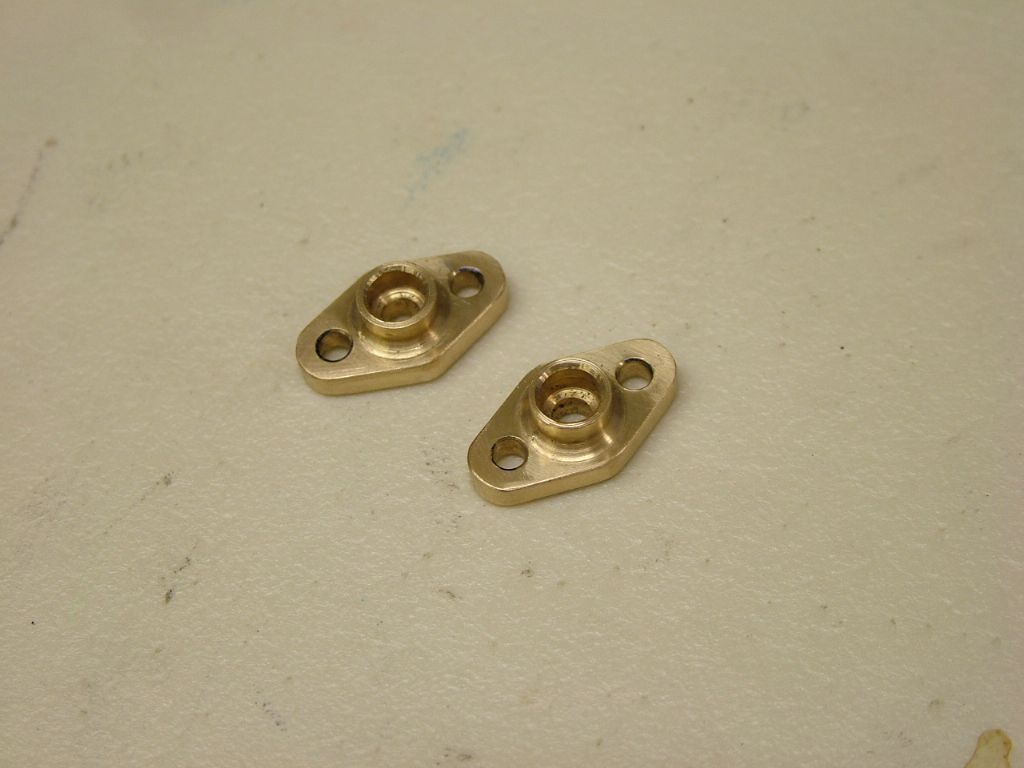
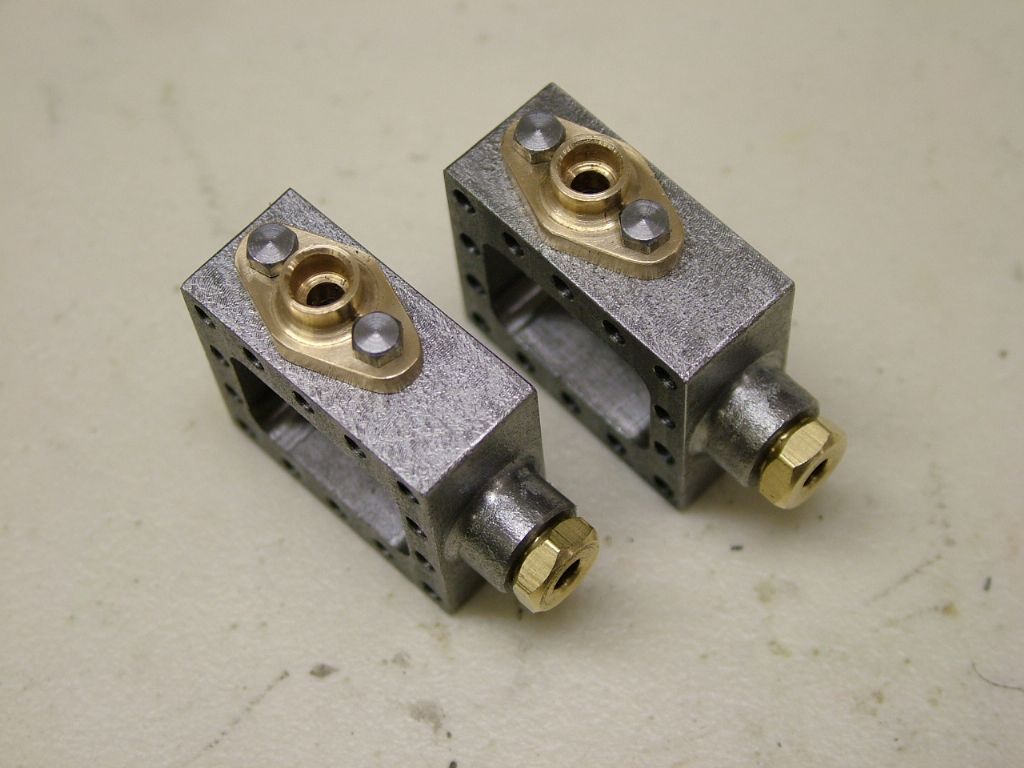
In the thread by Dr G on his making of the Stuart Twin Victoria the making of these small but significant parts has been discussed. Rather than spoil Doc's thread here are a few images to explain an alternative way of manufacture. First off some simple maths to establish the half angle of the diamond is required. Once this is known the 'fixture' can be tackled. It's just a simple piece of mild steel plate (ali would do) with two parallel edges a bit wider that the mill vise depth.This has a hole drilled in close to the edge that will take the diameter of the gland boss. Another hole is drilled to coincide with the gland bolt hole at the angle previously worked out The plate with two embryo glands. The deep chamfer is to cater for the radius on the boss
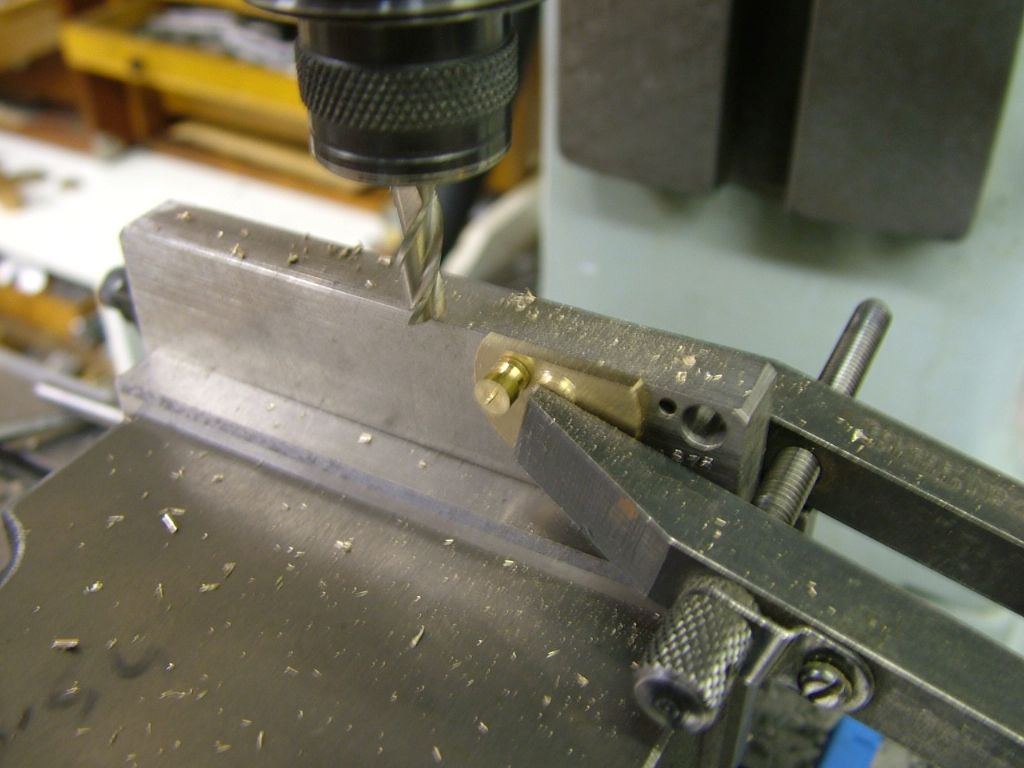
The plate is set level in the vise (image gives the appearance of an angle but it is parallel with the table) and the cutter set to the depth required. A small pin is turned to match the clearance hole and the boss clamped in place. The part is milled to the depth set........ .........then rotated to mill the opposite side
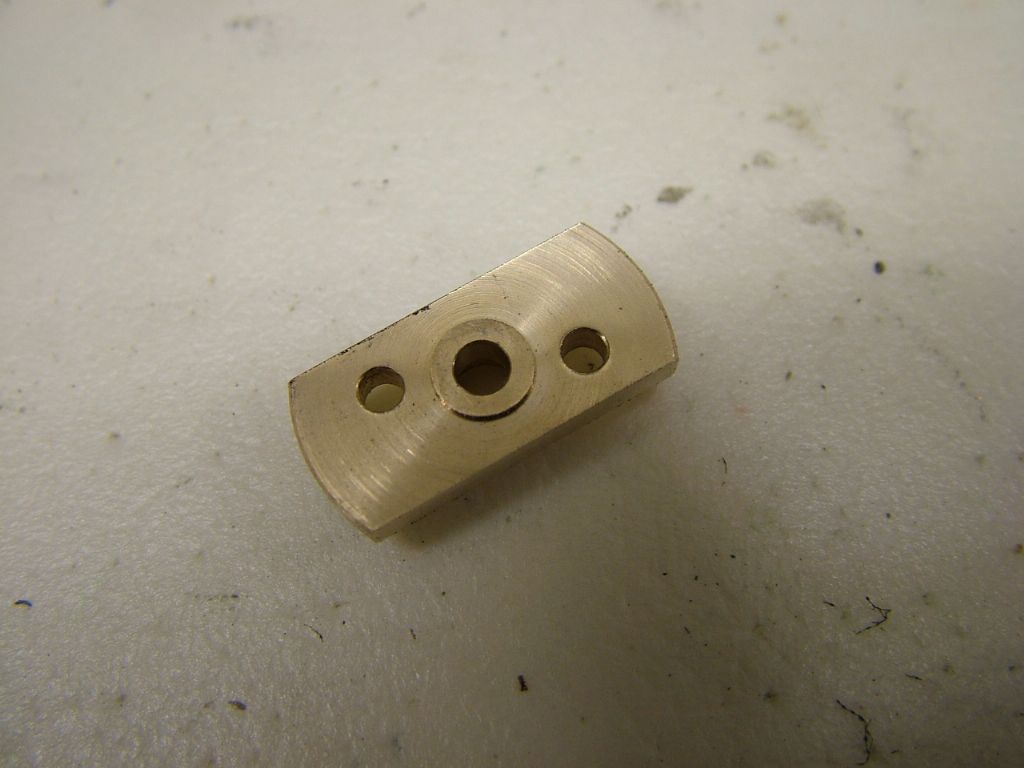
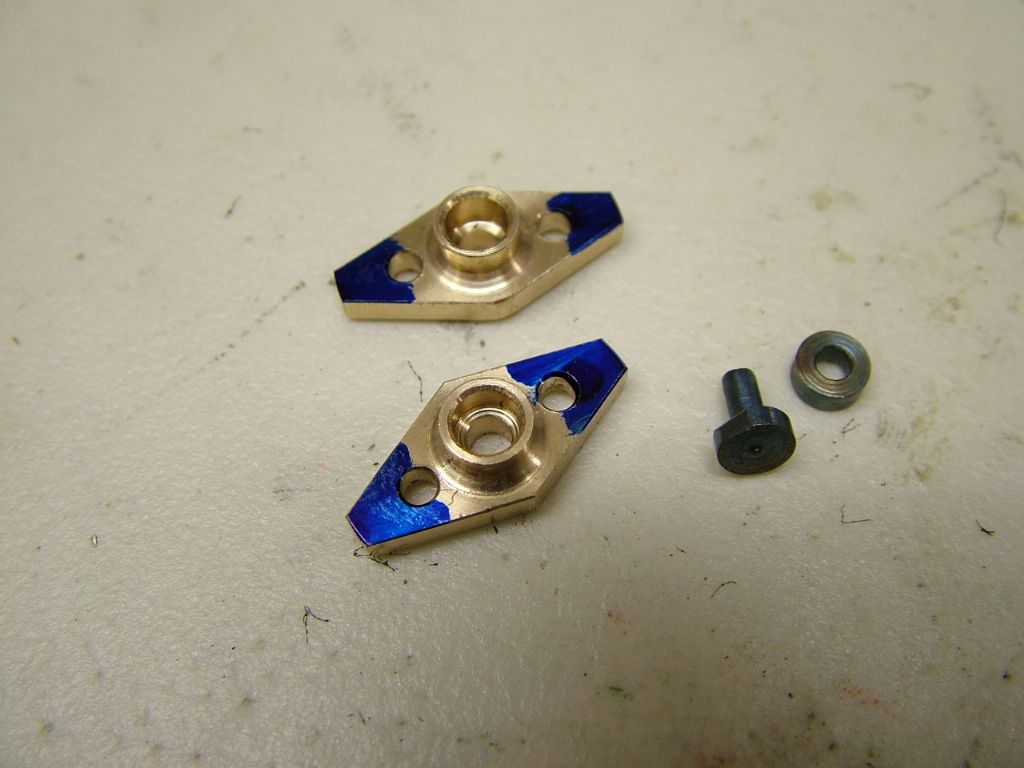
The plate can then be reversed or the part inserted from the other side of the plate to do the same on the remaining edges Initial milling complete A filling button is turned up and hardened..... .......and the ends brought to shape by filing
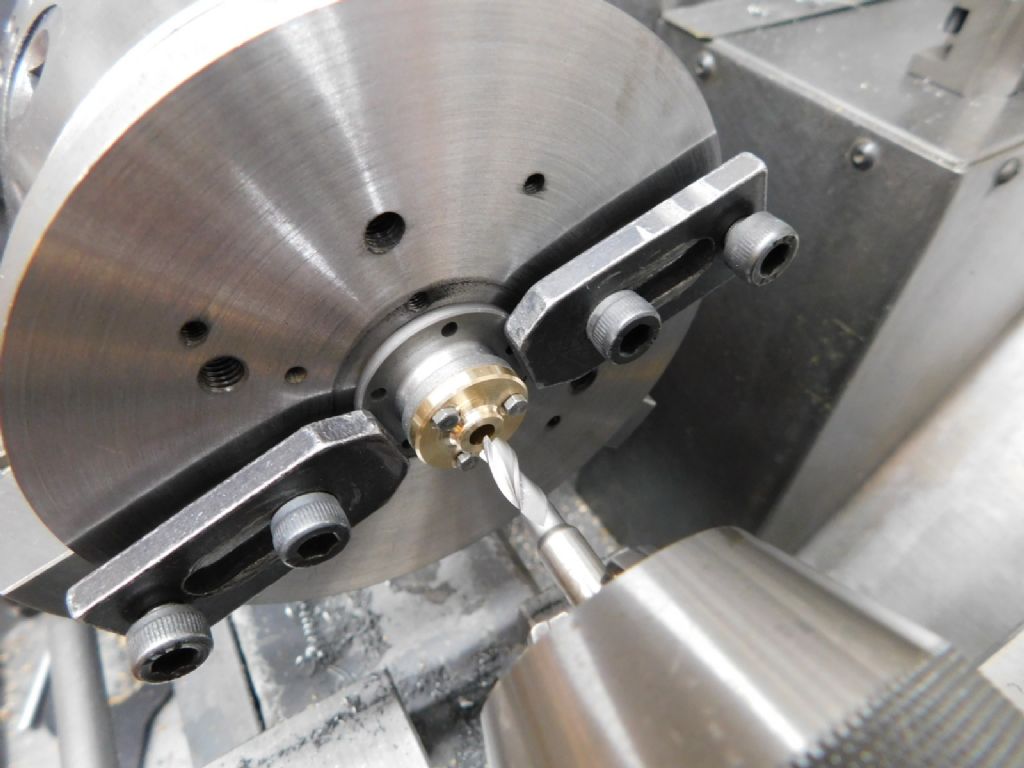
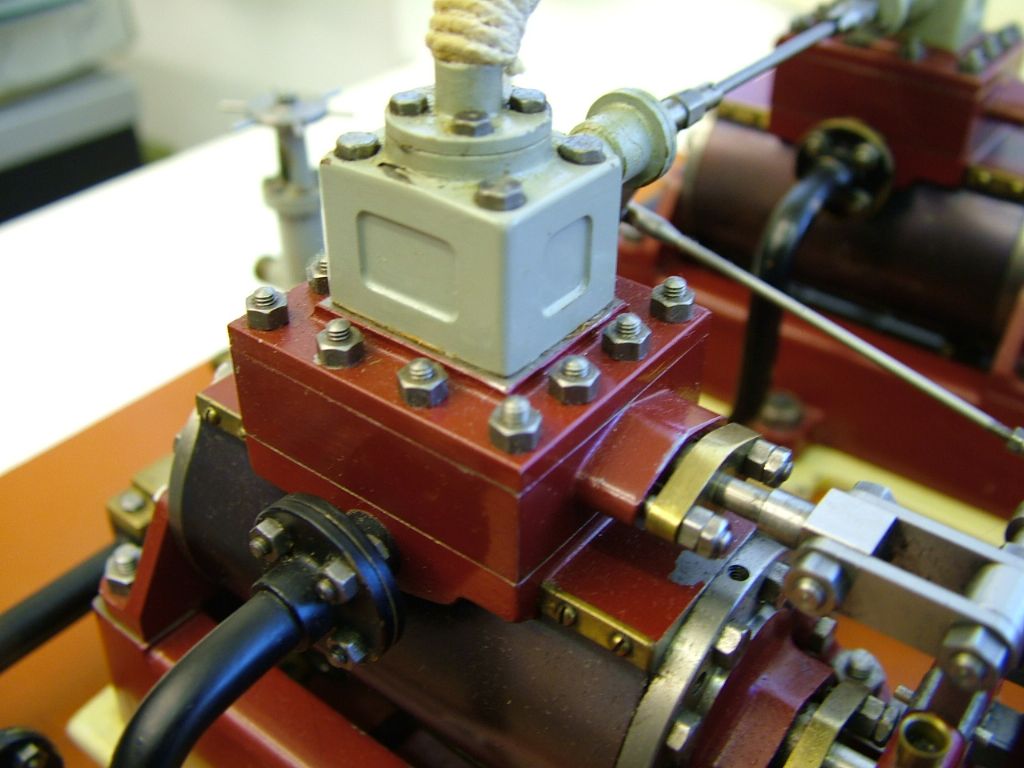
I appreciate this shows steam pipe glands but the principle is exactly the same for piston rod glands. The part would not have a centre hole in at this stage however. It would then be bolted to it's respective cylinder cover and be drilled and reamed together This image shows a round gland being opened up with an FC3 cutter before being drilled and reamed in such an operation Here is a pic of my Twin Vic which is when I came up with the above method - have used it many times since
Hope that's of interest to you and to anyone else that it can benefit Ramon (Tug)
|
| Thread: Stuart Twin Victoria (Princess Royal) Mill Engine |
| 17/06/2022 20:25:04 |
Not a short cut just easier ways of going about matters for the same result. Working to a paper template is not on other than for a guide. Establish the centre - move out to drill and tap the gland holes and mill the profile if desired Well yes you still could - both Jason and I are saying the same thing. He suggests a drill bit - I prefer to use the more precise location of a cone. Running as truly as possible just turn a short piece of say 8mm dia steel to a 60 degree point. Providing the R/T is truly centred it's just a matter of moving the plate holding the part on the R/T with the centre you've just turned held in the drill chuck locating which ever hole you wish to work to. You allow the plate to float until happy with the position then clamp up. Very simple and easy to position. Obviously set the R/T to a 'zero' and align the centre line by eye or a square off the back column for radiusing the outer points. Bear in mind that a full size engine would be very unlikely indeed to have the glands the identical shape of the casting. I have a very quick way of machining diamond shaped glands so will do a separate thread on here later for you and others rather than put more images on your thread - must water the garden first though! Best - R |
| 17/06/2022 10:25:30 |
Whilst I certainly compliment you on the thought you are putting into this Doc I do think that you might be over thinking the process from the fixture point of view. I've found these image from a couple of build that might be of help in the future.
This is the type of ali split clamp fixture I was referring too. It's being recycled from previous use and is for holding the eccentrics. The drill diam is the amount of throw of the eccentric, the parallel being set to the clamp not the other way round. The initial set up is as described before by 'cone' Once set up the fixture is bored to take the part then released and moved over the 'throw' amount. Drilled and reamed for the shaft and the boss turned
Whilst the above is on the lathe the principle is easily transferred to the mill on the rotary table.
Incidentally setting the work piece with a cone from tiny to big is pretty accurate but don't use a pre - tapped hole as a location - unless you have counter drilled the first the first thread out before threading (best practice anyway) In early days of my journeyin ME I was told by an old and much missed 'mentor' you ought to make your self a toolpost drilling/milling spindle. He was absolutely right, but you do need means of dividing in the lathe for it to be of best use. I think you have an ML7 in which case the 65T bull wheel is not of use but an expanding arbour inside the rear of the spindle to hold a gear and a firm detent is well worth making. Sorry for more pics on your thread but I do feel they are relevant.
Best - R |
| 15/06/2022 22:55:01 |
Doc - I think I follow what you are describing - taking the corner out with a triangular file would seem best by hand or possibly a slitting saw by milling? I take it you are making oval/elliptical shaped glands as opposed to the diamond shaped style? It's always good to have scraps of ali to call on especially if you can get some tooling plate - very flat and stable but anything is better than nothing.
|
| 14/06/2022 22:11:54 |
Well I can't disagree with you there Doc, not the ideal set up to use a DTI on. Whatever, what matters is that you got there in the end - more good progress Just as a matter of interest do you have any scraps of flat aluminium plate to call on? Ideal for making quick one off fixtures for jobs like these and easily recycled for something else down the line. |
| 14/06/2022 17:31:19 |
Posted by JasonB on 14/06/2022 16:36:11:
And all my videos of running engines are the confirmation that I need that it works for me
|
| 14/06/2022 15:22:05 |
Digital (light emitting) edge finders are very good Jason, just one fault in my book, very easily broken! Don't ask!! I can't actually use a traditional Starrett type edge finder or wiggler on my Linley mill due to not being able to get the shank diameter in the drill chuck but I have both types to use for the Amadeal - I'd still not use either for this task I'm afraid as despite the accuracy you describe - which I assure you I don't doubt for one second - you still don't have a visual confirmation that you are directly concentric. There's a co ax DTI for use too but again winding the head up to get the room to use it is off putting. A creature of habit I guess - shortcuts yes but not if the accuracy cant be verified. Regards - R
Edited By Ramon Wilson on 14/06/2022 15:23:01 |
| 14/06/2022 12:41:00 |
Okay lets approach this from a different direction. The component part is placed on the table/vise/rotary table and held. You put the edge finder in the chuck/collet and bring the part somewhere near centre and bring the edge finder into the hole. Move to one side till the finder runs off and take a reading - this is with DRO of course - using dials would be very difficult - then move in the opposite direction and do the same. Split the difference and move to the centre line on the DRO then repeat in the opposite axis. At no point do you KNOW (apologies for the capitols but it requires stressing) if the edge finder has run off equally but assume it has and carry out the operation. It's only when something doesn't fit that you realise you were not exactly on the centre - too late. It's waste of time to do this then check your position after setting with an EF with a DTI if you can't be sure - why not just use it in the first place If you use a DTI you know right from the outset you are as concentric to within whatever tolerance the DTI reads.
Sorry guys but I'm not convinced - as said above a quick superficial alignment of the part with a cone in the drill chuck as mentioned previously (it is not running BTW) then replaced with DTI to align the centre accurately. I use a small mirror to see the reading away from you. An edge finder is what it is - yes you can use it but it does not give a reading and was not designed for centering and as such cannot be totally relied on - well not in my opinion Like everything else yer pays yer money etc depends what you want of the end result I guess Ramon Edited By Ramon Wilson on 14/06/2022 12:41:29 |
Want the latest issue of Model Engineer or Model Engineers' Workshop? Use our magazine locator links to find your nearest stockist!
Sign up to our newsletter and get a free digital issue.
You can unsubscribe at anytime. View our privacy policy at www.mortons.co.uk/privacy
- *Oct 2023: FORUM MIGRATION TIMELINE*
05/10/2023 07:57:11 - Making ER11 collet chuck
05/10/2023 07:56:24 - What did you do today? 2023
05/10/2023 07:25:01 - Orrery
05/10/2023 06:00:41 - Wera hand-tools
05/10/2023 05:47:07 - New member
05/10/2023 04:40:11 - Problems with external pot on at1 vfd
05/10/2023 00:06:32 - Drain plug
04/10/2023 23:36:17 - digi phase converter for 10 machines.....
04/10/2023 23:13:48 - Winter Storage Of Locomotives
04/10/2023 21:02:11 - More Latest Posts...
- View All Topics
- Reeves** - Rebuilt Royal Scot by Martin Evans
by John Broughton
£300.00 - BRITANNIA 5" GAUGE James Perrier
by Jon Seabright 1
£2,500.00 - Drill Grinder - for restoration
by Nigel Graham 2
£0.00 - WARCO WM18 MILLING MACHINE
by Alex Chudley
£1,200.00 - MYFORD SUPER 7 LATHE
by Alex Chudley
£2,000.00 - More "For Sale" Ads...
- D1-3 backplate
by Michael Horley
Price Not Specified - fixed steady for a Colchester bantam mark1 800
by George Jervis
Price Not Specified - lbsc pansy
by JACK SIDEBOTHAM
Price Not Specified - Pratt Burnerd multifit chuck key.
by Tim Riome
Price Not Specified - BANDSAW BLADE WELDER
by HUGH
Price Not Specified - More "Wanted" Ads...
Do you want to contact the Model Engineer and Model Engineers' Workshop team?
You can contact us by phone, mail or email about the magazines including becoming a contributor, submitting reader's letters or making queries about articles. You can also get in touch about this website, advertising or other general issues.
Click THIS LINK for full contact details.
For subscription issues please see THIS LINK.
Model Engineer Magazine
- Percival Marshall
- M.E. History
- LittleLEC
- M.E. Clock
ME Workshop
- An Adcock
- & Shipley
- Horizontal
- Mill
Subscribe Now
- Great savings
- Delivered to your door
Pre-order your copy!
- Delivered to your doorstep!
- Free UK delivery!


 Register
 Log-in


