Member postings for Graham Meek
Here is a list of all the postings Graham Meek has made in our forums. Click on a thread name to jump to the thread.
| Thread: Emco FB2 Quirks and Additions |
| 29/09/2020 17:13:12 |
Hi Marcel, Thanks for the update, it is nice to get some feed back that verifies the above drawing, other than just my memory. It is also good to know the Motor Pinion tooth count, as to date I have not counted this. My own mill from Austria was manufactured in1996. I was told it was one of the last to be produced, how true that is I do not know. Regards Gray, |
| 24/09/2020 12:28:27 |
Hello Marcel, I am not familiar with the make of your machine. I have seen advertised non-Emco replacement gears of both 45 teeth and 47 teeth from the same supplier. The price was eye watering and dearer than a genuine Emco. I was bemused with the title of the gear in the Parts Handbook as being Gear 47. The last time I had my machine apart I did count the number of teeth on my Tufnol gear, and it is 45 teeth. The Outside diameter being 60,2 mm. I have also just counted around the not very good image on Pro-Machine Tools web-site and I make that 45 to 46T, but not 47T. I did wonder in the mix of these machines if Emco used a higher number of teeth on those machines fitted with 60 cycle , Hz, motors. However having just worked through the increase in rotational speed of the 60 Hz motor. The speed advisory plate for these machines comes out as one would expect, using the same gearing as a 50 Hz motor. The only other reasonable explanation is that it was originally 47T, but due to breakages the tooth count was reduced to 45T thereby producing a stronger gear. It would be interesting to know if a 45T will run in a 47T machine, as this would prove it. Thus I too am at a loss as to why these gears are different. If anyone has the real reason for this conundrum I would be glad to hear it. I do not like sending anyone off on a wild goose chase. Regards Gray,
|
| Thread: HSS/Tungsten Tool Honing Machine |
| 20/09/2020 16:22:59 |
We were using Structural Aluminium to build tooling back in the early 90's. This ranged from Robotised assembly tools that completely assembled things like the indicator and headlamp stalks for Audi and Ford cars. Various smaller items like door switches for Toyota and Ford. As well as Micro Chip handling units. The movement of Compact discs from the moulding press through metalizing, lacquering, printing and packaging. The complete manufacture of friction window stays from raw material through pressing, to assembly and packaging. Plus the assembly of Carbon Fibre segments which would eventually become disc brakes for Aircraft. All were based on structural aluminium systems, like Bosch Rexroth, but there are others. Many of the specialist pieces of equipment used in Radiotherapy were also built using these systems, but I cannot divulge anything about these machines. Regards Gray,
|
| 20/09/2020 12:13:20 |
Hi Chris, An article is already underway. The Editor of Home Shop Machinist, George Bulliss expressed an interest in this machine as soon as he saw John Slater's 3D views some months back. I cannot say whether this will get published over here at this moment in time. Regards Gray,
|
| 18/09/2020 12:20:44 |
Posted by Neil Wyatt on 17/09/2020 16:34:53:
Looks very nice Graham. Neil Thanks Neil, This is the first of a pair of machines which I am working on. The second is a Rotary Hone / Lap for doing a range of bores. This design comes off the back of a novel way of adjusting a lapping tool, which I made a while back to finish the bores of my Steam Wagon. This second machine is still at the design stage, and hopefully John Slater will do some 3D views of this later in the year. Unfortunately it will be another Aluminium construction for the main body, Regards Gray, |
| 17/09/2020 16:08:42 |
Hi Ian, They say beauty is in the eye of the beholder, in my book Aluminium looks good and is more than adequate for the job in hand. Plus it is a darn site cleaner to machine than Cast Iron, as well as being kinder on the tooling and the machines. If the "Purist" want to change things to suit themselves that is OK by me. In fact I am happy when someone takes one of my designs and modifies it to suit their needs. As regards exhibitions I only visit, never enter, so I won't have to worry about winning, or not winning anything. The Riveting technique is one I have used for a number of years. It is another technique picked up in the Training School when we made all our own kit. By using a bearing ball the material will flow far easier due to the excellent surface finish on the ball. Whilst the use of an Arbor Press to do the operation allows the operator to feel the material give during the clinching and then go solid when it is fully home. The cost of one bearing ball is peanuts compared to spin rivet tooling. Regards Gray, |
| 17/09/2020 11:35:00 |
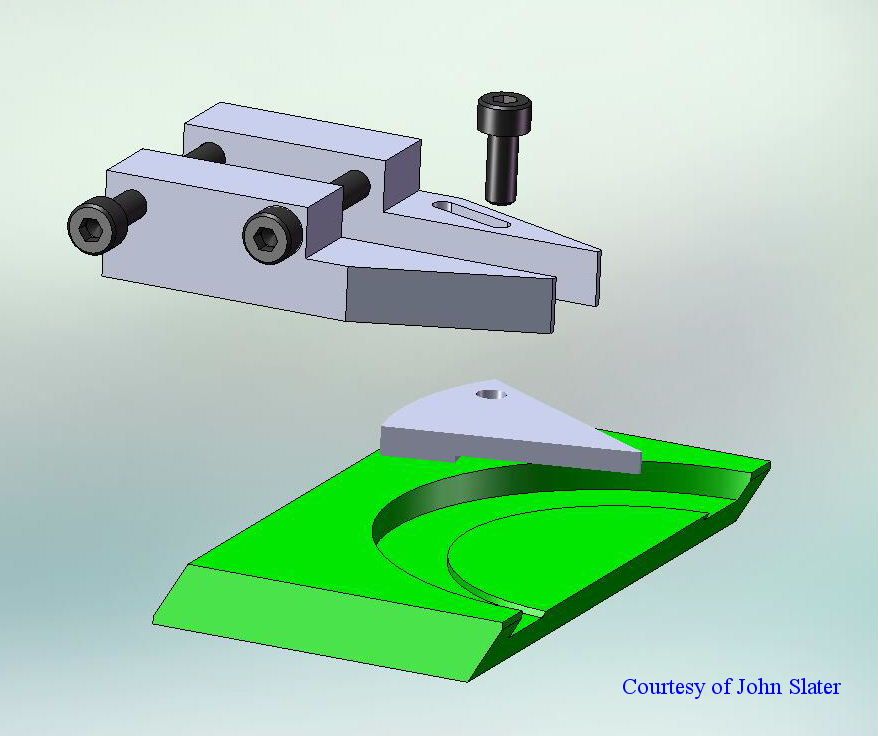
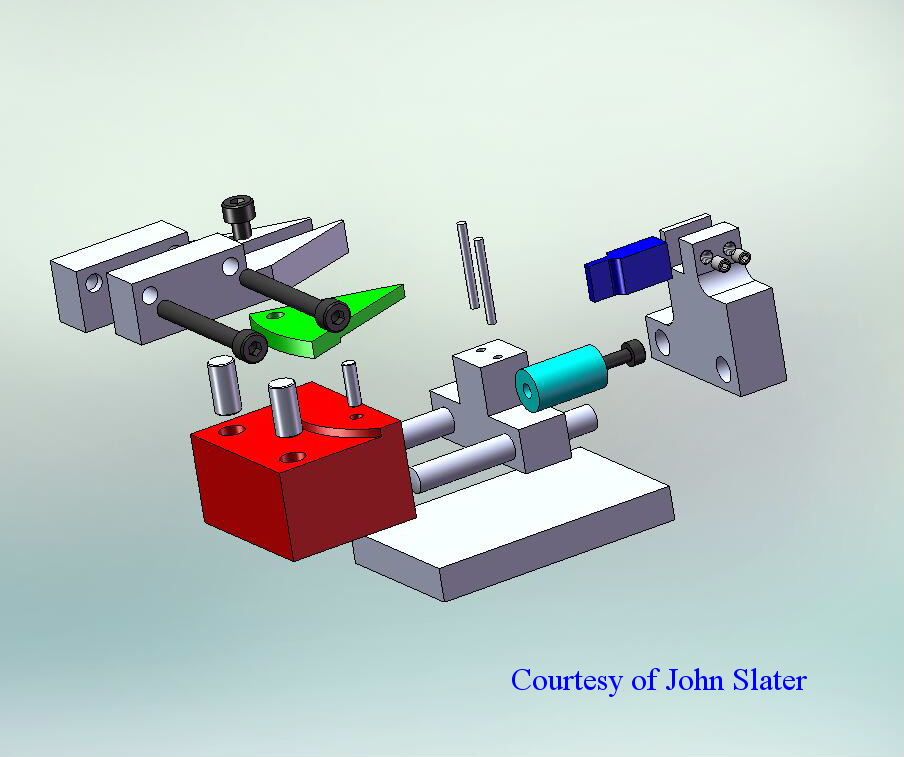
By way of introducing the next phase of the build. This is the separate table that is used to form the Radii on the tools. The centre for the table and sector radius is the face of the slip stone, or hone. This shows the Fixture parts for setting the radius. I will leave the setting of this fixture until I have finished the fixture. A picture will save me a thousand words describing how the fixture is used. Suffice to say this fixture automatically sets the tool at the correct radius and centralises it in one go. Regards Gray, |
| 16/09/2020 11:44:14 |
Thank you both for your kind words. I blame my apprenticeship with the Dowty Group as regards having to get everything right. Being part of the Aircraft Industry it had to be right, there are no lay-by's at 40.000 feet. Still their training stood me in good stead as a Toolmaker for 30+ years. Then later getting things right, and the education paid dividends while working for the Oncology Workshops at Cheltenham. Where we would see the effect of our work on patients. Regards Gray, |
| Thread: Emco FB2 Quirks and Additions |
| 15/09/2020 15:22:12 |
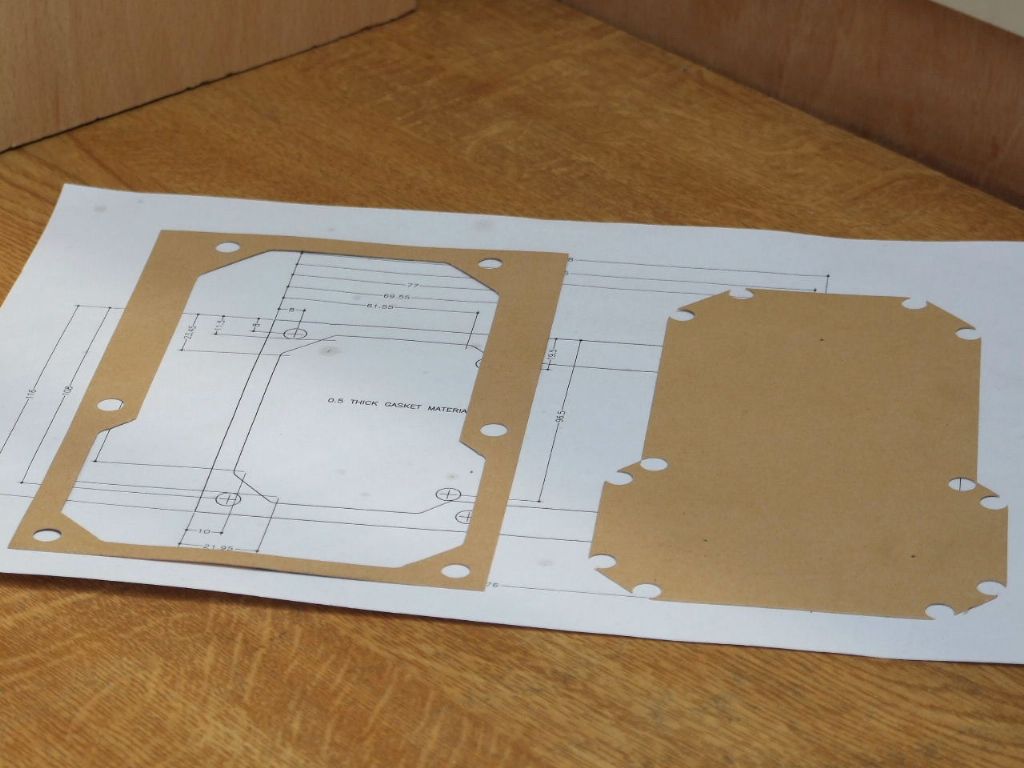
A recent inspection of the internals of the Milling Head gearbox showed the teeth on one side of the Sliding Gear showing signs of distress. Knowing the Gasket or Seal 3 was getting a little ropey on my machine I decided to order one of these along with the replacement gear. Unfortunately since I looked the last time these seals are no longer made. However an email to EMCO in Austria, provided a drawing of the Seal 3. Cutting gaskets by hand has never been my strong point. To make things easier for me I decided to make a drawing of the Seal so that I could use the same hole cutter used for the bolt holes, to also cut all the intersections. As a hand cut gasket I was pleased with the results. It was just a case of laying a rule as a tangent to each hole and cutting through with a craft knife. Sort of Dot to Dot. The holes at each corner not only make the gasket stronger, but take away the awkward niggle of not having cut into the corner enough with the craft knife. Making the Silver steel cutter and the gaskets took about just over an hour. Two gaskets can be had out of one A4 sheet of gasket material, so I took the opportunity to make two of them. The second is inside the machine cupboard door, taped to the door in a plastic bag just in case the next owner needs it. I think the photograph above illustrates the technique used. If there is sufficient interest for this drawing I will make it available as a PDF, with Neil's blessing and help. Regards Gray, Edited By Graham Meek on 15/09/2020 15:24:51 |
| Thread: HSS/Tungsten Tool Honing Machine |
| 15/09/2020 14:55:40 |
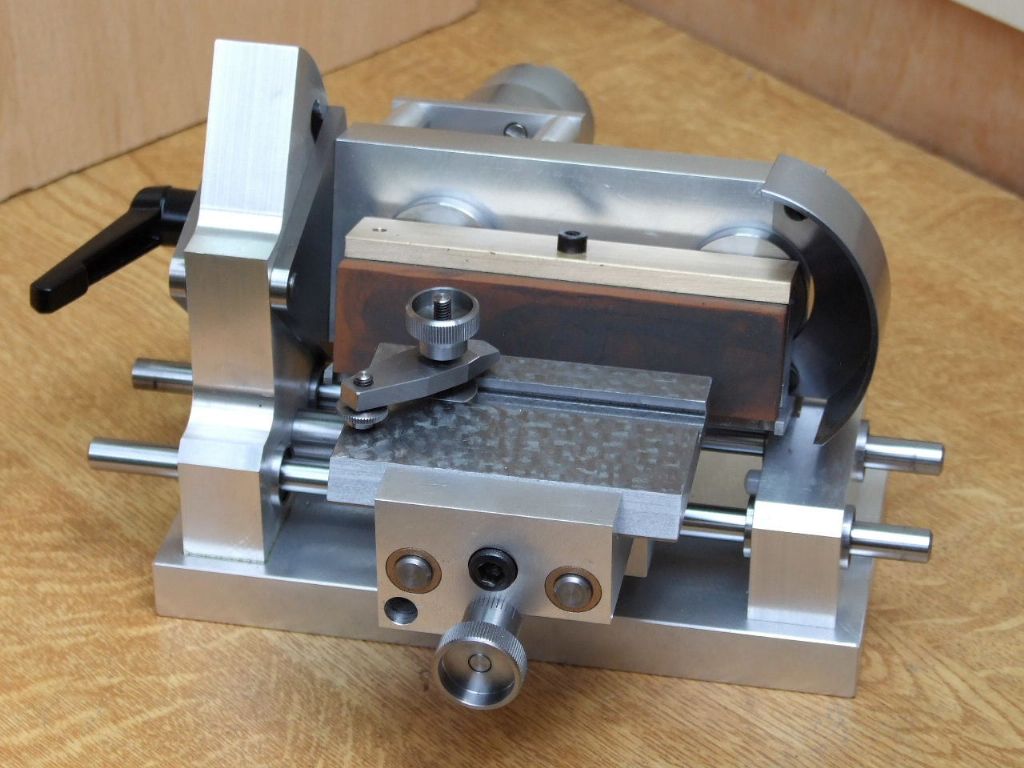
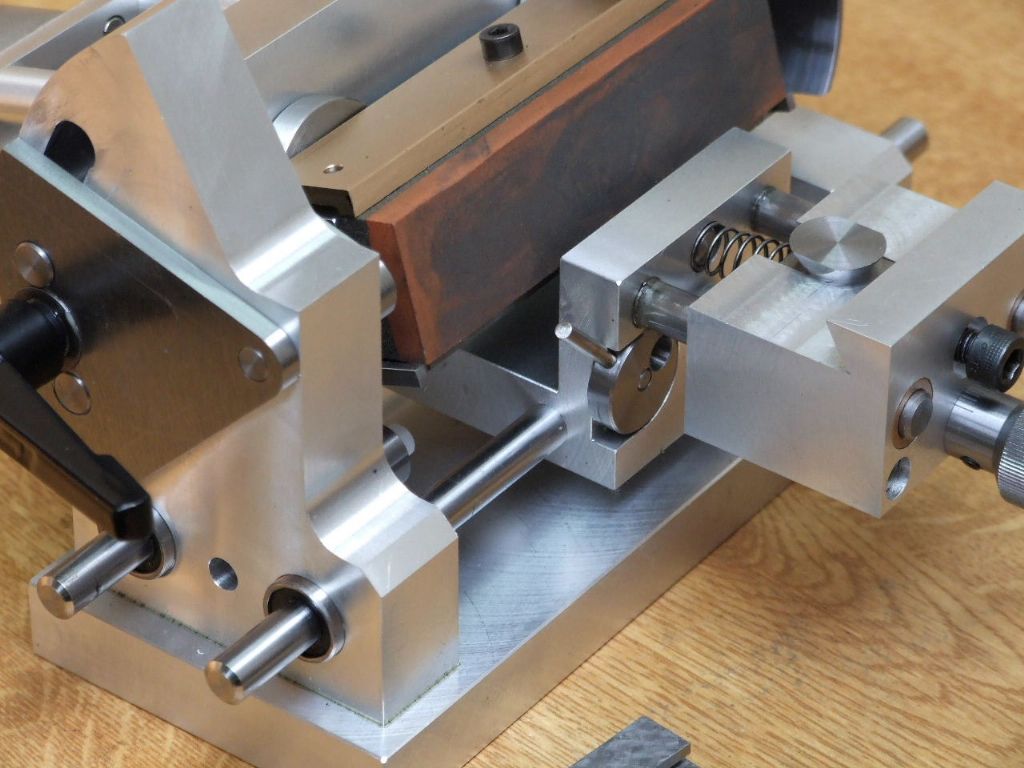
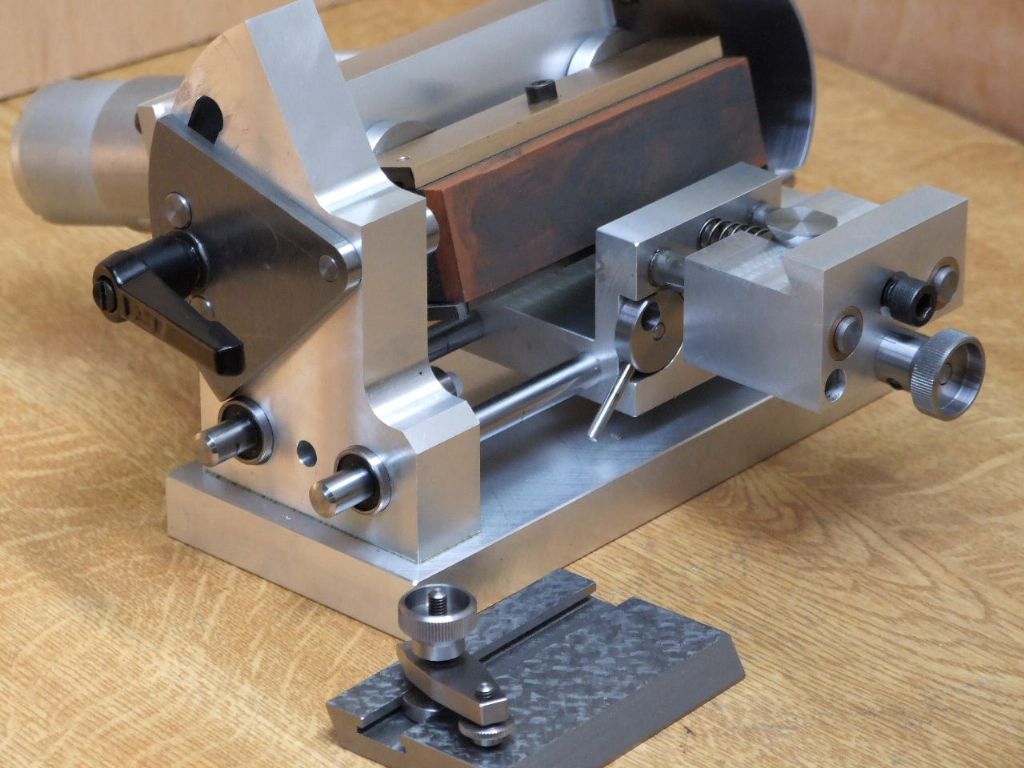
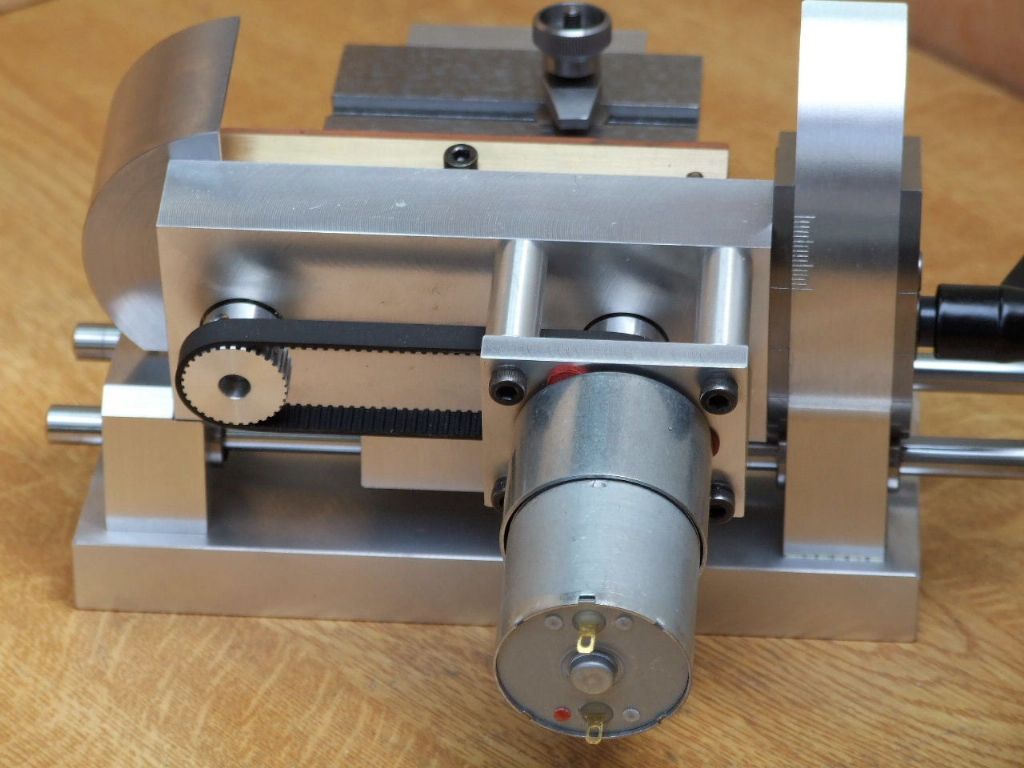
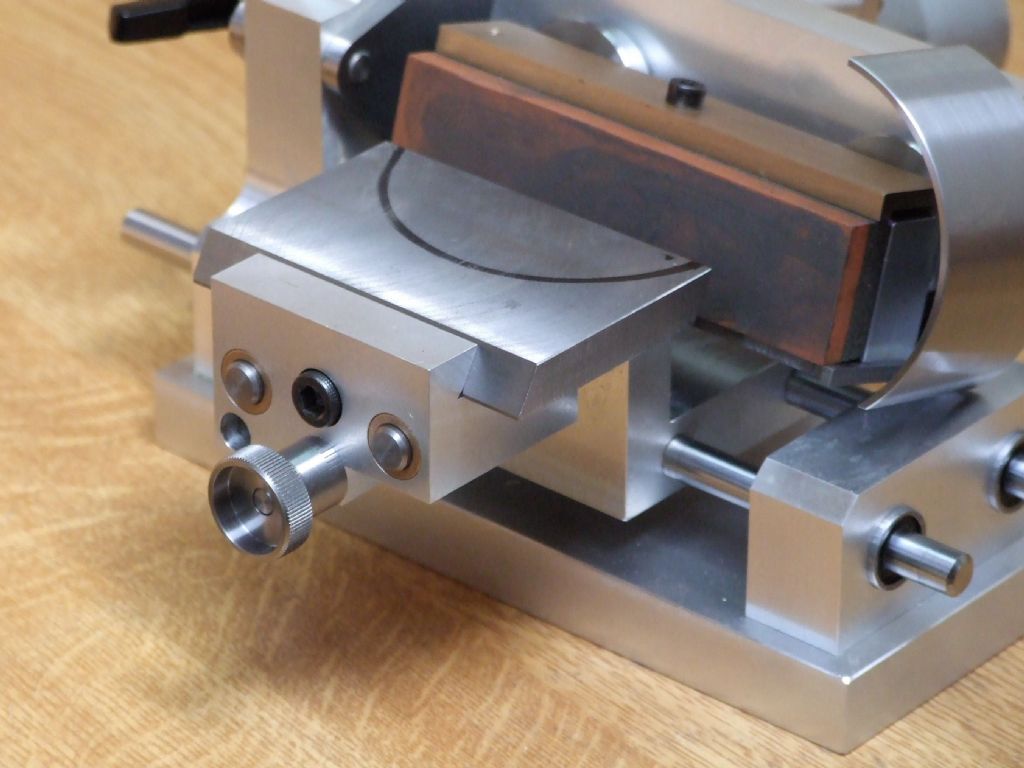
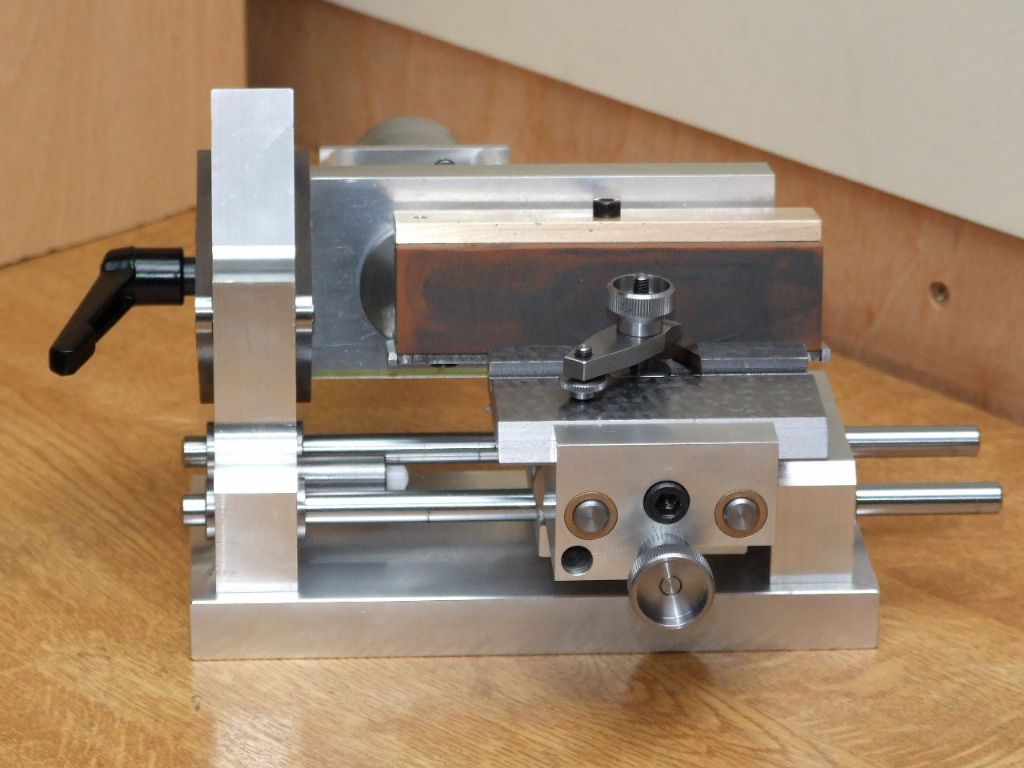
As promised a few days back here are some more shots of the Lathe Tool Honing Machine, This view differs from the previous one in that a Guard has been added to the Rt hand side. With the stone rotating clockwise there was a distinct pinch hazard. This second view shows several things, First is the Spring loading that automatically retracts the table and also automatically locates the interchangeable tables in position for locking. The nature of the clamping mechanism means the complete table with the tool still set up can be removed for closer inspection with no loss of positional settings. Secondly is the two position Deadstop. The primary use of the deadstop is when doing radii with the additional table, (more on that later). It also stops any collision between the edge of the table and the Slip stone. This view shows the Deadstop in position 2, the hole in the stop allows the table to be advanced by a measured amount past the datum position by using the adjustable stop. The graduations on the collar of the adjustable stop can be seen in the first photograph. This collar is only graduated with 10 of the full compliment of 40 divisions as each division is 0.025 mm or 0.001". I could not foresee a need for removing 1 mm with a hone. A Rear view of the machine showing the drive to the two cranks. The belt is kept in check by a cutout in one of the Motor support pillars so no washers are needed on the pulleys. The graduations on the degree scale can be seen in this view. This view shows the second table in position for doing the radii, but as yet not fully machined. The felt tip marker traces out a semicircular cut-out to take the tool bit holder. The details of which will be posted soon. Regards Gray, Edited By Graham Meek on 15/09/2020 14:57:15 |
| Thread: Facing parallel between centres. |
| 15/09/2020 12:01:36 |
Posted by blowlamp on 15/09/2020 11:55:18:
The reason to do it between centres is that this way provides an intrinsically 'perfect' solution to the problem.
Assuming the lathe is facing-up correctly and the headstock & tailstock centres are in proper alignment with each other, then this should be a simple job.
I say it's a 'perfect' solution because it requires no setting up with gauges or other tools. Therefore, it can be removed and replaced at will, with no loss of repeat accuracy. The end faces are generated, which is a (theorectically) perfect way to create an object, as it isn't reliant upon things like exact tool geometries or how precisely the tool is aligned to the job.
In contrast to face milling the ends, you would have to be sure the milling spindle axis is set exactly perpendicular to the table movement as well as ensure the table working surface is flat and perpendicular too. The effect of any inaccuracies would reflect in the job by faces not being parallel or slightly hollow due to spindle misalignment.
Martin. Martin, I could not have put it better myself, Regards Gray, |
| 14/09/2020 11:28:54 |
"Facing parallel between centres" is the title of this post. Failure to get a good result is hardly a claim that "it does not work". Especially if the methodology of this process is not fully understood. I do wonder how much of the of the aversion to this "between centres process", is based on disturbing the tailstock setting. It has always been a big No, No, with some individuals. The same is true when it comes to moving the topslide, when anyone advocates the set over top-slide method of Screwcutting. Those who know their machine tool history, will know, " Dead Centres" were the basis of all turned work at one time. It was not until later on that the "Live Mandrel" was developed and the faceplate became available. Dead Centres are still used in cylindrical grinding, for most work. The lathe Mandrel on the lathe in the picture above was no doubt finished this way. Regards Gray,
|
| 13/09/2020 13:24:02 |
If you look back to the post of the exaggerated tailstock set-over drawing previously. It will be noticed that the previously square base of the cone nearest to the tailstock is now at an angle to the plane of the cross-slide movement. A cut taken across this face will as one poster pointed out produce a conical face. As the tailstock is brought closer to the true lathe centre line this conical face becomes less conical. There comes a position when a point is reached that this face becomes truly flat. Beyond this point and moving the tailstock towards the operator the face will again go conical but in the opposite sense, Concavity. Any one who has had to produce a flat face on a component between centres on a Cylindrical Grinder will be familiar with this technique. I hasten to add that the process is reversed on a Cylindrical Grinder, as the cutting edge in this instance is the edge,or corner of a disc, the grinding wheel. This was the reason for my original advise for doing this job between centres. As the lathes in-ability to face flat can be worked around by altering the tailstock setting. I wrongly made the assumption the Originator knew this. Plus when setting the tailstock up to do such a job, eye balling the centres is not good enough. Time to get out the Verdict clock and make sure, by clocking the taper socket in the tailstock. A Tip, Jubilee Clips make good driving devices for large components where light cuts are being taken, especially when cylindrical grinding. The out of balance can be minimal, and by using two Jubilee clips opposite one another the part can be brought more into balance. Regards Gray, |
| Thread: HSS/Tungsten Tool Honing Machine |
| 01/09/2020 12:59:00 |
I had hoped to take a few more photograph today of the Honing Machine, unfortunately the camera batteries decided they needed recharging, so what I was hoping to show today will have to wait. Here is the Basic machine assembled. The graduated knob on the carriage is for an adjustable stop. The machine has a fixed stop for use when the Radius Attachment is fitted. The adjustable stop allows the extra 0.025 mm or 0.001" to be taken off if desired. As the graduations are 1 mm apart subdividing a division to take less off is easily achievable. The size of tool bit covered by this machine is 0 to 8 mm, larger tools will be outside the sweep of the stone at the lowest point. As can be seen the machine has been in use and has met the requirements of the design. It has also proved to be more versatile than was expected at the design stage. Some more photographs and a more detailed account to follow. Regards Gray, Edited By Graham Meek on 01/09/2020 13:01:08 |
| Thread: Emco FB2 Quirks and Additions |
| 29/08/2020 11:35:24 |
Hi Joe, That is the colours of the machine which I cannot remember the name of. They did a range of machines all based on the Emco products starting with a U3 copy, but were only about for a few years in the UK. I seem to recall they were sold in the USA. I also seem to recall Chester UK supplying a copy with a bright aluminium speed plate, as well as aluminium speed change levers. I think the noise levels of the FB2 were the reason Emco stopped production. The Oil recommended for my 1996 machine is a 68 hydraulic oil, where as before the oil had been 32 viscosity. The heavier oil maybe being used to quieten the noise level. Regards Gray,
|
| 23/08/2020 20:49:25 |
Nigel B, Thank you for the additional information, I welcome any information on the FB2 and its clones. I have learnt quite a few things from your input and also revived my memory on the other clones. Joe, Thanks for the photographs and the explanation on the "Rattle Damper". I seem to recall in my distant past hearing about this device before, but I cannot recall in what context it was being used. I don't think it was to do with stepper motors. Regards Gray, |
| 23/08/2020 15:55:15 |
Posted by Bazyle on 23/08/2020 14:39:58:
Appologies for a brief hijack on the FB2 subject. Edited By Bazyle on 23/08/2020 14:41:18 No problem with hijacking the thread, My machine is one of the last to come out of the Emco factory at Hallein, in Austria. The machine was purchased in 1996, the Emco colours were changed with the introduction of a revised electrical layout on the FB2. My machine has the switch gear, low volt transformer, emergency stop and connection blocks housed in the sloping front of the swarf tray. The Red, Grey and Black was introduced with the Emco F3 mill, (roughly about 1990), and its sister machines the F4 & F5, (this designation has changed in recent years to F3B or FB3 etc). There was a clone which was Red, Cream, (might have been Off-White), and Black, the name of which escapes me, but was only on the market here in the UK for a short while. Warco did do a clone, but I think this machine had the Myford Spindle nose. Emco machines are plain at the spindle nose with two spanner flats. (See the spindle lock earlier in this post for a photograph). The base casting on the Warco was also a dead give away with its sloping sides. (This is the same shape as the current Emco Maximat F1 Mill Drill). The motor on the Warco was also of bigger proportions with the ON/OFF switch on the side of the motor. However an FB2 head that was originally supplied with the Maximat Super 11 lathe also had the ON/OFF switch on the side of the motor. As the co-ordinate milling table could be purchased separately at one time, for those wishing to make an FB2 mill, by using the lathe milling head. It is therefore possible to have an FB2 with a non standard ON/OFF switch arrangement. The standard switch on a Green machine is on the side of the casting mounted on a detachable metal cover plate, the capacitor is also under the cover plate. Finally I do believe Emco supplied a Badged version of the FB2 to AJAX, I think these were Blue, but I have not seen one in the flesh. Hope these notes help Regards Gray, Edited By Graham Meek on 23/08/2020 15:58:34 |
| 23/08/2020 12:12:05 |
Nice work Joe and thanks for sharing your ideas on this post. The chuck adaptor is a clever idea, I suspect that would make a good article? Is that a Flywheel on the end of the stepper motor drive pulley? Regards Gray, |
| 22/08/2020 12:17:59 |
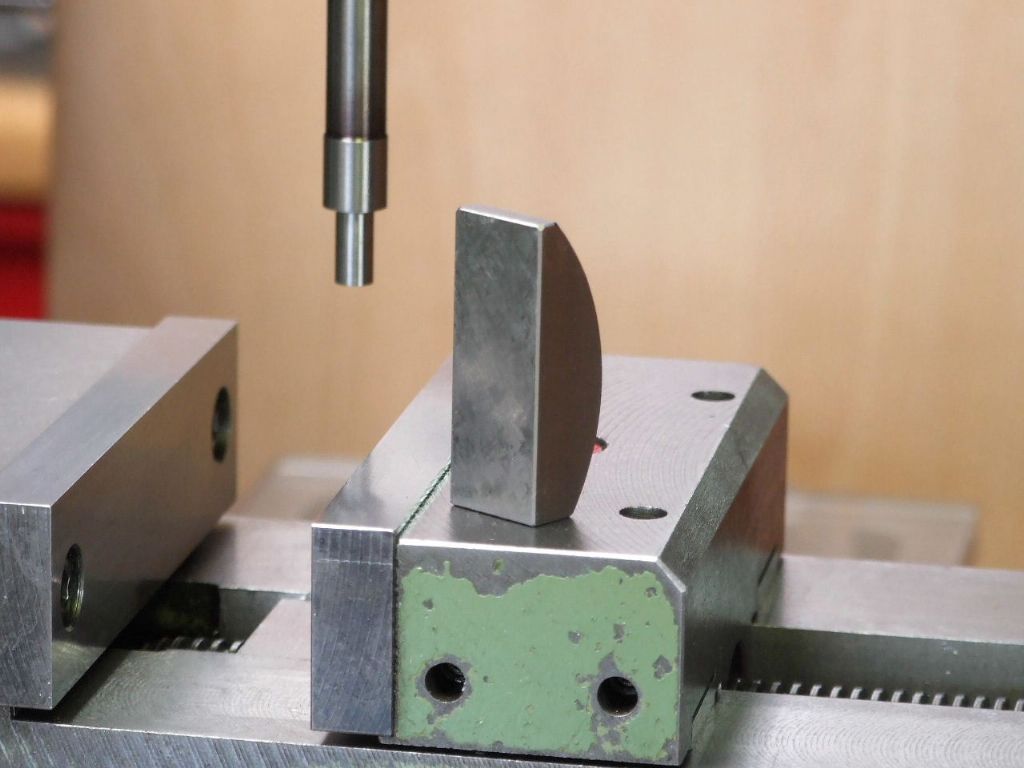
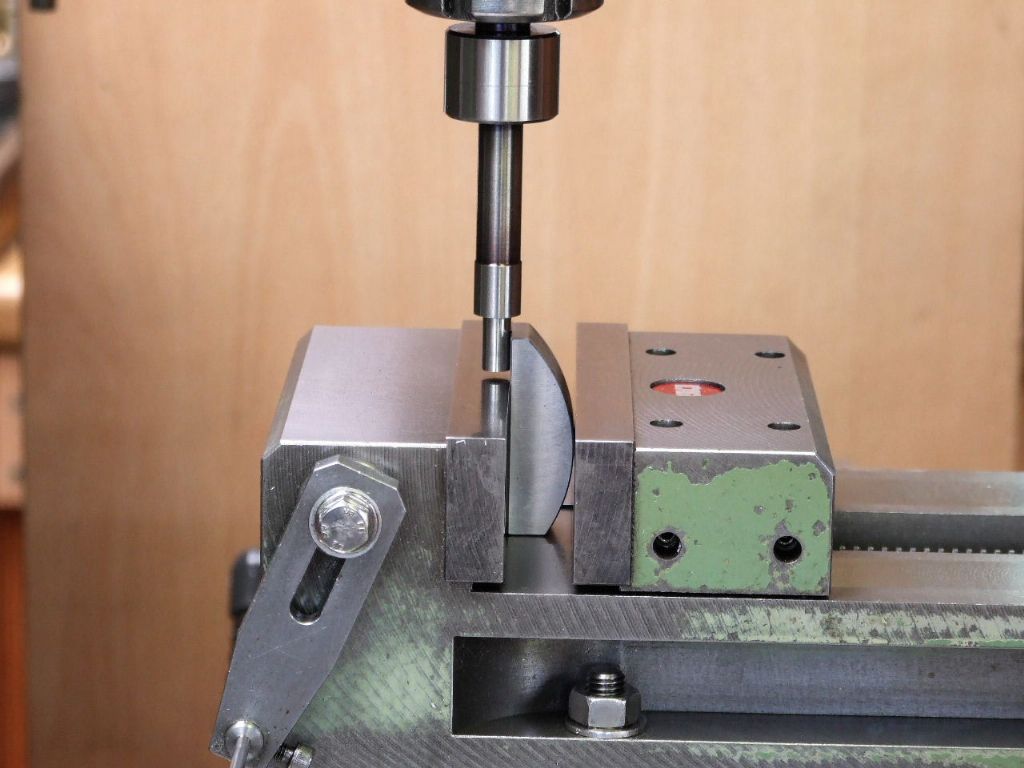
I have been asked over the years about my way of working. That is do I mark-out components then centre popping and drilling any holes from this. For me, this is going the long way around, but I will readily admit some jobs do not warrant my way of working, or are just too big or complicated to mount on the mill. All my work is done by co-ordinate location, the fixed vice jaw of the machine vice being set to Zero for the Y-axis. The Vice End Stop being the X-axis Zero. This way of working has other benefits when milling a component. Knowing the size of the cutter being used I can mill any up-stand or step to size without reference to my Vernier, simply by using my dials and scales on the machine. Locating the fixed jaw face is done with the following little item I made many years ago from an mild steel off-cut. The curved rear face of the bar stock ensures the flat face is up against the fixed jaw. A tipping moving jaw combined with a rectangular block could give a false reading. Due to the tipping moving jaw making the rectangular block cant over to towards the moving jaw. Three for the price of one here, first the edgefinder set-up, the edge-finder is again home made. Secondly the two holes in the moving vice jaw are M5 tapped holes. A Delrin plug and M5 grubscrew lock the moving jaw slide adjustment screws. The moving jaw adjustment lasts a lot longer with this modification. Thirdly is my vice stop for locating similar components in the vice with reference to the X-axis. To locate longer components I have an extender stud which screws into the same location and the stop screws into this in the same way as it does the vice. Under the head of the M6 hex-headed bolt is a Disc spring washer which allows the stop to be un-clamped and adjusted without fear of the stop dropping due to gravity, while I locate the M6 spanner. The disc spring also keeps swarf out from the interfaces by keeping them in contact. The 3 mm diameter silver steel rod is housed in a split bush which is retained in the stop by a circlip. The fit is extremely good and the head of the split bush is on the thrust side of the stop. The locking screw is an M4 capscrew which means the same 3 mm Allen key used to adjust the machines Quill depth stop can be used to lock the vice stop. One less item to have to locate, (had I used an M4 grubscrew this would need a 2 mm key). Regards Gray,
|
| 17/08/2020 11:10:39 |
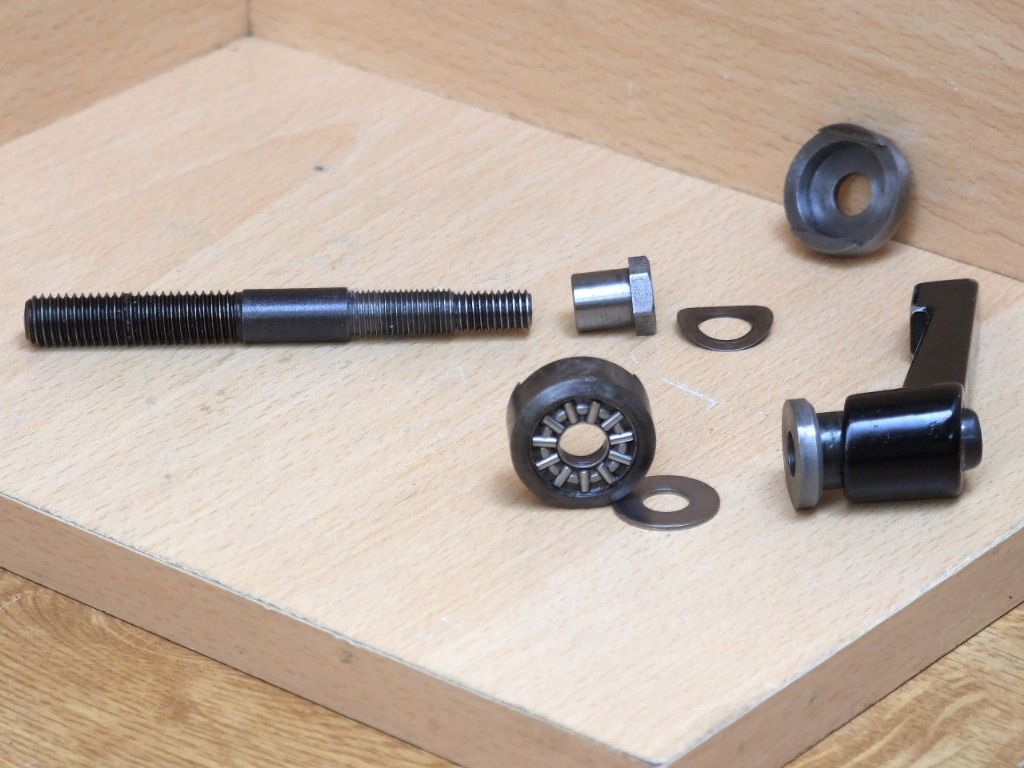
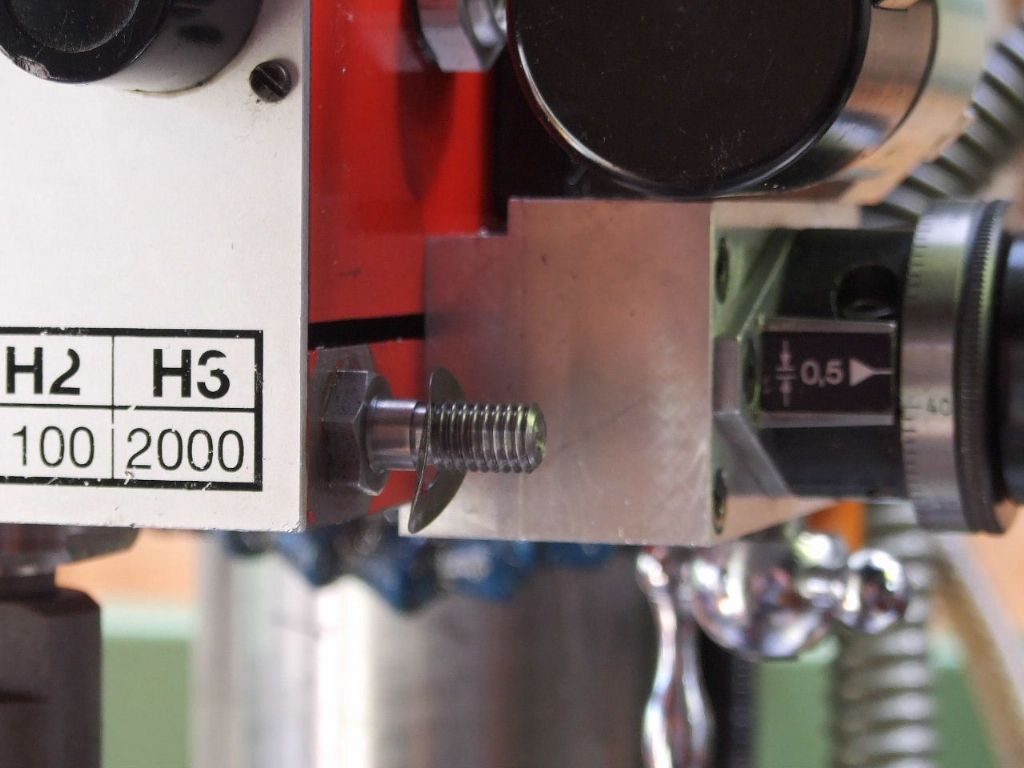
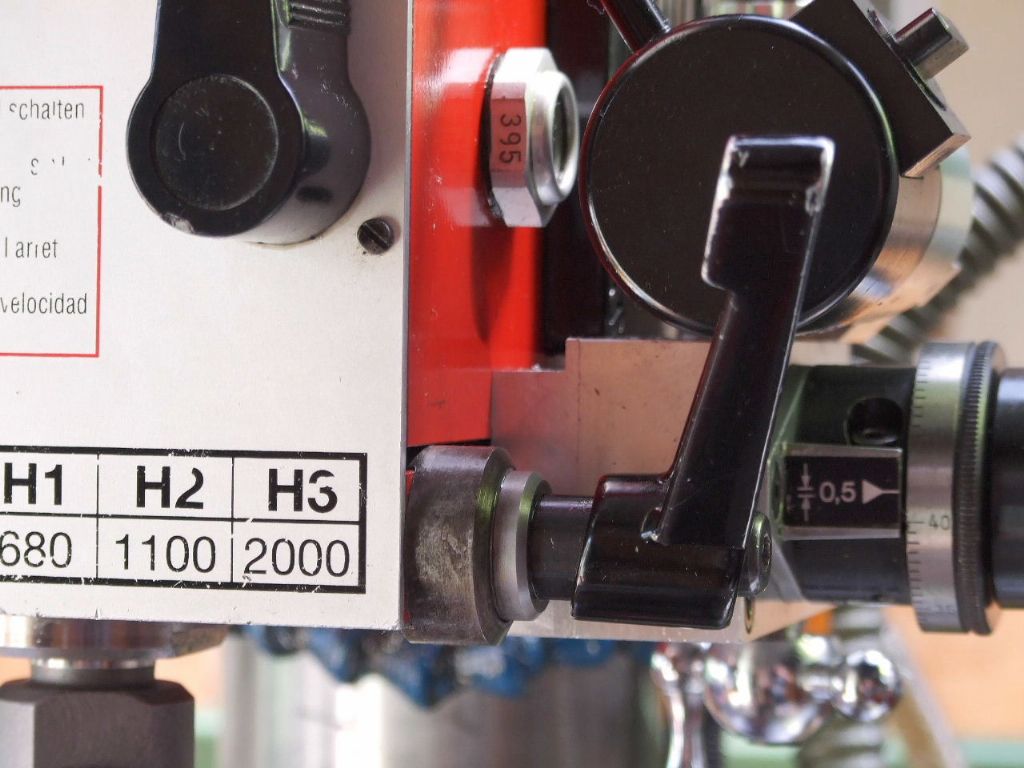
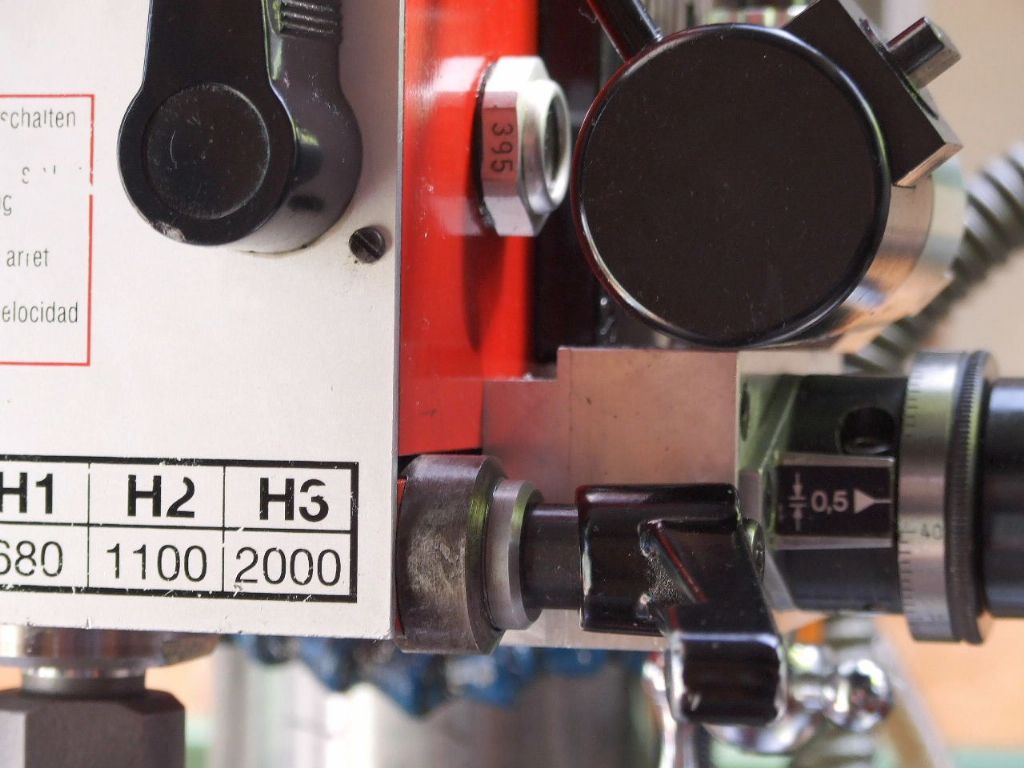
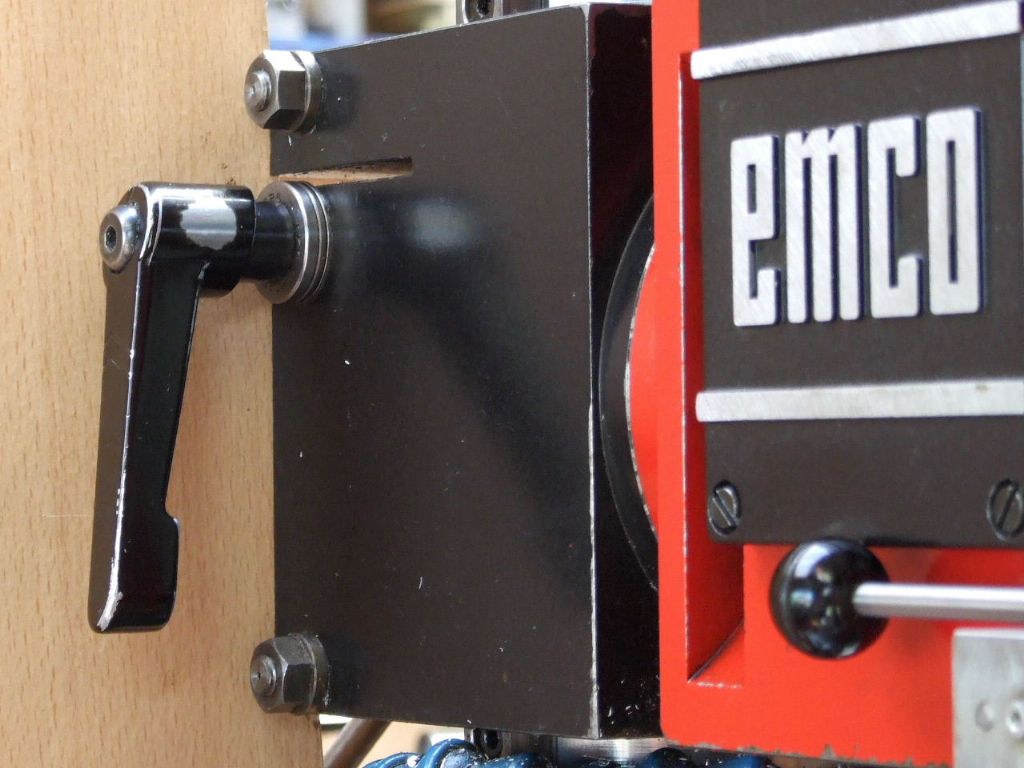
One annoyance I had with the Emco Quill clamping lever was its tendency to drop down without warning once the quill was released. This meant the carefully adjusted clearance for drilling was then lost. This combined with a dislike of using tapped holes in Cast Iron as part of the clamping regime. Far better to have a stud in the tapped hole and some form of lever clamp on the open end of the stud or even a nut. The stud is far easier to replace than the tapped hole in the machine. To this end I added the following modification. The stud with its fine thread for the tube nut allows the clearance to be preset and this is not disturbed once set. The clamping washer has a disc spring beneath it so that the lever stays put once released. The first picture shows the simple version in the background with a De-Luxe needle roller thrust race version in the foreground. This has been the current set-up for some while. The Vertical clamping Lever has also been changed to my preferred stud and lever system to which I have added another roller thrust race. Note that the thrust washer nearest the handle is the 2 mm thick option. Also in the photograph is the revised vertical clearance adjustment with nuts and studs, instead of bolts. These studs are a good fit in the stud hole so that they maintain alignment of the slider casting when any adjustment is made. The adjustment is made by the two shouldered nuts which have a 1 mm pitch thread and thus give the chance of a finer adjustment. All threads are screwcut to maintain concentricity and alignment. Regards Gray |
Want the latest issue of Model Engineer or Model Engineers' Workshop? Use our magazine locator links to find your nearest stockist!
Sign up to our newsletter and get a free digital issue.
You can unsubscribe at anytime. View our privacy policy at www.mortons.co.uk/privacy
- *Oct 2023: FORUM MIGRATION TIMELINE*
05/10/2023 07:57:11 - Making ER11 collet chuck
05/10/2023 07:56:24 - What did you do today? 2023
05/10/2023 07:25:01 - Orrery
05/10/2023 06:00:41 - Wera hand-tools
05/10/2023 05:47:07 - New member
05/10/2023 04:40:11 - Problems with external pot on at1 vfd
05/10/2023 00:06:32 - Drain plug
04/10/2023 23:36:17 - digi phase converter for 10 machines.....
04/10/2023 23:13:48 - Winter Storage Of Locomotives
04/10/2023 21:02:11 - More Latest Posts...
- View All Topics
- Reeves** - Rebuilt Royal Scot by Martin Evans
by John Broughton
£300.00 - BRITANNIA 5" GAUGE James Perrier
by Jon Seabright 1
£2,500.00 - Drill Grinder - for restoration
by Nigel Graham 2
£0.00 - WARCO WM18 MILLING MACHINE
by Alex Chudley
£1,200.00 - MYFORD SUPER 7 LATHE
by Alex Chudley
£2,000.00 - More "For Sale" Ads...
- D1-3 backplate
by Michael Horley
Price Not Specified - fixed steady for a Colchester bantam mark1 800
by George Jervis
Price Not Specified - lbsc pansy
by JACK SIDEBOTHAM
Price Not Specified - Pratt Burnerd multifit chuck key.
by Tim Riome
Price Not Specified - BANDSAW BLADE WELDER
by HUGH
Price Not Specified - More "Wanted" Ads...
Do you want to contact the Model Engineer and Model Engineers' Workshop team?
You can contact us by phone, mail or email about the magazines including becoming a contributor, submitting reader's letters or making queries about articles. You can also get in touch about this website, advertising or other general issues.
Click THIS LINK for full contact details.
For subscription issues please see THIS LINK.
Model Engineer Magazine
- Percival Marshall
- M.E. History
- LittleLEC
- M.E. Clock
ME Workshop
- An Adcock
- & Shipley
- Horizontal
- Mill
Subscribe Now
- Great savings
- Delivered to your door
Pre-order your copy!
- Delivered to your doorstep!
- Free UK delivery!


 Register
 Log-in


