Member postings for Graham Meek
Here is a list of all the postings Graham Meek has made in our forums. Click on a thread name to jump to the thread.
| Thread: Interfering with fits? |
| 20/08/2021 11:18:14 |
Hi Richard, I would not recommend pressing aluminium into aluminium. There is too high a tendency for the aluminium insert to pick-up as it is being pressed in. When I have to fit aluminium to aluminium it is usually a light press fit, no more than +0.01 mm with a smear of Loctite to stop the "picking up". Preference would be to go for a mild steel insert. If you are adamant you want to do a press fit then for 38 mm diameter you need to have your insert larger than the H7 bore, (0.0 to +0.25 mm) by +0.034 to +0.050 mm for an r6, or interference fit. You will probably need a good arbor press to get these parts together. If it were me, I would go with Tony, 0.01 mm down on diameter and Loctite 638 and possibly with one band of straight knurl on the last part of the insert to go into the hole. The band of knurl will also need some effort to get the insert into the hole, so be prepared if you do this. The important part is to leave the assembly to cure for 24 hours. Regards Gray, Ignore my post things have moved on since I started typing. Edited By Graham Meek on 20/08/2021 11:19:48 |
| Thread: Knurling tool |
| 19/08/2021 11:14:36 |
I regret the connection with the Page in The Carol and knurling is lost on me. Just to clear up any further confusion with the mention of a further DIN reference. The DIN spec I mentioned earlier is for "Formed" knurling, on the page reference stated. I know this because of the formulae provided. The "Nominal" or Finished Outside diameter is "d1", the "Initial diameter", "d2", and "Tooth spacing" on the knurling wheel, "t". For Straight knurling, DIN ref RAA the formula is d2=d1-0.5.t For 30 degree Diamond knurling, ref RGE, the formula reads d2=d1-0.67.t Standard t values are given as 0.5;0.6;0.8;1.0;1.2;& 1.6 mm. As I mentioned I have never used these, but will give them a try.
With regards to the single wheel knurling tool for straight knurling. It is not so simple a tool as it would first appear as someone who used to make large quantities for Neil Hemingway when he was trading knows. For one thing the axle of the wheel needs to be square in the guide slot otherwise the wheel is not presented to the work parallel with the lathe centreline. This misalignment could be out in the vertical and horizontal directions. Ideally the slot and the Reamed axle dowel hole would be machined at one setting. If the error is out in the vertical it will skew the knurl on the work, up or down, making it helical. This type of misalignment is shown up when the axle is inserted and the wheel locks up solid. To the Novice this is usually rectified by making the slot wider than is necessary, but this then introduces another problem. The fit of the knurl on the axle needs to be fairly good or the wheel will wobble. More so if the axle is not square in the slot and sitting in a wider slot than is necessary. This wobble usually produces a knurl where the edges are fuzzy. I have always used Hardened Dowel pins for the axles. These being cheap at the time, were a good running fit in the knurl being used and a press fit in the reamed hole of the holder. The slot for the knurl is always offset towards the chuck. The thin leg of the slot is merely keeping the knurl on the axle when in the drawer and allowing knurling closer to the chuck. Regards Gray,
|
| 18/08/2021 10:50:09 |
Hi Clive, You are welcome, I am glad my scribbling was of use. Regards Gray, Generally, There seems to be some confusion between "Cut or Milled" straight knurling and the "Deformation, or Forming" process carried out by a conventional straight knurling tool. The outside diameter of a "Cut" knurl will always be the start diameter, or, slightly less. This discrepancy depends on how far the cutting tool is fed-in, too much and the initial diameter will be smaller. Think of a gear being cut, the outside diameter remains constant. Like the gear, the PCD of the "Cut" knurl is below the initial outside diameter. The outside diameter of the "Formed" knurl will always be larger than the start diameter. Unless the start diameter needs to be skimmed to suit during the knurling process as I mentioned above. In the "Forming" of the knurl the initial outside diameter of the knurl is the PCD of the finished knurl, or very near. Thus if the Pitch at the PCD of the conventional Knurling Wheel is not evenly divisible into the start diameter, then there will be problems. Regards Gray,
|
| Thread: Yet another scam |
| 17/08/2021 15:51:30 |
I usually answer unsolicited calls with "Sharpness Light House, Chief light house keeper speaking, who is calling" this usually ends with the Brrrrrrrrrrrrrrrr of a phone hung up. If they persist I say "Hang on I have got to go and change the lamp", then go back some time later to replace the handset. Sharpness for those who do not know is a Canal outside Gloucester. Regards Gray, |
| Thread: Knurling tool |
| 17/08/2021 11:18:21 |
Hi Clive, Regretfully my memory is not what it was, so I cannot produce word for word, but here goes. During my career in industry I have only ever known straight knurls to be used as a single wheel. George H Thomas showed his single wheel knurling tool in his article on Micrometer Dials. I also recall it was GHT who advocated the correct pre-knurling diameter, but where escapes me. There is no way other than by pure luck, that the knurls will be in synchronization with each other when used in a calliper knurling tool. Yes the knurls will produce a knurl, but it will probably be finer than the pitch on the original knurling wheel. If it is the same then that is down to luck. The only way it might work out perfectly is if the circumference is evenly divisible by the by the pitch of the Knurls. Think of two gear cutters diametrically opposite cutting an even number of teeth, these will synchronize. Now consider the same set-up but with an odd number of teeth, anything but a gear will be produced. My take on using a single straight knurl is to cant the wheel towards the tailstock. Such that the leading edge is in contact with the work first. This canting over does not have to be excessive, only about 2-3 degrees. This allows more pressure to be applied over a shorter distance than if the tool was presented to the work square on. The first pass over the work is started off the work after first touching on and applying a cut. This depth of cut is something to be recorded, once a good knurl has been established. This should give a knurl with a nice sharp crest each and every time. The feed does not want to bee too slow. I use about 0.1 to 0.15 mm per rev. (0.004 to 0.006" approx). If the knurl starts to chew itself up then the diameter is too large for the pitch of the knurls to divide into evenly, slightly skim the diameter to correct. This skim does not need to be too deep, remember the pitch of the knurl is not that big. Lastly the knurling tool is turned square on and the tool is brought up to engage the knurls while the mandrel is revolving. A slight pressure is applied and the knurling tool is oscillated over the knurl to impart a sheen or burnish. Cleanliness of the knurls is paramount and I never apply oil to the knurl using a swarf brush. Not only will the brush get trapped but it will also introduce small bits of swarf from previous work. Apply a drop of oil at the start from the oil can, that way it is known to be clean. I also chamfer before and after knurling. A chamfer gives a softer engagement to the knurling wheel as it advances across the work. Clearly define the start and finish of the knurl with a chamfer, and never rely on placing a rule near the knurl to gauge the length. I have seen rules become files from this practice. An example below of my take on straight knurling. I hope this rather lengthy set of notes helps? Regards Gray,
|
| 16/08/2021 17:54:29 |
As regards calculating the required diameter for a specific knurl. In the past this has been ridiculed as un-necessary. I for one have never done this. Because over the years I have come to know what diameters work with my knurls. Our Continental Cousins however take a different approach. On page 92 of the "Mechanical and Metal Trades Handbook", (Europa-Lehrmittel), there are seven different calculations which relate to 5 different types of knurling. These are covered by DIN 82 (1973-01). Clearly they have gone about the issue with some applied science. The next time I have some knurling to do I shall give this a try. Regards Gray, Edited By Graham Meek on 16/08/2021 17:55:14 |
| 16/08/2021 10:51:58 |
|
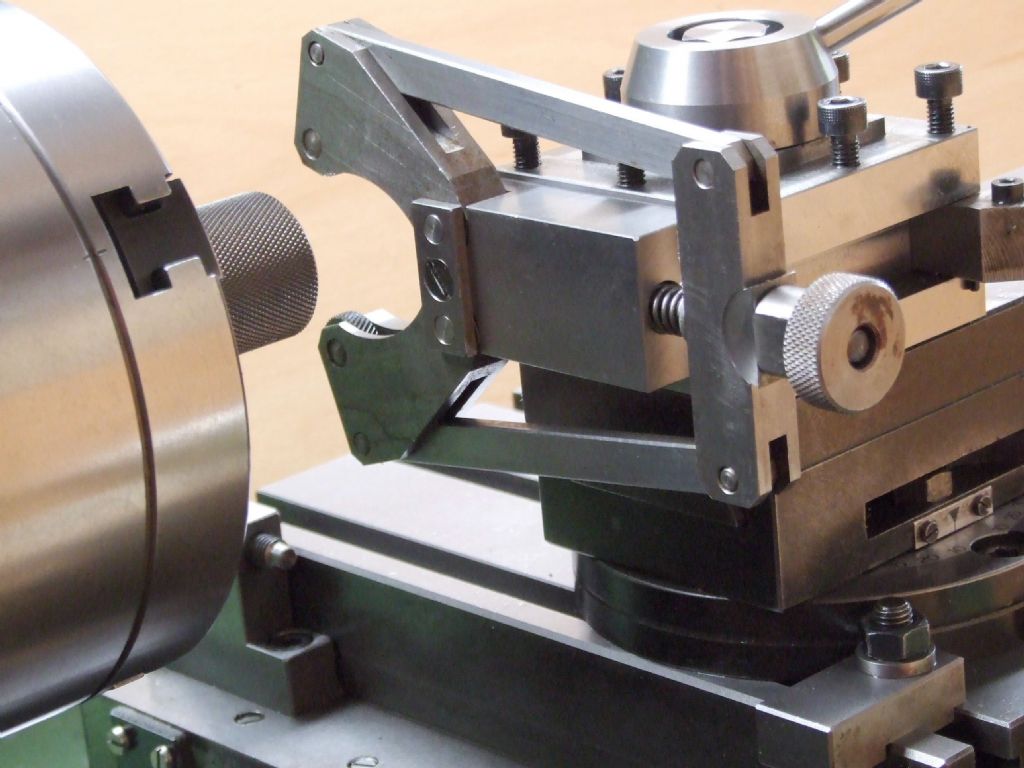
A while back in this post I outlined the faults with the commercial knurling tools. Nick's photograph above clearly demonstrates what I said, a picture paints a thousand words. Given the time so far expended on this discussion and the steps necessary to correct the faults with commercial knurling tools. To my mind it is easier to start from scratch with a known and proven design, and not necessarily mine. As regards spending loads of money for state of the art knurling tools which only get occasional use, (even in the Meek workshop). To me this does not make financial sense, but each to his own. The only time I have found the more expensive knurling tools of benefit is when knurling Brass. As they produce a crisper pattern in this material. The manufacture of ones own cut knurling tool is no big deal, the knurls are a tad on the expensive side though. I have attached photographs of the work produced from my meagre home brewed kit. The only cost of this standard of work is, financially for the knurls, and my time in making the equipment. The materials came from the scrap box. When I put this tool in the tool post I have the satisfaction of knowing that I made it, and more importantly it will produce the goods. The reliability of my knurling tool to produce good quality work first time has more than repaid for the time expended in its manufacture. "Does exactly what it says on the Tin" comes to mind. Click on the photographs for a closer look. Regards Gray, |
| Thread: Getting Myford oiled up |
| 09/08/2021 11:40:43 |
Over the years I have seen Myford's dripping in oil, so much so the swarf tray has become a lake. The amount of oil needed is miniscule, the old adage of a little goes a long way is very true. Place a drop of oil on a steel plate and leave it, see how long it takes to evaporate. The bedways on my Emco Maximat have no oiling points, the felt wipers pick up oil when the bedways are lubricated and redistribute the oil as the ways become dry. As regards grinding dust. I cover my bedways with an old piece of Denim when using the Tool post grinder. The lighter side always goes towards the ways. When storing the Denim away I fold the lighter side innermost, that way it will always stay clean. After all grinding work, (& I do a lot), the machine is given a good clean and re-oiled. The lathe is 35 years old this year. It was my source of income for a number of years, and the bedways are still pristine. I am reminded of the playground wisdom of "more oil on the bicycle chain makes the bicycle go faster". Regards Gray,
|
| Thread: Knurling tool |
| 06/08/2021 11:47:59 |
Of all the knurling tools I have used in my profession, the Marlco has been the the Roll-Royce. However the problem with all scissors type knurls is that the Load applied is centrally displaced about the Fulcrum point and the Knurls point of contact. Having the Knurls and the Fulcrum so far apart allows play to creep into the system. To control this side cheeks are added or in the case of the Marlco guide slots. This refinement is what keeps the knurls directly above one another, and does not allow them to displace due to the helical thrust forces imposed by the design of the wheel. Displacement of the knurls is easily seen as one knurl usually takes precedent and the knurl is anything but a diamond pattern. To move away from the long pair of arms, the 0-50mm Knurling Tool that I designed has a slight leverage advantage when it comes to applying the load required for the knurling operation. Because the arms are shorter the lateral displacement is less of a problem and the Keep Plate checks any side play. Further the arms are of a more robust design with no chance of flexibility or weakness. In use the knurls are brought into contact over the centre of the revolving work piece, (which should always be skimmed, the corner chamfered, and I never use just bar stock), using the knurled knob. The Knurling tool is then moved off the workpiece and the knurls adjusted (about half a turn more with my knurls), self-act feed is engaged and the lathe does the rest. An additional pass with further adjustment might be needed, but once a feel for the knurls has been acquired then I can usually produce a knurl in one pass. Material type does have a bearing on this adjustment, and the number of passes that are required. Lastly as regards the eccentric lever on the Marlco tool. I was taught to use this at the end of the knurling pass to release the pressure on the knurls and allow the tool to be moved off the work. Using this lever alone allows multiple items to be produced once the main adjustment has been set. Regards Gray,
|
| Thread: New Chuck won’t screw on |
| 02/08/2021 12:35:37 |
I think an assumption has been made about ISO 9001, as I do not see any ISO 9001 accreditation on the vendors website, unless I have missed something. The certification process allows for the withdraw of the accreditation if it can be proven the laid out procedures have not been followed. It costs money to acquire this standard, and there is an ongoing cost for checks by a Quality auditor. Those companies who get the standard, make sure they do not loose it. Regards Gray, |
| 01/08/2021 11:56:11 |
I did point out back on page 2 of this post. That checking a part, using another machined part was "asking for trouble". There are clearly Spindles in use that are larger than the "Inspection Part". It certainly does not take much to work that out. If a part is going to be checked this way then the Inspection Part needs to have the largest permissible sizes, or MMC, otherwise this check is useless. As a small Spindle will pass all the parts. Regards Gray,
|
| 30/07/2021 16:29:26 |
It seems Myford were not alone in picking odd increments for the Spindle Nose thread. Schaublin did one lathe with an M37.6 x 3 thread, and another with M47.6 x 3. Regards Gray,
|
| 30/07/2021 16:17:52 |
Hi Jason, If my memory serves me correctly Germany was using Imperial threads up until, or just before the second World War, so 26 TPI could well have been used. Regards Gray, |
| 30/07/2021 12:15:51 |
The Metric and Whitworth thread systems, as well as several others, use what are called constant pitch series. M42 can be had with a 2mm pitch as part of the Metric Fine series. Similarly the 1 1/8" x 12 TPI is part of the Whitworth 12 TPI constant pitch series, and was one of the "Preferred" pitch series, 16, 20 & 26 TPI were also part of this series in this size. Although certain pitches were to be second and third choices. Myford did a similar thing with the S7 and 254 tailstock. Where the bearing piece that screws into the tailstock body uses a preferred BSF thread. I touched on this in my article on the Tailstock Dial some while back. As regards the M42.5, Myford in their wisdom I guess. Regards Gray, |
| Thread: Machining D2 Steel? |
| 29/07/2021 15:16:27 |
I have used D2 in the past for press tools. It is usually vacuum hardened for this usage. The material is more dimensionally stable than O1 during the heat treatment process. If these characteristics are not required then I would stick with O1. D2 is not something I would want to choose to machine if I had the option of using O1. Most tool steels will rust, so if the requirement is for a non-rusting component then stainless is the way to go, but this comes with its own set of problems depending on the grade. Regards Gray. |
| Thread: New Chuck won’t screw on |
| 25/07/2021 11:41:44 |
Hi Richard, Many years ago I had a similar problem with my then new ML 10. The actual register of the Grip-Tru chuck was too small, and that was down to Pratt & Burnerd, they were not cheap, even then. As regards the supplier checking the thread against another machined part, then this is asking for trouble. Unless the "Inspection Parts" have been checked to see if the threads being used conform to the "Go" and "Not Go" sizes of a Screw Plug Gauge, then this approach is useless. Plus using the Myford spindle as a gauge is checking several conditions at once, and for one thing does nothing to actually check the true size of the Register diameter. The Register diameter on the Spindle, will always be smaller, it has to be to enter the hole. This hole could be 0.25mm or 0.010" oversize and the spindle will still go in. This size of Register would probably not do anything to help the concentricity though. I suspect from what you have done with your 3/4" tap is restored the correct Crest Radius on the thread. No doubt the Tap, or screw-cutting insert used to produce this thread has become worn on this radius, and this is where the undersize condition actually was. This problem would have been found if a Pukka Screw Thread Gauge was used to check the part. As the "Go" gauge checks the form, pitch and size of the thread. The "Not Go" checks the maximum Effective diameter and looks like a severely Truncated thread, with the top half of the thread ground down to the Max effective diameter. Lastly, you say you have put a clock on the Chuck. I have seen several posts where a clock has been put on the Body of the chuck. I for one would not expect this diameter to be "true", or "spot on". Nine times out of ten it has only been ground to make it look pretty. This is probably done on a centre-less grinder, and can be anywhere as regards concentricity, as its function is irrelevant to the working of the chuck Gripping a ground diameter in the chuck jaws is the only safe test for concentricity, as this is where it matters. An old "Gudgeon" or "Wrist" Pin from an internal combustion engine is ideal for this, or a Hardened Dowel Pin. I hope these notes are of help Regards Gray, Edited By Graham Meek on 25/07/2021 11:43:49 |
| Thread: Emco Compact 5 collet holder |
| 22/07/2021 16:16:54 |
|
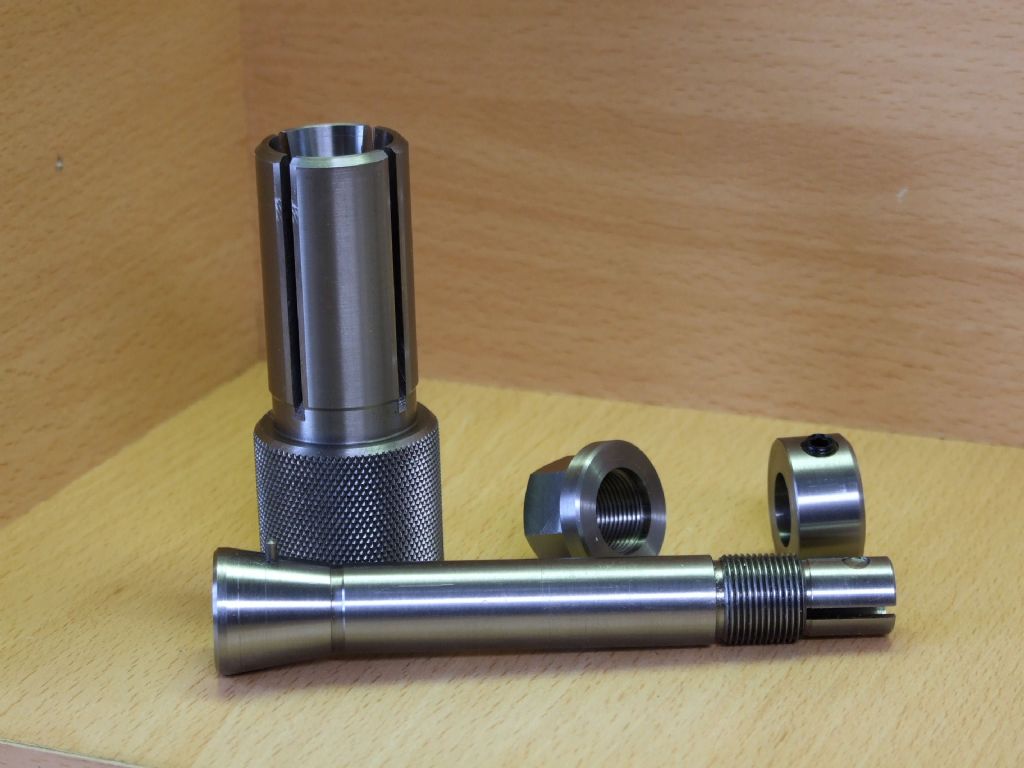
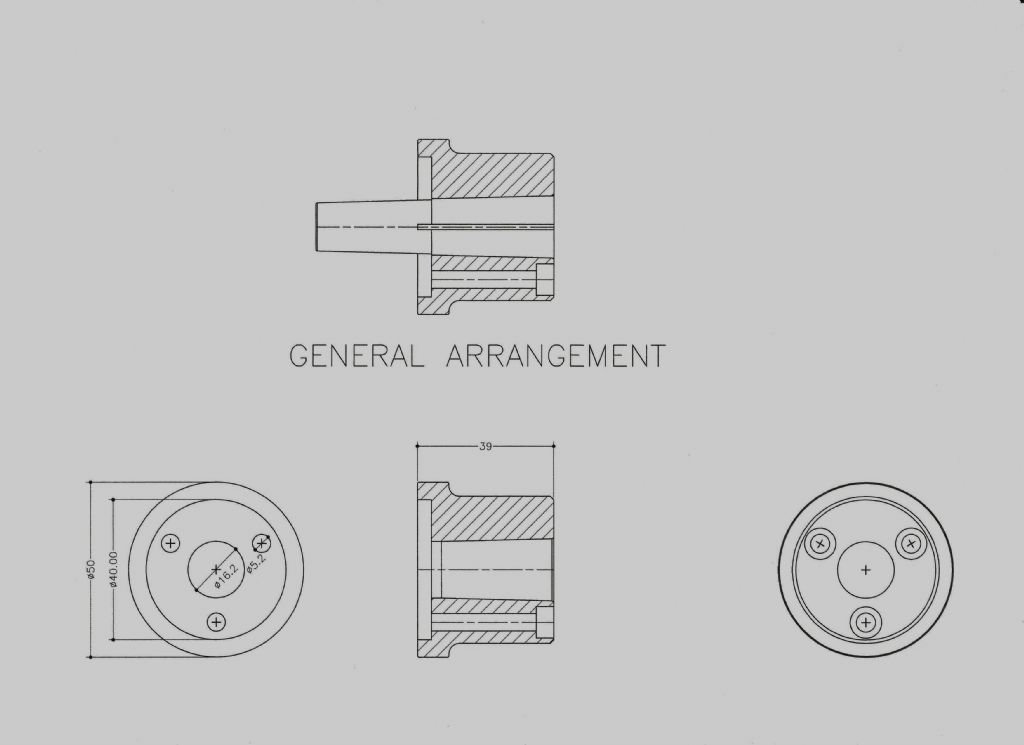
This is the sort of thing I had in mind, which would allow any No 2 Morse collets to be used. Regards Gray, |
| 22/07/2021 15:07:16 |
Posted by Emgee on 22/07/2021 13:45:18:
Posted by Geoff Stenner on 22/07/2021 07:35:09:
Direktspannzangen, 7-teilig With MK2 New Collet Set | eBay Any comments on these? Geoff All of the Emco 5 cnc lathes I have or had needed the small end of the MT2 arbor reducing in diameter to fully enter the spindle, seems they were built to accept a shorter length taper. Emgee Hi Emgee, It is funny you should say that, as I spent ages getting a set of No 2 Morse Collets that did not disappear into the spindle. Those I have of Eastern origin, which I use on my 2/3 rds Quorn, all go in too far. While a set I bought made in the USA, and are years old, do not. I must therefore urge Geoff on the side of caution if going down this route. The problem could be overcome by using a sub-plate screwed to the spindle nose and bored through No 2 Morse. This would ensure maximum concentricity and it would not need to be the entire length of the Morse taper. Just sufficiently long enough for the working portion of the collet. This approach could be extended to suit other collets, provided the collet draw tube will enter the Compact 5 Spindle. Regards Gray, |
| Thread: Keeping the workshop cool |
| 22/07/2021 12:54:07 |
My workshop has a corrugated asbestos roof, beneath this a layer of roofing felt which is on 19 mm water proof chipboard. Beneath that is 25 mm of foam insulation with foil on both sides. A skylight in the centre lets in natural light and the Suns rays. The skylight has two layers of twin wall plastic separated with a 150 mm air gap. Cosy in winter, but useless now. 33C last night at 9.30pm. The main window faces due West and I regularly see the Sun set over the Brecon Beacons, so the rays are with me all day. Currently the workshop is a no-go area. With 37% of the Earths energy consumption set to be used on Aircon by 2050, it is a problem worth some serious consideration, if the figures are to be believed. For my part I have often thought the Rev Stirling's engine holds the key here, but it needs someone better than I to sort it out. Regards Gray, |
| Thread: Emco Compact 5 collet holder |
| 22/07/2021 11:42:58 |
Posted by Geoff Stenner on 22/07/2021 07:35:09:
Direktspannzangen, 7-teilig With MK2 New Collet Set | eBay Any comments on these? Geoff Hi Geoff, I use these Draw-in No 2 Morse collets as well as my ESX 25. Whereas the ESX, and ER collets have a working range of 0.5 or 1.0 mm, depending on the nominal size of the collet. The Draw-in collets are a little more fussy and need to grip on a nominal diameter or very near. When I worked on a Hardinge HLV lathe, the Draw-in collets of this machine, (5C) had a gripping tolerance of Nominal to minus 0.025mm or 0.001" set by the manufacturer of the collets. Deviating from this will not only ruin the collet but will seriously effect the collets original concentricity guarantee. These collets would never be used to hold barstock, only turned diameters. The draw in collet does have an advantage over the ESX, ER collet in that it can hold a shorter length of diameter, especially if this diameter abuts a shoulder. However the gripping capacity of the No 2 Morse collet is inferior to the 5C in these circumstances. Hope this helps Regards Gray, Edited By Graham Meek on 22/07/2021 11:44:05 |
Want the latest issue of Model Engineer or Model Engineers' Workshop? Use our magazine locator links to find your nearest stockist!
Sign up to our newsletter and get a free digital issue.
You can unsubscribe at anytime. View our privacy policy at www.mortons.co.uk/privacy
- hemingway ball turner
04/07/2025 14:40:26 - *Oct 2023: FORUM MIGRATION TIMELINE*
05/10/2023 07:57:11 - Making ER11 collet chuck
05/10/2023 07:56:24 - What did you do today? 2023
05/10/2023 07:25:01 - Orrery
05/10/2023 06:00:41 - Wera hand-tools
05/10/2023 05:47:07 - New member
05/10/2023 04:40:11 - Problems with external pot on at1 vfd
05/10/2023 00:06:32 - Drain plug
04/10/2023 23:36:17 - digi phase converter for 10 machines.....
04/10/2023 23:13:48 - More Latest Posts...
- View All Topics
- Reeves** - Rebuilt Royal Scot by Martin Evans
by John Broughton
£300.00 - BRITANNIA 5" GAUGE James Perrier
by Jon Seabright 1
£2,500.00 - Drill Grinder - for restoration
by Nigel Graham 2
£0.00 - WARCO WM18 MILLING MACHINE
by Alex Chudley
£1,200.00 - MYFORD SUPER 7 LATHE
by Alex Chudley
£2,000.00 - More "For Sale" Ads...
- D1-3 backplate
by Michael Horley
Price Not Specified - fixed steady for a Colchester bantam mark1 800
by George Jervis
Price Not Specified - lbsc pansy
by JACK SIDEBOTHAM
Price Not Specified - Pratt Burnerd multifit chuck key.
by Tim Riome
Price Not Specified - BANDSAW BLADE WELDER
by HUGH
Price Not Specified - More "Wanted" Ads...
Do you want to contact the Model Engineer and Model Engineers' Workshop team?
You can contact us by phone, mail or email about the magazines including becoming a contributor, submitting reader's letters or making queries about articles. You can also get in touch about this website, advertising or other general issues.
Click THIS LINK for full contact details.
For subscription issues please see THIS LINK.
Model Engineer Magazine
- Percival Marshall
- M.E. History
- LittleLEC
- M.E. Clock
ME Workshop
- An Adcock
- & Shipley
- Horizontal
- Mill
Subscribe Now
- Great savings
- Delivered to your door
Pre-order your copy!
- Delivered to your doorstep!
- Free UK delivery!


 Register
 Log-in


