Member postings for Iain Downs
Here is a list of all the postings Iain Downs has made in our forums. Click on a thread name to jump to the thread.
| Thread: High Speed Milling |
| 22/06/2023 21:04:35 |
A couple of reasons. One is that a larger cutter has more force and is likely to take the piece off the superglue chuck fixture. At least it has for me in the past. Second, the intent was (and perhaps is) to take the remainder of the metal away leaving the hand in place. Shaping this will require a finer cut than a bigger mill will do (the hand is narrower than the boss). As per the above, I've not got to that part yet However, at least the thinning is tedious and it would be worth experimenting with a larger cutter, though previous attempts have not gone well. Iain |
| 22/06/2023 17:17:51 |
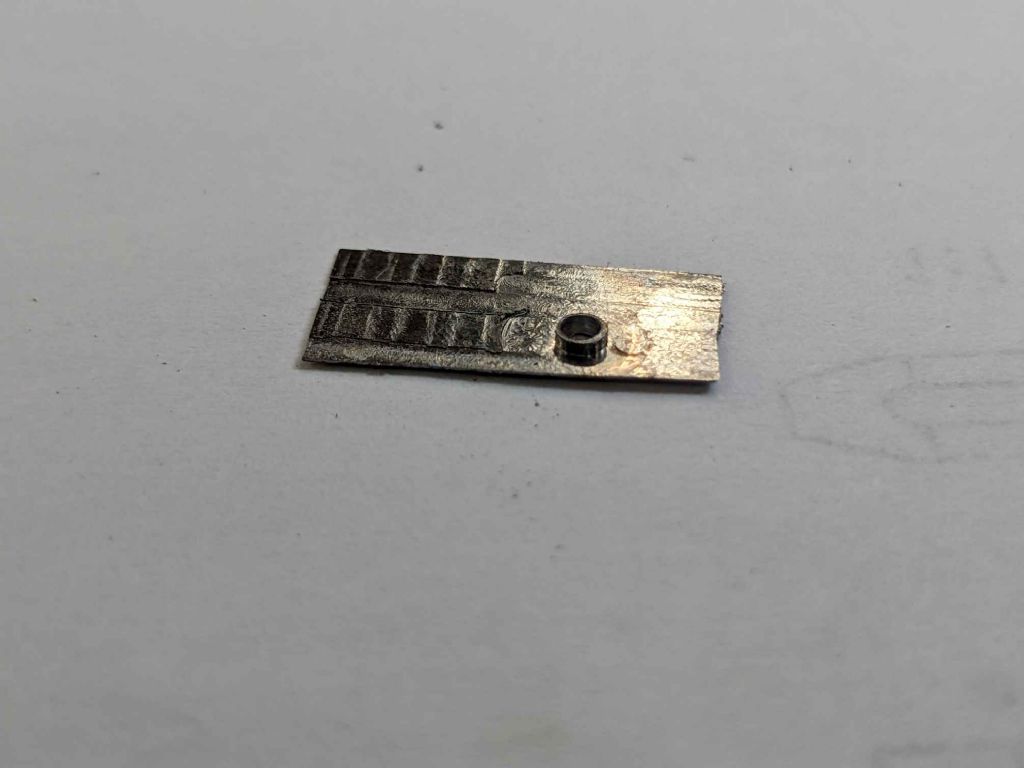
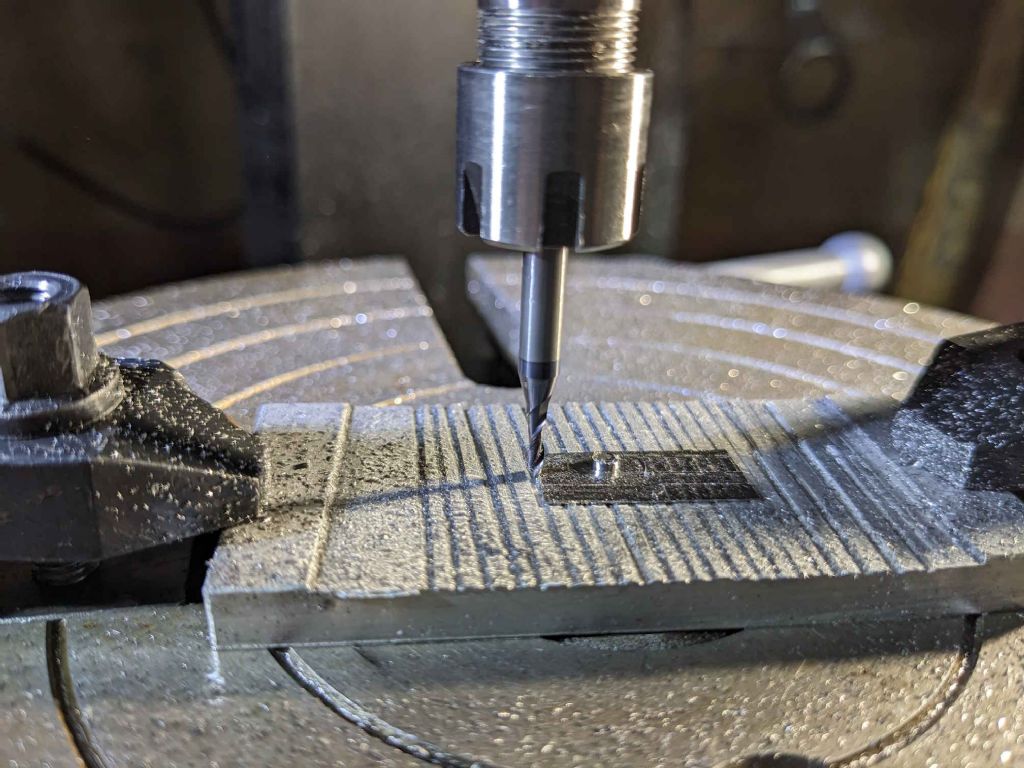
Firstly, many thanks for the various answers, which were helpful. My main take-aways were to lower the speed and DOC a bit and to avoid slot milling! I set to and did my first attempt at what I'm (ultimately) trying to make. that being watch hands. the image below is the result., I ended up using a 2mm cutter for this item. The first step was to thin it down from 1mm to about 0.25 except around the boss you can see. Then to finish the rough square on the rotary table down to 2.5mm and drill the centre to 1.9mm. Although the thickness is ended up at about 0.3mm, I@m more than happy for this as a first attempt. I had expected to use the smaller cutter to actual carve out the hand shape (which is essentially a rectangle with arcs where the boss is) but I realised I'd not got all the measurements I need on my drawing. Plus, I definitely felt that I should quite whilst I was ahead. For those interested, I started by squaring (well two faces) some 6mm ally on the mill, then bolted it to the rotary table more or less in the middle. Then mill the centre to ensure that it was still square. Next to make some slots to absorb any excess superglue (initially with the 1mm slot drills, but that turned out not work so well - see earlier posts!). Deburr, clean and then stick a piece of 1mm thick 5x10 carbon steel in roughly the centre. You can see that I was quite a bit out!. Add some weights and leave till the next day. Trim round the central boss .02mm or so oversize and down to 0.25 mm (target is 0.22, but will need polishing etc), then turn round the boss using the rotary table and finally centre and drill the boss to 1.9mm. Given that the mill end diameter is 2mm you can see how small this is! All in all this has gone much better than I expected. Probably next step is cut out and file to shape (with VERY fine blades) and if it's not broken by then, polish and heat treat. I suspect, however that this will not end up being the final hand - I have so MANY mistakes to make yet! Iain |
| 21/06/2023 16:28:58 |
I'm doing some relatively fine work (0.25mm holes for example) and so I've built a high speed milling spindle for my mill. By high speed, I mean up to 19,000 rpm. It has an ER11 collet. So far I've tried to use two types of (carbide) end mills. There's one sort readily available on Amazon which has a 1/8th barrel and quite a long cutting part (so perhaps 1mmx 20mm or so). It's not always clear if these are meant to mill metal, but some seem to be. The other is a more clearly metal oriented end mill from APT (who very kindly suggest speeds and feeds on their site - a 1mm end mill should run at 20,000 in steel, but I guess 19,000 is close enough). The cutting part in this case is around 5mm. I've had the joy of breaking a number of the amazon end mills and one of my two APT mills. I can't quite work out what is the trigger for breaking and end mill. In one test I made a slot in steel 3mm deep, 1mm across and 15mm long with no problems (about 0.3mm DOC). In other tests I am less aggressive (so I think) and 'sping|' away goes the cutter. Best success so far (relatively speaking) was cutting a 0.4mm deep slot across about 30mm of aluminium (1mm wide) with the APT cutter. This went fine (see later), but right at the end of the slot as it immerged from the metal,'Sping!', the APT one went. One thing what was disturbing with APT one was a strong signing. If I move the bed slowly it would be intermittent (so contacting the metal, rebounding, contacting and so on). going faster the singing was consistent. I think that this was mainly due to the stick out of the mill. The barrel is very long and hits the end of the collet internal bore. With my next one I will shorten the barrel. I'm really looking for general advice on this. Are the cheap cutters really going to work on steel? Should I just buy lots of mills as they will break? I should say that the mill is substantial (for a hobby - a VM32L, around 240KG) but manual, so my irregular handle turning may be a factor. Hope this makes some sense.
Iain |
| Thread: Lathe spindle alignment |
| 16/06/2023 13:05:04 |
Well. It turns out that I am an idiot. I started by drilling out to 14mm, but there was still seem screeching. So I checked the tool height and it was a little under. I fixed that and, once I'd worked out that the best speed was around 1000 rpm, I got a good finish. The lathe still turns to be narrower at the chuck end but is 15 microns or so better. I've tuned the outside with some emery and it's within 2 microns along the length. The bore is good enough for a 'light press fit' at both ends. Huub I'm using the CCGT060204 (aluminium) and it's pretty much all I use for normal cutting and boring - HSS with zero rake for bronze and brass, though and I have some very small pieces to turn (2mm dia) which I will probably use hss for. I want a tight fit for the bearings to make sure concentricity is good. If you have a gap for loctite (I use 638 for bearings) then there is the chance of it being a bit off. I don't think I've finished setting up the lathe, but I've other things to get on with in the short term. Thanks for all the advice.
Iain |
| 16/06/2023 11:08:08 |
Huub - not using a top slid and I suspect my boring bar is the same as yours. Which makes me ask a question. Previously I've drilled out to 14mm with a blacksmith drill, but not been happy with the finish or accuracy. I'm asking myself if I stopped at 12mm this time with a 'good' drill. Perhaps that's the root issue. I will put a 14mm hole in and see if that makes things better. I don't think I saw any rubbing (and I think I checked), but don't trust my memory). That will be embarrassing if that's the case!
Iain |
| 15/06/2023 15:42:17 |
Hi, Huub. The one I've made was OK apart from narrowing towards the chuck by about 0.03 mm. I 'fixed' this with some emery and it was at least good enough for a prototype (a high speed milling spindle). What I'm actually doing is drilling out to 14mm and then boring the remaining 2mm with the last passes being very fine (helped by some telescoping bore gauge). Then bring down the outer dia (from 25 / 27 mm depending on the stock) to 20mm. I'm holding a piece of 65mm bar in my 3 jaw and parting it off after the turning and boring, then turning it round in a 20mm ER32 collet to face off - or perhaps I thought the parting off was good and I just finished on some emery. Can't remember now. Sadly, autofeed on this lathe is not particularly fine and is a pain to set up. I don't use it. Instead practicing a steady hand - well eventually it will get steady!
Iain |
| 15/06/2023 12:57:43 |
I think we swapped Michael. I will be patient and try the EN1A.
Iain |
| 15/06/2023 12:56:14 |
Thanks Howard, I meant to say in the previous post that this was attempted with both HSS and carbide insert (the sharp aluminium type). Also with various speeds from 500 rpm up to 2000. I've also swapped out the insert and I've tried cuts from wafer thin to 0.5mm. The insert bar has worked well in the past and is my goto bar for boring. What I'm doing is duplicating a piece (45mm long, OD 20mm, ID 16mm) which I'd made before the changes which work OK. That really was EN1A, but now run out I've ordered some more EN1A Pb and will re-try with that before I consider stripping the lathe again.
Iain |
| 15/06/2023 11:41:46 |
Having put the lathe back together, I've turned down a piece of (what I thought was ) EN1A and then drill and started to bore. The outside is kind of OK, but the inside is a mess. Screeching and an almost knurled effect. I've tried another piece of steel with similar results. In some ways this is worse, The cutter is being seriously deflected. I suspect the second piece of steel (origin unknown) may be tougher than my little lathe is happy with (boring anyway). The first deflects less but resonates badly. I would like to suspect the steel rather than what I've done with the headstock and re-assembly, but wanted to seek some more expert opinions before I strip the lathe back down again... Help!
Iain |
| 13/06/2023 20:06:32 |
An Engineers Level (0.02mm / 1000mm if I recall) is one of the many things I've bought because, 'some day I'll need it'. Perhaps this is now! I'm out tomorrow and need to finish a project, so it may be a few days before I get back to measuring. I've now got the lathe back together (not without a couple of scares!) and cut a test bar. However, I'm not sure I particularly trust what I've written down, so I will have another look later in the week and report back. Thanks all. Iain |
| 13/06/2023 14:24:41 |
Hi, Huub. Ways are stoned, but that part of the bed looks OK anyway.
Howard. All this makes sense, but the bench is way out of true and sorting that out to the point where I'm near where an engineers level would indicate would be a goodly amount of work. However, the thread has persuaded me that this would be a good thing to do and I will add it to my todo list. Probably associated with adding in a heavy baseplate as suggested earlier.
Iain |
| 12/06/2023 19:22:25 |
Hi, Huu, My 0 starts about 50mm from the spindle as that's about as far as the cross slide will go. The lathe has a single prismatic feature so should not be too subject to wear. I have, however, just tuned up the clamps to the bottom of the bed (I suppose they're gibs) and dropped the lift from 0.04mm to about 0.02. Any tighter and the cross slide won't move. Chris. I think I need the lathe back together to use the famous Rollies Dad method, which I think boils down to using averages.
Michael. there will be some droop, but this should not have much affect as long as I'm close to the centre of the bar (which is effectively vertical over a short distance). And I've measured in both directions and get the same results. More tomorrow!
Iain |
| 12/06/2023 16:43:49 |
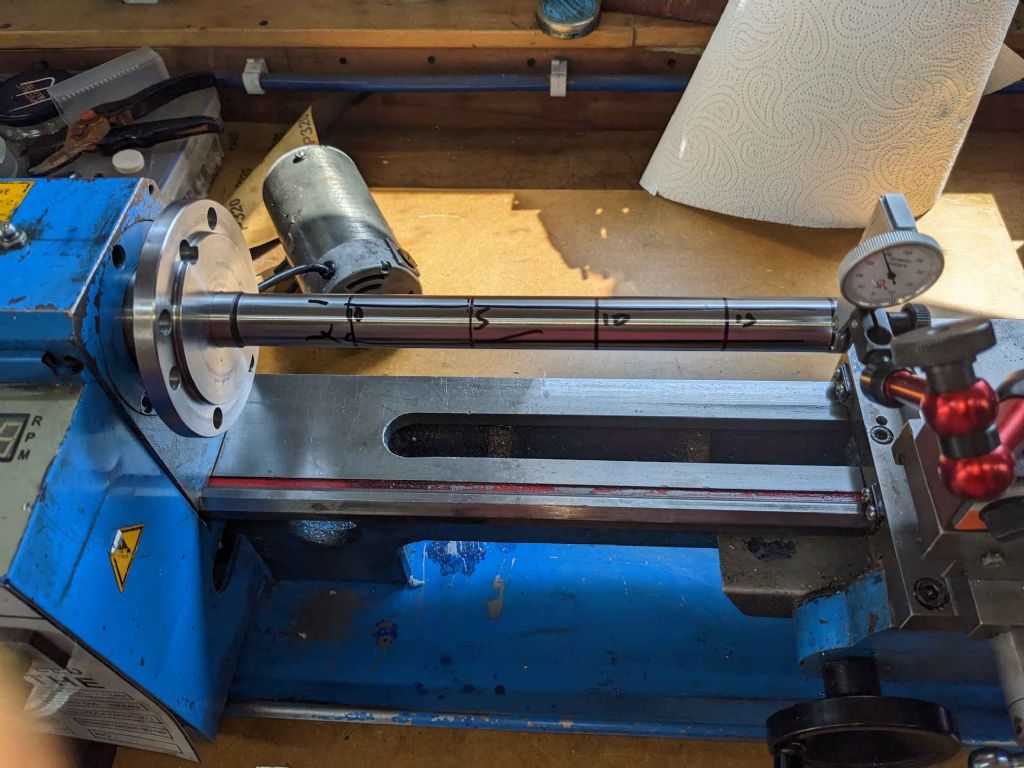
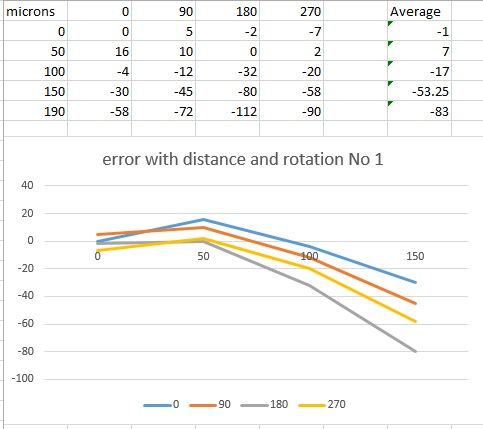
I decided that a bit of measurement was in order. I put my test bar in the spindle and marked rings at 50mm intervals and lines lengthwise at roughly 90 degrees. the bar is consistent diameter through the measured area within a couple of microns. The picture below is the test set up. I took care to set up the indicator (a 2 micron jobbie from China) in line with a centre in the spindle first. Here is a snapshot of the results. Note that I repeated this twice with the test bar in different positions and each time ran through the measurements twice - the results were not identical, but were reasonably consistent. you will see that the spindle appears to move away and then towards the indicator with a maximum error (on average) of 83 microns 150mm down the bar. I can only assume that this is due to a twisted bed, something I'm not in a position to fix at the moment. This does seem to show that the average error is now under 20 microns (< one thou) for the first 100mm, which is reasonable. I'd be interested to get input from anyone who is better equipped to interpret this data - I certainly am not! I will be on the lookout for a bit bit of steel at some point - there is a scrapyard in ripon and I think this is an application which is fine for some IDontKnowWhatItIsIum as long as it's sizeable and heavy.
Iain
|
| 11/06/2023 18:35:54 |
Hi, Dave. I'm pretty sure that it's not the pipe bending. Mainly because the MT3 test bar shows a deflection pretty close to what I measured with the 'tube'. The tube started off as 27mm mild steel (EN1A possibly Pb) with a stick out of about 60mm. The inside was bored to 16mm and then the outside cut down to 20mm. During the outside turning, I checked diameter with a micrometer at several places and fairly often and it was consistently showing smaller at the chuck end. So I'm fairly sure it's the alignment. After I've turned a new tube tomorrow, I can let you know the good news or admit I'm an idiot and the problem is elsewhere!
Iain |
| 11/06/2023 16:22:50 |
Hi, Hopper. I tried lifting the corners of the splash tray on which the lathe is bolted, which should have had the effect of twisting the bed - at least a little. In fact this had little effect on the alignment. Since then I've removed the headstock and applied some shims (aluminium foil turns out to be 0.01mm in width) which has considerably improved the alignment. It would seem that the alignment bar isn't quite as perfect as the advertisement indicated, so I'm not quite sure how good yet, but probably between 5 and 10 microns over 50mm. I'm sitting here wondering if an extra shim might bring it even better or to leave well enough alone... Next step (tomorrow) is to put it back together and take a test cut. I will report.
Iain
|
| 11/06/2023 12:43:53 |
Thanks, Andy. A trip to the scrapyard may follow! At the moment, I have the lathe in bits with the headstock off. Nipping the bolts had no positive effect, though I could make things worse by loosening some bolts - particularly the front right one. My first attempt is to make sure that the surfaces are all clean and deburred. I thought I did this before, but who knows? As the deviation is about 0.03 over 50mm and the headstock is 100mm long, I should need a .06mm shim (in total - two 0.03 might be better). If the deburring fails I will try that before trying to get clever with filing and sanding.
Iain |
| 11/06/2023 10:43:32 |
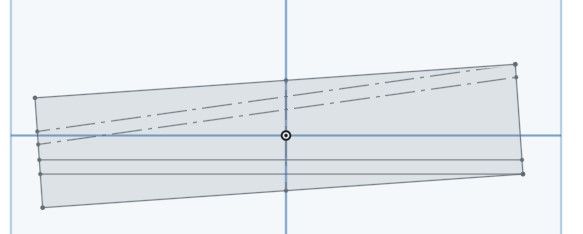
Thanks for the responses, guys. Old Mart I *think* that this is what I was hoping would work, but as Huub says, it's a bit of a pain to do. I will give that a go, though. Andy - that was very interesting. Did you check the trueness of the lathe after the work? I see that you'd checked that it was the same after bolting as before, but that assumes that the bed was in true to start with. That's something I will have to consider, probably later as I don't have the stock for that and my welding skills are ... dubious! In passing, my parting off has been much better since I changed the guides for the cross-slide under the bed. Teh replacements are brass and somewhat heavier than the original bars. I found this on a you-tube video, but can't recall which one other than that the author had a distinctive nasal voice. 20mm mild steel seems quite reliable these days even at higher speeds. Having said that sometimes it doesn't work for no apparent reason! Chris, If I've understood your question correctly, the diagram below might help.. The angled rectangle is the bar in a chuck which leans away from the operator. Left hand side is the chuck end. Note that the chuck is in line with the spindle and the bar rotates around its axis. the bottom horizontal lines represent the travel of the cutter. the lower one is the outside, then inner the bore. The dotted lines are what the travel would be on the other side of the bar..It's a bit hard to see, but if you tilt your head so that the bar is horizontal you will see what I mean. Thus the part near the chuck is narrower (inside and out) than the end. Hope that makes sense!
Iain |
| 10/06/2023 21:06:22 |
HI, Clive. The lathe is rather small and is not secured to the bench. There's no particular way of doing that - not straightforwardly anyway. I can try applying some shims or such and see if it makes any difference. Thanks
Iain |
| 10/06/2023 18:56:25 |
I recently turned a 50mm long 'pipe' in steel with an external diameter of 20mm and internal bore of 16mm. Both inside and outside were around 0.02mm or so narrower at the chuck end. I particularly wanted this to be highly accurate, particularly the inside as I wanted to press bearings in. I managed to get some approximation of what I wanted with the aid of some wet and dry, but this wasn't really ideal. I had to wait for a new test bar as my existing MT3 test bar had rusted rather nastily. What I found was that the test bar did in fact lean away from the cross slide by around this factor. This seemed independent of the rotation of the test bar. When I bought the lathe (a 7x14 Real Bull CJ18A from now defunct SPGtools), it was suggested that I could align the spindle by 'nipping up' the bolts which hold the headstock on. I've done this previously when relacing the spindle and this does seem to have some effect. My questions are:- Should I be able to get better alignment with my mini lathe (Mr Schlesinger and so on) Is nipping up / freeing the headstock botts the best way to do this? I ask these questions as I'm not particularly keen on stripping down the lathe if I'm not going to be able to fix this. I look forward to your help!
Iain |
| Thread: Material for Collet Holder |
| 31/05/2023 09:54:23 |
I've recently bought a bunch of ER11 collet holders from Aliexpress. the one I've measured so far has a run out of 12 microns, which is OK, I think. They are actually decent quality on the whole, and quite ridiculously cheap. For a tenner you can get 2 or 3! One word of warning - some of the reviews and my own experience indicates that the holder proper is pretty nice, but the nuts can be subject to burrs. Seems random, so maybe buy a couple of spares. I think you can also get them from Amazon for a little bit more.
Iain |
Want the latest issue of Model Engineer or Model Engineers' Workshop? Use our magazine locator links to find your nearest stockist!
Sign up to our newsletter and get a free digital issue.
You can unsubscribe at anytime. View our privacy policy at www.mortons.co.uk/privacy
- *Oct 2023: FORUM MIGRATION TIMELINE*
05/10/2023 07:57:11 - Making ER11 collet chuck
05/10/2023 07:56:24 - What did you do today? 2023
05/10/2023 07:25:01 - Orrery
05/10/2023 06:00:41 - Wera hand-tools
05/10/2023 05:47:07 - New member
05/10/2023 04:40:11 - Problems with external pot on at1 vfd
05/10/2023 00:06:32 - Drain plug
04/10/2023 23:36:17 - digi phase converter for 10 machines.....
04/10/2023 23:13:48 - Winter Storage Of Locomotives
04/10/2023 21:02:11 - More Latest Posts...
- View All Topics
- Reeves** - Rebuilt Royal Scot by Martin Evans
by John Broughton
£300.00 - BRITANNIA 5" GAUGE James Perrier
by Jon Seabright 1
£2,500.00 - Drill Grinder - for restoration
by Nigel Graham 2
£0.00 - WARCO WM18 MILLING MACHINE
by Alex Chudley
£1,200.00 - MYFORD SUPER 7 LATHE
by Alex Chudley
£2,000.00 - More "For Sale" Ads...
- D1-3 backplate
by Michael Horley
Price Not Specified - fixed steady for a Colchester bantam mark1 800
by George Jervis
Price Not Specified - lbsc pansy
by JACK SIDEBOTHAM
Price Not Specified - Pratt Burnerd multifit chuck key.
by Tim Riome
Price Not Specified - BANDSAW BLADE WELDER
by HUGH
Price Not Specified - More "Wanted" Ads...
Do you want to contact the Model Engineer and Model Engineers' Workshop team?
You can contact us by phone, mail or email about the magazines including becoming a contributor, submitting reader's letters or making queries about articles. You can also get in touch about this website, advertising or other general issues.
Click THIS LINK for full contact details.
For subscription issues please see THIS LINK.
Model Engineer Magazine
- Percival Marshall
- M.E. History
- LittleLEC
- M.E. Clock
ME Workshop
- An Adcock
- & Shipley
- Horizontal
- Mill
Subscribe Now
- Great savings
- Delivered to your door
Pre-order your copy!
- Delivered to your doorstep!
- Free UK delivery!



 Register
 Log-in


