Member postings for Zebethyal
Here is a list of all the postings Zebethyal has made in our forums. Click on a thread name to jump to the thread.
| Thread: Dros without breaking the bank? |
| 04/12/2017 09:56:43 |
I can also reccommend the Yuriy's toys approach. I bought some Igaging scales for my X2 mill for £82.00 after speaking to an ebay supplier in the USA for a dedicated listing. The remote displays were not the best and are actually upset/reset by the motor in the mill itself. I replaced the 'USB' cables with shielded ones to my electronics board at the exhorbitant cost of $0.99 each - an ebay purchase from China The electronics side cost me £5.00 and runs the scales via phone charger, or similar free PSU, and provides bluetooth connectivity to a cheap Android tablet that cost me £43.00 that runs Yuriy's app. I used Yuriy's basic Arduino code and adjusted it to work with an atTiny45 microcontroller - why use a 32 pin chip when 8 is more than enough - it actually only needs 7!
Edited By Zebethyal on 04/12/2017 10:01:09 |
| Thread: Sine Bar replacement |
| 22/11/2017 13:35:16 |
Tom Lipton has a good video on YouTube called What's My Sine? about making a quick and dirty sine bar that is probably accurate enough for most purposes made from a parallel and a couple of bearings. He also shows an even simpler one made from a piece of wood and a couple of nails to prove a point about how accurate they can be even when made from such simple materials. |
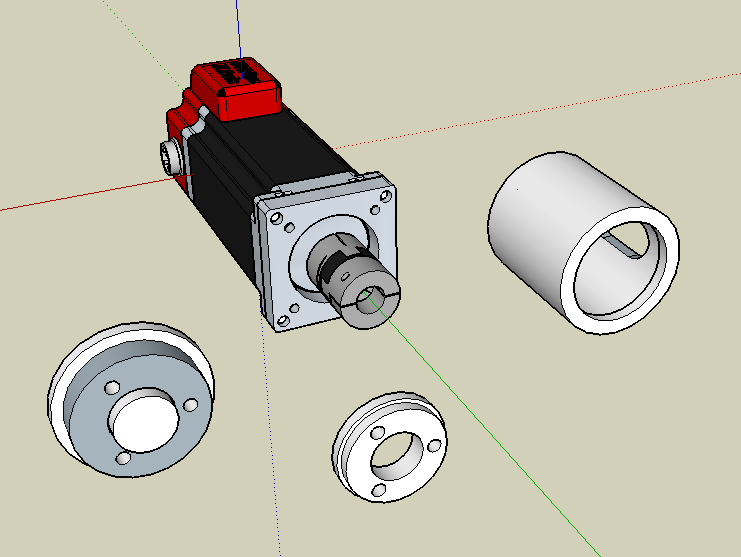
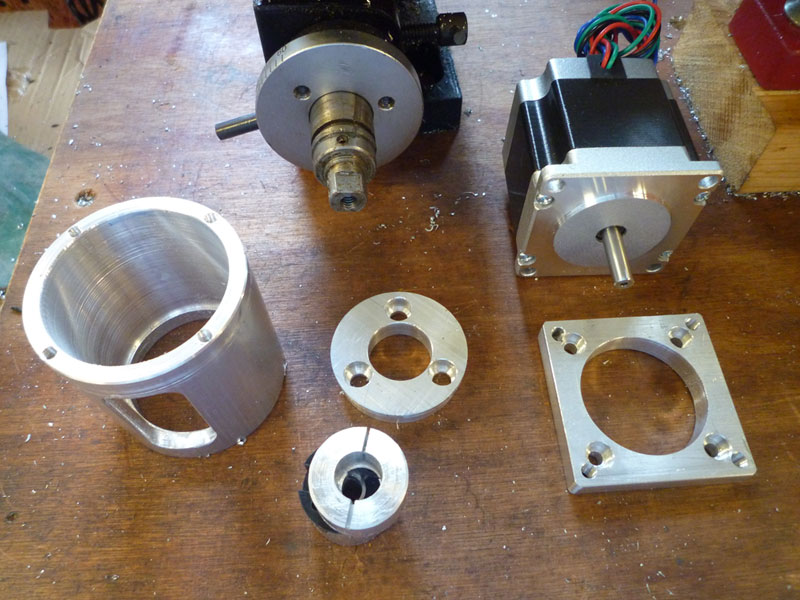
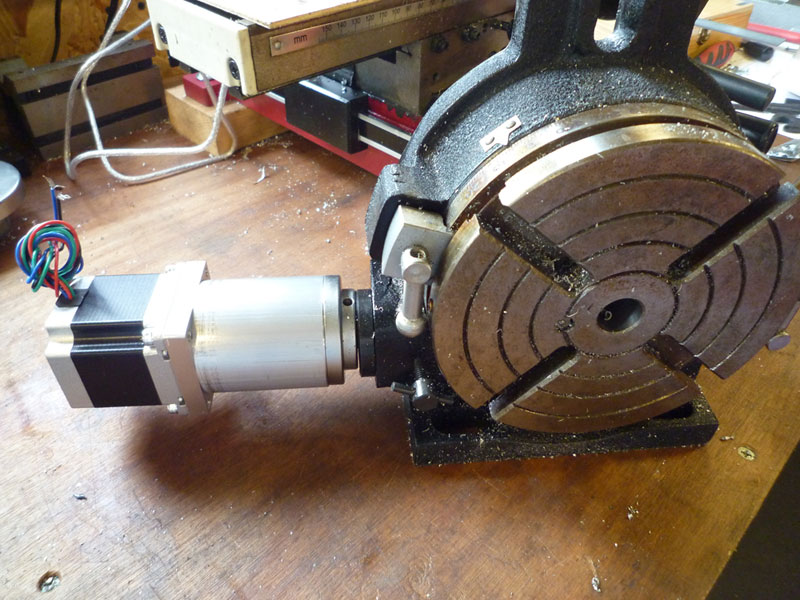
| Thread: Division Master (Stepper Motor Dividing) |
| 21/11/2017 12:07:30 |
Optional features include:
The full list of what it can do is shown at World of Ward under description and features. I chose to implement a bare bones version, as I currently have no need for the additional functionality and wanted it to be as simple as possible to implement on perfboard. I can always build the full version later and re-use the parts for minimal additional cost - if I do decide to upgrade, I will probably buy the bare PCB from Steve Ward at £6.00 it is still pretty cheap. |
| 21/11/2017 09:24:13 |
The Ward Controller PCB can actually be simplified, back to being more like his original design, the current version has many extra bells and whistles that not everyone actually requires. This is a schematic of a bare bones version, the keypad part could easily be replaced with a 4x4 matrix one for £0.99 from ebay.
The only real requirements for building it are a PIC chip (free via the sample service from Microchip), A clone PicKit programmer (about £7.00) and a ZIF adapter (under £2.00) both reusable for future projects, in total less than the price of a genuine Arduino. The LCD you would need to buy for any version of the controller (£3.00) and a small perfboard costs pennies. You would still require the following items for either version: a stepper driver - I used a PMinMO one that I built for about £5.00, a PSU (old laptop one - free) voltage regulator to supply 5V (Pulse Width Buck Converter - about £1.00) and a stepper motor that will work within the range of the stepper driver (mine cost £17.00). |
| 20/11/2017 15:20:17 |
You are correct in stating that the Ward site only covers the electronics side of the project. For the mechanical side, it's only really a couple of simple items to make plus some form of coupling. I made all of the items myself from my own drawings, and I would consider myself very much in the beginner category of engineering.
Edited By Zebethyal on 20/11/2017 15:21:30 |
| Thread: Dro units |
| 14/11/2017 10:33:18 |
Tom Lipton has a neat solution to this problem on his Blog where he made a 127 hole plate for his spindexer using a method similar to that described by JasonB but used 3 different PCDs and the same angle for all holes:
|
| Thread: 'What LatheXXXXX sorry 3D Printer should I buy' |
| 31/10/2017 11:17:59 |
I always set my Z height to zero based on having light scratching against a sheet of paper between the print head and the heated bed and have lovely smooth faces on the finished product once removed (usually the best surface of the finished print!). I can usually tell whether or not the bed is properly level and extruding properly whilst the initial layer is being printed - I cancel the print if it is too squashed or not squashed enough before the initial layer is even finished and adjust as appropriate - better bed levelling (remember to do this with the bed hot, it changes shape with the heat), or better zero Z height adjustment. I print onto kapton tape that has been cleaned with acetone, on a glass sheet clamped on top of my heated bed with mini bulldog clips. I change the tape when it starts to look tatty, which if you are careful with removing your prints can be 6 months or more. If you have left the heat on for the extruder, it is always worth extruding a bit before starting a print, as the plastic in the internal reservoir slowly oozes out and is not replaced if the stepper is not turning - also worth printing an outline to ensure that all is extruding properly before the main print starts. A date appropriate print of some skeletons I printed last year - the bed was not as level as it might have been and the one on the right had fused joints. If you look closely, you can see that the perimeter is wider in the lower right than elsewhere on the print - squashed more due to insufficient Z height. Printed using glow-in-the-dark filament.
Edited By Zebethyal on 31/10/2017 11:28:42 |
| Thread: John Stevenson |
| 25/10/2017 08:00:52 |
I have not been on the forum for a while and had come back on to ask John when the Chinese CNC controller review he was writing was likely to be ready for publication. I then saw this thread and feared the worst. Reading through, initially my fears were set aside with hopes that John may yet recover and I would still be able to ask my question as some form of amusing chastisement, but as the thread progressed I eventually reached the news that he had sadly lost the fight. I never had the pleasure of meeting him, but we did have a couple of exchanges on this forum on CNC related topics, and I always enjoyed reading any thread he had chosen to post a response to - every one brought a smile to my face. My condolences to the Delectable Debs, friends and family - RIP John you will be sorely missed. Tim Moores |
| Thread: Digital caliper remote display |
| 08/08/2017 11:01:40 |
I took the Yuriy's Toys approach for the DRO on my Mini Mill that uses Igaging scales but built my own circuit board based on an atTiny85 and some USB connectors (total cost less than £5.00). This runs Yuriy's firmware with a couple of minor tweaks for the atTiny chip.
This interfaces via Bluetooth to a cheap 10" Android tablet, but any Andriod device would work just as well. The Igaging scales use mini USB cables, but use +3v, Clk, Data, Gnd on the pins Edited By Zebethyal on 08/08/2017 11:05:24 |
| Thread: Insulating mats |
| 06/07/2017 15:59:45 |
I use a themally reflective sheet under my heated bed, as suggested on the Richrap blog
About £1.00 for 3 x 35 x 20cm sheets Edited By Zebethyal on 06/07/2017 16:03:43 |
| Thread: Beware Melting Connectors on RAMPS boards |
| 08/06/2017 07:53:59 |
Posted by Neil Wyatt on 07/06/2017 18:34:57:
Posted by Zebethyal on 07/06/2017 14:52:31:
Posted by Neil Wyatt on 02/06/2017 11:55:58:
Just a warning to anyone making any type of 3D printer using a RAMPS board. Check your power connector plug - it seems that despite being rated between 12 and 15 amps they overheat easily and melt with obvious risks. Just google 'ramps power connector melted'. Even with a 15A rating, you may be exceeding that on a typical 3D printer with a heated bed:
In total around 17A Sanguinolo board also has issues with heated bed traces melting, so I offboarded the control of my heated bed. (Sanguinololu is effectively a Mega + Ramps with a 644 or 1284 chip, but in a much smaller footprint)
I think the connectors are rated 15A per way rather than total i.e. 60A total Your sums give a total current of 34A - as it comes back out again on the ground pins. Either way it's a lot to put through a small connector. Neil I was thinking more of 17A in on the +ve and 17A out on the -ve power connectors, so still exceeding the 15A per way limit. But I also think we are violently agreeing with each other. |
| 07/06/2017 14:52:31 |
Posted by Neil Wyatt on 02/06/2017 11:55:58:
Just a warning to anyone making any type of 3D printer using a RAMPS board. Check your power connector plug - it seems that despite being rated between 12 and 15 amps they overheat easily and melt with obvious risks. Just google 'ramps power connector melted'. Even with a 15A rating, you may be exceeding that on a typical 3D printer with a heated bed:
In total around 17A Sanguinolo board also has issues with heated bed traces melting, so I offboarded the control of my heated bed. (Sanguinololu is effectively a Mega + Ramps with a 644 or 1284 chip, but in a much smaller footprint)
|
| Thread: How to attach a quality drill chuck to a Morse Taper 2 arbor? |
| 05/06/2017 09:19:17 |
Morse taper originally was thought of as 5/8 inch per foot (0.625). As precision improved, it was realized that the existing patterns did not quite conform to this ideal. Rather than orphan equipment already in use, the slightly-off specifications have continued to be used The above is quoted in several places as a reason why Morse tapers are not all exactly the same angle. |
| Thread: The diesel controversy |
| 11/05/2017 07:46:54 |
Posted by Antony Powell on 10/05/2017 13:40:24:
As far as suicide goes it was leaded petrol that produced the main carbon monoxide when burnt therefore unleaded petrol means less carbon monoxide = less suicides from it you can try for hours with unleaded fuel without success coupled with more efficient engines means less pollution hence why these days you very rarely here of it happening..... Tony From a suicide/accidental death point of view, the unleaded fuel producing less CO merely delays the process. In any closed space there is only so much oxygen and whilst normal combustion will produce C02 and H20, after a while the oxygen will become depleted and both you and the engine will start to produce more CO as there is less oxygen and more carbon available. You can die from carbon monoxide poisening with nothing producing the CO other than yourself, given a suitable sized sealed enclosure and enough time, after a while you will also become too lethargic to do anything about escaping once the CO poisening sets in. If however the garage has suitable ventilation, then CO poisening is unlikely. |
| 08/05/2017 15:47:37 |
Posted by Mike Poole on 07/05/2017 20:52:37:
Surely the best thing to do with ethanol is drink it and run engines on methanol. Mike Methanol is not nice either - similar properties to ethanol, but one less carbon atom per molecule. Cars run on methanol need to have anodised fittings, or the methanol will 'eat' the aluminium. You don't need to worry about dirt in your fuel system as the methanol will 'eat' it all, ideally flush your fuel system after running to prevent it from eating the hoses. Don't get it on your skin as it will be absorbed, attacks the nervous system and can make you blind and mad. Absorbs water as previously mentioned. Sickly sweet smell when it burns, which can become cloying quite quickly. Burns clear so you can walk into a methanol fire and not know it (this is why the fire marshals at the drag strip always put on their balaclavas and hold their fire extinguishers when the methanol cars come round). You need about twice the quantity of methanol to normal gasoline for the same 'bang' from the engine, however the power drop off when running rich is far less severe than with gasoline, (so everyone runs rich - running lean with a turbo = torched heads) but there is a risk of hydrolocking your engine due to too much methanol being used. Engines run cold on methanol, so overheating is raealy a problem, most methanol engines employ a lean out valve in order to warm them up. The methanol will also get past the oil rings and turn your sump oil to the consistency and colour of 'custard' |
| Thread: Prusa i3 Build |
| 26/04/2017 13:28:42 |
Acetone can be bought in bulk from any fibreglass supplier, I recently bought 25l of 'Cure-it' acetone for when I re-covered one of my flat roofs with fibreglass. |
| 24/04/2017 08:57:20 |
As previously mentioned I use kapton tape cleaned with acetone on a sheet of glass on top of my heated bed, I also have some foil backed insulating material under the bed to reflect back heat from underneath. I print PLA with the bed at 55C and the nozzle at 195C, sometimes 200C for the first layer. I only use a raft if the item has proven difficult to print without one, and only use a fan to cool the filament from about 10 layers up if there are likely to be overhangs that need it to prevent them curling up. Most items need to be prised off the bed with some force as they are stuck fast even when cold. For initial height setting prior to each print, I use a piece of paper and adjust until the paper just catches on the nozzle, I repeat this in a number of places around the bed for levelling. I do this with the bed hot as the bed may warp as it heats up and push the glass high somewhere unexpected. 3 point mounting is much easier to adjust than 4 point for the bed. For my Mini Kossel when that is complete, I am looking to use a 10mm thick disc of sanded acrylic for the bed with no heat, this will be a PLA only printer and means I can use one of my many small laptop power supplies to run it.. |
| 20/04/2017 09:39:56 |
I have also heard good things about BuildTak, but not tried it myself. I do not currently print with ABS, but I believe the bed needs to be around 110C for that to stick well. |
| 20/04/2017 08:04:10 |
I have a glass sheet on top of my heated bed that I cover with kapton tape (I bought a 100ft/30m reel of 50mm for less than £3.50 & free P&P from HK via Ebay), then I clean this before a new print, once it has heated up to around 55C, with acetone. I only replace the kapton tape when it starts to look messed up which is usually only after several dozen prints, I will be lucky if I use up the roll of tape in my lifetime. I printed all the parts for a 2020 Kossel mini, plus many others on the current layer of tape which I last changed over a year ago! |
| 19/04/2017 10:25:14 |
I redesigned my i3 and swapped the orientation of the X axis stepper to allow me to use shorter belts.
I have only ever used nylon tubing for my Z axis couplings and apart from one of them unscrewing itself on one occasion I have never had any issues with the Z axis. I added a tensioner to the X axis belt, as this was not easy to adjust as standard. I also switched to a Wades extruder from the bowden setup shown above. By far my biggest issue is with back EMF from the relay that switches my heated bed on and off, causing the X axis stepper to miss steps every so often. I use a Sanguinololu board (because they are dirt cheap) but they do not really have suitable traces for running a 10A heated bed, so I took the control off board. I use an Xbox 360 PSU for all power, I could probably resolve the issue if I split off the heated bed power from the stepper power with a separate PSU, but I can't be bothered at present, so I live with the issue. Edited By Zebethyal on 19/04/2017 10:25:39 |


Magazine Locator
Want the latest issue of Model Engineer or Model Engineers' Workshop? Use our magazine locator links to find your nearest stockist!
Sign up to our Newsletter
Sign up to our newsletter and get a free digital issue.
You can unsubscribe at anytime. View our privacy policy at www.mortons.co.uk/privacy
Latest Forum Posts
- hemingway ball turner
04/07/2025 14:40:26 - *Oct 2023: FORUM MIGRATION TIMELINE*
05/10/2023 07:57:11 - Making ER11 collet chuck
05/10/2023 07:56:24 - What did you do today? 2023
05/10/2023 07:25:01 - Orrery
05/10/2023 06:00:41 - Wera hand-tools
05/10/2023 05:47:07 - New member
05/10/2023 04:40:11 - Problems with external pot on at1 vfd
05/10/2023 00:06:32 - Drain plug
04/10/2023 23:36:17 - digi phase converter for 10 machines.....
04/10/2023 23:13:48 - More Latest Posts...
- View All Topics
Support Our Partners


Shopping Partners
Subscription Offer

Latest "For Sale" Ads
- Reeves** - Rebuilt Royal Scot by Martin Evans
by John Broughton
£300.00 - BRITANNIA 5" GAUGE James Perrier
by Jon Seabright 1
£2,500.00 - Drill Grinder - for restoration
by Nigel Graham 2
£0.00 - WARCO WM18 MILLING MACHINE
by Alex Chudley
£1,200.00 - MYFORD SUPER 7 LATHE
by Alex Chudley
£2,000.00 - More "For Sale" Ads...
Latest "Wanted" Ads
- D1-3 backplate
by Michael Horley
Price Not Specified - fixed steady for a Colchester bantam mark1 800
by George Jervis
Price Not Specified - lbsc pansy
by JACK SIDEBOTHAM
Price Not Specified - Pratt Burnerd multifit chuck key.
by Tim Riome
Price Not Specified - BANDSAW BLADE WELDER
by HUGH
Price Not Specified - More "Wanted" Ads...
Get In Touch!
Do you want to contact the Model Engineer and Model Engineers' Workshop team?
You can contact us by phone, mail or email about the magazines including becoming a contributor, submitting reader's letters or making queries about articles. You can also get in touch about this website, advertising or other general issues.
Click THIS LINK for full contact details.
For subscription issues please see THIS LINK.
Digital Back Issues


Donate

 Register
 Log-in
Model Engineer Magazine
- Percival Marshall
- M.E. History
- LittleLEC
- M.E. Clock

ME Workshop
- An Adcock
- & Shipley
- Horizontal
- Mill

Subscribe Now
- Great savings
- Delivered to your door

Pre-order your copy!
- Delivered to your doorstep!
- Free UK delivery!