Forum sponsored by:

Adding a microswitch to Carl Wilson's Arduino Controlled Indexer - MEW249 refers
| Greensands | 30/06/2022 19:30:58 |
| 449 forum posts 72 photos | I have made up the Carl Wilson's Arduino controlled indexer as described in MEW249 and have been using it for machining Hex bar stock on my 3-axis stepper motor controlled milling machine. So far, so good but I would like to be able to fit a microswitch on the X axis of the mill in order to auto advance the Arduino by the required 60 degrees in place of (or in parallel with) manual activation of the On-Off-On Mom switch provided by Carl. .Can anyone suggest how this might be done as early tests have not proved to be successful. |
| Huub | 30/06/2022 22:53:57 |
| 220 forum posts 20 photos | I am not familiar with the Carl Wilson's Arduino controlled indexer! You could use UGS, a gcode sender that has user defined buttons. The button can be linked to a line of gcode that could rotate the table 60°. UGS is compatible to a lot of grbl versions. I control my rotary table using an ESP32 controller running grbl_ESP32_R (or grbl_ESP32). These grbl versions can send a command as a respond to a switch being pressed. The command could be a gcode that instructs the table to rotate 60°. |
| John Haine | 01/07/2022 11:33:32 |
| 5563 forum posts 322 photos | If you have a stepper power feed on the x axis as well, then GRBL can move the x axis back and forth and drive the divider too, controlled with a few lines of gcode from UGS. |
| SillyOldDuffer | 02/07/2022 13:16:04 |
| 10668 forum posts 2415 photos | Maybe, but I can't find my copy of MEW249. Is Carl's code and wiring available on the web? Carl does the change manually with an on/off/on momentary switch. I don't know of an off-the-shelf switch that does that but they're quite likely to exist if you know where to look! Might be easier to make a wiper switch to fit on the lathe. I think it's easier to do off/on/off and have the Arduino invert the logic. A contact mounted on the saddle, which is earthed, passes over an insulated contact held at 5V via a resistor, causing a pin the Arduino to register logic 1,0,1:
Main problem is likely to be debouncing and cleaning up the signal presented to the Arduino. Unfortunately, good earths by sparky electrician standards are often a heap of filth in telecommunications! Trouble is microcontrollers are switched by low voltages and react in microseconds. They easily detect that most mechanical switches don't make or break cleanly and bounce many times over tens of milliseconds. They also react to any other low level electrical noise present. Step one is to try the circuit without a debounce capacitor. If operation is unreliable, try adding a capacitor between 0.01 and 0.1 microfarads. It may be necessary to experiment. With luck the capacitor stores enough charge to fill short negative spikes so the Arduino never sees them, and also decouples any AC on the line to ground, but it's a mild bodge. More elaborate filtering and debouncing may be necessary. Mucky signals are the bane of microcontrollers. Might even be the reason why what's already been tried isn't working. Dave Edited By SillyOldDuffer on 02/07/2022 13:16:26 |
| John Haine | 02/07/2022 13:24:54 |
| 5563 forum posts 322 photos | easybutton.h is your friend... |
| Robert Atkinson 2 | 02/07/2022 15:22:58 |
 1891 forum posts 37 photos | You should be able to just put a push putton or microswitch in parallel with the relevant side of the existing on-off-on toggle switch. If it's random operation try using screened cable to connect the switch. Robert G8RPI. |
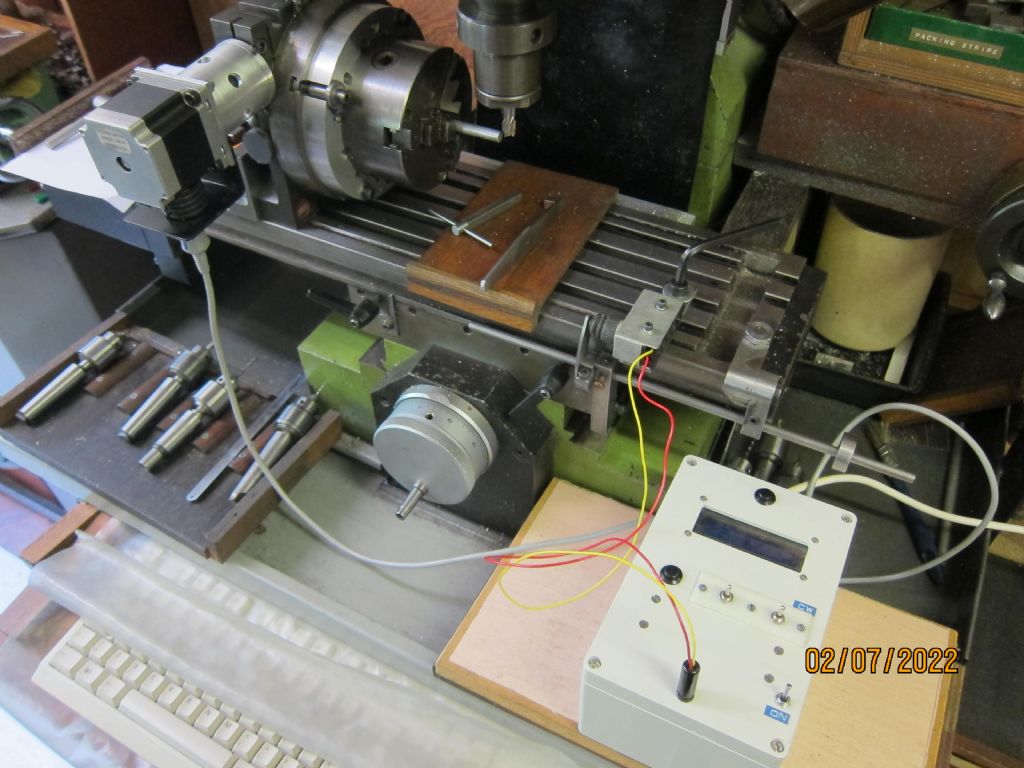
| Greensands | 02/07/2022 15:50:12 |
| 449 forum posts 72 photos | Have now been able to get the microswitch circuit working as required, Not sure what the original problem was as all that was required is to wire the microswitch across the On-Off-On Mom switch and bring it out to the front panel via a 3.5mm jack plug as seen in the photo. Net result is that the RT is now activated through 60 degrees at the end of each pass along the X-Dirn to complete the Hex cut
|

Please login to post a reply.
Magazine Locator
Want the latest issue of Model Engineer or Model Engineers' Workshop? Use our magazine locator links to find your nearest stockist!
Sign up to our Newsletter
Sign up to our newsletter and get a free digital issue.
You can unsubscribe at anytime. View our privacy policy at www.mortons.co.uk/privacy
Latest Forum Posts
- hemingway ball turner
04/07/2025 14:40:26 - *Oct 2023: FORUM MIGRATION TIMELINE*
05/10/2023 07:57:11 - Making ER11 collet chuck
05/10/2023 07:56:24 - What did you do today? 2023
05/10/2023 07:25:01 - Orrery
05/10/2023 06:00:41 - Wera hand-tools
05/10/2023 05:47:07 - New member
05/10/2023 04:40:11 - Problems with external pot on at1 vfd
05/10/2023 00:06:32 - Drain plug
04/10/2023 23:36:17 - digi phase converter for 10 machines.....
04/10/2023 23:13:48 - More Latest Posts...
- View All Topics
Support Our Partners


Shopping Partners
Subscription Offer

Latest "For Sale" Ads
- Reeves** - Rebuilt Royal Scot by Martin Evans
by John Broughton
£300.00 - BRITANNIA 5" GAUGE James Perrier
by Jon Seabright 1
£2,500.00 - Drill Grinder - for restoration
by Nigel Graham 2
£0.00 - WARCO WM18 MILLING MACHINE
by Alex Chudley
£1,200.00 - MYFORD SUPER 7 LATHE
by Alex Chudley
£2,000.00 - More "For Sale" Ads...
Latest "Wanted" Ads
- D1-3 backplate
by Michael Horley
Price Not Specified - fixed steady for a Colchester bantam mark1 800
by George Jervis
Price Not Specified - lbsc pansy
by JACK SIDEBOTHAM
Price Not Specified - Pratt Burnerd multifit chuck key.
by Tim Riome
Price Not Specified - BANDSAW BLADE WELDER
by HUGH
Price Not Specified - More "Wanted" Ads...
Get In Touch!
Do you want to contact the Model Engineer and Model Engineers' Workshop team?
You can contact us by phone, mail or email about the magazines including becoming a contributor, submitting reader's letters or making queries about articles. You can also get in touch about this website, advertising or other general issues.
Click THIS LINK for full contact details.
For subscription issues please see THIS LINK.
Digital Back Issues


Donate

 Register
 Log-in
Model Engineer Magazine
- Percival Marshall
- M.E. History
- LittleLEC
- M.E. Clock

ME Workshop
- An Adcock
- & Shipley
- Horizontal
- Mill

Subscribe Now
- Great savings
- Delivered to your door

Pre-order your copy!
- Delivered to your doorstep!
- Free UK delivery!
All Forum Topics > Help and Assistance! (Offered or Wanted) > Adding a microswitch to Carl Wilson's Arduino Controlled Indexer - MEW249 refers