Radius curves from drawings (example R66)
Not sure how to take the measurement and transfer to work piece
| Alex Gibson 1 | 23/06/2021 15:49:42 |
| 3 forum posts 1 photos | Hi all Sorry if this is a silly question.
How do you put the radius from a drawing into your practical work, ai am a little stuck with understanding the process or how to measure and mark onto a work piece, for example the drawing is showing R66 (measured in mm).
Thanks inadvance
Alex |
| Nigel Graham 2 | 23/06/2021 15:58:41 |
| 3293 forum posts 112 photos | If you mean from a centre off the work or its stock material, one way is to clamp the work to a marked-out surface with the centre on that. If the workpiece is thick you would need mark the centre on a block or something to reduce the triangulation error introduced by the height difference. It may help obtain a better answer if you can supply a photo of what you're trying to achieve. |
| JasonB | 23/06/2021 16:28:42 |
25215 forum posts 3105 photos 1 articles | A photo of that part of the drawing would help us give some more specific answers, details of how to add photos here or say what the drawing is for If for example a large flat plate has a R66 corner I would measure in from each of the two edges and lightly mark a line 66mm in. Where the two lines intersect put a light dot punch mark and then set your dividers to 66mm place one point in the dot punch mark and then draw the corner radius with them like a compass. As for cutting to that line then rough sawing and filing is one way and there are several other options depending on what tools you have available. |
| duncan webster | 23/06/2021 16:32:29 |
| 5307 forum posts 83 photos | It all depends on how important the R66 is. If it matters then use the methods above, if it is cosmetic find a saucer/plate/tin etc can of the approximate dimension and draw round it |
| Alex Gibson 1 | 23/06/2021 17:17:16 |
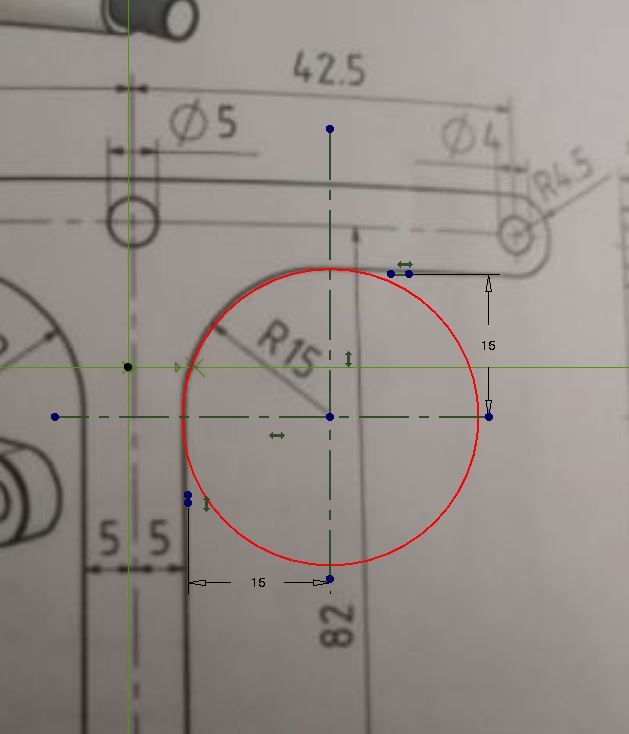
| 3 forum posts 1 photos | An example from the drawing: Mod edit: for convenience here it is, and the right way up!
Edited By SillyOldDuffer on 23/06/2021 17:37:02 |
| JasonB | 23/06/2021 17:41:33 |
25215 forum posts 3105 photos 1 articles | More or less as I said above draw two lines 15mm from each edge of the "tee" shape as you mark out the sheet of metal. punch where they meet and then draw a circle of 15mm radius. When it comes to making the part you may want to make a 30mm dia hole in that location first and then cut the straight lines or simply file the radius after machining of filing the two straight edges
Edited By JasonB on 23/06/2021 18:17:14 |
| old mart | 23/06/2021 18:41:59 |
| 4655 forum posts 304 photos | In the case of the drawing shown, the exact radius is not vital,and could vary. I notice that the material is not vital either, (ALU/MS). |
Please login to post a reply.
Want the latest issue of Model Engineer or Model Engineers' Workshop? Use our magazine locator links to find your nearest stockist!
Sign up to our newsletter and get a free digital issue.
You can unsubscribe at anytime. View our privacy policy at www.mortons.co.uk/privacy
- hemingway ball turner
04/07/2025 14:40:26 - *Oct 2023: FORUM MIGRATION TIMELINE*
05/10/2023 07:57:11 - Making ER11 collet chuck
05/10/2023 07:56:24 - What did you do today? 2023
05/10/2023 07:25:01 - Orrery
05/10/2023 06:00:41 - Wera hand-tools
05/10/2023 05:47:07 - New member
05/10/2023 04:40:11 - Problems with external pot on at1 vfd
05/10/2023 00:06:32 - Drain plug
04/10/2023 23:36:17 - digi phase converter for 10 machines.....
04/10/2023 23:13:48 - More Latest Posts...
- View All Topics
- Reeves** - Rebuilt Royal Scot by Martin Evans
by John Broughton
£300.00 - BRITANNIA 5" GAUGE James Perrier
by Jon Seabright 1
£2,500.00 - Drill Grinder - for restoration
by Nigel Graham 2
£0.00 - WARCO WM18 MILLING MACHINE
by Alex Chudley
£1,200.00 - MYFORD SUPER 7 LATHE
by Alex Chudley
£2,000.00 - More "For Sale" Ads...
- D1-3 backplate
by Michael Horley
Price Not Specified - fixed steady for a Colchester bantam mark1 800
by George Jervis
Price Not Specified - lbsc pansy
by JACK SIDEBOTHAM
Price Not Specified - Pratt Burnerd multifit chuck key.
by Tim Riome
Price Not Specified - BANDSAW BLADE WELDER
by HUGH
Price Not Specified - More "Wanted" Ads...
Do you want to contact the Model Engineer and Model Engineers' Workshop team?
You can contact us by phone, mail or email about the magazines including becoming a contributor, submitting reader's letters or making queries about articles. You can also get in touch about this website, advertising or other general issues.
Click THIS LINK for full contact details.
For subscription issues please see THIS LINK.
Model Engineer Magazine
- Percival Marshall
- M.E. History
- LittleLEC
- M.E. Clock
ME Workshop
- An Adcock
- & Shipley
- Horizontal
- Mill
Subscribe Now
- Great savings
- Delivered to your door
Pre-order your copy!
- Delivered to your doorstep!
- Free UK delivery!


 Register
 Log-in


