Forum sponsored by:

Further Adventures with the Sieg KX3 & KX1
A thread for new owners of these machines to post in.
| JasonB | 04/03/2020 20:54:43 |
 25215 forum posts 3105 photos 1 articles | I wanted an oval shaped base for a small model so decided to use a bit of Corian. I cut a rectangle a little over the desired 80mm x 60mm and drilled the holes for mounting the engine which were then used to hold the part onto a block of aluminium that could easily be held in a vice and allow the edge of the tool to be used without risk to the jaws. Profile is with a 10mm 4-flute carbide cutter running at 5000rpm and feed rate of 450mm/min, full 12mm height and 2mm per roughing pass with a 1mm to finish. The moulded edge wa sdone using a router but at a slow 5000rpm and the same 450mm/min feed, I would usually be running this at 20,000rpm plus in a router but it gave a good finish at that feed rate. Only downside is the confetti that is attracted to any surface |
| Ron Laden | 05/03/2020 05:33:22 |
 2320 forum posts 452 photos | There are two things I like about it Jason, it's not wood and it's not round. Nothing wrong with a round wooden base of course but I think it good to see something a bit different now and then. You have mentioned Corian before I will have to see if I can find someone local and get some offcuts. |
| John Haine | 05/03/2020 06:48:29 |
| 5563 forum posts 322 photos | Corian is lovely stuff to machine, even at low speeds - also fine with normal milling cutters. Local guy round here does Corian kitchen & bathroom surfaces, has a skip full of stuff too small for his uses but plenty big enough for many ME bits. |
| JasonB | 05/03/2020 07:05:47 |
25215 forum posts 3105 photos 1 articles | Ron, I have shown it being used in several builds, couple more engine bases including one early in this thread, Basis for an old style knife switch and several times as an insulator for ignition parts. As John says it is nice to machine but can be a bit brittle and snap if you use it for the wrong part. You may also like this which is neither wood or round.
|
| Joseph Noci 1 | 05/03/2020 07:09:41 |
| 1323 forum posts 1431 photos | Hopefully not to far of topic - does go on about Corian though... I use Corian for moulds for the wings and fuselage of the small UAV below - Corian is fantastic for this. Holds a very fine edge very well in machining, and imparts that same fine edge to the composite in the mold. Corian also polishes up very well, and will leave a glossy finish on the molded product. Molds were made on a large CNC machine, for wings and fuselage. The Wing upper mold took 8 hours, the lower, 5 hours. Fuselage halves took 6 hours each. Wing has 3meter span. The molds are rigid, no bend of flop to them, and very stable under temp - we bake the mold with internal composite parts at 90degC for 2 hours - the molds hold the shape very well. Really an amazing material. The molds for this plane are at the workshop and I find I have no photos of them! - I will get photos at some point if anyone is interested. Joe
Edited By Joseph Noci 1 on 05/03/2020 07:14:23 |
| Ron Laden | 05/03/2020 13:23:54 |
2320 forum posts 452 photos | Will have to get some, I can think of a few uses for it but no I wont be making a toilet seat though it does look good. I think I remember a curved lid which you made for a box, that was impressive also. Ron |
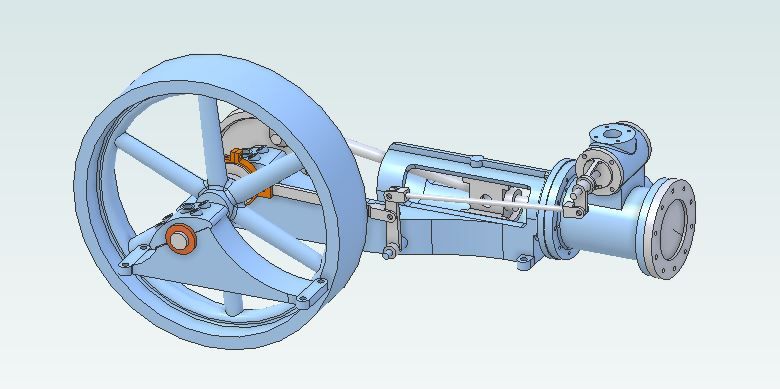
| JasonB | 08/04/2020 17:13:31 |
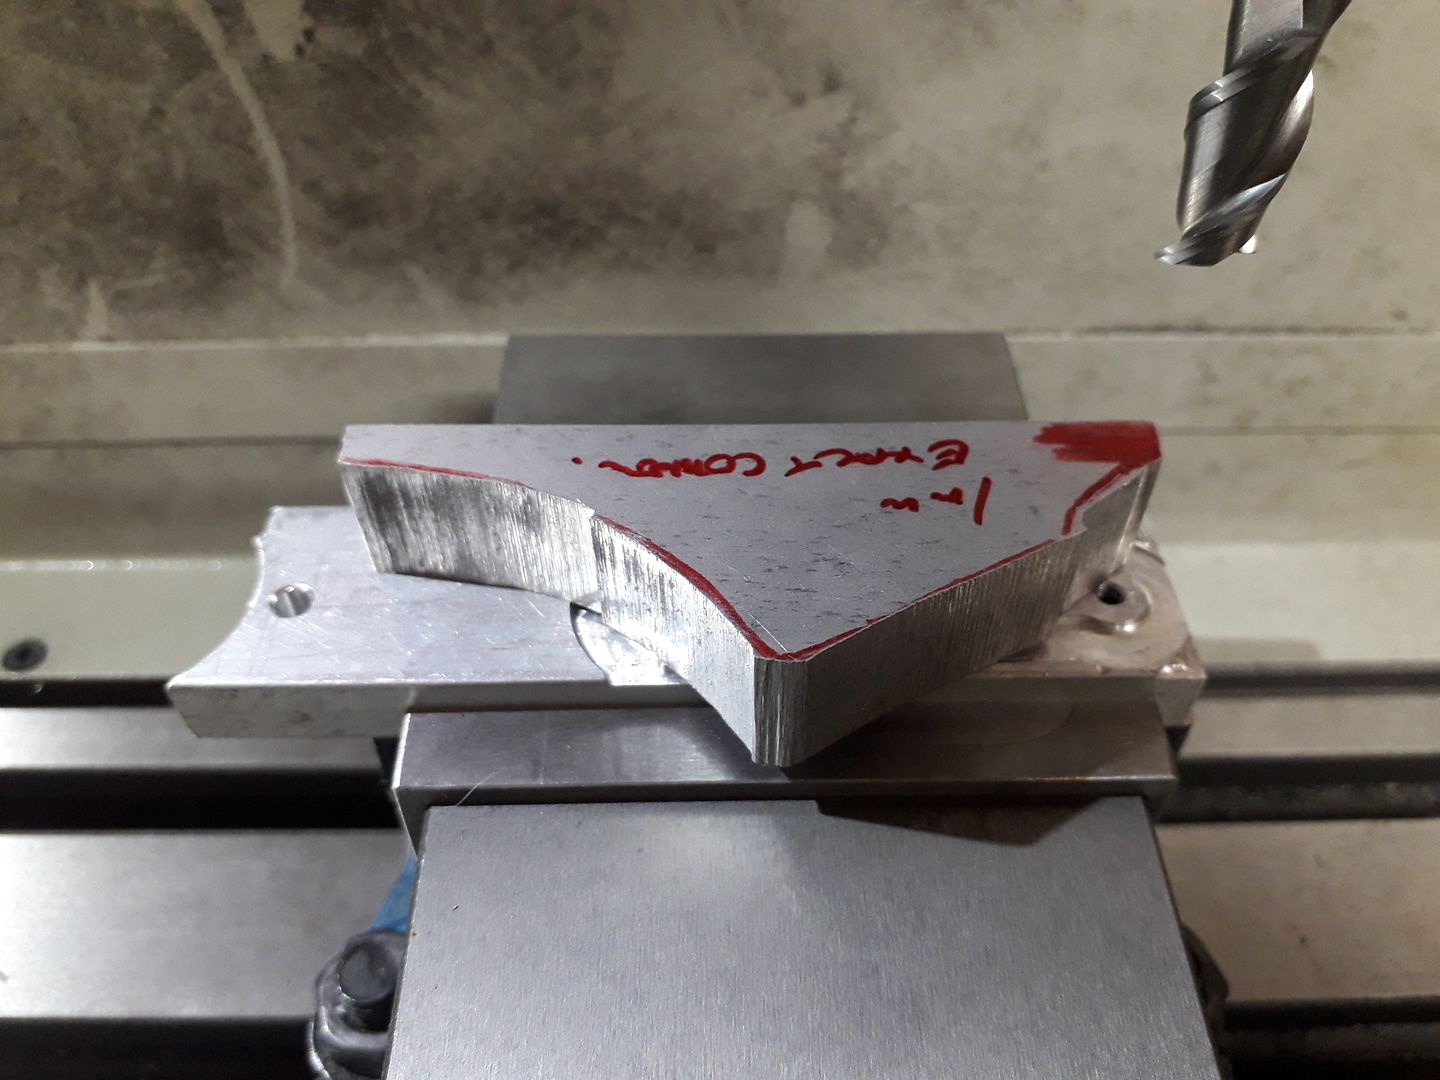
25215 forum posts 3105 photos 1 articles | The current lockdown has allowed me to spend a bit more time on the darkside I was not going to bother videoing this but with the other thread about profile cuts thought I would. I did two tool paths in F360, one a roughing contour leaving 2.5mm stock all round and then the final contour taken at the full 16mm depth of the material in 0.5mm depths with a 0.25mm finish past & a spring pass which was not really needed. However I actually did the roughing on the vertical bandsaw to a Sharpie line drawn around a paper template so only needed to run the second path. This shows the smaller of the two parts which is tapped and screwed to some scrap being held in the vice so the tool can extend just below the bottom of the work.
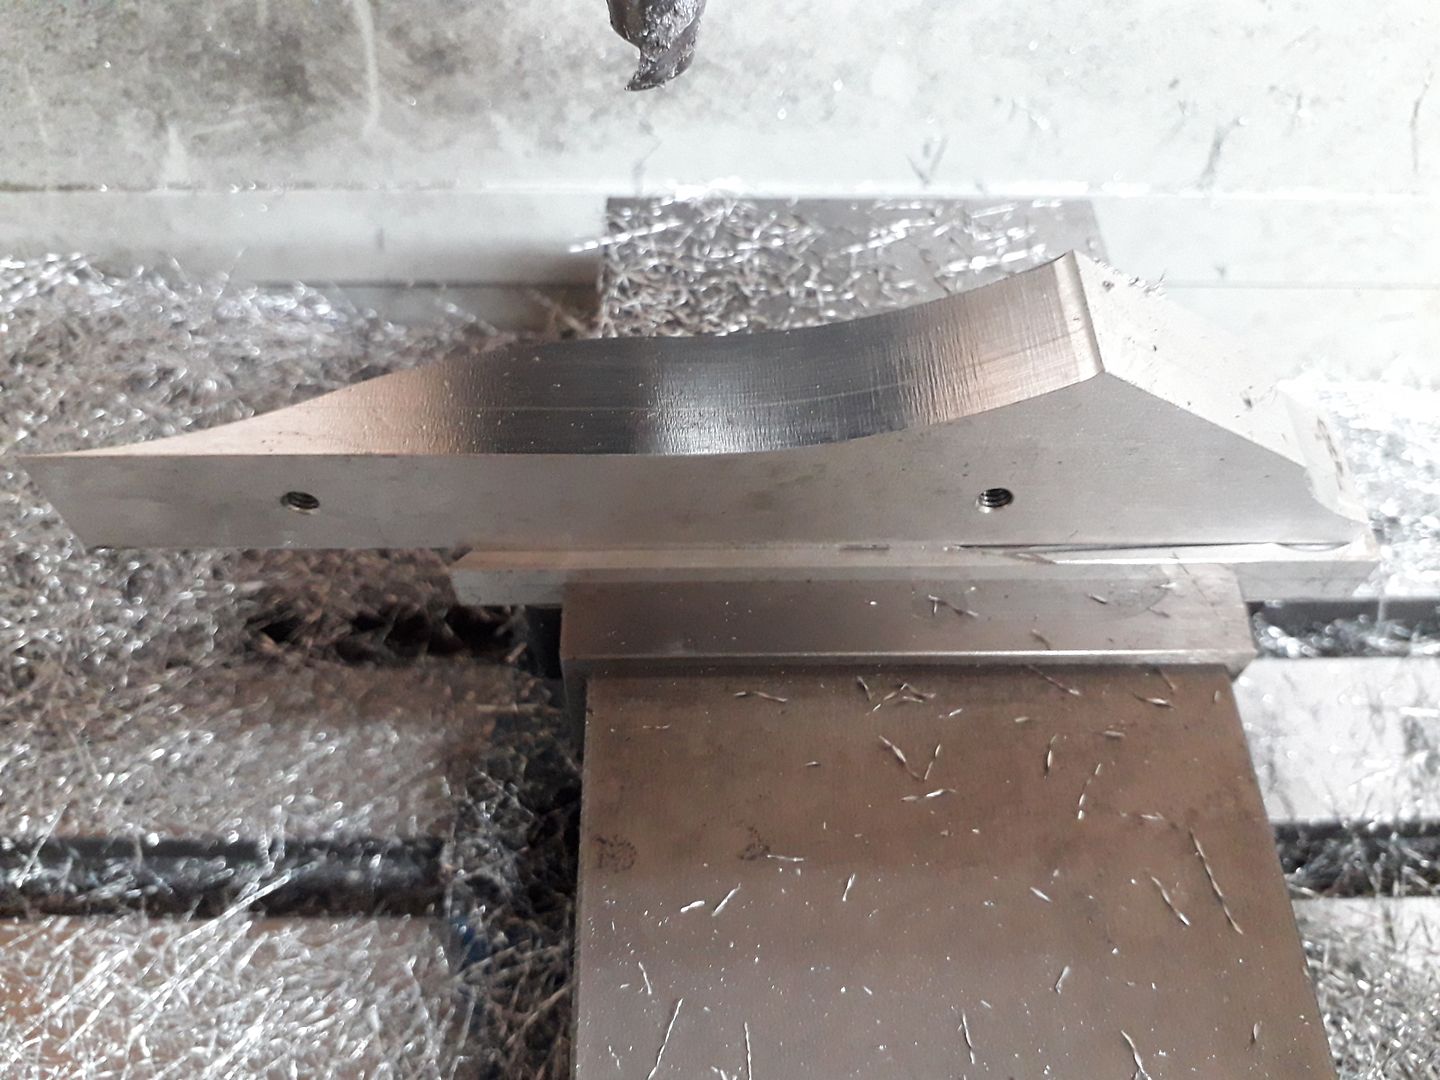
This is the larger part being milled with one of ARC's 10mm dia aluminium specific cutters running at 4000rpm and feed at 300mm/min. Quite pleased with the finish from what is a quiet well used cutter as you can see from my finger reflection if you skip to the end. It was then mounted the right way up to mill the "S" shape on what will be the side.
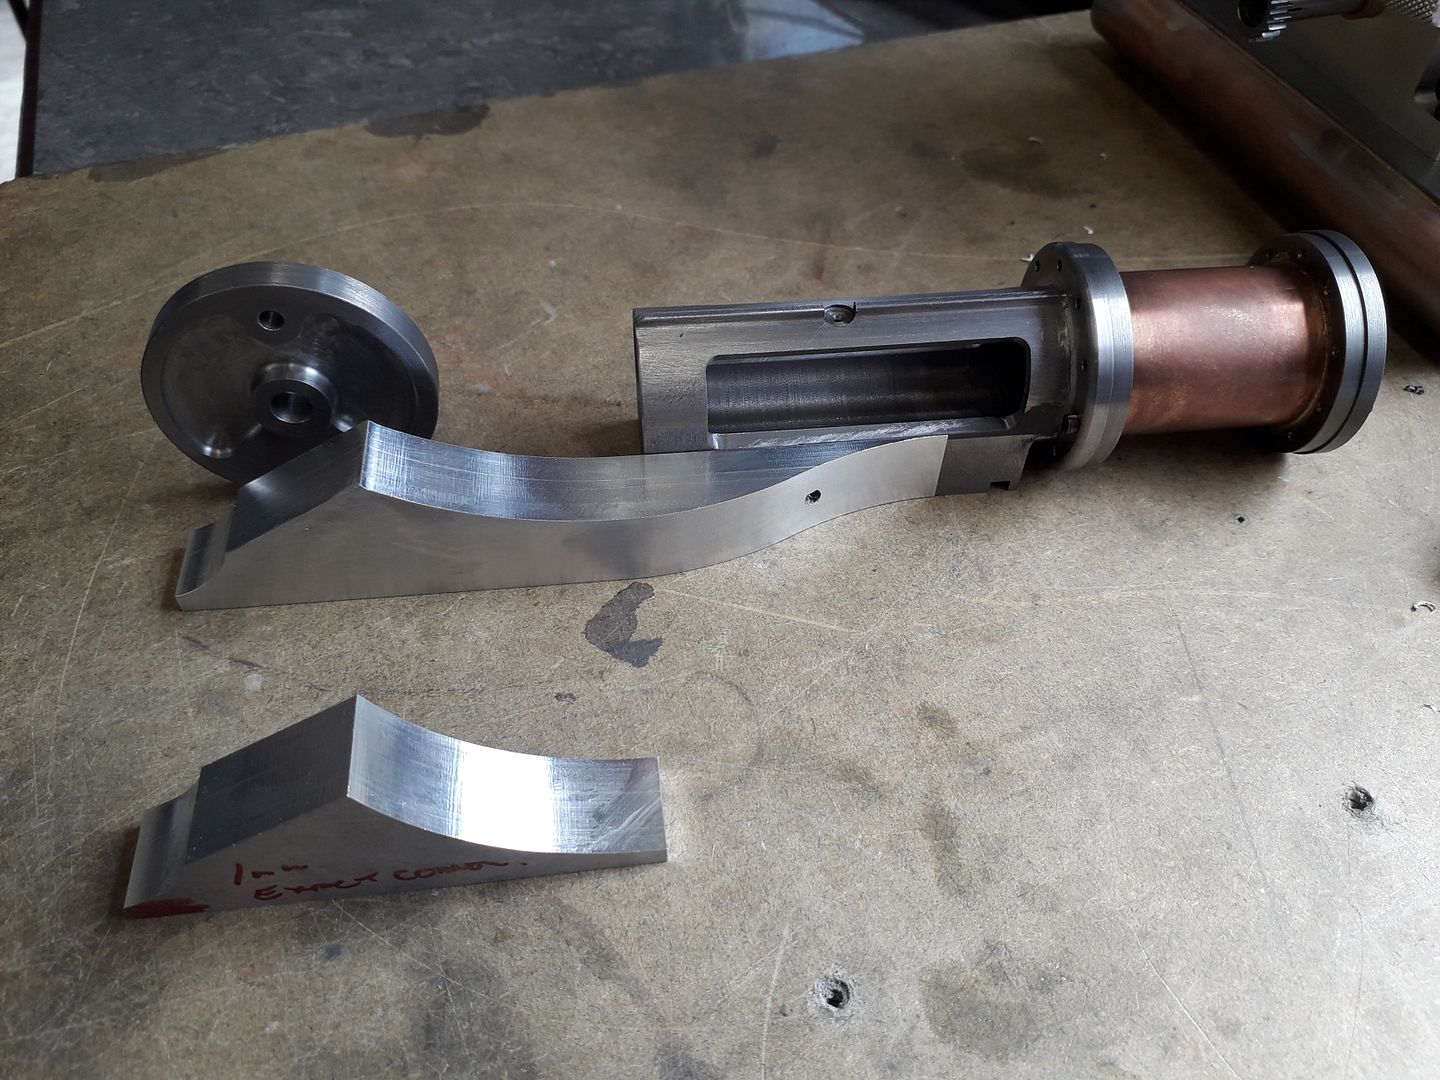
Can you tell what it is yet?
The crank disc in the photo above had the recesses either side done on the CNC as did the cylinder end cover and its boss which were both shaped at the same time.
J |
| Ron Laden | 09/04/2020 11:26:06 |
2320 forum posts 452 photos | Nice work Jason, great finish on the aluminium. I have no idea what it is except there are some interesting shapes there especially the piece next to the cylinder |
| Baz | 09/04/2020 12:28:11 |
| 1033 forum posts 2 photos | I know what it is! It’s Jason’s next build thread complete with drawings👍😄 |
| JasonB | 09/04/2020 13:05:22 |
25215 forum posts 3105 photos 1 articles | You'll be lucky!
|
| Ian Johnson 1 | 09/04/2020 14:38:36 |
| 381 forum posts 102 photos | Nice work Jason and that 's' shaped piece was held nice and firmly by those two screws Ian |
| Sarah | 09/04/2020 15:07:18 |
| 27 forum posts 4 photos | Hi, I have had a break of a few years using my KX1 mill and one job I wanted to do last time I used it was to check the spindle speed, I always thought it was on the low side. As I'm waiting for some new cutters I did a spindle speed test and got the following results. I did check the tachometer on a couple of other machines and it seems quite accurate. Requested RPM Actual RPM 1000 831 I was surprised it was that far out. I found an article on KX1 motor tuning and tried to adjust the spindle motor movement profile. I increased the Velocity and was pleased when I achieved 7,000rpm within 50rpm. I saved the axis settings, pressed okay and went back to the normal display. Unfortunately next time I selected a spindle speed it had dropped again. I checked the spindle motor movement profile again, it had retained the new Velocity figures but the Step Pulse had changed from 4us to 3us. though I tried quite a few things I cant get Mach3 to retain the Step Pulse figure. The setting were: Steps per: 100, Velocity 6000 (changed to 7800), Acceleration: 500, G's: 0.050988, Step Pulse 4 (system changed to 3). Has anyone else changed the spindle speed ? There are a few variables on the Motor Tuning page, but I dont know what they really do and I'm reluctant to change things that I don't understand in case I damage anything.
i would again be grateful for any help.
Many thanks, Sarah |
| Andrew Johnston | 09/04/2020 15:15:21 |
 7061 forum posts 719 photos | I managed to fine tune spindle speed some years ago in Mach3 and I don't recall it being that difficult. However I was using the Tormach version of Mach3, so that might have been subtly different. I no longer have the system as I now use Tormach PathPilot; altogether leaps and bounds ahead of Mach3. I'm amazed the speeds are so far out. I think mine were only a percent or two. I wanted them accurate for use with a tension/compression tapping head. Andrew |
| JasonB | 09/04/2020 15:33:41 |
25215 forum posts 3105 photos 1 articles | Have not felt the need to check the speed of my KX3 but will get the tacho out tomorrow and see what it is running at. Don't suppose you have hit the 10% override a couple of times? |
| Sarah | 09/04/2020 15:40:54 |
| 27 forum posts 4 photos | i was surprised as well that the speeds are that far out. I did think it was simple, I just changed the Velocity value from 6000 to 7800 and it was just right. It just wouldn't retain the pulse width value, I tried saving the values in slightly different ways but I couldn't get the pulse width to stay at 4us. I did wonder if the difference in velocity values was responsible? I didn't hit the over ride, just double checked anyway. I would be grateful for your Mach3 settings. Regards, Sarah Edited By Sarah on 09/04/2020 15:57:56 |
| Ian Johnson 1 | 09/04/2020 17:02:43 |
| 381 forum posts 102 photos | Hi Sarah I adjusted the top speed of my KX1 from 5000rpm to 7000rpm! It was an easy process in the settings and I don't remember altering the pulse settings, but it was a long time ago and I've had a sleep since then! I rely on mach 3 to tell me what revs the machine is doing. Might be time to check my machine too! Ian |
| Sarah | 09/04/2020 17:46:59 |
| 27 forum posts 4 photos | Hi Ian, Would you be able to let me have your settings please 😊 The pulse settings changed them selves from 4us to 3us after I increased the velocity, which then put the speed back down. Jus coildnt get them to change back to 4us.
Thanks. Edited By Sarah on 09/04/2020 17:47:44 |
| Adam Stevenson | 09/04/2020 19:05:26 |
| 35 forum posts 1 photos | You will need a speed testing device to check the speeds. Click on the config menu and select the Motor Tuning item. This will bring up the Motor Tuning window. |
| Andrew Johnston | 09/04/2020 19:17:25 |
7061 forum posts 719 photos | I suspect that what I did isn't relevant. Looking at the manual I changed a parameter in a settings folder to get a specific frequency shown on the VFD display. So clearly I'm running an induction motor. I don't know what motor the Sieg machines use. Andrew |
| Sarah | 09/04/2020 19:32:28 |
| 27 forum posts 4 photos | Hi Adam, Thank you for typing all that in 😊 That's the procedure that I used, worked fine as I increased the Velocity value until it was within 10 rpm, then I pressed the Save Axis Settings and Okay. Back at the main screen I types in the speed required and it sounded a bit slow again. I tacho'ed it again and the speed had dropped. When I checked the Motor Tuning and Setup screen it had retained my new Velocity figure, but the Step Pulse had dropped from 4 to 3us. Changing it to 4 brought the speed back up, but whenever I left that screen it reverted to 3us. Got quite frustrated! I don't know if I need to alter the Steps per parameter? Regards,
Sarah |


Please login to post a reply.
Magazine Locator
Want the latest issue of Model Engineer or Model Engineers' Workshop? Use our magazine locator links to find your nearest stockist!
Sign up to our Newsletter
Sign up to our newsletter and get a free digital issue.
You can unsubscribe at anytime. View our privacy policy at www.mortons.co.uk/privacy
Latest Forum Posts
- *Oct 2023: FORUM MIGRATION TIMELINE*
05/10/2023 07:57:11 - Making ER11 collet chuck
05/10/2023 07:56:24 - What did you do today? 2023
05/10/2023 07:25:01 - Orrery
05/10/2023 06:00:41 - Wera hand-tools
05/10/2023 05:47:07 - New member
05/10/2023 04:40:11 - Problems with external pot on at1 vfd
05/10/2023 00:06:32 - Drain plug
04/10/2023 23:36:17 - digi phase converter for 10 machines.....
04/10/2023 23:13:48 - Winter Storage Of Locomotives
04/10/2023 21:02:11 - More Latest Posts...
- View All Topics
Support Our Partners


Shopping Partners
Subscription Offer

Latest "For Sale" Ads
- Reeves** - Rebuilt Royal Scot by Martin Evans
by John Broughton
£300.00 - BRITANNIA 5" GAUGE James Perrier
by Jon Seabright 1
£2,500.00 - Drill Grinder - for restoration
by Nigel Graham 2
£0.00 - WARCO WM18 MILLING MACHINE
by Alex Chudley
£1,200.00 - MYFORD SUPER 7 LATHE
by Alex Chudley
£2,000.00 - More "For Sale" Ads...
Latest "Wanted" Ads
- D1-3 backplate
by Michael Horley
Price Not Specified - fixed steady for a Colchester bantam mark1 800
by George Jervis
Price Not Specified - lbsc pansy
by JACK SIDEBOTHAM
Price Not Specified - Pratt Burnerd multifit chuck key.
by Tim Riome
Price Not Specified - BANDSAW BLADE WELDER
by HUGH
Price Not Specified - More "Wanted" Ads...
Get In Touch!
Do you want to contact the Model Engineer and Model Engineers' Workshop team?
You can contact us by phone, mail or email about the magazines including becoming a contributor, submitting reader's letters or making queries about articles. You can also get in touch about this website, advertising or other general issues.
Click THIS LINK for full contact details.
For subscription issues please see THIS LINK.
Digital Back Issues


Donate

 Register
 Log-in
Model Engineer Magazine
- Percival Marshall
- M.E. History
- LittleLEC
- M.E. Clock

ME Workshop
- An Adcock
- & Shipley
- Horizontal
- Mill

Subscribe Now
- Great savings
- Delivered to your door

Pre-order your copy!
- Delivered to your doorstep!
- Free UK delivery!
All Forum Topics > CNC machines, Home builds, Conversions, ELS, automation, software, etc tools > Further Adventures with the Sieg KX3 & KX1