Forum sponsored by:

Merryweather Fire King
| Bob Wild | 26/01/2022 16:53:37 |
| 99 forum posts 77 photos | Hi (also Bob) I used Hammerite smooth gloss (not the old hammer finish). On the tin it said that primer was not required. So that is what I did. I did rub it down after four coats and then treat it with car polish. I'm quite happy with the result, but we shall see what it's like in the long term. Unfortunately, I'm no expert in these matters, so it is very much a matter of learning from experience! Bob |
| Bob Wild | 11/02/2022 22:38:42 |
| 99 forum posts 77 photos | Who said model engineering was interesting and challenging ? Got to make fifty six of theses little blighters to locate the wheel spokes !
And then there's the little matter of fifty six spokes.
Bob Edited By Bob Wild on 11/02/2022 22:42:13 |
| Bob Wild | 28/02/2022 11:11:13 |
| 99 forum posts 77 photos | Good progress with the wheels. I thought I'd show some of my machining operations as I was using a faceplate for the first time. Any comments from the experts would be post appreciated. My idea was to build the whole assembly on a disc of aluminium which could be moved between the faceplate and the mill rotary table without moving any parts. This way I would (hopefully) maintain concentricity. The outer rim was made from four strips of brass pinned and glued together:
Mounted on the faceplate I machined the outer diameter:
Then the inner diameter:
Because of the size of the rim I couldn't figure out how to machine the tyre groove on the OD, so I transferred to the rotary table and slowly milled the groove:
I also drilled the holed for the axles with the same setup. Then on the bench I could assemble the axles and the hub:
I was disappointed to realise that when I machined the tyre groove most of the pins I had put in to hold it all together had been nearly machined away and the whole assembly looked a bit flimsy. So I decided to add a brass tyre at the bottom of the groove and screw that in place. That seemed to work well, but it did reduce the depth of the groove from 8mm to 6 mm. Fortunately I already had the neoprene square section for the tyres and with a bit if experimenting found I could mill 2mm off the thickness - disaster averted. So here is one of the finished wheels. Not sure how to bond the neoprene tyre to the rim though. Any suggestions?
Bob |
| Werner Schleidt | 28/02/2022 15:22:05 |
 158 forum posts 180 photos | Hi Bob, I use on my small fire engine ,a little bit bigger than yours, wooden wheels. The rubber was a band 20 mm wide and 5 mm thick . The rubber Band was glued together with second glue cyan acrilate. The rubber ring was a liitle bit smaller in diameter. So i have to use two screwdriver to pull it on. As adhesive i used contact glue. This fire engine is radio controlled and have a weight of 20 kg. After a few days of driving one tire came off in a curve during steering. I sanded the glue away and made the surface rough and glue it again. After that it was no problem. On my Merrywheather Fire King i have a few time the problem that the glue came off the steel tire. I read in the traction talk forum that some use polyurethan glue from a british trader. With this tip i found in ebay from UHU and Pattex polyurethan glue for craftsmen workers. With this i made several test trys and this glue is much more elastic and i made measurements and found that the factory data are correct. It worked perfect for glueing metal to rubber ,for shoe repair and many other difficult things where i was not able to glue before. My problem on the fireking was that the epoxy glue is to hard and was destroyed after driving of compound cuble stones. They hit permanent against the rubber metal surface and so the connection to the metal surface was destroyed. I hope you get some additional practice informations. keep up the good work Werner |
| Bob Wild | 01/03/2022 11:52:07 |
| 99 forum posts 77 photos | Hi Werner, I haven't seen your radio controlled fire engine. Are there any posts about it? You certainly seem to have had fun with your tyres. That's a good idea about UHU. I was thinking of using some similar type of contact adhesive. Maybe the kind used to bond car windscreen rubber in place or an impact adhesive like Evo-stick.. I'll do a few experiments. Bob |
| Bob Wild | 19/03/2022 15:51:18 |
| 99 forum posts 77 photos | Finally got the wheels finished, including some gold striping. Quite pleased with the results. The lines could have been wider, but that was the maximum my pen would open.
Added minor details to be more like the real thing. The rear wheels have an extra (strengthening?) ring. The chain wheel was solid when I got it, so I machined some spokes for authenticity. Also each hub has a funny fitting in the centre. Not sure what they are; grease boxes perhaps ?
And finally it is starting to look like a fire engine:
|
| Paul Lousick | 19/03/2022 21:35:16 |
| 2276 forum posts 801 photos |
Thicker lines can be painted with a Beugler pinstriping tool. Rollers are available in different widths. |
| Bob Wild | 05/09/2022 22:59:50 |
| 99 forum posts 77 photos | A major milestone today! Cut the gears, which was a new experience for me. Not too many problems once I got the hang of the dividing head. Since I moved the valve eccentrics ages ago I couldn't use the engagement lever as Julius designed it. So I had to resort to what is probably an unorthodox but effect design of my own. The gear slides in a clevis which is moved in and out with a square shaft. A pin is used to lock the clevis in either the engaged or disengaged position. Here are the parts of the assembly (the chain wheels are proprietary items) :
And this is the complete assembly:
And here installed in the engine:
And finally I have drive to the wheels. Fitting the chains was a nightmare. To start with I made the chains such that they just fitted with a minimum of play. But the links kept jamming. So I tried making them a bit longer. But you can't get a bit longer because you have to increase by one whole link. The end result means that the chain flaps around terribly. So I'm going to try inserting some sort of tensioner. Anyway the engine does drive the wheels which to me is a major achievement. I was quite pleased that the control valve does indeed control the speed. Pity the wheels are a bit wobbly, so I'll have to have a look at that!
|
| Werner Schleidt | 06/09/2022 07:36:46 |
158 forum posts 180 photos | Hi Bob, it look nice running. To the length of the chain you have to think when the fireking is on its wheels yo have a length change by compressing the axle springs. I do not know how much it is on your small engine , but it is not negligible. In addition normally there are bars to adjust the tension of the chains. Werner |
| Roger Best | 06/09/2022 12:28:59 |
 406 forum posts 56 photos | It all looks terrific Bob, a work of art. Paint is a real nag, I am building a booth in my workshop as I never want to paint when there is good weather. It takes up a lot of space but should help my sanity. Does you chain manufacturer do "half links"? that might halve your problem. A tensioner is a good idea although to allow axle movement I think the bars that Werner refers to are better, not sure how they fit in this design. |
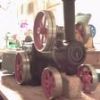
| Werner Schleidt | 07/09/2022 06:49:11 |
158 forum posts 180 photos | Hi Bob, in this original picture I marked the tension bar . It is connected to the rear axle and to the drive axle. This shifts the springs in the radius of the tension bar, but it have to be adjusted when the fire king is on the wheels. It is adjustable with right and left hand thread.
Werner |
| Bob Wild | 07/09/2022 09:56:24 |
| 99 forum posts 77 photos | Thanks Werner and Roger. Yes, I am going to put a tensioner on the chain. I tried it with a hand held support which did indeed help. The method used on the Hungerford machine looks too complicated for me. The springs are very stiff and don't deflect very much at all. My only problem will be fitting one in the space available - ti is getting very crowded in that area! Incidentally, I have been thinking about a good way to make an authentic looking fire hose, Any ideas? I habe posted a general question in this thread: Bob |
| Werner Schleidt | 07/09/2022 15:06:03 |
158 forum posts 180 photos | I made my suction hose from a standard plastic suction hose. This had a good function but it looked terrible. Then I had the idea to wrap a gauze bandage around it and fix it with black paint . This look is very realistic from my opinion. In your size it is more difficult to find something, but I think a small yarn made from natural fibres can do the job. I am interested to see which tipps came in. good luck Werner |
| Bob Wild | 03/10/2022 22:56:07 |
| 99 forum posts 77 photos | A major milestone today. Got the drive chains mounted and finally managed to get the FK moving. The video is a bit short cos it careered off under my car. Then I realised that the front wheels were not actually bolted on.
The end is in sight - just got the hoses and water stuff to do. Then a bit of cleaning and touch up the paint
Edited By Bob Wild on 03/10/2022 22:57:09 Edited By Bob Wild on 03/10/2022 23:02:34 Edited By Bob Wild on 03/10/2022 23:04:53 |
| Bob Wild | 29/11/2022 16:39:29 |
| 99 forum posts 77 photos | The last part of this build is the hose assembly. After a load of constructive suggestions from other members I finally settled on Shoe Laces ! It is actually Tubular Cotton Braid Undyed, and I'm quite pleased with it's appearance.
These are all the components to assemble it to the pump:
Here it is mounted round the front. The hose is connected to the pump and wraps around the sides and front. Astonishingly it does actually pump water with a jet about six feet into the air. Video to follow shortly. Added a few more details on the front, like what Cherry Hill did. Spot lights, a Bell and two nozzles
Now all that remains is to completely strip it down, clean up all the gunge and repaint as required.
Bob Edited By Bob Wild on 29/11/2022 16:40:36 |
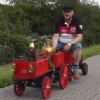
| Bob Wild | 31/12/2022 16:01:39 |
| 99 forum posts 77 photos | Fire King is finished:
Done the final details . Added pin striping on the side panels. A bit shaky, but I'm not too displeased with my first attempt. Then I added the etchings. I relied on a tutorial from another member on this forum to copy from a photo print onto a piece of brass. I found this was a bit hit and miss. After several attempts to iron on the text I manged to get most of the letters on. Again, not perfect but passable. If it ever stops raining I will post some videos of it working. Made a bit of a mistake with the driver. I didn't realise I had ordered a headless model and I have failed miserably in trying to get one of the female members of the family to make him some clothes. The brass helmet will be a bit of a challenge! It has been quite a marathon project. It has taken me two years and at a conservative estimate I reckon about 1500 hours. Possibly nearer two thousand. I'm not sure I would have started it if I had known how long it was going to take! Anyway, it has been good fun, and I will certainly enjoy Hogmanay tonight, then I can start on my next project - "Stephenson's Rocket" Thanks to all those who have helped and a Happy New Year to all. Bob Edited By Bob Wild on 31/12/2022 16:03:48 Edited By Bob Wild on 31/12/2022 16:11:31 |
| Roger Best | 03/01/2023 18:58:35 |
406 forum posts 56 photos |
Its a very interesting and pretty model. I see why you got it done in only two years. I expect it will grace pride of place for many years. |
| Bob Wild | 03/01/2023 19:37:58 |
| 99 forum posts 77 photos | Thanks chaps for all your comments and encouragement, but wait till you see it moving and pumping! Bob |


 Your engine is very impressive Bob. Well done.


Please login to post a reply.
Magazine Locator
Want the latest issue of Model Engineer or Model Engineers' Workshop? Use our magazine locator links to find your nearest stockist!
Sign up to our Newsletter
Sign up to our newsletter and get a free digital issue.
You can unsubscribe at anytime. View our privacy policy at www.mortons.co.uk/privacy
Latest Forum Posts
- hemingway ball turner
04/07/2025 14:40:26 - *Oct 2023: FORUM MIGRATION TIMELINE*
05/10/2023 07:57:11 - Making ER11 collet chuck
05/10/2023 07:56:24 - What did you do today? 2023
05/10/2023 07:25:01 - Orrery
05/10/2023 06:00:41 - Wera hand-tools
05/10/2023 05:47:07 - New member
05/10/2023 04:40:11 - Problems with external pot on at1 vfd
05/10/2023 00:06:32 - Drain plug
04/10/2023 23:36:17 - digi phase converter for 10 machines.....
04/10/2023 23:13:48 - More Latest Posts...
- View All Topics
Support Our Partners


Shopping Partners
Subscription Offer

Latest "For Sale" Ads
- Reeves** - Rebuilt Royal Scot by Martin Evans
by John Broughton
£300.00 - BRITANNIA 5" GAUGE James Perrier
by Jon Seabright 1
£2,500.00 - Drill Grinder - for restoration
by Nigel Graham 2
£0.00 - WARCO WM18 MILLING MACHINE
by Alex Chudley
£1,200.00 - MYFORD SUPER 7 LATHE
by Alex Chudley
£2,000.00 - More "For Sale" Ads...
Latest "Wanted" Ads
- D1-3 backplate
by Michael Horley
Price Not Specified - fixed steady for a Colchester bantam mark1 800
by George Jervis
Price Not Specified - lbsc pansy
by JACK SIDEBOTHAM
Price Not Specified - Pratt Burnerd multifit chuck key.
by Tim Riome
Price Not Specified - BANDSAW BLADE WELDER
by HUGH
Price Not Specified - More "Wanted" Ads...
Get In Touch!
Do you want to contact the Model Engineer and Model Engineers' Workshop team?
You can contact us by phone, mail or email about the magazines including becoming a contributor, submitting reader's letters or making queries about articles. You can also get in touch about this website, advertising or other general issues.
Click THIS LINK for full contact details.
For subscription issues please see THIS LINK.
Digital Back Issues


Donate

 Register
 Log-in
Model Engineer Magazine
- Percival Marshall
- M.E. History
- LittleLEC
- M.E. Clock

ME Workshop
- An Adcock
- & Shipley
- Horizontal
- Mill

Subscribe Now
- Great savings
- Delivered to your door

Pre-order your copy!
- Delivered to your doorstep!
- Free UK delivery!
All Forum Topics > Work In Progress and completed items > Merryweather Fire King