New Micrometers
| colin hawes | 05/12/2021 11:43:53 |
| 570 forum posts 18 photos | Posted by SillyOldDuffer on 03/12/2021 14:44:17:
Posted by colin hawes on 02/12/2021 19:17:50:
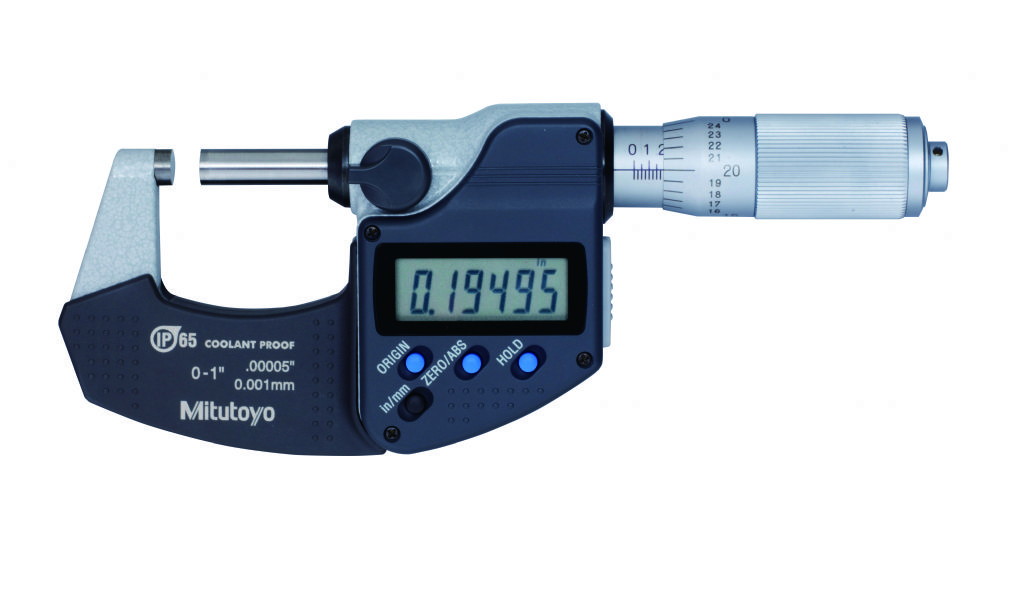
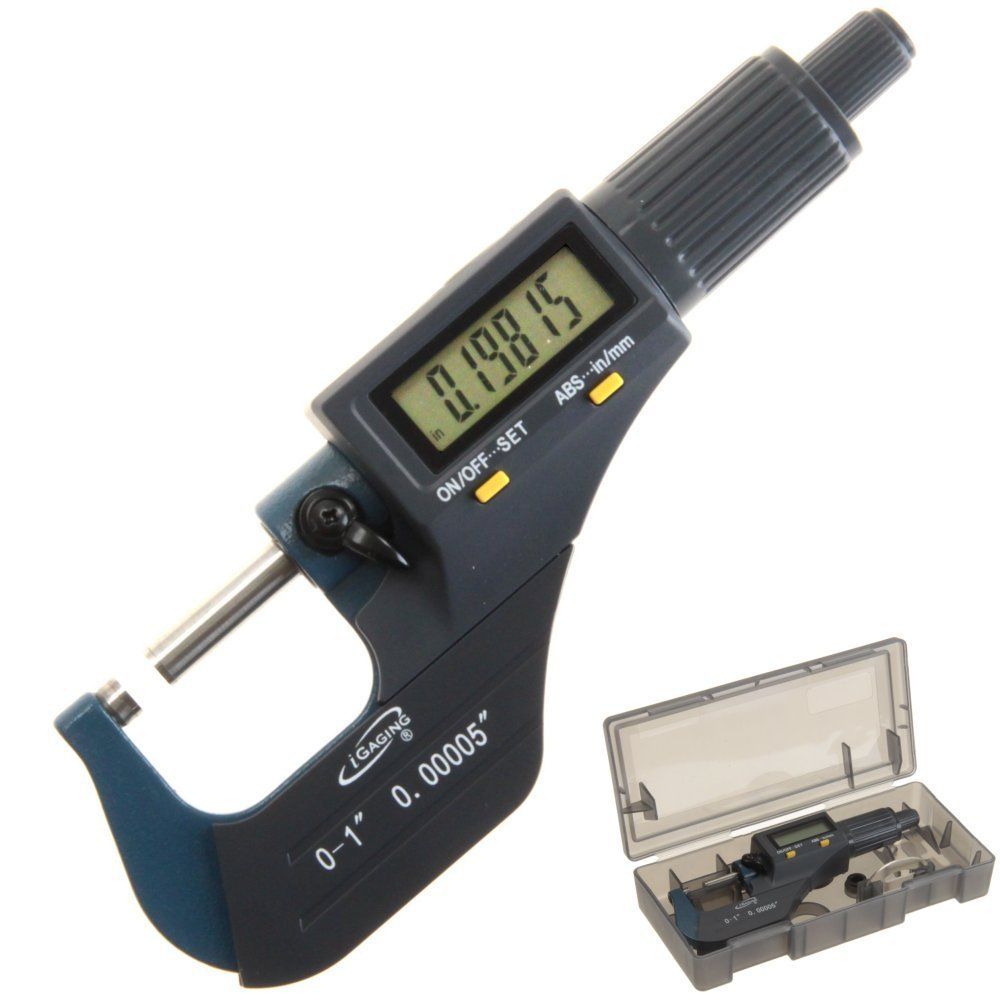
A decent mechanical micrometer will only develop very small errors due to wear or operational "feel" whereas a digital electronic one could introduce unknown errors so for maximum accuracy I prefer the mechanical micrometer. Colin Is that true? What 'unknown errors' are introduced by digital micrometers? A common type has a digital display mounted on an ordinary analogue instrument with a differential screw. I wouldn't expect a difference in accuracy. The advantage of the digital display is eliminating misreading errors, and being able to do Imperial/Metric and offsets etc. The disadvantage is needing a battery! The analogue and digital display can be checked against each other. Owners please, do they differ, and if so, which reading is less wrong? Another type is digital only. There's no analogue scale. Although the example below looks cheap and plasticky to my jaded eye, it's made by iGaging and like the Mitutoyo pictured above reads to half-tenths. Seems to save space, and I suspect this type doesn't contain a precision differential screw, relying on some other arrangement, perhaps a miniature DRO track and rotation counter. They're not expensive. Does anyone know how they work? The problem with differential screw micrometers is they depend on the production accuracy of an expensive screw, which is vulnerable to wear, tear and dirt. They're particularly prone to wear on one section of thread if the instrument is repeatedly used to measure similar sized objects. Like the curates egg, worn micrometers are only good in part. A digital instrument could avoid wear problems by not relying on a precision thread, instead directly measuring movement along an optically or magnetically precise track. Anyone have experience of them? Dave Edited By SillyOldDuffer on 03/12/2021 14:45:32 Reading inaccuracy caused by a reading circuit problem giving a believable false reading. A mechanical instrument can't present such a reading. Colin |
| SillyOldDuffer | 05/12/2021 14:57:05 |
| 10668 forum posts 2415 photos | Posted by colin hawes on 05/12/2021 11:43:53:
Posted by SillyOldDuffer on 03/12/2021 14:44:17:
Posted by colin hawes on 02/12/2021 19:17:50:
A decent mechanical micrometer will only develop very small errors due to wear or operational "feel" whereas a digital electronic one could introduce unknown errors so for maximum accuracy I prefer the mechanical micrometer. Colin Is that true? What 'unknown errors' are introduced by digital micrometers? ...Reading inaccuracy caused by a reading circuit problem giving a believable false reading. A mechanical instrument can't present such a reading. Colin Surely mechanical instruments give believable false readings whenever the screw is worn, anvils damaged, the clutch is iffy, or the frame is bent. My main objection to second-hand micrometers that they are all believable! I twitch when chaps describe their latest bargains as having 'reputable brand-names' or being 'top-quality', 'high-grade', 'decent', 'good', 'spot-on', 'very accurate' or 'as new'. These subjective terms are inappropriate to an instrument used to take accurate precise measurements. They imply the owner is an optimist rather than an engineer, and certainly isn't a metrologist! Micrometers have a specification proved by checking them periodically against a reliable standard gauge and recording the results on a calibration certificate. The standard isn't a pre-loved set of Jo-blocks, even if they do look tip-top. Proof and evidence please, not unverified opinion. I argue digital displays are less likely to mislead when they go wrong because the malfunction is usually obvious: blanks, zeros, eights, negatives and jumping digits etc. In comparison, an analogue display always looks good, even when the instrument is out of tolerance. Dave |
| colin hawes | 05/12/2021 16:06:23 |
| 570 forum posts 18 photos | If you rely on using the clutch to take readings it is easy to inadvertently include a speck of swarf as it is not felt ; it is my opinion that finger touch on the thimble is more likely to show up such an event . Although I confess I've never experienced it on a micrometer, I have seen a clock digital display with a number giving a wrong figure due ,presumably, to the connecting matrix becoming faulty and losing a part of the digit. Colin |
| Brian G | 05/12/2021 16:25:34 |
| 912 forum posts 40 photos | My fear with a digital micrometer is the same as with a digital calliper, accidentally coming out of "Abs" mode and not noticing. To try and avoid this I set the "Inc" zero well away from the zero point which hopefully would make this error obvious. Brian G |
| SillyOldDuffer | 05/12/2021 17:45:34 |
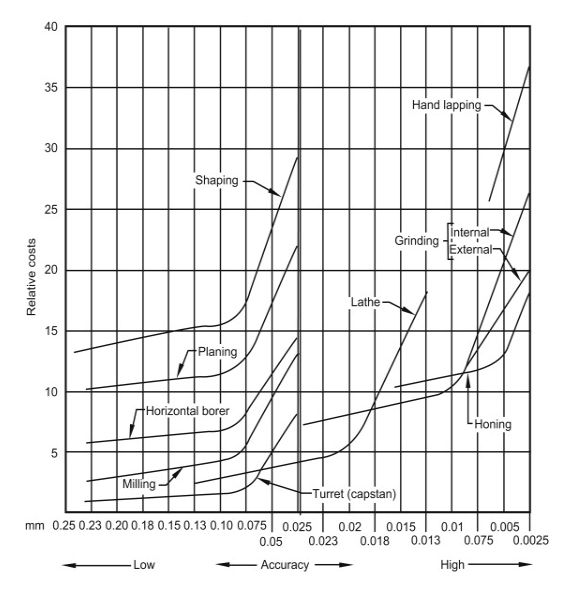
| 10668 forum posts 2415 photos | This graph puts an interesting perspective on accuracy and the cost of achieving it with various machine tools. The graph dates from 1991 and doesn't reflect improvements made at the high-accuracy end: it's not unusual for a CNC Machine Centre to do rather better than 0.025mm. Broadly right though. The cost of accuracy increases linearly up to a 'knee', beyond which the cost multiplies. The graph shows the maximum repeatable accuracy rather than the very best that can be achieved by a skilled operator taking his time and accepting a lot of rejects! The graph divides in the middle at 0.025mm, which is a thou. 0.025mm sets a boundary between low and high accuracy, and it's about the best that can be expected of Shaping, Planing, Horizontal Boring, Milling machines and Capstan/Turret lathes. Planing and Shaping are expensive and not very accurate. Although they can be pushed to the 0.025 limit, they perform most economically when less than 0.1mm accuracy is needed. Their high cost compared with milling probably explains why these machines have become unusual. My guess is they are too slow. Milling gets to 0.1mm fairly easily, but pushing up to 0.025/thou triples the price. It's unlikely that a home-workshop mill can achieve better than 0.025mm accuracy. The same limitation applies to Turret and Capstan lathes: they're good for cheap production and can achieve about the same accuracy as a mill. High-accuracy requires grinding, including honing, lapping, and hand-lapping. Precision grinding is rare in a home workshop, but industry use it on a huge scale. Lathe performance as shown on the graph is interesting because it straddles the 0.025mm boundary, getting to about 0.02mm/0.0008" before the knee kicks in, with a practical limit of about 0.013mm/0.0005". Lathes are good performers, capable of reasonable accuracy without costing a fortune. Likewise, milling machines are attractive - reasonable accuracy at low cost. Model engineers don't do much precision grinding because the machines and process is relatively expensive. That 0.025mm boundary is important in the context of micrometers because it pretty much defines the practical accuracy to which we work. It's about a thou, and doing better than ±0.0005" is really hard. I doubt many home workshops are capable of it, whatever micrometer they have. Most of us use a different technique I think? I 'fit' parts together, using one to gauge the other, without worrying about exact dimensions. For example rather than bore an accurate 20mm hole and turn a 19.97mm shaft to fit it, I bore a hole of about 20mm, and turn the shaft to slide comfortably into it. No need for a micrometer of any sort, let alone one that does tenths! Fitting is too slow and expensive for production work and spares need to be interchangeable but I don't care! Does anyone really apply the American System of Manufacturing at home? Dave Edited By SillyOldDuffer on 05/12/2021 17:47:21 |
| Neil Lickfold | 06/12/2021 02:08:31 |
| 1025 forum posts 204 photos | What I do like about mechanical micrometers is their are no batteries to leak and fail the tool. In saying that, I recently did buy a digital depth micrometer, for the purpose of using it like a comparator. I don't think it matters all that much , if electronic or mechanical, as long as you can make the parts you want to. Gauge block sets are in the very affordable range now, with many coming with a certificate of accuracy for each block. So with a good set of gauge blocks and repeatable measuring equipment, new cutting tool technologies, now more than ever, allows home users to being able to easily make interchangeable parts. |
Please login to post a reply.
Want the latest issue of Model Engineer or Model Engineers' Workshop? Use our magazine locator links to find your nearest stockist!
Sign up to our newsletter and get a free digital issue.
You can unsubscribe at anytime. View our privacy policy at www.mortons.co.uk/privacy
- hemingway ball turner
04/07/2025 14:40:26 - *Oct 2023: FORUM MIGRATION TIMELINE*
05/10/2023 07:57:11 - Making ER11 collet chuck
05/10/2023 07:56:24 - What did you do today? 2023
05/10/2023 07:25:01 - Orrery
05/10/2023 06:00:41 - Wera hand-tools
05/10/2023 05:47:07 - New member
05/10/2023 04:40:11 - Problems with external pot on at1 vfd
05/10/2023 00:06:32 - Drain plug
04/10/2023 23:36:17 - digi phase converter for 10 machines.....
04/10/2023 23:13:48 - More Latest Posts...
- View All Topics
- Reeves** - Rebuilt Royal Scot by Martin Evans
by John Broughton
£300.00 - BRITANNIA 5" GAUGE James Perrier
by Jon Seabright 1
£2,500.00 - Drill Grinder - for restoration
by Nigel Graham 2
£0.00 - WARCO WM18 MILLING MACHINE
by Alex Chudley
£1,200.00 - MYFORD SUPER 7 LATHE
by Alex Chudley
£2,000.00 - More "For Sale" Ads...
- D1-3 backplate
by Michael Horley
Price Not Specified - fixed steady for a Colchester bantam mark1 800
by George Jervis
Price Not Specified - lbsc pansy
by JACK SIDEBOTHAM
Price Not Specified - Pratt Burnerd multifit chuck key.
by Tim Riome
Price Not Specified - BANDSAW BLADE WELDER
by HUGH
Price Not Specified - More "Wanted" Ads...
Do you want to contact the Model Engineer and Model Engineers' Workshop team?
You can contact us by phone, mail or email about the magazines including becoming a contributor, submitting reader's letters or making queries about articles. You can also get in touch about this website, advertising or other general issues.
Click THIS LINK for full contact details.
For subscription issues please see THIS LINK.
Model Engineer Magazine
- Percival Marshall
- M.E. History
- LittleLEC
- M.E. Clock
ME Workshop
- An Adcock
- & Shipley
- Horizontal
- Mill
Subscribe Now
- Great savings
- Delivered to your door
Pre-order your copy!
- Delivered to your doorstep!
- Free UK delivery!


 Register
 Log-in


