Forum sponsored by:

Ballaarat construction series
| Simon Collier | 24/10/2021 01:28:22 |
 525 forum posts 65 photos | Thanks for your design of this interesting loco Luker. I know that it ran on 3’6 gauge, but what scale did you use? I can’t find it in the articles. Dividing 42” by 5” gives 1 in 8.4, but what did you do? f |
| Luker | 24/10/2021 10:42:39 |
 230 forum posts 172 photos | Posted by Simon Collier on 24/10/2021 01:28:22:
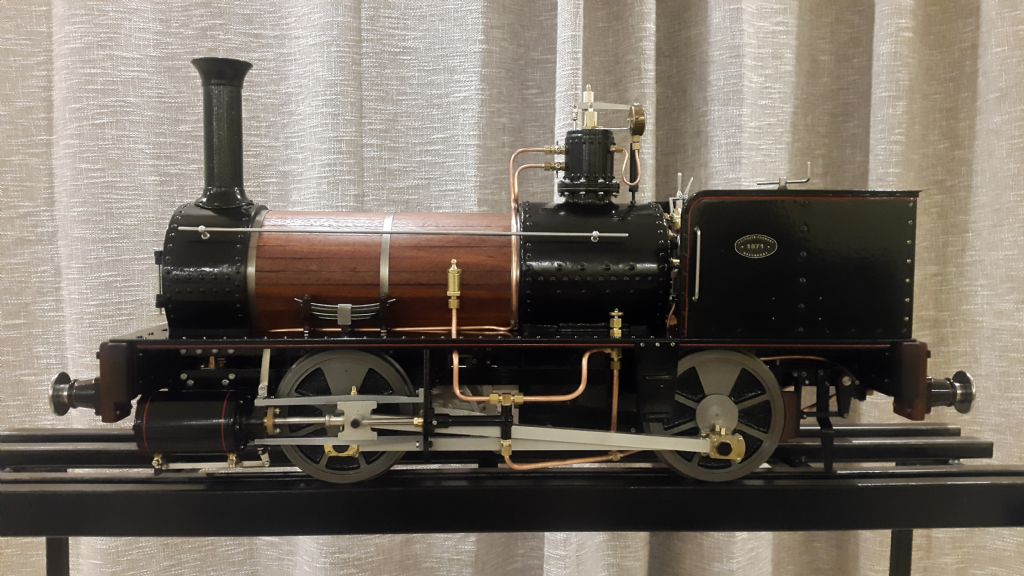
Thanks for your design of this interesting loco Luker. I know that it ran on 3’6 gauge, but what scale did you use? I can’t find it in the articles. Dividing 42” by 5” gives 1 in 8.4, but what did you do? f Hi Simon, yep you spot on, I used 8.4. I model in metric so I use a gauge rail multiplier and generally clean up the dimensions as I build. This is a little different to the designers that model inch to the foot. There are a few notable deviations including the wheel and flange which is to the ME standard and the cylinders aren't to scale. The cylinders are different because scale cylinders would have been too small for the boiler etc. I do a few simulations and based on the results of those the boiler is matched to the smokebox and cylinders etc. Then all the linkages are updated for a hard working loco (out track is a little rough!). |
| Simon Collier | 25/10/2021 09:53:04 |
525 forum posts 65 photos | Thanks Luker, that makes it clear. It could be a quick build because it only has the essentials, but it is quite a smalll loco at that scale. |
| Luker | 29/10/2021 15:38:26 |
230 forum posts 172 photos | The Gooch valve gear and links for the Ballaarat are detailed in the new ME (4677). I thought a small animation of the linkages in motion would be nice... |
| Chris Perkins 3 | 29/10/2021 18:03:07 |
| 8 forum posts | Thanks Luker |
| Simon Collier | 30/10/2021 00:35:48 |
525 forum posts 65 photos | Lovely animation; horrendous valve gear. I enjoyed the article. Double expansion links. What a pain! |
| Luker | 30/10/2021 16:14:29 |
230 forum posts 172 photos | Posted by Simon Collier on 30/10/2021 00:35:48:
Lovely animation; horrendous valve gear. I enjoyed the article. Double expansion links. What a pain! Thanks Simon, the Gooch valve gear is interesting to design, but modern simulation techniques make life a little easier. I would not like to design this valve gear with just a drawing board! It is incredibly interesting to see all the linkages working in-between each other. I must say the Ballaarat valve gear hasn’t given me any of the issues I’ve read about, even back notching (within reason) is as good as any of my other locos. In fact it behaves the same as my Walschaerts fitted 3.5g 2-6-2 loco in terms of coal consumption, water consumption etc. (this loco has similar design tractive effort, boiler size etc.). The expansion link wasn’t that difficult to make, it was easier than the normal type because the laser cut surface was of better quality (thinner section). If I were to machine these from scratch they would be held together and match machined so not much extra work. Some pics…
|
| Luker | 30/10/2021 16:18:14 |
230 forum posts 172 photos | Posted by Simon Collier on 25/10/2021 09:53:04:
Thanks Luker, that makes it clear. It could be a quick build because it only has the essentials, but it is quite a smalll loco at that scale. Took me 9 months from first casting to first steam test Concerning the size of the Ballaarat; there’s a picture earlier in this thread of the loco with two adults standing beside it to give an idea of scale. It will happily pull 2 large adults on our track which has an interesting 1:50 gradient for 60m, under trees that tend to dust the track with slippery juices. My 2-6-2 tends to slip here but the Ballaarat doesn’t. I'm reasonably sure it will haul more but my driving cart only takes two... |
| Simon Collier | 30/10/2021 22:03:46 |
525 forum posts 65 photos | Great photo that shows the set up perfectly. The long radius rods would reduce angularity problems so perhaps why you find it works well in practice. Yes, with 4 links, you’d want them laser/water/wire cut. |
| Luker | 31/10/2021 18:30:02 |
230 forum posts 172 photos | Posted by Simon Collier on 30/10/2021 22:03:46:
The boiler scales to a little under 4”. Did you use 4” tube or roll the barrel? The barrel was rolled... For my boilers I use modern manufacturing techniques and materials more suited for the younger model engineer |
| Luker | 26/11/2021 12:10:12 |
230 forum posts 172 photos | The new ME is out for the digital readers (ME 4679), which has part 6 of the Ballaarat construction series dealing with my method to machine cylinders. I mentioned that the pistons need to be mechanically free but steam tight, and I gave two different methods of practically checking this. I used the technical term of the piston ‘oozing down’ in one of the tests… the video below shows this ‘new’ measure. |
| Luker | 26/11/2021 12:25:38 |
230 forum posts 172 photos | The YouTube video I mentioned in Part 6 for setting up the lathe to turn parallel is embedded below. I put this video together a number of years back for a course I presented. Apologies in advance for the amateurish video! |
| tom hardy | 28/11/2021 08:04:11 |
| 30 forum posts 1 photos | hi luker i am a member of the northern districts model engineering group in perth. myself and three other members are building ballaarats 3x 5 inch and 1x 71/4 inch . an article on this loco was in our local saturday west australain newspaper it does mention a south african who has built a ballaarat we dont have the facilities to cast wheels with cast iron so we are going to try another way. we are going to get some discs of 125 round bar to the width of the wheel then machine a recess in them. then have some sheet metal laser cut to the shape of the spokes and silver solder them in to the recess regards tom
|
| Luker | 28/11/2021 12:59:05 |
230 forum posts 172 photos | HI Tom, That’s great! Please post pictures as you guys go, even if you don’t follow my design. I’d love to see how other builders tackle the same loco! I’m sure the other forum members following the series would also be interested in different build options. Making the wheels from a disk and laser cut pieces will work perfectly. These will probably have better wear characteristics than any commercially cast wheels simply because most foundries won’t know how to chill the running surface. Looking forward to some pictures! Luker |
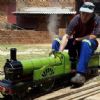
| Luker | 06/02/2022 05:24:38 |
230 forum posts 172 photos | I found this little local media piece on the Ballaarat the other night. That little loco means a lot to the community which is great! |
| Luker | 12/02/2022 12:41:32 |
230 forum posts 172 photos | The young lad building the Ballaarat let me know I was a little vague in my description of making the taper reamer for the drain cocks, so I put together the following… |
| tom hardy | 14/02/2022 12:33:11 |
| 30 forum posts 1 photos | hi luker news from the builders in west australia photo of wheels constructed by clive chapman. discs where cut from 1045 steel and recessed .spokes were cut from 4mm steel sheet by a laser cutter. the spokes are a neat fit and held in place with small grub screws . loctite would probably be ok regards tom hardy |
| Luker | 14/02/2022 14:56:20 |
230 forum posts 172 photos | Hi Tom, Those wheels look very good! Small grub screws will work perfectly; just don’t push the spider out when pressing the axels home. Some of the guys here build their wheels from laser like you have; then silver solder the lot up. Clive has forgotten the counter balance, it doesn’t add that much weight but is very period specific for these ‘ribbed-disk’ wheels. If you drill one or two blind holes and pour a little lead in there you’ll end up with better balanced wheels than mine. Thanks for the pic! Please keep them coming. |
| tom hardy | 15/04/2022 00:59:19 |
| 30 forum posts 1 photos | hi luker we need some more measurements for the boiler drawings so our boiler inspector can draw up plans for a copper boiler shell overall and firebox widths regards tom hardy west australia |
| Luker | 15/04/2022 06:01:57 |
230 forum posts 172 photos | Hi Tom, this should do it. You shouldn’t have any issues converting the boiler design for copper. Just check the stress in the crown area if you remove the crown stay for rod stays (Aus boiler code). I’ve found the code is a little light in this area… (see: Modern boiler construction methods for the model engineer)
|


Please login to post a reply.
Magazine Locator
Want the latest issue of Model Engineer or Model Engineers' Workshop? Use our magazine locator links to find your nearest stockist!
Sign up to our Newsletter
Sign up to our newsletter and get a free digital issue.
You can unsubscribe at anytime. View our privacy policy at www.mortons.co.uk/privacy
Latest Forum Posts
- *Oct 2023: FORUM MIGRATION TIMELINE*
05/10/2023 07:57:11 - Making ER11 collet chuck
05/10/2023 07:56:24 - What did you do today? 2023
05/10/2023 07:25:01 - Orrery
05/10/2023 06:00:41 - Wera hand-tools
05/10/2023 05:47:07 - New member
05/10/2023 04:40:11 - Problems with external pot on at1 vfd
05/10/2023 00:06:32 - Drain plug
04/10/2023 23:36:17 - digi phase converter for 10 machines.....
04/10/2023 23:13:48 - Winter Storage Of Locomotives
04/10/2023 21:02:11 - More Latest Posts...
- View All Topics
Support Our Partners


Shopping Partners
Subscription Offer

Latest "For Sale" Ads
- Reeves** - Rebuilt Royal Scot by Martin Evans
by John Broughton
£300.00 - BRITANNIA 5" GAUGE James Perrier
by Jon Seabright 1
£2,500.00 - Drill Grinder - for restoration
by Nigel Graham 2
£0.00 - WARCO WM18 MILLING MACHINE
by Alex Chudley
£1,200.00 - MYFORD SUPER 7 LATHE
by Alex Chudley
£2,000.00 - More "For Sale" Ads...
Latest "Wanted" Ads
- D1-3 backplate
by Michael Horley
Price Not Specified - fixed steady for a Colchester bantam mark1 800
by George Jervis
Price Not Specified - lbsc pansy
by JACK SIDEBOTHAM
Price Not Specified - Pratt Burnerd multifit chuck key.
by Tim Riome
Price Not Specified - BANDSAW BLADE WELDER
by HUGH
Price Not Specified - More "Wanted" Ads...
Get In Touch!
Do you want to contact the Model Engineer and Model Engineers' Workshop team?
You can contact us by phone, mail or email about the magazines including becoming a contributor, submitting reader's letters or making queries about articles. You can also get in touch about this website, advertising or other general issues.
Click THIS LINK for full contact details.
For subscription issues please see THIS LINK.
Digital Back Issues


Donate

 Register
 Log-in
Model Engineer Magazine
- Percival Marshall
- M.E. History
- LittleLEC
- M.E. Clock

ME Workshop
- An Adcock
- & Shipley
- Horizontal
- Mill

Subscribe Now
- Great savings
- Delivered to your door

Pre-order your copy!
- Delivered to your doorstep!
- Free UK delivery!
All Forum Topics > Model Engineer. > Ballaarat construction series