Forum sponsored by:

Minnie 1"
Beginner minnie 1" build
| JasonB | 29/03/2020 20:08:40 |
 25215 forum posts 3105 photos 1 articles | The wooden plugs are only to fill the holes so you can mark out the ends. Post a photo of your casting and I'll suggest a way forward as you will have to bore it out from scratch. |
| james huxstep | 29/03/2020 20:28:19 |
 91 forum posts 24 photos |
Edited By JasonB on 29/03/2020 20:33:47 |
| JasonB | 29/03/2020 20:33:25 |
25215 forum posts 3105 photos 1 articles | Will get back to you tomorrow. |
| JasonB | 30/03/2020 11:21:32 |
25215 forum posts 3105 photos 1 articles | I think I would start by lightly filing the top end to give a flat surface for marking out on, swing 4 arcs of approx half the diameter in from points around the edge and then place a punch mark where the middle is likely to be much like whats shown in this image
Now holding the casting by the flange in the 4 jaw chuck get the bottom and top punch mark to run as true as possible then at a slow speed drill with a ctr drill. Bring up the tailstock for support and turn the top parallel section to 1 1/16" and lightly face the end as far in as you can reach without hitting the tailstock ctr. Reverse the casting around and now gripping by the top parallel section ctr drill the bottom end and again bring up the tailstock ctr for support. Face the end and then the outside of the flange followed by the 31/32" collar. Then taper turn the outside. Remove the tailstock and fit the fixed steady to run on the 31/32" diameter to support the casting while you drill it out to 3/4". Reverse the work once more so you are holding by the OD of the flange and set the fixed steady to run on the 1 1/16" top section. You can now bore out the inside to the correct taper. |
| james huxstep | 30/03/2020 22:06:28 |
91 forum posts 24 photos | Thanks very much Jason,I'm half way through.so far so good.for the outside taper do I match the castings existing taper,or do I work it out from the drawings?
Thanks again
James |
| JasonB | 31/03/2020 06:55:05 |
25215 forum posts 3105 photos 1 articles | I'd work it out from the drawings and then see how that compared to the casting and adjust if you need to. |
| james huxstep | 02/04/2020 21:20:26 |
91 forum posts 24 photos | ok, thanks jason, that went pretty well.There is a couple of small holes in the casting i found whilst machining but otherwise all good. A quick question about hss endmill/slot drill speeds.I seem to be ok with the larger and medium side of end mills/slot drills, but small end mills tend to be a bit hit and miss.i.e. the 1/16" slot drill i just broke.i wonder if im not running them fast enough rpm wise.I always slow down the feed rate on the table feed motor and keep to light cuts. i am running the 1/16" slot drill at about 1100 rpm. I seem to fair slightly better with the 4 fluted type, but tiny diameter anything tends to be a bit hit and miss for me .All machining cutting fluid is used. Any thoughts anyone?
thanks
james |
| JasonB | 03/04/2020 06:57:24 |
25215 forum posts 3105 photos 1 articles | You don't say what material but that is too slow, Ideally in steel you would want about 6000rpm and aluminium anything upto 12000rpm but will probably have to be limited by the max speed of your machine.I'd hand fees on the small sizes so you get a bit of feel. Depth of cut with those small slot drills one quarter of diameter. |
| james huxstep | 06/04/2020 20:42:27 |
91 forum posts 24 photos | Thanks for the assistance on milling speeds, yeah i was running too slow. ive since solved that issue by doubling the speed and taking smaller cuts.
Quick question.I need to create the reamed hole 1/4" in the axle fork. i have a new hand reamer 1/4".What size would you drill under sized before reaming with the reamer? also can i put the hand reamer in the drill chuck as it has a parallel shank., and do it under power?
thanks james |
| JasonB | 06/04/2020 20:50:52 |
25215 forum posts 3105 photos 1 articles | 15/64th or 6mm would be OK Yes you can use hand reamers under power but run quite slowly say 200rpm or less. |
| james huxstep | 22/04/2020 08:43:56 |
91 forum posts 24 photos | Hi chaps!
I am fast approaching the front wheels.I have not done the rear wheel first so I have no experience on the process. What wood would you suggest for creating the jig?and what type of tool to use? Any tips on turning the ally cast rims?
Next job ATM is milling the spoke recesses in the front wheel hubs. I've made a jig for the rotary table to keep the alignment .One end spigot for the hole in table,and one for the undersized hole in the hub.
Thanks
James
|
| Michael Belfer | 08/02/2021 00:25:11 |
| 43 forum posts 11 photos | This seems to be for general questions about a minnie build, so perhaps here. O-rings.... something of a black art it seems. I have looked up the ztubal Cakn book and I am only a tiny bit less in the dark. LC Mason speaks of d-bit sizes, and that various supplies of rings vary a little in size, but several times through the book looking and I dont seem to be successful in finding what size rings are required It would be nice to know, in case what I buy are not the same as he originally used
Michael dow nunda
|
| Michael Belfer | 08/02/2021 00:49:13 |
| 43 forum posts 11 photos | Same applies to cylinder mounting studs: I cant find dimensions, although there is mention of: a) drill and tap 1/4 depth into cylinder block b) hex nut depth plus a few threads showing c) the two chests finish to 5/16" and 3/8" thick d) both chest covers 3/32 thick e) 7BA nuts 3/32 thick giving 3/4 and 13/16 plus say 2 threads showing = 1/32 more, or calculated lengths of 25/32 and 27/32 Do they sound right? Be nice to see it verified in the text or drawings somewhere, but I couldn't find it
Michael dow nunda |
| JasonB | 08/02/2021 07:29:56 |
25215 forum posts 3105 photos 1 articles | O Rings 1 x bs111, 1 x bs006, 1 x bs010, 1 x bs007 and 1 x Ref B (3/32" ID) nitrile.Plus two to suit your gauge glass. Make the holes the size Mason gives As for studs I've never seen their lengths given that is down to the builder to establish. For example it may say drill 1/4" deep but depending on your individual taps the thread will not go right to the bottom of the hole so best do a test of the first one in each group and work it out from there |
| Michael Belfer | 08/02/2021 08:17:20 |
| 43 forum posts 11 photos | Well, (as frequently the case, it seems). Jason rides to the rescue. Thanks Jason. I find Numbers BS006, 007, 010, and 111 without too much bother but what is a reference B? Michael |
| JasonB | 08/02/2021 08:45:27 |
25215 forum posts 3105 photos 1 articles | 0.064" section, 3/32ID, 7/32" OD Viton according to Blackgates but expect you will have to source something locally, no BS number given |
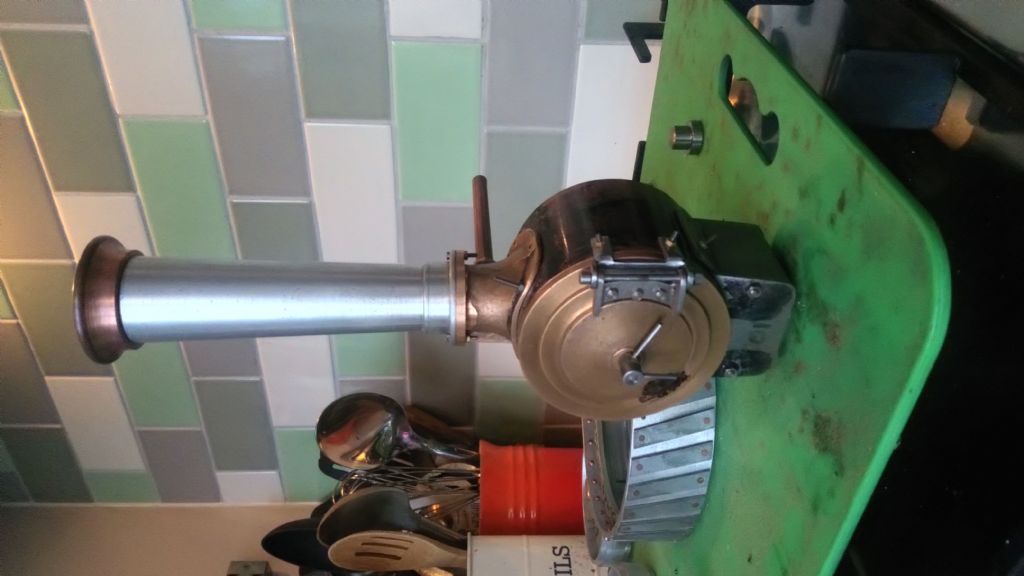
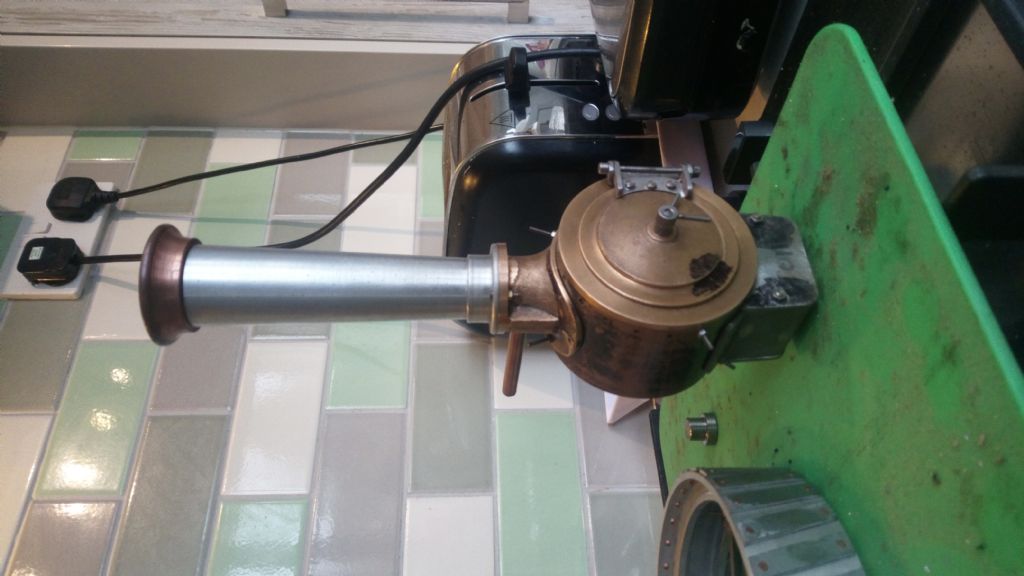
| james huxstep | 23/12/2021 10:32:33 |
91 forum posts 24 photos | Hi all Im stil going! Front end done. Front wheels done Rear wheels almost done. Boiler parts all formed and sent off to western steam to be brazed up. [i chickened out of doing it myself] But im having an issue with the rear wheels rear hub castings. More on that in a minute. Time for some progress photos. |
| james huxstep | 23/12/2021 10:32:53 |
91 forum posts 24 photos |
|
| james huxstep | 23/12/2021 10:49:32 |
91 forum posts 24 photos |
|
| james huxstep | 23/12/2021 10:49:46 |
91 forum posts 24 photos |
|


![dsc_5910[1].jpg](/sites/7/images/member_albums/162725/902280.jpg "dsc_5910[1].jpg")
Please login to post a reply.
Magazine Locator
Want the latest issue of Model Engineer or Model Engineers' Workshop? Use our magazine locator links to find your nearest stockist!
Sign up to our Newsletter
Sign up to our newsletter and get a free digital issue.
You can unsubscribe at anytime. View our privacy policy at www.mortons.co.uk/privacy
Latest Forum Posts
- hemingway ball turner
04/07/2025 14:40:26 - *Oct 2023: FORUM MIGRATION TIMELINE*
05/10/2023 07:57:11 - Making ER11 collet chuck
05/10/2023 07:56:24 - What did you do today? 2023
05/10/2023 07:25:01 - Orrery
05/10/2023 06:00:41 - Wera hand-tools
05/10/2023 05:47:07 - New member
05/10/2023 04:40:11 - Problems with external pot on at1 vfd
05/10/2023 00:06:32 - Drain plug
04/10/2023 23:36:17 - digi phase converter for 10 machines.....
04/10/2023 23:13:48 - More Latest Posts...
- View All Topics
Support Our Partners


Shopping Partners
Subscription Offer

Latest "For Sale" Ads
- Reeves** - Rebuilt Royal Scot by Martin Evans
by John Broughton
£300.00 - BRITANNIA 5" GAUGE James Perrier
by Jon Seabright 1
£2,500.00 - Drill Grinder - for restoration
by Nigel Graham 2
£0.00 - WARCO WM18 MILLING MACHINE
by Alex Chudley
£1,200.00 - MYFORD SUPER 7 LATHE
by Alex Chudley
£2,000.00 - More "For Sale" Ads...
Latest "Wanted" Ads
- D1-3 backplate
by Michael Horley
Price Not Specified - fixed steady for a Colchester bantam mark1 800
by George Jervis
Price Not Specified - lbsc pansy
by JACK SIDEBOTHAM
Price Not Specified - Pratt Burnerd multifit chuck key.
by Tim Riome
Price Not Specified - BANDSAW BLADE WELDER
by HUGH
Price Not Specified - More "Wanted" Ads...
Get In Touch!
Do you want to contact the Model Engineer and Model Engineers' Workshop team?
You can contact us by phone, mail or email about the magazines including becoming a contributor, submitting reader's letters or making queries about articles. You can also get in touch about this website, advertising or other general issues.
Click THIS LINK for full contact details.
For subscription issues please see THIS LINK.
Digital Back Issues


Donate

 Register
 Log-in
Model Engineer Magazine
- Percival Marshall
- M.E. History
- LittleLEC
- M.E. Clock

ME Workshop
- An Adcock
- & Shipley
- Horizontal
- Mill

Subscribe Now
- Great savings
- Delivered to your door

Pre-order your copy!
- Delivered to your doorstep!
- Free UK delivery!
All Forum Topics > Beginners questions > Minnie 1"