Learning CAD with Alibre Atom3D
Discussion of the series starting in MEW 274
Articles

Alibre Atom3D
Thanks to the generosity of Alibre, Model Engineers' Workshop Magazine is able to offer every reader of Model Engineers' Workshop a free six-month licence to Alibre Atom3D. Alongside this great opportunity, starting with issue 274 of Model Engineers' Workshop we are running a detailed tutorial series in the magazine. This page will be the 'hub' for links to example files, tutorials and more so make sure you drop in regularly to keep up to date!
| David Jupp | 04/02/2019 17:45:38 |
| 978 forum posts 26 photos | Mick - the first step in creating any sketch is to choose a plane OR a flat face to sketch on. So in this case, and assuming the top of the head if indeed flat, select the head top face, enter 2D sketch mode, place 12mm dia circle and constrain concentric to one of the existing holes. If the top of the head isn't flat, you'll have to add a new plane at a suitable height to start your counterbore from (that could be just above the top of the hole, or it could be at the level you want the bottom of the counterbore to be at - the direction of cut will be opposite for these 2 options. |
| JasonB | 04/02/2019 18:16:19 |
25215 forum posts 3105 photos 1 articles | Looks like you have also selected extrude but if it's a counter bore you want "cut extrude" to remove metal. |
| Kenneth Jones 1 | 05/02/2019 09:33:59 |
| 8 forum posts | Of course, now the penny has finally dropped. The tutorials were banging on about crossing lines and I was not taking it in. I may have learned the hard way but at least I have learnt. Thanks Guy's Kenj |
| George Archer | 05/02/2019 19:56:41 |
| 5 forum posts | I am very grateful to Jason B for his "get round" to put the angle on the rim of the thumbscrew. However I tried the dimension would only produce a linear distance. It appeared the system did not recognise the axis as an element in the drawing. Does Alibre have a digital "foremans boot" perhaps by keyboard shortcuts to encourage the system to do as its told? |
| JasonB | 05/02/2019 20:17:28 |
25215 forum posts 3105 photos 1 articles | Sounds like you may be clicking on the line that defines the edge of a plane rather than an axis. if you hold down both mouse keys and drag the part slightly you should be able to see if it is that or an axis line you are selecting to dimension from. |
| mick | 06/02/2019 17:50:34 |
| 421 forum posts 49 photos | |
| JasonB | 06/02/2019 18:11:52 |
25215 forum posts 3105 photos 1 articles | Horizontal would have best been done at an early stage where a section through the head sketched out and then rotated. Though you could do a cut rotate to get the same result without having to go back to the start. Draw on the XY plane and then rotate about the Z axis. You only need the sketch to be half the head. vertical fins can be drawn on the XY or YZ plane and then use cut extrude and select "through all" If not sure let me know and I'll post a couple of examples later. |
| John Hinkley | 08/02/2019 10:15:25 |
1545 forum posts 484 photos | Help!!! This morning, I opened AA3D to continue working on some drawings and got the message that "License ( sic ) initialisation was unsuccessful. Error code 10000442". Tried again, this time error code ended 514. then again, ending 550. In desperation, I downloaded the program again, uninstalled the original ( ver 2 ) and re-installed. This time the error code ended 496. Undaunted, I tried again, now the error code ended 333. Next try ended 553. Now I am daunted. Please don't tell me I've lost access to all the work I've put in over the last 3½ monhs since I started using the trial. Anyone got any ideas? And, yes, I know I could contact support, but I'd like to get it sorted PDQ. Thanks, John
|
| David Jupp | 08/02/2019 10:24:19 |
| 978 forum posts 26 photos | John - fear not. This article will show you how to fix it. You will need to re-enter your activation code - if you can't find it, contact support (they can find it from the details used when setting up the trial). Edited By David Jupp on 08/02/2019 10:27:07 |
| John Hinkley | 08/02/2019 10:38:43 |
1545 forum posts 484 photos | Thank you, David. I remembered seeing that tip somewhere before, but failed to find it in this thread. I'll try it now and report back. John .......... Just a few moments later and I can start breathing, again. All back to normal, thank goodness. Many thanks for your help, David. |
| David Jupp | 08/02/2019 10:48:35 |
| 978 forum posts 26 photos | Boring technical explanation - communication between your PC and the Licensing server involves an 'offset' parameter. This changes regularly and is remembered on your computer. Should the offset value get 'out of synch', all communication becomes garbled. Deleting the local licence copy (which is what that article details an easy way of doing) re-sets communications and establishes a new offset value for future communications. |
| mick | 10/02/2019 17:45:56 |
| 421 forum posts 49 photos | Hi Jason. I've drawn another sketch but can't exactly see the way forward. If you could, when you have the tine, give me a view of the section and the cut rotation you mentioned it would be appreciated. Thanks.
|
| JasonB | 10/02/2019 17:51:24 |
25215 forum posts 3105 photos 1 articles | Will post it after dinner, I have done the sketche salready. |
| JasonB | 10/02/2019 18:58:42 |
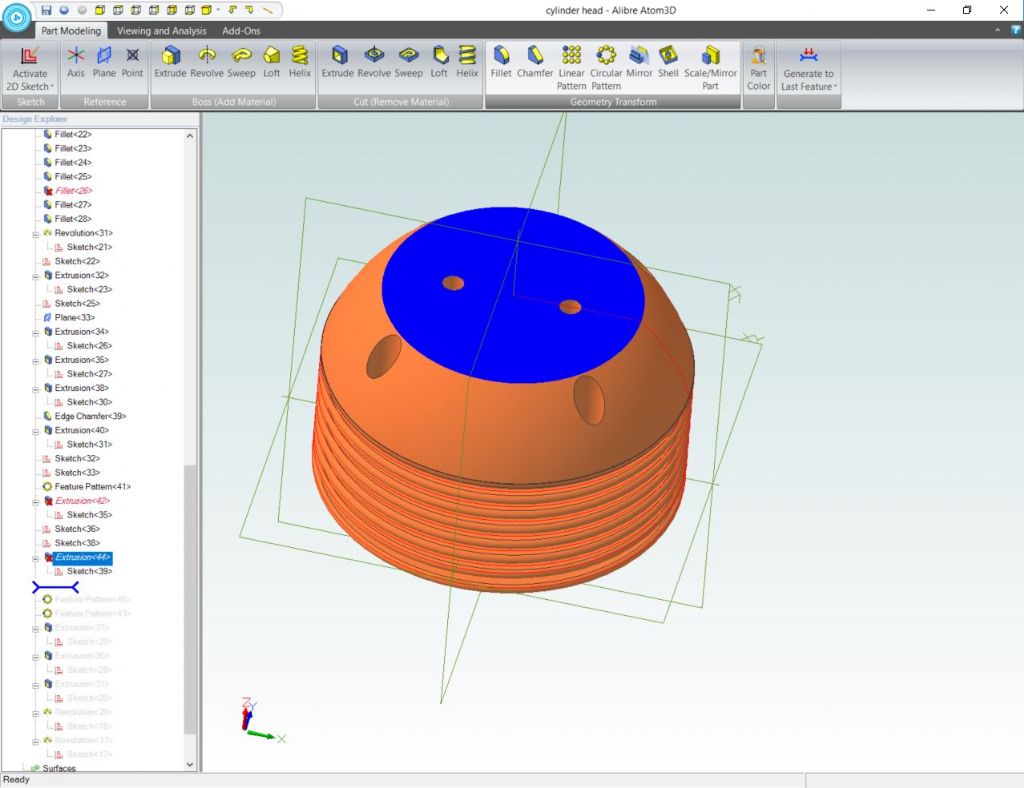
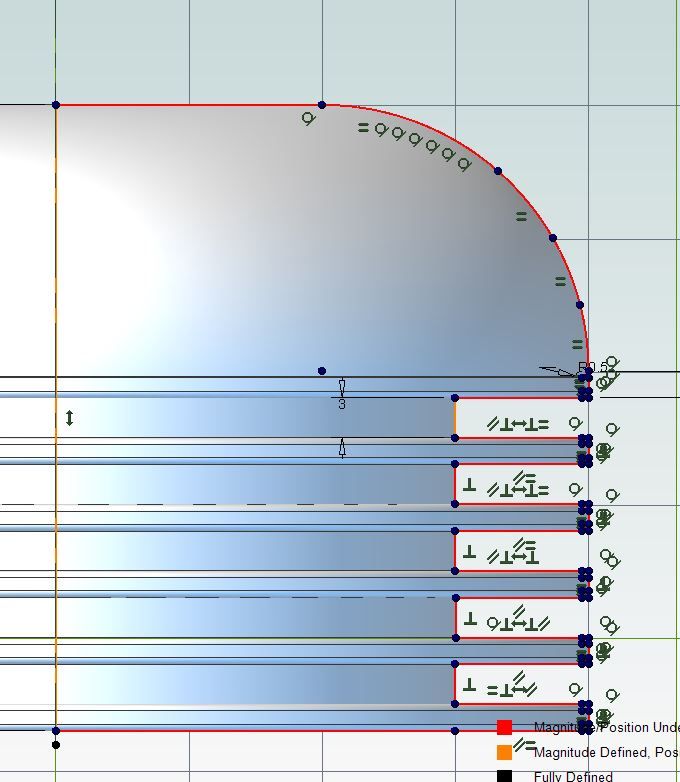
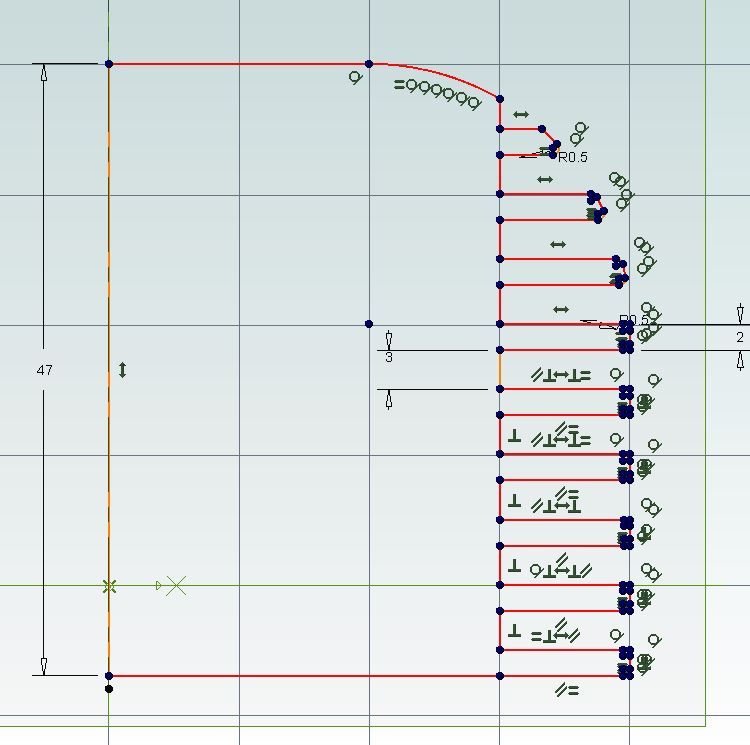
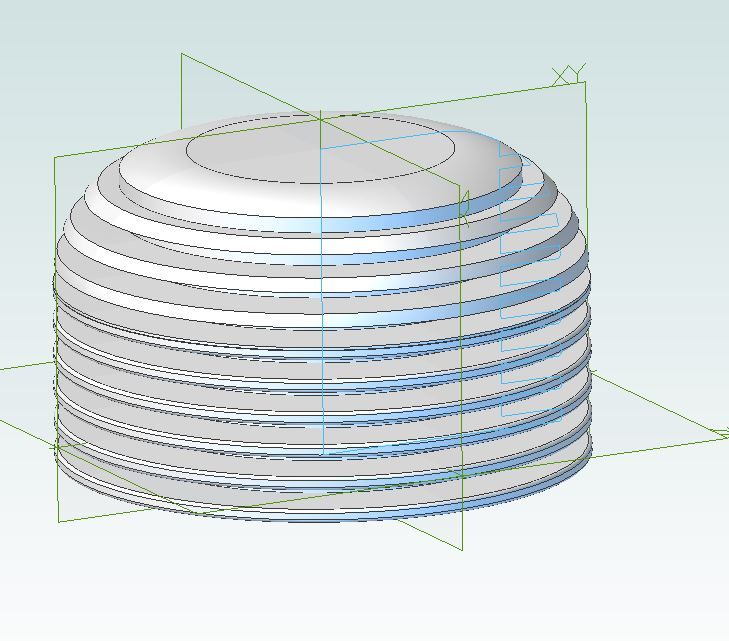
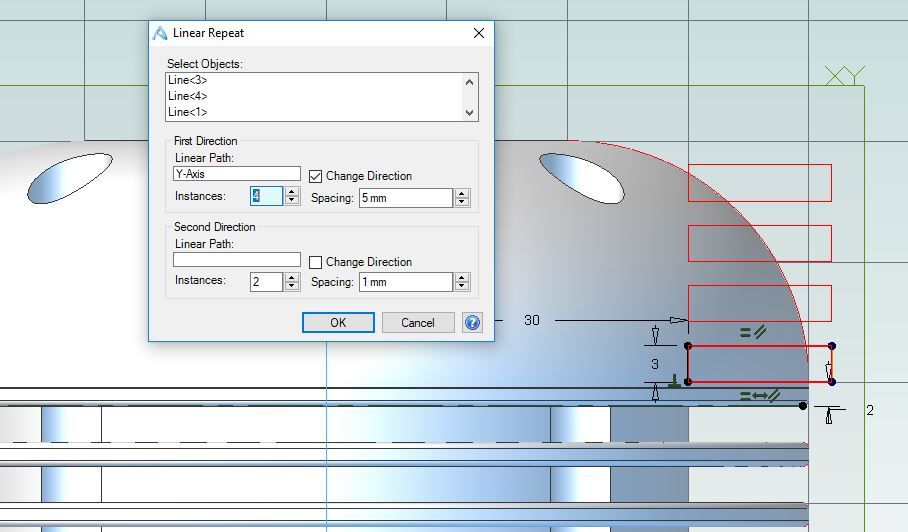
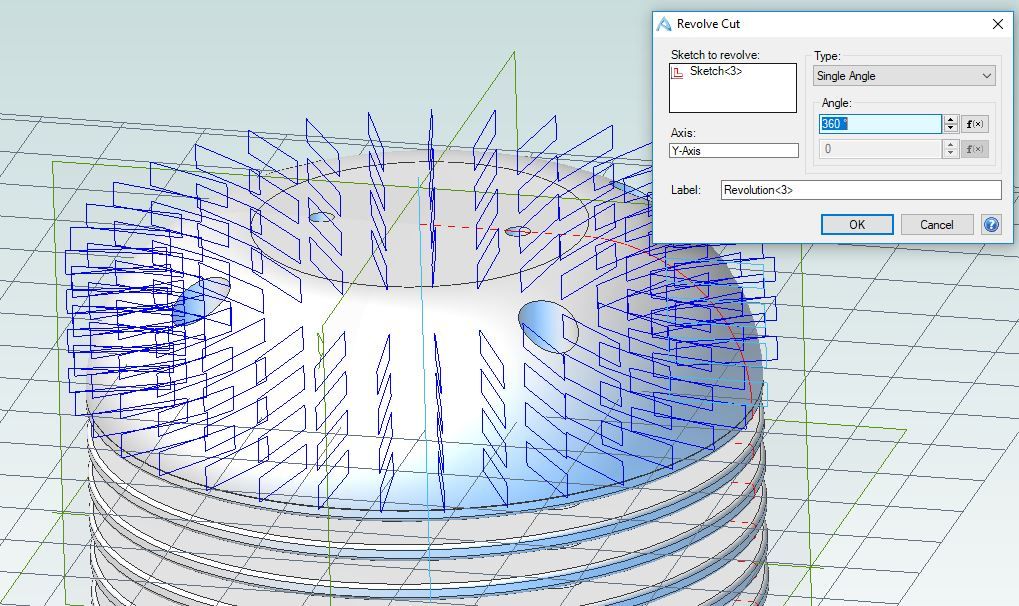
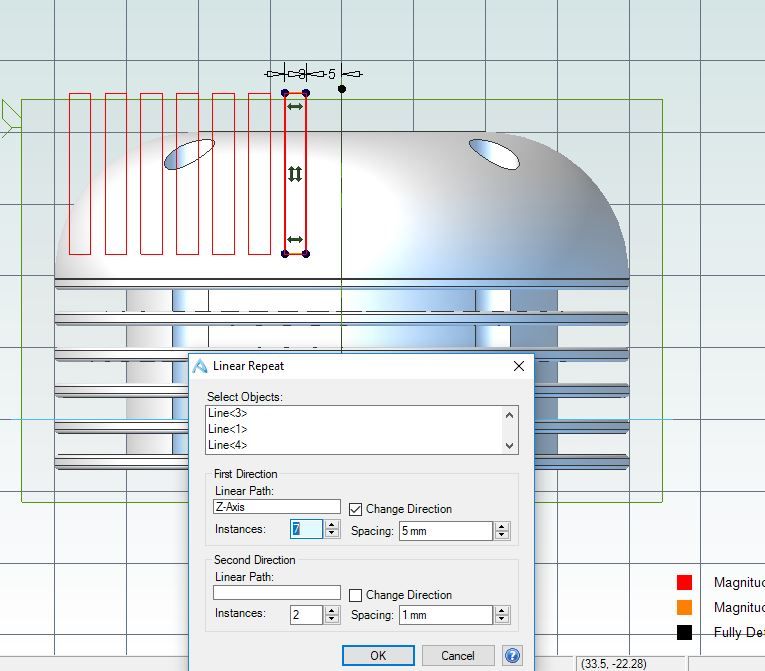
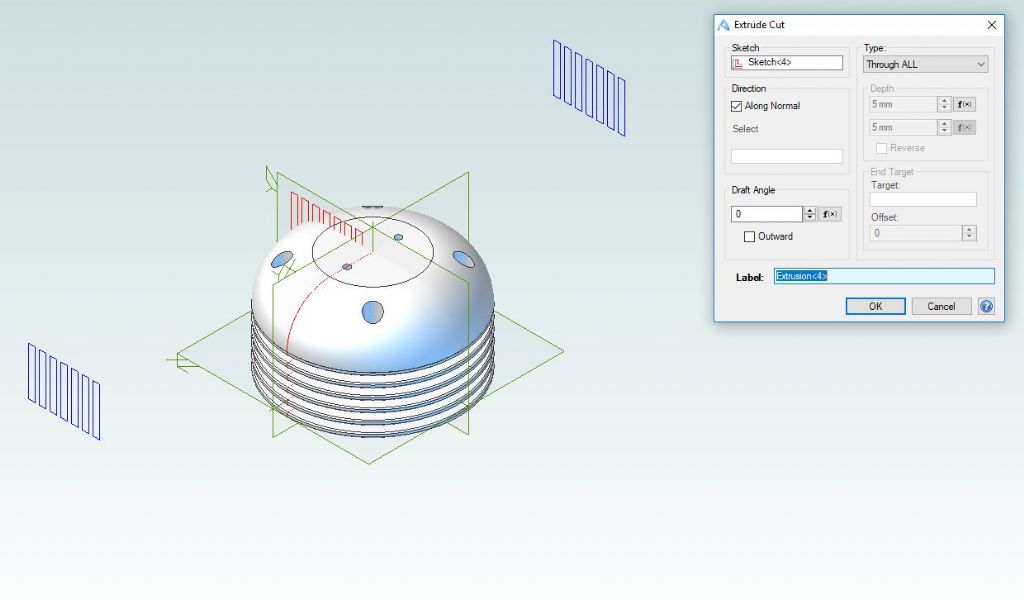
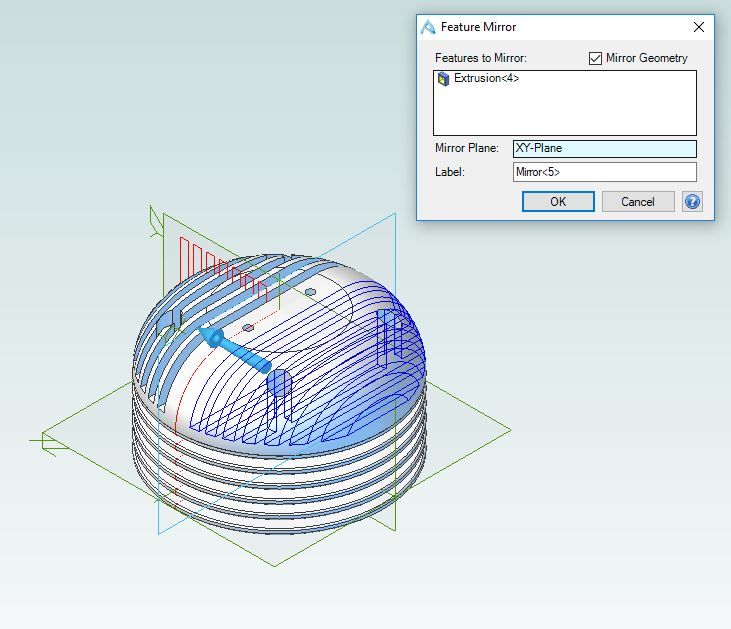
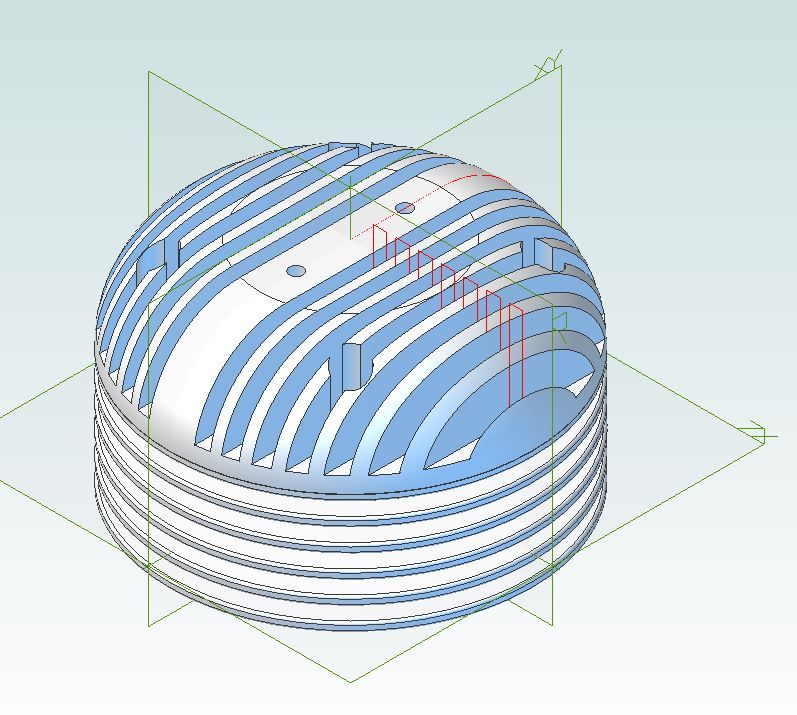
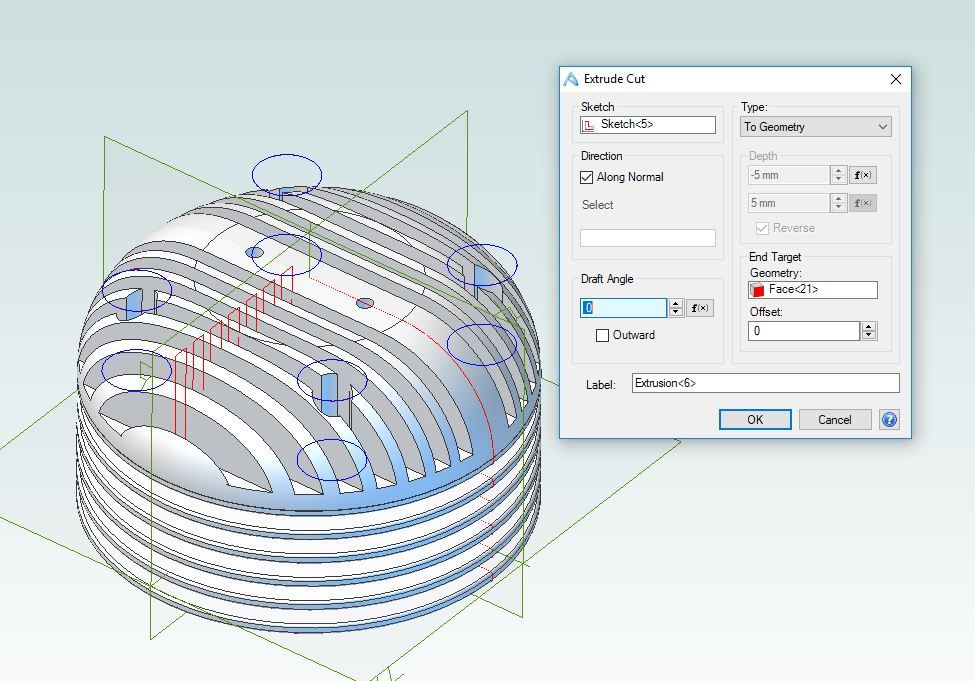
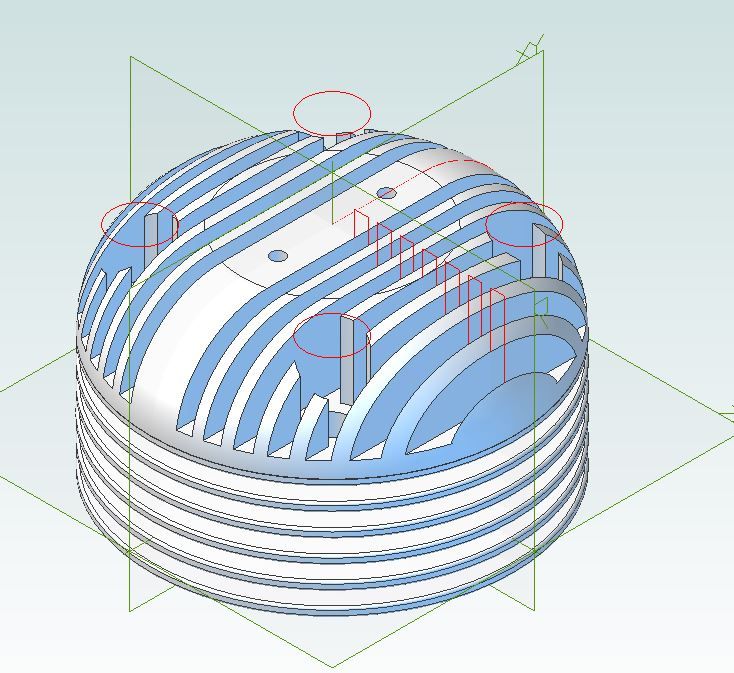
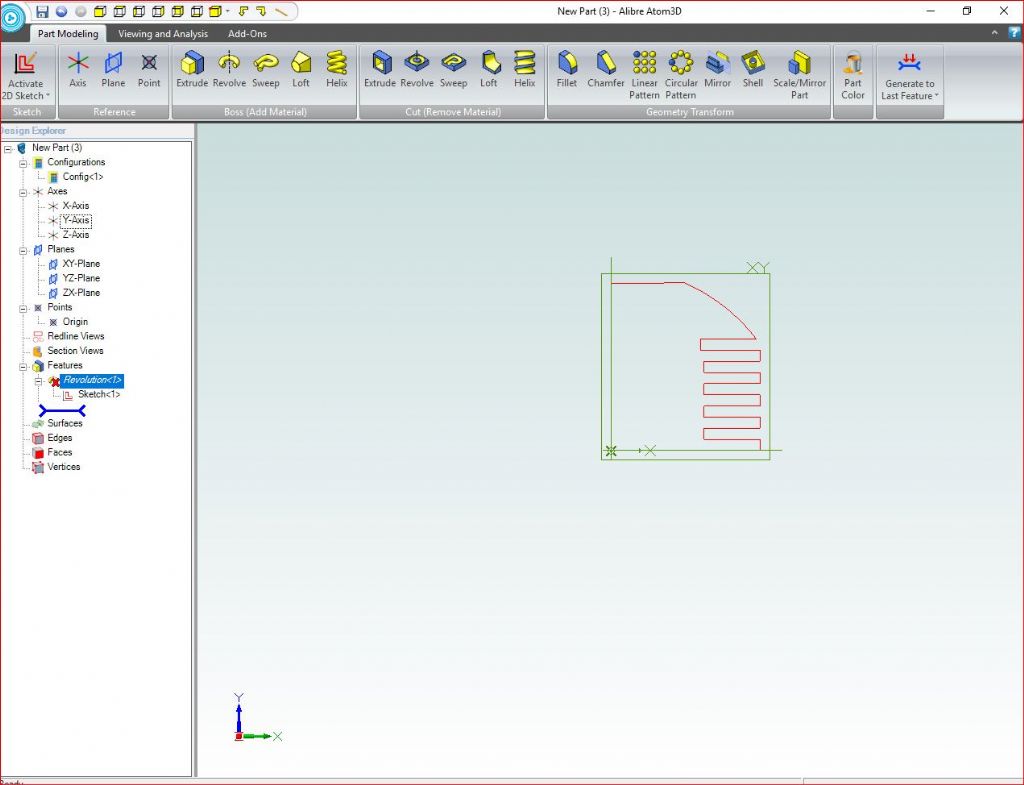
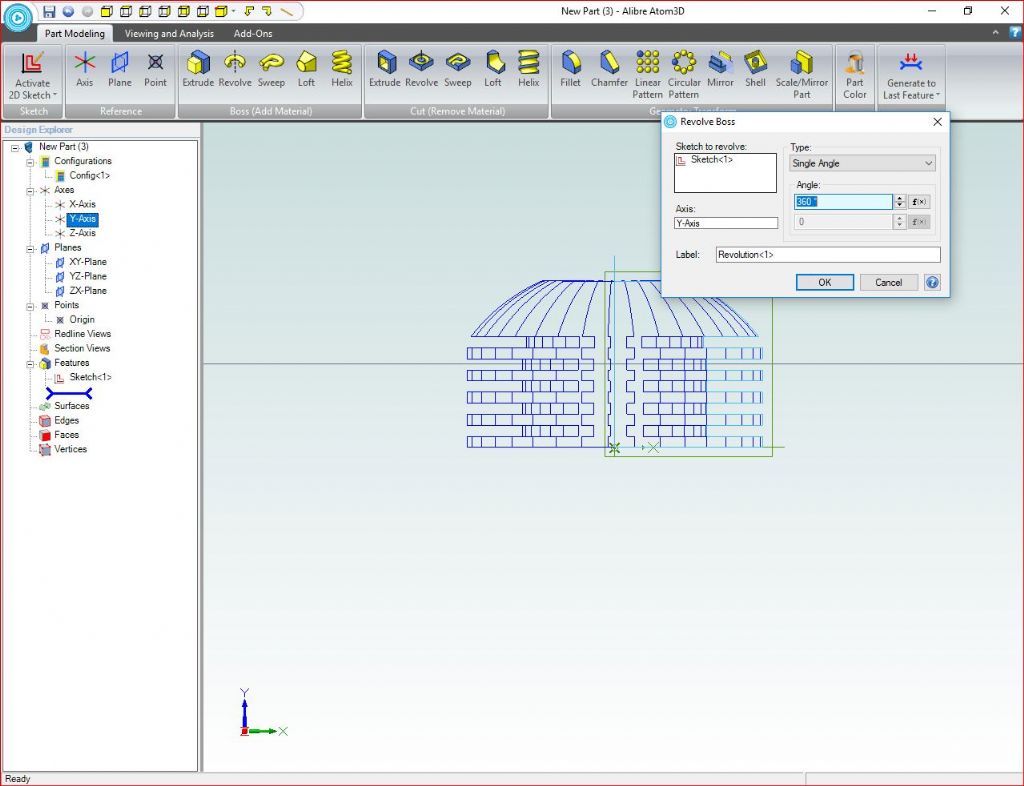
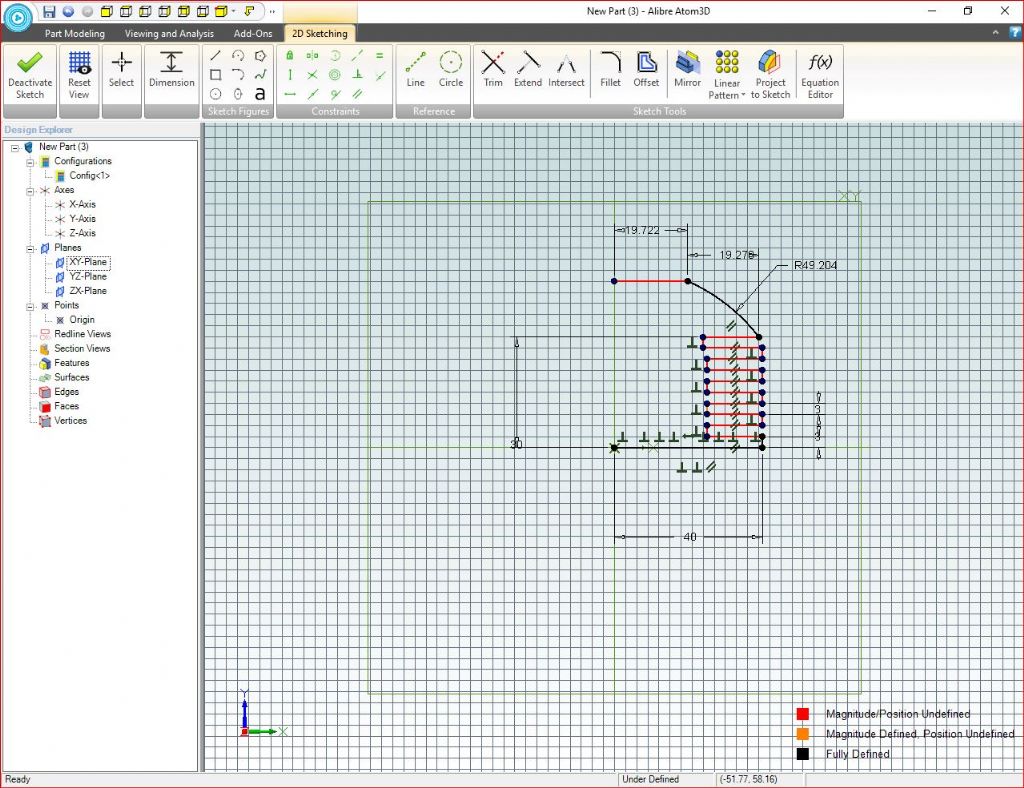
25215 forum posts 3105 photos 1 articles | So as I said before I would draw a sketch and rotate that to get the basic shape of the head. Which when rotated gives something like this First option to add horixontal fins would be to incorporate them into the sketch shown above which would then look something like this And when rotated gives this result If you don't have a sketch like mine or just want to cut the fins into your existing head then a sketch can be drawn where the cuts will be. Notice that I just drew one 3mm high rectangle and then used the linear pattern tool to place the three others above that rather than draw out the whole lot. Then using the revolve cut about the central axis the slots can be cut out, they first show as the blue guide lines But once you click OK they will be cut out like so. If you prefer vertical fins then click one of the vertical planes and draw the slots on that, again I drew one slot and then used the linear pattern for the rest. Decided to just draw slots through half the head so I could avoid the valve holes Then used cut extrude and selected through all After clicking OK it shows the cuts as on the left below. Then to slot the other side I used Mirror to get the other cuts shown as blue until OK is pressed. Then you get to see the finished cuts |
| JasonB | 10/02/2019 19:12:00 |
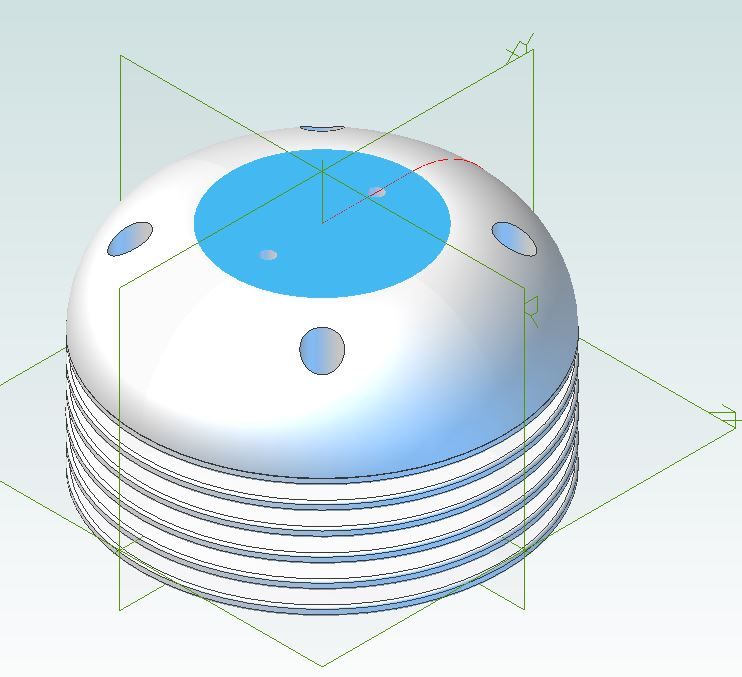
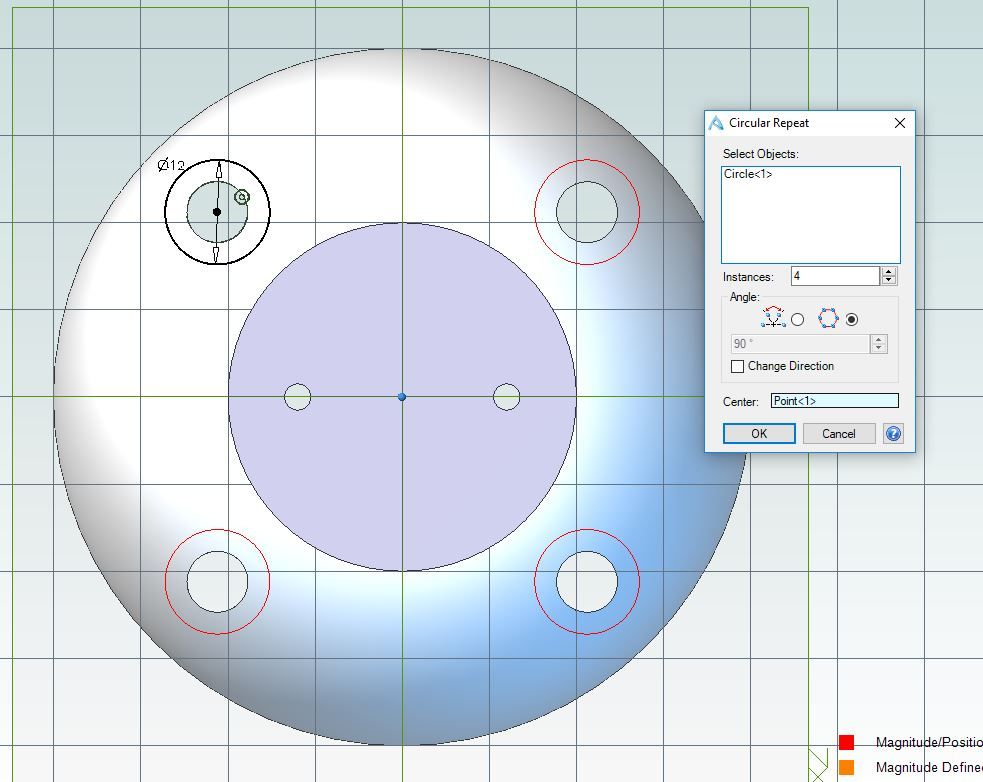
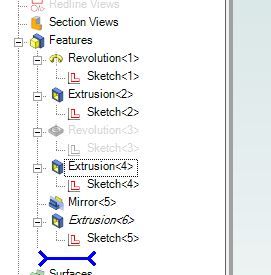
25215 forum posts 3105 photos 1 articles | For the counter bores that you asked about earlier first click the flat top of the head which will make it blue then activate 2D sketch Draw a circle roughly over one of the through holes and dimension it's diameter, then using the concentric constraint click the through hole followed by the circle just drawn which will place it centrally over the through hole. You could do the same for the other 3 counter bored or as I did use the circular pattern feature to place them. De-acivate the sketch and then use cut extrude, you can either set a depth or if the fins have been drawn already select "to geometry" and click the bottom of one of the vertical slots as the place the counter bore will end. Click OK and jobs done You can see I have a lot less sketches at the side than your screen shot, the pale grey pair are the horizontal fins which I have suppressed as we don't need both Edited By JasonB on 10/02/2019 19:14:55 |
| mick | 11/02/2019 16:44:18 |
| 421 forum posts 49 photos | Thanks Jason, that will keep me quiet for a bit!! |
| David Jupp | 12/02/2019 15:10:36 |
| 978 forum posts 26 photos | Mick - I'd add that in each of Jason's examples, an alternative approach would have been a single slot profile in the sketch, extrude cut that, then feature pattern to get the required number and spacing of slots. There is no 'right' or 'wrong' method - using feature patterns keeps the sketch simpler, hence easier to edit. |
| mick | 15/02/2019 18:05:09 |
| 421 forum posts 49 photos | Hi. Jason, its been far too quiet of late! I've been trying all the methods you've demonstrated but I can't get the results in your screen shots. My screen shots are in reverse order ( can't even get that right!) With the sketch I've produced I get the warning that the sketch isn't closed when I exit sketching. The sketch will only rotate when the Y axis is selected, screen shot two, if I select either X or Z I get the result shown in screen shot 3 and that's before I click the okay tab. When I click okay on the rotated sketch I get the result shown in screen shot 3 |
| JasonB | 15/02/2019 18:28:34 |
25215 forum posts 3105 photos 1 articles | You need a horizontal line from ctr axis out to the edge of the head and a vertical line up the central axis which will close the sketch. If you look at my sketch again you can see these two lines, bottom one is red and vertical is orange hence a bit harder to see over the green axis line |
| David Jupp | 15/02/2019 18:42:04 |
| 978 forum posts 26 photos | For more detail about 'closed' profiles - review this video. |
Please login to post a reply.
Want the latest issue of Model Engineer or Model Engineers' Workshop? Use our magazine locator links to find your nearest stockist!
Sign up to our newsletter and get a free digital issue.
You can unsubscribe at anytime. View our privacy policy at www.mortons.co.uk/privacy
- hemingway ball turner
04/07/2025 14:40:26 - *Oct 2023: FORUM MIGRATION TIMELINE*
05/10/2023 07:57:11 - Making ER11 collet chuck
05/10/2023 07:56:24 - What did you do today? 2023
05/10/2023 07:25:01 - Orrery
05/10/2023 06:00:41 - Wera hand-tools
05/10/2023 05:47:07 - New member
05/10/2023 04:40:11 - Problems with external pot on at1 vfd
05/10/2023 00:06:32 - Drain plug
04/10/2023 23:36:17 - digi phase converter for 10 machines.....
04/10/2023 23:13:48 - More Latest Posts...
- View All Topics
- Reeves** - Rebuilt Royal Scot by Martin Evans
by John Broughton
£300.00 - BRITANNIA 5" GAUGE James Perrier
by Jon Seabright 1
£2,500.00 - Drill Grinder - for restoration
by Nigel Graham 2
£0.00 - WARCO WM18 MILLING MACHINE
by Alex Chudley
£1,200.00 - MYFORD SUPER 7 LATHE
by Alex Chudley
£2,000.00 - More "For Sale" Ads...
- D1-3 backplate
by Michael Horley
Price Not Specified - fixed steady for a Colchester bantam mark1 800
by George Jervis
Price Not Specified - lbsc pansy
by JACK SIDEBOTHAM
Price Not Specified - Pratt Burnerd multifit chuck key.
by Tim Riome
Price Not Specified - BANDSAW BLADE WELDER
by HUGH
Price Not Specified - More "Wanted" Ads...
Do you want to contact the Model Engineer and Model Engineers' Workshop team?
You can contact us by phone, mail or email about the magazines including becoming a contributor, submitting reader's letters or making queries about articles. You can also get in touch about this website, advertising or other general issues.
Click THIS LINK for full contact details.
For subscription issues please see THIS LINK.
Model Engineer Magazine
- Percival Marshall
- M.E. History
- LittleLEC
- M.E. Clock
ME Workshop
- An Adcock
- & Shipley
- Horizontal
- Mill
Subscribe Now
- Great savings
- Delivered to your door
Pre-order your copy!
- Delivered to your doorstep!
- Free UK delivery!



 Register
 Log-in


