Forum sponsored by:

CovMac Lathes
| Phil Whitley | 11/09/2014 17:48:30 |
 1533 forum posts 147 photos | Now I have shown you mine, you must show me yours, but I won't pressure you as I know you haven't got it home yet! Phil. |
| CHRISTOPHER MILLS 1 | 11/09/2014 17:49:24 |
 152 forum posts 61 photos | Phil, Many thanks. According to Tony's site, that motor of yours is off the 17" inch chuck model. I have a friend who will move my CovMac on a pallet. I have to move it out of situ, in a back garden shed, and get it to the road. It is all level, and all concreted, but I will be taking no chances. Are all the pieces you removed easy to get off, or do I need to know anything occult? Chris.
|
| Phil Whitley | 11/09/2014 21:45:29 |
1533 forum posts 147 photos | Hi Chris, nothing clever, it is all just undoing bolts, and heavy lifting! Moving lathes on pallets is a real NO-NO!! pallets are not strong enough to hold the weight, which is concentrated at two points, and the pallets always flex! what generally happens is that the lathe belly flops forward and smashes itself to bits on the concrete. Far better and safer too put one of these http://www.bfsltd.co.uk/products_hooks.asp adjustable crane hooks on the forks and suspend the lathe below the forks. this is the totally safe and right way to do it, and I have seen so many amazing old machines written off by trying to put them on, or move them with a pallet. they are just far too top heavy. If you do move it on a pallet you MUST ratchet strap it to the fork truck mast with at least two heavy duty ratchet straps with timber balks between the mast and the lathe so that it cannot possibly fall forward .Do not think that you can ratchet strap it to a pallet, it will tear the pallet to pieces and still fall off. Pallets are designed to support weight evenly spread over the whole area of the pallet surface, you cannot do this with a lathe. Under the headstock there is a large round hole in the bed casting, this is usually for a round steel bar to be pushed through to form an attachment point for a lifting chain, the lathe will balance on this point when the saddle is adjusted left and right. I have also used these lifting points with a heavy ratchet strap between the crane and the tail stock end to aid the balance.. Moving on rollers is relatively easy. You need some 1" or 1 1/2" pipe at least 12" wider than the lathe headstock foot so you can have 6" poking out either side, and a good long crowbar, one with wheels on if you can get one http://www.hirestation.co.uk/tool-hire/Material%20Handling/Skates%2c%20Crates%20and%20Crowbars/375550/ Lift with the crowbar in the centre of the headstock foot and place a roller under the foot, then go to the tailstock end and lift that end, and place another roller under the headstock end behind the first. You only really need two rollers, the rest are for cornering. Now go and sweep that concrete yard so clean that you could eat your dinner off it!!! any loose grit will stop the rollers dead, and the machine will keep moving! Now go to the tailstock end and , with a small lever or crowbar, start to move the lathe, 2" at a time till you get used to it. Incidentally, this is a job that you cannot do by yourself, you need a couple of strong, but intelligent people to help, for safety's sake as well as the to provide the grunt needed. One uses the lever to move the lathe forward whilst the other two steady the headstock end and attend to the rollers, to corner simply angle the rollers in the direction you want to go. Slow and steady wins the race, and please remember if it falls over on someone they won't be getting up! Another method would be a really heavy duty engine crane to lift the headstock end just clear of the floor and then move the tailstock end on a skate or a roller crowbar. Do not lift on the chuck!!! Also be aware that you cannot put a ratchet strap or lifting sling round the outside of the leadscrew or the feed drive, as the will bend. Phew, think I have covered everything.......................please be careful. Phil |
| Oompa Lumpa | 11/09/2014 22:16:16 |
| 888 forum posts 36 photos | Don't use rollers. Far easier to put angle iron down and slide along the tops. Mr Stevenson describes this in detail somewhere but there is no risk of it falling off rollers this way. graham. |
| Phil Whitley | 11/09/2014 22:22:11 |
1533 forum posts 147 photos | That sounds interesting! I have never done that before. I will look for Johns post! Phil |
| CHRISTOPHER MILLS 1 | 11/09/2014 23:28:08 |
152 forum posts 61 photos | Phil, Many thanks for your time in offering all of this advice. I will take it all onboard, but the friend who said "pallet it" is a very experienced engineer, who has a great deal of experience moving machinery. He has many lathes. Maybe he has not moved many?? I would build a "Rolls Royce of a pallet, because it is not going on any standard sized pallet, being over 7 feet long. I will look up all the references you have kindly given me. If I have to move it myself, my inclination is to separate the bed from the legs, and move them separately. Is there any sense in that? It would address its top-heaviness. I wish to dismantle it anyway, for renovation. I will take no chances, because I really love this lathe, and I am under no real time pressure, because the vendor is very relaxed; it was his father's and he has taken over two years even to advertise it for sale. He is very happy to see it going to a good home, for the alternative was the scrapman, as nobody else was interested in it. I cannot afford a professional company, so I really have to shift it myself. I have to swivel it through 90 degrees, twice, to exit the shed it is sat in. So, I was thinking of running two heavy duty plywood plates, under the headstock and tailstock ends, with twelve swivel castors, altogether rated at 2.4 tons, and run it over two 1/4 inch plywood sheets, on the floor, to smooth out any bumps in the concrete. That would move it to the road. I would use bottle jacks to get it up, with two 9 x 2 timbers, under the bed, high enough to push the plates with castors in under. There is a 2 ton capacity engine crane, hand operated, on eBay for £133. It looks a serious piece of kit. Could I use one of those to put it onto a flatbed? I feel happier with the idea of separating bed from the plinth and legs. I paid £400 for the lathe, and am budgeting about £400 to move it. Your advice is very much appreciated. Many thanks. Chris.
|
| Muzzer | 12/09/2014 03:15:37 |
 2904 forum posts 448 photos | Be wary of the so-called "2 tonne" engine cranes. If you mean one of these fine machines, which are available in almost any colour and brand name under the sun, you can start by halving or thirding that number. I enjoyed great amusement when lifting my Bridgeport clone milling machine (almost exactly 1 tonne) with one of these. With that kind of load, it wobbled around as if it was made of rubber. Luckily I have a proper, sturdy engine crane that was able to pile in and finish the job without me ending up in a box and the machine in a hole in the ground. I'd love to see somebody lift 2 tonnes with one of these. Merry
Edited By Muzzer on 12/09/2014 03:16:19 |
| CHRISTOPHER MILLS 1 | 12/09/2014 08:04:45 |
152 forum posts 61 photos | Muzzer, Many thanks for this - I thought these looked too good to be true, for the price. How do they get away with this, under our famous Health & Safety culture? Chris. |
| Phil Whitley | 12/09/2014 09:14:21 |
1533 forum posts 147 photos | Hi Chris, I am very reassured! making your own pallet is a whole different ball game. taking the lathe off its legs does make the whole job MUCH safer It sounds like it is going to be ok. I can't comment on taking the legs off because I have never done it on mine, there will be huge whitworth bolts somewhere underneath. If you can get forks under the bed, or use a lifting hook and get the whole plot just clear of the deck, then unbolt the legs, which probably means the drip tray and its sump comes off as well, then lower it onto a pallet, job done! As I said on another forum, I have seen grown men cry when their pride and joy lies smashed on the floor! Only a couple of weeks ago I was watching a guy move an immaculate looking BIG Colchester with a fork lift, and if it had not been for a ratchet strap which suddenly twanged tight, it would have been on the floor! Good luck! Can' wait for some pics, I will try to get some better ones of mine next week, unfortunately, today I will be mainly plumbing (another job) Nervous Phil.
|
| CHRISTOPHER MILLS 1 | 12/09/2014 09:36:05 |
152 forum posts 61 photos | Phil, Although new to metal lathes, I have very carefully spent 18 months studying every aspect of interest to me. After talking to you, and others on this forum, I am now quite looking forward to moving it. I think I am resolved now to separate bed from base. Cast iron plinth and legs look so fragile, and the top heaviness seems an accident waiting to happen. Do you know if the legs come off the drip tray, and then the bed off the tray, or if the legs are integral to the drip tray? There is a series of "You Tube" videos, headed "Hendy Lathe Move", where this enthusiastic, novice (a bit like myself) American moves a huge old Hendey lathe, in some of the most lunatic ways possible, all alone, every stage done entirely alone) into his basement, and it is more useful, in some ways, watching how "not to do it" than watching professionals doing it properly. He survived, but he caused three major pieces of damage to the Hendey, including smashing off the taper turning attachment, bending the main rod alongside the lead screw, and smashing off one of the main casting bed legs. He was lucky he did not kill himself, at one point he has it at the tops of a flight of stairs,he is standing at the bottom gazing up at it. When it did finally fall, and smashed the bed leg, he had, give him credit, stepped to one side, out of the danger path. I think I will separate the legs and bed, under carefully controlled conditions, then bolt and lash the bed to the Rolls Royce pallet" and have my friend put it to his transport. I will discuss it with him on Sunday, when I see him. Can I visit you, and see your CovMac, when I am up north on business? I would much look forward to it. Yours differs a little in that it has wheels on the side and compound slide controls. Mine has those cute little handles, with two pieces, a ball and a sort of a toggle. I do not know what they are called, but I love them. I would guess that my Covmac is a little earlier than yours. I hope to get you pictures in the next week or so. Mine is a battleship grey colour, with a darker grey paint showing underneath. I want to restore it to the darker grey colour. What do the two big handles on the top of the headstock do? I imagine the left hand one is setting four different spindle speeds, but the right, I do not know. Chris.
|
| CHRISTOPHER MILLS 1 | 12/09/2014 12:56:57 |
152 forum posts 61 photos | Phil, Sorry to be a pest, but I am calculating the weight I have to shift. Assuming Tony is right about the weight of the standard Covmac 13" geared head model @ 1870 lbs, 130 lbs short of the ton, our models are heavier in that they have an extra 21" of central bed, and the plinth instead of the headstock end legs. I am trying to calculate weight of the bed and headstock on their own. If I remove tailstock,(80lbs?) carriage (200 lbs?) , drip tray, (50lbs? plinth and leg, (80lbs) gap piece (30lbs) and chuck, my feeling is the bed and headstock, and gearbox, remaining are going to be well less than a ton, in which case I can shift it using a drop tail lift three and half ton van? An average drop tail lift will take a ton. I had ruled that out, early, but now dismantling I think will enable it. This seems to be my answer, assuming I can separate bed from legs okay . Are you in broad agreement with me, here? I think I am getting there, now. Many thanks. Chris.
|
| Phil Whitley | 12/09/2014 21:41:19 |
1533 forum posts 147 photos | Hi Chris, You are not a pest!!! this is exactly what these forums are for! I will read your posts as I write and try to answer all your questions. I will also nip to my workshop tomorrow, take some more pics, including some of the leg fixings, and have a good poke about to see what is what. I watched the Hendey lathe move for as long as I could bear it, I would give whatever is left of my eye teeth for a taper turning attachment, and he didn't even have the nouse to take it off! First things to remove are all the sticky out bits, and as a bit of general advice, wherever possible, put the bolts back in the holes, it makes reassembly much easier, you can't loose them, and you don't reassemble with the right threads, but the wrong length, and have to swap them about. The one exception to this would be the ones that hold the legs on, in order to keep the underside of the lathe smooth for sliding/rolling. As I said before, I think taking the legs off is a good idea. The tail stock end one is a bit flimsy, and it did spring a bit on mine when I was moving it on rollers, which you cannot put under the tail stock end of course. The problem with removing the saddle (carriage) is that you have to remove the lead screw and the feed drive rod, which means disconnecting them from the feed/screw cutting gearbox Other than this the saddle and apron removal is straightforward enough, if you are going this far, you might consider removing the headstock from the bed as well.. This would mean resetting it square to the bed on reassembly, but you will have to check, and possibly adjust it anyway. I will have a look at the possibility tomorrow to see if it is feasible. You are very welcome to come and see my lathe anytime you are in the north, as I am what I laughably call self employed, my timetable is very flexible. If you PM me or send your email to phildothermeticatlangtoftdotnet I will give you my contact details. I am in agreement with you, but when you remove the lead screw/feed shaft and the saddle, you will be left with something that is very heavy at one end, and no way of balancing it The colours on Tonys site look black, but they could be dark grey, a very popular colour for this era of machines. As far as I know the two big handles on the top are both gear levers, they may be a high/low lever and a speed change, or two speed change levers used in combination, I will find out tomorrow for you. Tail lifts are ok but tend to tilt away from the back of the truck when heavily loaded, I can remember moving a clicking press and unloading it with a tail lift, if it hadn't been for the fearsome slope on my yard it would have been another disaster. 3 1/2 ton van? I am going to be awkward again Phil,
|
| Phil Whitley | 12/09/2014 21:52:54 |
1533 forum posts 147 photos | Today I went to see my friend Jim to fix his radiators. I hate him because he has a Tom Senior mill, and he is holding my dumpy philips screwdriver hostage. |
| CHRISTOPHER MILLS 1 | 13/09/2014 07:20:32 |
152 forum posts 61 photos | Phil, Many thanks, and I will take your wise point on the 3.5 ton van. I rather look forward to your investigation into my best options with the CovMac. I see from the historical archive, that by 1938, CovMac were a subsidiary of Alfred Herbert and Company, also of Coventry. Chris. |
| Phil Whitley | 13/09/2014 16:57:55 |
1533 forum posts 147 photos |
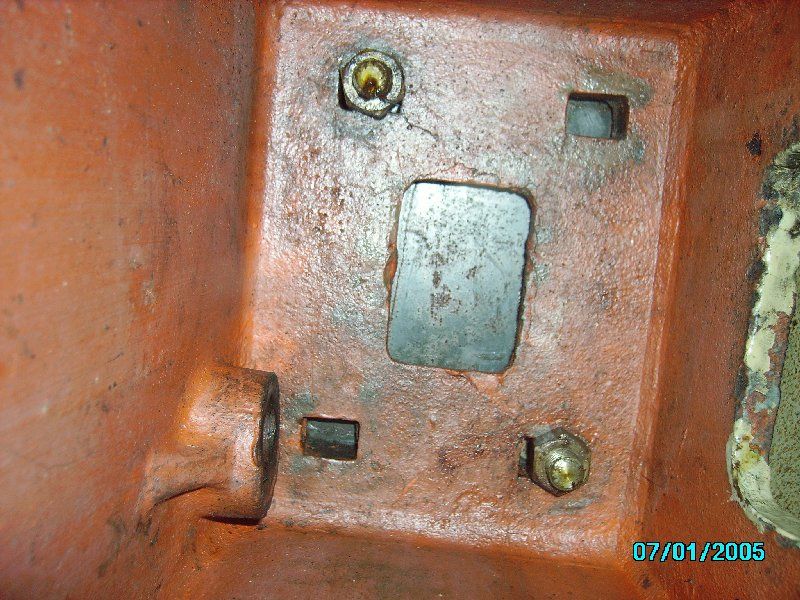
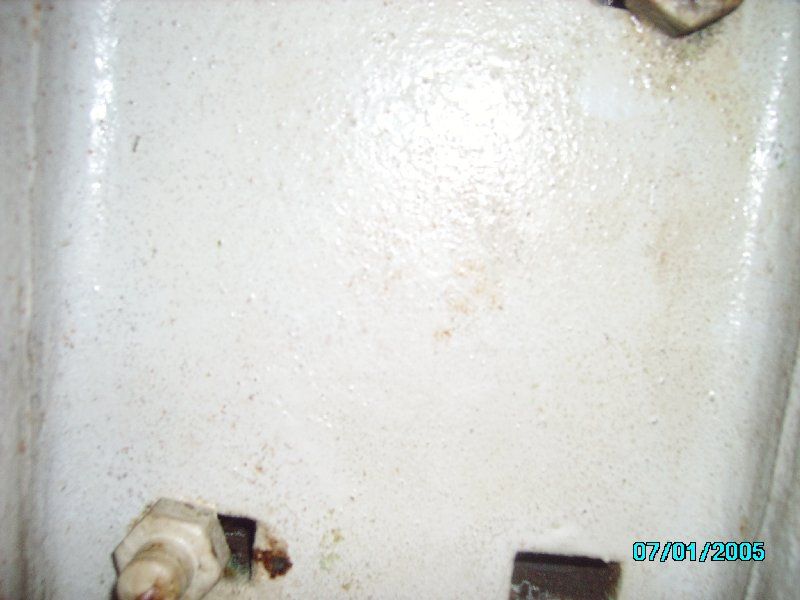
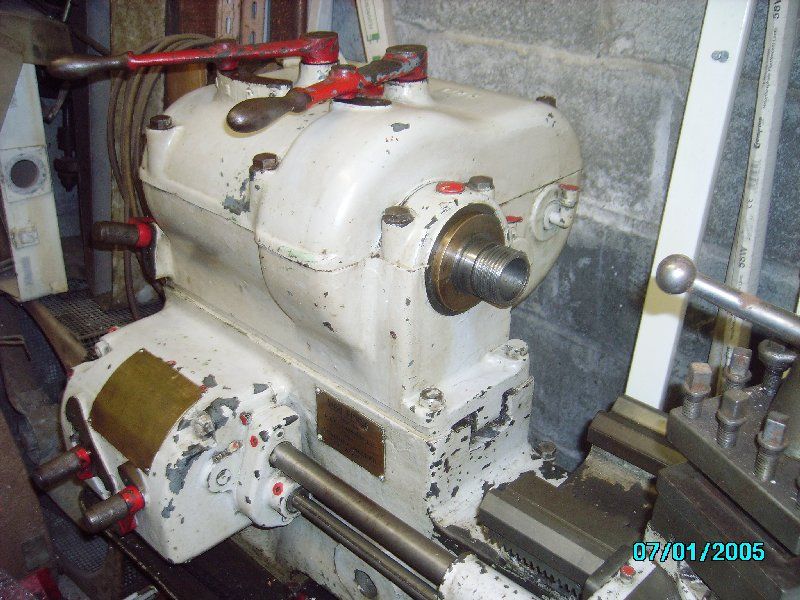
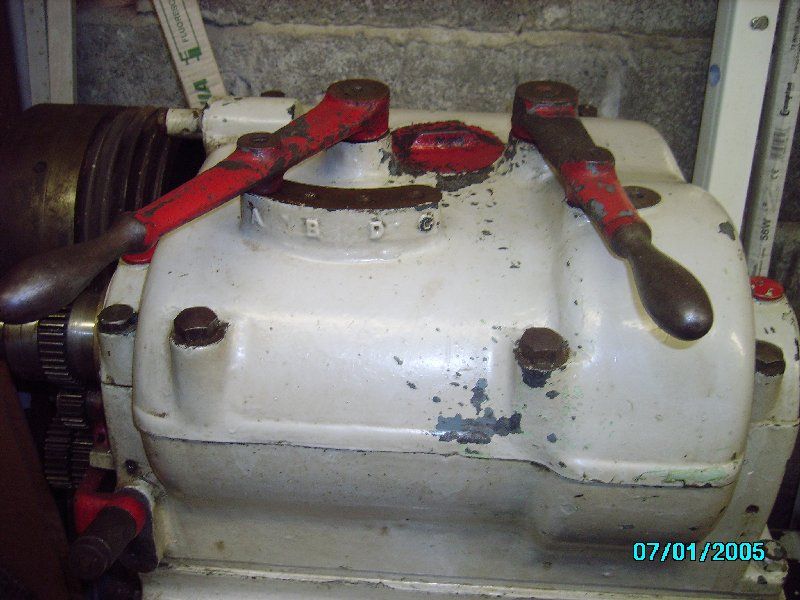
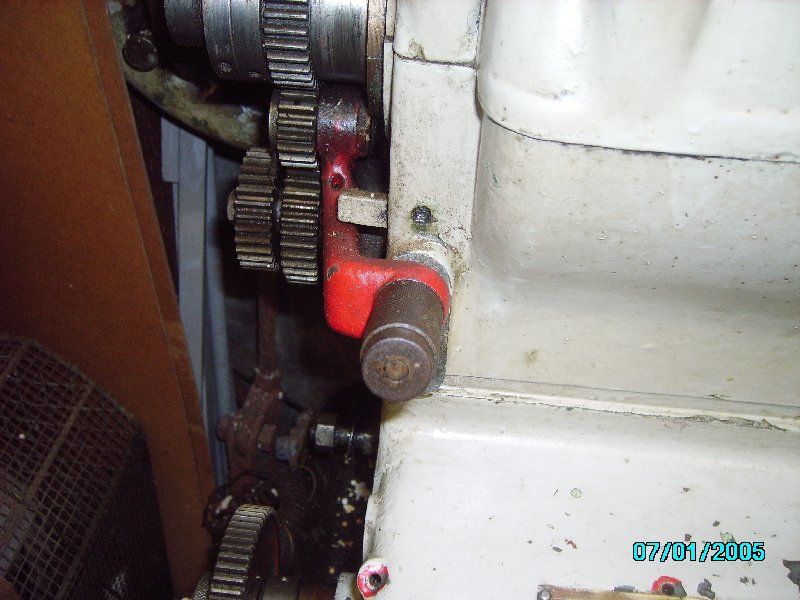
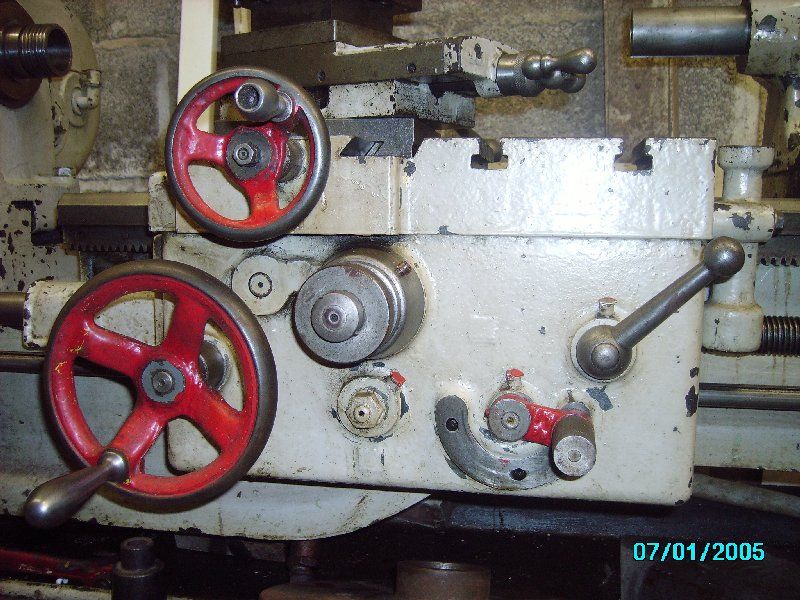
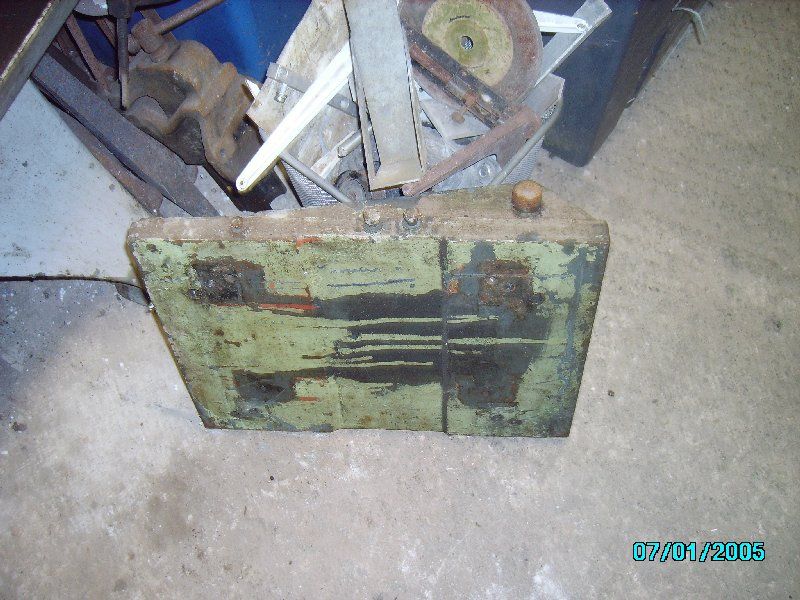
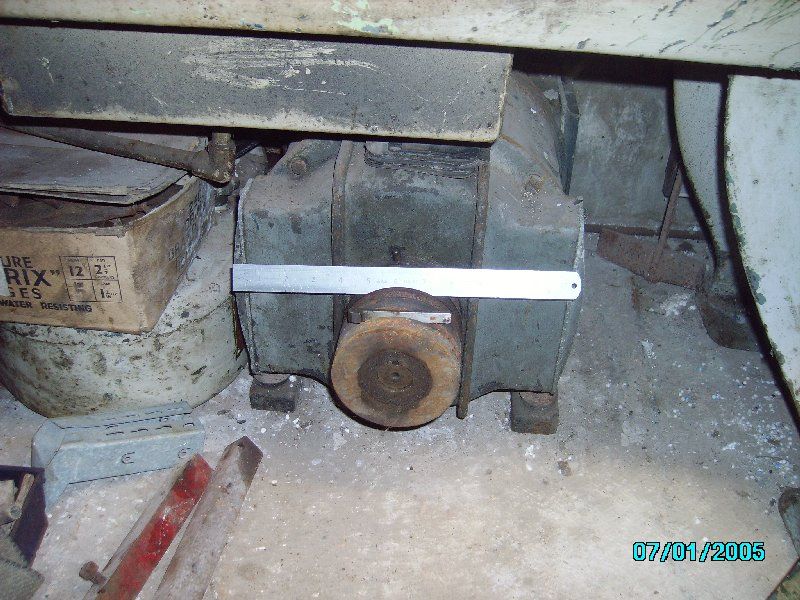
The red one is the headstock column, there are two studs and nuts but you will note 4 holes, the other two have not been drilled or tapped It is the same at the other end, (bit of a bad pic) but you can see two studs and nuts again, and two apparently unused holes. If you remove all the belt covers and gear covers, motor, motor plate, then the banjo with the gears on it, you will see these two bolt heads If you remove these two, and these two under the spindle Then fit a chuck or faceplate and place a sling round and behind the chuck, and round and behind the vee belt pulley, and as far as I can see, the gearbox lifts off. You will need to make careful note of the number and position of any shims that may be in there (there may be none) If you then remove the nuts from the studs holding the legs on and remove the studs (they will probably come out with the nuts) you could lift the bed assembly with a fork truck, remove the legs, and lower the bed to the floor. As I said before if you remove the saddle you will first have to remove the lead screw and the feed shaft And without knowing how they disconnect from the feed/screwcutting gearbox, this process could be simple, or complex, I simply don't know! If you do remove them, you could then remove the saddle and apron, and the feed/screwcutting box as well, leaving you with some still very heavy, but much more manageable pieces to transport. The top two levers, left hand one is the four speedchange lever, right hand is the back gear, or high/ low change giving eight speeds, four in low/backgear, and four in high. Sounds complex, but it isnt. Tumbler reverse lever, this reverses the direction of the feed/screwcutting gearbox, and thus reverses the direction of the leadscrew for cutting left hand threads, and any other process needing the opposite rotation.At least, that is my take on this lever, some also have a neutral position so you can operate the lathe without the external gear train and the feed box turning, which make for a MUCH quieter lathe!! saddle/apron controls, from the top. Small "ball" handle operates the top slide (AKA compound slide, which can be adjusted around an engraved protractor scale to turn tapers and for screwcutting. Small red handwheel operates the cross slide, which moves the compound slide and the toolpost across the bed. Large red handwheel moves the whole saddle along the bed. Round knurled knob in the centre of the apron switches the feeds between "sliding" (up and down the length of the bed) and "surfacing" which powers the cross slide backwards and forwards across the bed. Below that is an oil nipple (not grease!) The little red three position lever to the right selects the feed direction with a central neutral position, and the ball handle just above that opens and closes the half nuts for screw cutting. Bolted to the end of the apron on the extreme right next to the two T slots is the leadscrew indicator, sometimes called the screwcutting dial, which reads out the position of the saddle in relation to the threads on the lead screw. Once again, sounds more complex that it is in reality. The golden rule with all levers is do not change gear with the lathe chuck revolving! The motor plate, solid cast iron one inch thick, and I can barely lift it! The motor, and yes, that is a 12" rule! I can just about drag it across the floor, I would guess about 2 1/2 to 3 cwt. |
| Phil Whitley | 13/09/2014 17:08:31 |
1533 forum posts 147 photos | Right, it has just lost the end of that post, as the cut command did not work so I will try to type it up again Hope all this helps. I would strip it completely, it will make the move much simpler and safer, but you would still need help and a fork truck or engine crane, and if you are going to refurbish it, why not I would not go beyond giving the headstock and feed box a good wash out, as if you remove the spindle you will have to reset the bearings and that is a tricky job, but not impossible by any means. You will have to check the alignment when you refit the gearbox, but that should always be done after a machine is moved anyway. If I can give any more help let me know. Phil That wasn't as good but never mind |
| Phil Whitley | 13/09/2014 17:14:04 |
1533 forum posts 147 photos | Hi Chris, Where is the motor on your Covmac? I have just realised that the cast boss you can see inside the headstock plinth is where the bolt used to adjust the belt tension goes through. That is why the door is there, to get to the belt adjustment. Phil |
| CHRISTOPHER MILLS 1 | 13/09/2014 17:38:47 |
152 forum posts 61 photos | Phil, This is really wonderful stuff, and you cannot imagine how much I appreciate your going to this time and trouble. I certainly owe you a drink. It looks like you had to half dismantle your machine!! Mine has the thick iron motor plate, like yours, but the motor on mine is much smaller. Mounted to the rear base of the headstock end, it has twin 'V' belts which run up at about 60 degrees, and attach to the back gear side of the headstock. They do not go anywhere near the headstock plinth - miss it out completely. If I remove the carriage, can I not roll it to the end, and off the bed, supporting lead screw and rod, and then re-bolt the two back into their tailstock housings, leaving gearbox end untouched? The dark grey paint revealed on yours, under the white paint, exactly matches my base coat, and I think that is our original colour. I had hoped the lathe would be easy to dissemble, being made in the 1930s/'40s. What socket set do I need? Is it classified as 'Whitworth"? I have tried your dot com address but it blanks me. You can trie me - cpmills1 'at' g mail dot com Many thanks, and best wishes. Have a great weekend, Phil. We surely now, finally, form your hoped for CovMac Owners' Club? It is fun to have a Covmac, I know that already. Have you not run yours yet? Is it because you only have Three Phase in your workshop? I recall you said the CovMac motor was single phase. Chris.
|
| frank brown | 13/09/2014 18:05:45 |
| 436 forum posts 5 photos | When I moved my Deckel clone, we used a 7 1/2 tonner, because its weight is 1000kG ~1 ton. We could not find a tail lift rated at a ton on a smaller vehicle. It was only a couple of years ago but I think that the driving license regs have changed in the intervening period so its not possible now. Frank |
| Phil Whitley | 13/09/2014 21:00:11 |
1533 forum posts 147 photos | Hi Chris, got your emails, Your lathe seems almost identical to mine, and the conehead of flickr although that seems to have a slightly different feed box, and no plinth with cupboard. I think your motor fixing is exactly the same as mine too, If you look inside the "cupboard" there is a large nut and thread which is attached to the motor plate, and adjusts the belts. No dismantling to do, unfortunately that is how it is at the moment, but it will be soon going back together and traveling a few yards to my "new" machine shop across the other side of the main workshop I think maybe you could remove the saddle like that, but how would you lift it clear without damage to the lead screw, it is VERY heavy. you could separate the apron from the saddle (apron is the bit that hangs down the front with the controls on it) then remove the saddle, then the apron, then replace the lead/feed end bracket. I have never done this however, so I am only assuming it is possible! The dismantling does seem to be very straightforward, as you say, the 30's/40's construction is basic, rugged but also simple and uses a few bolts to hold the whole thing together. Now I have had a good look at mine, i realise it is actually simpler than I thought, and I could have continued stripping mine if landylifts Hiab hadn't been able to lift it. Socket set needs to be Whitworth or BSF (mostly the same size) You will also need a few good BIG screwdrivers, one of which should have a hexagon on it so it can be turned with a spanner if neccasary. Some lever bars, and a soft (hide) faced mallet. When removing screws the screwdriver blade needs to be a tight fit in the screw, almost to the point where you need to tap it with a mallet to get it in the slot, then push HARD and turn sharply, with the spanner if possible. you should also take some release oil/WD40 although it is rare for a well oiled machine like this to have any seized bolts, a plentiful supply of rags/ handwipe paper. Clean it down before you start, it stops accidents, slips and drops.As I said before, put every bolt you can back in the thread it came out of, and with nuts and bolts on guards etc, put them back in the holes they came from and tighten, it makes reassembly so simple, and saves hours! I haven't run mine yet, but that is simply because for the last 20 years I have been involved in other things, and My brother was using my workshop for his business http://www.cambraicovers.com/ I got it back about five years ago. On the same day Steve from landylift was moving my Covmac to my workshop, he was moving the last of my brothers heavy machinery down the road to his new workshop, it all worked very well I then embarked on a three year refurb on my workshop working on it when time allowed. If you get over to see me I can show you around! If you have three phase, you also have single phase, you just use one of the phases, and a neutral.I have tried to get a three phase 3 hp 750 rpm motor, but they are expensive (about £250 new, very rare used) and though they are more efficient than a single phase motor, I will probably use the original motor for now. Incidentaly, I see the "stayrite" starter on the wall next to the lathe, although the joke where I served my apprenticeship (I am originally an Electrical Engineer) was "Stayrite NEVER Right" I would get it, as it matches the motor. Strange motor on yours, shaped like a Brooks, but with the vents through the side of the foot is unusual, interesting! I think I feel a very exclusive Covmac owners club coming on! Phil |


Please login to post a reply.
Magazine Locator
Want the latest issue of Model Engineer or Model Engineers' Workshop? Use our magazine locator links to find your nearest stockist!
Sign up to our Newsletter
Sign up to our newsletter and get a free digital issue.
You can unsubscribe at anytime. View our privacy policy at www.mortons.co.uk/privacy
Latest Forum Posts
- hemingway ball turner
04/07/2025 14:40:26 - *Oct 2023: FORUM MIGRATION TIMELINE*
05/10/2023 07:57:11 - Making ER11 collet chuck
05/10/2023 07:56:24 - What did you do today? 2023
05/10/2023 07:25:01 - Orrery
05/10/2023 06:00:41 - Wera hand-tools
05/10/2023 05:47:07 - New member
05/10/2023 04:40:11 - Problems with external pot on at1 vfd
05/10/2023 00:06:32 - Drain plug
04/10/2023 23:36:17 - digi phase converter for 10 machines.....
04/10/2023 23:13:48 - More Latest Posts...
- View All Topics
Support Our Partners


Shopping Partners
Subscription Offer

Latest "For Sale" Ads
- Reeves** - Rebuilt Royal Scot by Martin Evans
by John Broughton
£300.00 - BRITANNIA 5" GAUGE James Perrier
by Jon Seabright 1
£2,500.00 - Drill Grinder - for restoration
by Nigel Graham 2
£0.00 - WARCO WM18 MILLING MACHINE
by Alex Chudley
£1,200.00 - MYFORD SUPER 7 LATHE
by Alex Chudley
£2,000.00 - More "For Sale" Ads...
Latest "Wanted" Ads
- D1-3 backplate
by Michael Horley
Price Not Specified - fixed steady for a Colchester bantam mark1 800
by George Jervis
Price Not Specified - lbsc pansy
by JACK SIDEBOTHAM
Price Not Specified - Pratt Burnerd multifit chuck key.
by Tim Riome
Price Not Specified - BANDSAW BLADE WELDER
by HUGH
Price Not Specified - More "Wanted" Ads...
Get In Touch!
Do you want to contact the Model Engineer and Model Engineers' Workshop team?
You can contact us by phone, mail or email about the magazines including becoming a contributor, submitting reader's letters or making queries about articles. You can also get in touch about this website, advertising or other general issues.
Click THIS LINK for full contact details.
For subscription issues please see THIS LINK.
Digital Back Issues


Donate

 Register
 Log-in
Model Engineer Magazine
- Percival Marshall
- M.E. History
- LittleLEC
- M.E. Clock

ME Workshop
- An Adcock
- & Shipley
- Horizontal
- Mill

Subscribe Now
- Great savings
- Delivered to your door

Pre-order your copy!
- Delivered to your doorstep!
- Free UK delivery!
All Forum Topics > Beginners questions > CovMac Lathes