Forum sponsored by:

Grinding a step drill
| DC31k | 07/02/2023 14:54:26 |
| 1186 forum posts 11 photos | Posted by Hopper on 07/02/2023 13:41:56: ...the more usual way to do it would be to drill the small hole then use a counterbore bit to drill the larger hole. The difficulty with that approach is that the pilot and counterbore are available in only specific combinations of sizes, generally a clearance hole for a nominal fastener diameter and a standard counterbore diameter. In addition, the length of the small diameter may not suit the OP's particular application. If you want something other than standard metric sizes, a longer pilot or a tighter counterbore than is usual, there will not be an off-the-shelf solution. |
| ega | 07/02/2023 16:58:59 |
| 2805 forum posts 219 photos | The Granlund counterbore system employs separate pilots which are available in a range of sizes and, if necessary, are easily shop-made; very expensive new but can be had at used prices. |
| Vic | 07/02/2023 18:40:11 |
| 3453 forum posts 23 photos | Posted by DC31k on 07/02/2023 14:54:26:
The difficulty with that approach is that the pilot and counterbore are available in only specific combinations of sizes, generally a clearance hole for a nominal fastener diameter and a standard counterbore diameter. In addition, the length of the small diameter may not suit the OP's particular application. If you want something other than standard metric sizes, a longer pilot or a tighter counterbore than is usual, there will not be an off-the-shelf solution. This is what I’ve found. As I work mostly in Aluminium Alloy I started making my own counterbores some years ago from silver steel. They are easily made on a mill and then hardened with a blow torch. I don’t even bother tempering them normally. If my efforts to grind a drill bit doesn’t work out I may well make a counterbore to fit a suitable size drill bit and see how that works. It will likely need some clearance grooves for swarf clearance though. |
| Hopper | 08/02/2023 00:48:10 |
 7881 forum posts 397 photos | Yes it looks like some kind of relief for swarf clearance would be needed if you make your own. The Zoro picture you posted above looks like the small diameter section is tapered back smaller as it meets the larger diameter section, with almost a groove ground around it. Another way you might be able to remove that much HSS faster in the lathe, other than the use a carbide tool bit and turn it down as in one of the videos you posted, might be to buy a cheap compact bench grinder, the type that has 6" wheels but very narrow, and a smaller motor than the heaver duty models, and mount it on the cross slide then fit it with a smaller and better quality wheel. It would shift metal faster than a router and mounted point, which could be used for finishing off and putting on the taper and swarf clearance groove. It would give more precise control than a pistol drill mounted to the bench grinder. Just be very careful to cover all lathe surfaces to keep the huge amounts of abrasive grit generated out of the slideways, chuck, etc. |
| Graeme Yorwarth | 08/02/2023 22:23:11 |
| 12 forum posts 5 photos | Hi, I think the machine you need to look at is called a Monoset (so perhaps search monoset tool grinding wheels). Using an Aluminium Oxide Cup Wheel and would sometimes be dressed by hand using a Carborundum Stone (or sometimes called a Dressing Stick) and sometimes with a Diamond Dressing Stone. Personally I would use a drill grinding gauge to help set the heights and angles. My favourite drill gauge is the shop made version, made from a 500 x 50 x 2 mm thick strip of sheet metal with a small 50x 50 x 90 degree upset to one end in the middle of the upset a centre pin is added and used to locate the centre in the drill tang (away from the cutting edge). The cutting edge of the drill is then swept across the 450 x 50 mm face marking and arc. A comparison is made between the first flute arc and the second flute arc (sorry could not find a picture).
Graeme Edited By Graeme Yorwarth on 08/02/2023 22:38:55 Edited By Graeme Yorwarth on 08/02/2023 22:40:05 |
| ega | 08/02/2023 22:57:11 |
| 2805 forum posts 219 photos | This is from Ian Bradley's The Grinding Machine:
|
| Graeme Yorwarth | 18/02/2023 21:45:58 |
| 12 forum posts 5 photos | Hi Ega, We used to cut a notch in the vertical member to set the 118 degree angle correctly and confirm the cutting edges were the same length (as the scribed line checks the same height only). Great picture, needs a modern edit to replace 'engineers marking blue' with 'black marker pen' or perhaps I have this vague memory that some of the old timers used chalk, the history for this tool is probably related to reducing mess: c 1880: Marking Blue (mainly used for recreation by apprentices) c 1920: Chalk (used on edge by the cutter grinders and very quick) c 1980: Black Marker Pen (used by the tool room) c 2020: Sharpie Pen? Graeme |
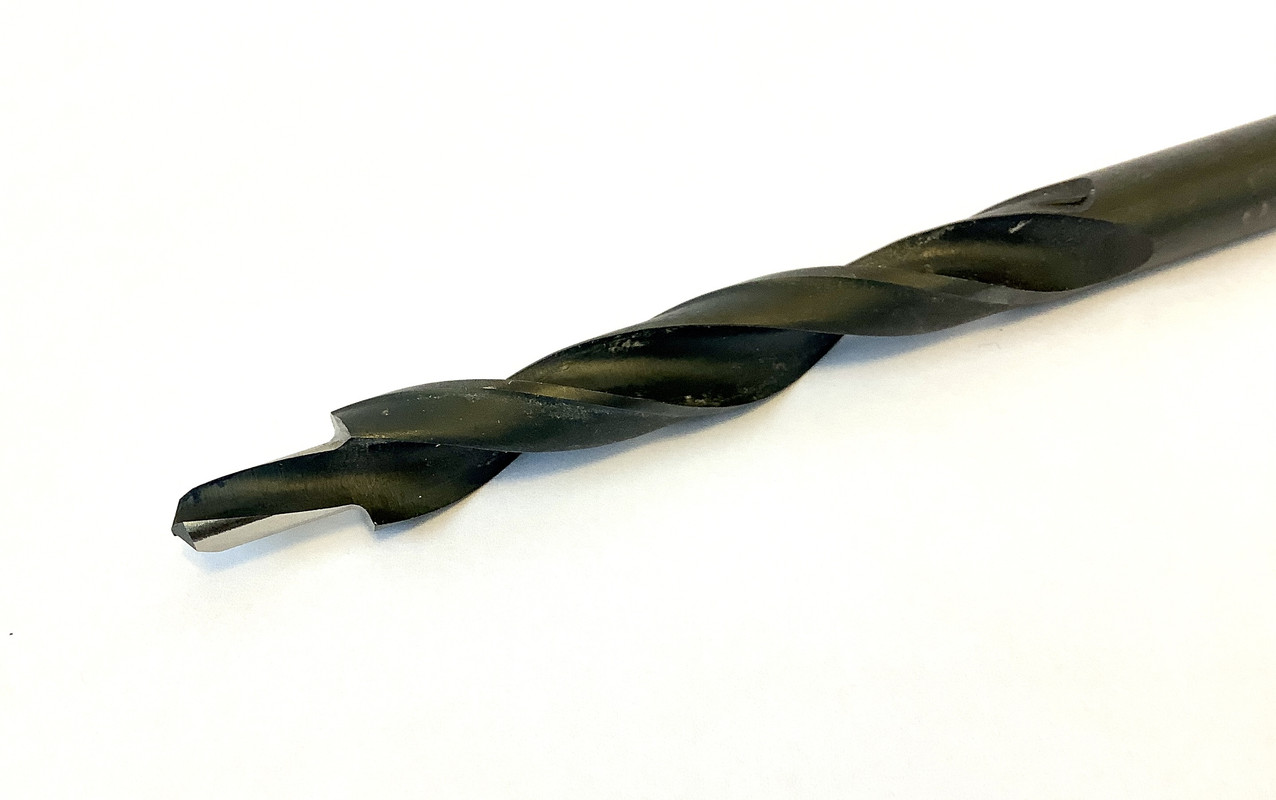
| Vic | 25/02/2023 12:20:41 |
| 3453 forum posts 23 photos | I realised I hadn’t posted a picture. The job has been done and the drill bit works fine. This is my second attempt as I overshot the pilot at my first attempt. Luckily I had bought two spare bits - £1.10 each. I made a collar for the bit as a depth stop then drilled a hole in a piece of wood to act as a guide using my bench grinder. It didn’t take too long until I got near the target diameter for the pilot. I’d prefer something more exact but it’s done the job.
|
| ega | 25/02/2023 16:16:07 |
| 2805 forum posts 219 photos | Graeme Yorwarth: Just seen your post. Good point about the angle. I take it that the notch would be in one or both edges of the vertical member, effectively taking the place of the normal angle gauge. |


Please login to post a reply.
Magazine Locator
Want the latest issue of Model Engineer or Model Engineers' Workshop? Use our magazine locator links to find your nearest stockist!
Sign up to our Newsletter
Sign up to our newsletter and get a free digital issue.
You can unsubscribe at anytime. View our privacy policy at www.mortons.co.uk/privacy
Latest Forum Posts
- *Oct 2023: FORUM MIGRATION TIMELINE*
05/10/2023 07:57:11 - Making ER11 collet chuck
05/10/2023 07:56:24 - What did you do today? 2023
05/10/2023 07:25:01 - Orrery
05/10/2023 06:00:41 - Wera hand-tools
05/10/2023 05:47:07 - New member
05/10/2023 04:40:11 - Problems with external pot on at1 vfd
05/10/2023 00:06:32 - Drain plug
04/10/2023 23:36:17 - digi phase converter for 10 machines.....
04/10/2023 23:13:48 - Winter Storage Of Locomotives
04/10/2023 21:02:11 - More Latest Posts...
- View All Topics
Support Our Partners


Shopping Partners
Subscription Offer

Latest "For Sale" Ads
- Reeves** - Rebuilt Royal Scot by Martin Evans
by John Broughton
£300.00 - BRITANNIA 5" GAUGE James Perrier
by Jon Seabright 1
£2,500.00 - Drill Grinder - for restoration
by Nigel Graham 2
£0.00 - WARCO WM18 MILLING MACHINE
by Alex Chudley
£1,200.00 - MYFORD SUPER 7 LATHE
by Alex Chudley
£2,000.00 - More "For Sale" Ads...
Latest "Wanted" Ads
- D1-3 backplate
by Michael Horley
Price Not Specified - fixed steady for a Colchester bantam mark1 800
by George Jervis
Price Not Specified - lbsc pansy
by JACK SIDEBOTHAM
Price Not Specified - Pratt Burnerd multifit chuck key.
by Tim Riome
Price Not Specified - BANDSAW BLADE WELDER
by HUGH
Price Not Specified - More "Wanted" Ads...
Get In Touch!
Do you want to contact the Model Engineer and Model Engineers' Workshop team?
You can contact us by phone, mail or email about the magazines including becoming a contributor, submitting reader's letters or making queries about articles. You can also get in touch about this website, advertising or other general issues.
Click THIS LINK for full contact details.
For subscription issues please see THIS LINK.
Digital Back Issues


Donate

 Register
 Log-in
Model Engineer Magazine
- Percival Marshall
- M.E. History
- LittleLEC
- M.E. Clock

ME Workshop
- An Adcock
- & Shipley
- Horizontal
- Mill

Subscribe Now
- Great savings
- Delivered to your door

Pre-order your copy!
- Delivered to your doorstep!
- Free UK delivery!
All Forum Topics > Workshop Tools and Tooling > Grinding a step drill