Forum sponsored by:

Mist Coolant (Fogbuster)
| Clive Foster | 07/02/2021 15:59:42 |
| 3630 forum posts 128 photos | It's arguable that synthetic oil water mixes are better from the bio-hazard point of view for most ME / Home Shop types than ordinary suds mixes. The 2 or 3% mix of Rocol Ultracut I chucked in the Smart & Brown 1024 coolant tray about 15 years back is, with a couple of top ups along the way, is still healthy. No odd niffs or bacteria signs. Despite received wisdom and HSA warnings about the dangers of synthetics I use the same 2% mix in the Bijur Spraymists. Fact is given half decent adjustment the sniff test says there is much less coolant coming back my way than when using the standard flood set up. Flood was always a "when its the only way" thing for me as it can be quite evil without the chuck guards down. Running with the Bijur turned right down into the fug free range is near routine. Really depends whether I can be bothered to drag the little Binks-Bullows hydrovane compressor from one machine to another. For me the $64,000 question has always been why full on "fill the factory with fug" misting as described by David G ever became a thing. Quite apart from the obvious health hazards and working environment unpleasantness there is no engineering logic to high delivery misting. Cooling capability can never be more than a fraction of full flood and misting at that sort of level probably wastes more lubricant than full flood which, mostly, just drains back into the sump. Although following the setting instructions of my Bijur Spraymist systems (which were expensive devices made for professional users) actually has them operating pretty much in the fog buster region with almost no atmospheric contamination the nozzle arrangement is fundamentally intended to produce high volumes of mist. There appears to be no reason why Bijur could not have adopted a nozzle of similar design to Josephs which would have been far more in keeping with how the instructions say the device should be used. The basic concept is old. Actually making a version that works well for a given application is, as ever, a more serious matter but surely not beyond a commercial producer. Seems to me that Joes nozzle pretty much obsoletes the whole Fog Buster concept too. Clive
|
| Jimmeh | 08/02/2021 20:35:01 |
 27 forum posts 12 photos | Thanks everyone for all the suggestions and advice. I really should have been clear that the last thing I want is a mist or fog in the workshop. If the fogbuster copy I'm making works as intended there should be not be any atomisation, and if there is I would rather it didn't make me ill! I have a little Bambi BB24 silent compressor which probably can't keep up with too much demand so low flow is the order of the day. I'll try and post up how I get on with my own creation... If it's not too awful! Edited By Jimmeh on 08/02/2021 20:35:51 |
| Clive Foster | 09/02/2021 19:33:32 |
| 3630 forum posts 128 photos | Fog Busters and other low quantity coolant/lubricant devices need a flexible mounting system allowing the nozzle to be gotten very close to the cut so the coolant/lubricant goes where its needed with minimal waste. As the output consists of fine droplets in an airstream its clearly much better if the nozzle and airstream point away from the operator so all the drops splat onto the job or machine without bouncing back into your face. Conventionally coolant systems are mounted on the rear of the machine so splash or overspray tends to go towards the user. Very unpleasant unless you have effective guarding to intercept the stuff. I've been working on a magnet retained system to carry my Bijur Spraymists on the quick change Dickson toolposts of my lathes. Magnetic retention to make it easy to slide on and off as required. Basically a Tee section built up from sharp corner angle iron has magnets on the vertical face to keep it all stable. One arm of the Tee hooks over the anti-rotation pin and the other mounts a small, cheap, imported articulating arm (of the type officially sold to mount dial indicators) carrying the mister head and feed tube mount. I imagine a simple post with multi-position clamp on arm could serve just as well to carry the mister head but might need some low cunning to get the right angles of dangle. The articulated arm seemed more likely to just work. It all quite effective at getting the nozzle where it needs to be:- 1) Longitudinal Feed
2) Cross feed / Facing
3) The top of the tailstock on the Smart & Brown 1024 VSL is basically rectangular so it sits quite well on that to enabling it to be used with drills.
4) Three small 10 mm diameter x 3 mm thick magnets keep it in place
In the background of the photographs you can see the small magnetic base and post I've previously used to carry the Bijur head. The big, flat top of the S&B cross slide made that just about useable because the magnetic base could be slid around to find a position where most of the lubricant went on the work and none came back in my face. But it was never very satisfactory. The vertical lock-line is fitted to the original full flood factory system. Effective but messy. Very messy. Two set-up for my two lathes have cost me £20 (ish) for two arms and 10 small magnets and some work to make sharp steel angle from the very rusty stash inherited when helping to take down and old domestic garage. Not too shabby. Clive Edited By Clive Foster on 09/02/2021 19:40:27 |
| Alan Wood 4 | 10/02/2021 15:45:30 |
| 257 forum posts 14 photos | As a variation of Clive's mounting technique, I modelled in Fusion 360 a 3D printed version of a standard Myford QCTP tool holder to mount the Fogbuster nozzle. The nozzle itself has been modified per Clough42's idea to feed the air and lubricant via 1/2" LocLine. The front position on the QCTP works well in driving the air jet to the back of the lathe. The QCTP fixture also means the nozzle can be quickly removed when working non lubricant materials. If undertaking a boring operation the head is rotated to its normal position and the Fogbuster mount is fitted to the side slot.
|
| Clive Foster | 10/02/2021 16:02:19 |
| 3630 forum posts 128 photos | Alan I like that. Really neat. Hafta say I started out considering using a bar in a toolholder to carry mine but I didn't want to "waste" a toolholder and, not having 3D printing, making a specific mount seemed too much trouble. But my T2 styes have those locating pins just right for hooking over so ... Clive |
| Joseph Noci 1 | 10/02/2021 17:29:01 |
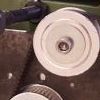
| 1323 forum posts 1431 photos | My flexi-nozzle uses the same interlocking flexi-tube as most the flood cooling systems do - The air supply flows inside that, and also within is a 4mm OD FESTO plastic tube that carries the oil to the nozzle. The base has two entries - one air and one coolant, from the mixer contraption. The base has a magnet undet and can be parked anywhere convenient.. Magnet under base - from a small loudspeaker...the groove around the circular magnet below is where the voice coil used to be..
Coolant inlet pipe fitted - 2nd hole is air inlet.
Joe
|
| Jimmeh | 04/07/2021 19:06:12 |
27 forum posts 12 photos | Well its been a little while, and I've been a little busy work, but I have finally got my fogbuster copy build and running. I built the main unit a while ago and just needed to sort out a bracket to attach it to the locline. I don't have a 3D printer... but I do have a CNC machine now! The bracket design was way over the top with lots of fillets and curves, but it was a good opportunity to learn how to hold such parts. So I loaded the system with some coolant (big thank you Alan Wood for supplying some coolant to get me going!) and started cutting out the bracket. In operation the coolant valve only needs opening a crack, and with less than 10psi it pushes the chips away from the cut and provides a steady stream of coolant droplets without any mist and fog! The only time I got a fog was during testing when I had filled the coolant reservoir with water (thankfully no oil) and tested the pneumatic solonoid valve without the needle valve on the fogbuster in place... Oops! A litre of water instantly atomised over the workshop. Thank you for the help everyone. James Locline mounting bracket
Finished Fogbuster
|
| Jimmeh | 04/07/2021 19:20:18 |
27 forum posts 12 photos | An overview of the CNC setup with the coolant tank, regulator and solenoid valve mounted on the wall.
|
| Clive Foster | 04/07/2021 20:14:32 |
| 3630 forum posts 128 photos | Congratulations on a very smart job. You should do a write up for MEW. Although the internet finds plenty about fog buster projects it all seems pretty Americentric and "what I did with some handy bits" sort of thing. Fair enough if you want to play development engineer but a lot of people would prefer to simply follow the words and music to get something neat, workmanlike and functional that "just works". Your version looks to be just that. Clive |
| noel shelley | 04/07/2021 20:59:58 |
| 2308 forum posts 33 photos | In the winter would this not be to invite condensation in our cold workshops and all that goes with it ? When using old speaker magnets I fill the gap where the voice coil was with resin to stop metal particles or swarf getting in. Very smart job ! Best wishes, Noel. |
 long feed (r).jpg")
 facing (r).jpg")
 drilling (r).jpg")
 magnet side (r).jpg")
![img_20210210_152638[1].jpg](/sites/7/images/member_albums/143741/888857.jpg "img_20210210_152638[1].jpg")
![img_20210210_152624[1].jpg](/sites/7/images/member_albums/143741/888856.jpg "img_20210210_152624[1].jpg")


Please login to post a reply.
Magazine Locator
Want the latest issue of Model Engineer or Model Engineers' Workshop? Use our magazine locator links to find your nearest stockist!
Sign up to our Newsletter
Sign up to our newsletter and get a free digital issue.
You can unsubscribe at anytime. View our privacy policy at www.mortons.co.uk/privacy
Latest Forum Posts
- *Oct 2023: FORUM MIGRATION TIMELINE*
05/10/2023 07:57:11 - Making ER11 collet chuck
05/10/2023 07:56:24 - What did you do today? 2023
05/10/2023 07:25:01 - Orrery
05/10/2023 06:00:41 - Wera hand-tools
05/10/2023 05:47:07 - New member
05/10/2023 04:40:11 - Problems with external pot on at1 vfd
05/10/2023 00:06:32 - Drain plug
04/10/2023 23:36:17 - digi phase converter for 10 machines.....
04/10/2023 23:13:48 - Winter Storage Of Locomotives
04/10/2023 21:02:11 - More Latest Posts...
- View All Topics
Support Our Partners


Shopping Partners
Subscription Offer

Latest "For Sale" Ads
- Reeves** - Rebuilt Royal Scot by Martin Evans
by John Broughton
£300.00 - BRITANNIA 5" GAUGE James Perrier
by Jon Seabright 1
£2,500.00 - Drill Grinder - for restoration
by Nigel Graham 2
£0.00 - WARCO WM18 MILLING MACHINE
by Alex Chudley
£1,200.00 - MYFORD SUPER 7 LATHE
by Alex Chudley
£2,000.00 - More "For Sale" Ads...
Latest "Wanted" Ads
- D1-3 backplate
by Michael Horley
Price Not Specified - fixed steady for a Colchester bantam mark1 800
by George Jervis
Price Not Specified - lbsc pansy
by JACK SIDEBOTHAM
Price Not Specified - Pratt Burnerd multifit chuck key.
by Tim Riome
Price Not Specified - BANDSAW BLADE WELDER
by HUGH
Price Not Specified - More "Wanted" Ads...
Get In Touch!
Do you want to contact the Model Engineer and Model Engineers' Workshop team?
You can contact us by phone, mail or email about the magazines including becoming a contributor, submitting reader's letters or making queries about articles. You can also get in touch about this website, advertising or other general issues.
Click THIS LINK for full contact details.
For subscription issues please see THIS LINK.
Digital Back Issues


Donate

 Register
 Log-in
Model Engineer Magazine
- Percival Marshall
- M.E. History
- LittleLEC
- M.E. Clock

ME Workshop
- An Adcock
- & Shipley
- Horizontal
- Mill

Subscribe Now
- Great savings
- Delivered to your door

Pre-order your copy!
- Delivered to your doorstep!
- Free UK delivery!
All Forum Topics > General Questions > Mist Coolant (Fogbuster)