Forum sponsored by:

Vertical Boiler Fittings
| Gas_mantle. | 14/03/2018 22:07:16 |
 359 forum posts 269 photos | My guess is a hand cranked fan to great a draught would be tiresome to use and be impractical. Like I say I'm no expert but I think you will need a steam blower and an electric blower to get things started. Almost certainly a very small boiler wont light without a blower.
|
| gary arthur | 14/03/2018 23:21:52 |
 113 forum posts 706 photos | You may very well be correct, Sir. I'm generally not too shabby at coaxing a fire into life but that's no guarantee of success in this small-scale situation. I hear you loud and clear and if as I experiment with possibilities it looks like it's going as you predict I will probably go down the gas route instead rather than install an electric blower. Nothing would be lost in that scenario as the firebox I have in mind would (I think) double as a burner housing with minimal modification. Will certainly report on it in this thread when I get to that stage. Cheers. Edited By gary.a.ayres on 14/03/2018 23:23:54 |
| gary arthur | 18/03/2018 00:01:38 |
113 forum posts 706 photos |
Edited By gary.a.ayres on 18/03/2018 00:06:09 Edited By gary.a.ayres on 18/03/2018 00:07:12 |
| JasonB | 18/03/2018 07:35:43 |
 25215 forum posts 3105 photos 1 articles | Yes they are both clack valves, as you have the second valve then may as well fir it or at least fit a bush for it that could just have a blanking plug fitted if not in use. |
| gary arthur | 18/03/2018 09:03:13 |
113 forum posts 706 photos | Yes indeed! Cheers Jason. |
| gary arthur | 23/03/2018 14:56:17 |
113 forum posts 706 photos | Hi again - Picking up on the other bit of Gas_mantle's suggestion, I have decided to install a steam blower on the boiler, and have ordered a 1/4 x 40 blower valve (the question of an electric blower vs alternatives remains moot for me at this stage - I'll cross that bridge later). However, I have scoured the internet and found that information on how a steam blower is set up is surprisingly difficult to find. I understand the principle, i.e. a regulatable jet of steam up the chimney creates an updraught which draws the fire. At the other end, though, do I simply stick a bush for the blower valve into the boiler, near the top? In other words, is it in effect just a secondary steam outlet straight out of the boiler and into the bottom of the chimney? I assume so, but would like to see it in black and white before I go making holes... Edited By gary.a.ayres on 23/03/2018 15:00:55 |
| JasonB | 23/03/2018 15:13:08 |
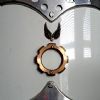
25215 forum posts 3105 photos 1 articles | Yes it just takes steam and blows it through a small pipe usually with a reduced dia end into the chimney base. The reduced dia increases the steams velocity. It also helps to run the exhaust steam into the bottom of the chimney to do the same job, this would have a larger blast nozzle so you don't strangle the exhaust gasses and is used when running, the blower is more often used once you get a bit of pressure in the boiler to help raise steam or to keep the fire going if you stop the engine mid way through a run. This shows the larger blast nozzle and smaller blower pipe at the base of a traction engine chimney.
|
| Bazyle | 23/03/2018 15:23:31 |
 6956 forum posts 229 photos | There is some science in blower nozzle positioning. The steam from a jet hole diverges (spreads out) at a known angle (you'll have to do some searching for that) and the idea is to get the steam plume to fit inside the bottom of the chimney and not overspill. Look into 'petticoat pipes' for locomotives. Re extra clack. At some time you will make an engine with a built in or added water pump. Part of the fun of that is adjusting the size of pump and a thing called a bypass valve to get the flow of water in to match the rate of steam consumption coming out so the level stays level. |
| gary arthur | 23/03/2018 15:30:28 |
113 forum posts 706 photos | @ JasonB - Excellent! Yes, I had managed to ascertain that the blower pipe should be small, so I ordered a blower valve which is smaller than my main steam outlet will be. I'll find a way to further narrow the end of the pipe. I was also thinking about taking the exhaust up the chimney, so great to have confirmation of that as well as your useful tip about keeping the blast nozzle wide so as not to strangle it. Thank you once again Sir for your generous advice! Edited By gary.a.ayres on 23/03/2018 15:31:24 Edited By gary.a.ayres on 23/03/2018 15:35:51 |
| gary arthur | 23/03/2018 15:35:23 |
113 forum posts 706 photos | @ Bazyle - Thanks on both counts. I shall look into the blower nozzle dynamics as you suggest when I get to that stage. As for the bypass valve info - very interesting. That is quite a bit down the line for me, but it sounds great and makes me want to explore...
|
| Gas_mantle. | 23/03/2018 17:37:11 |
359 forum posts 269 photos | To narrow the blower pipe exit on my 3" dia boiler I just soldered a brass nipple over the end, I can't remember what size the hole is but is probably not much more than 1mm dia. |
| gary arthur | 23/03/2018 19:34:52 |
113 forum posts 706 photos | Aha... it did occur to me following JasonB's post above that a nipple soldered on the end might be a way of doing it. I will keep this in mind, as well as investigating Bazyle's suggestion above. Thanks, Gas_mantle. Edited By gary.a.ayres on 23/03/2018 19:37:28 |
| JasonB | 23/03/2018 19:47:03 |
25215 forum posts 3105 photos 1 articles | I think I soldered a rivit into mine and then drilled out the rivit to the required size |
| gary arthur | 23/03/2018 19:52:56 |
113 forum posts 706 photos | Ah ok. I can see that would allow some pretty precise control by choosing your drill size. |
| gary arthur | 23/03/2018 19:54:07 |
113 forum posts 706 photos | And indeed think I might be able to make out the rivet in your photo above. |
| Doubletop | 24/03/2018 07:30:56 |
 439 forum posts 4 photos | Gary I see references to Sandy Campbells 3" boiler. There are plenty of refernces to it if you Google and build logs on some of the other forums. Drawings (but not the originals) here **LINK** Pete Edited By Doubletop on 24/03/2018 07:31:26 |
| gary arthur | 24/03/2018 09:47:11 |
113 forum posts 706 photos | Wow! These are lovely drawings. JasonB also sent me some drawings of the SandyC boiler; these will make a nice addition. Useful to know about the build logs too - will do a search for them. My boiler in progress is actually based on a Stan Bray design, but this is all good info for my general understanding of such matters and for ideas to draw on even if not following the full plan. Cheers Pete. |
| gary arthur | 13/06/2018 22:50:14 |
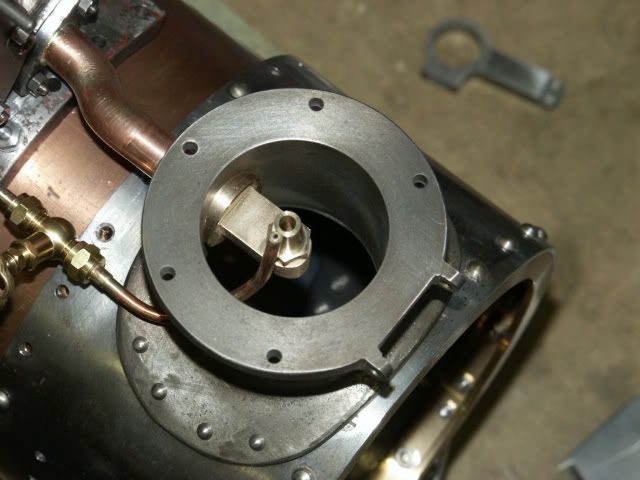
113 forum posts 706 photos | Hi again. Thought it was time to post an update. The picture below shows the boiler in its present state, fitted with the test pressure gauge, Schrader valve for initial air testing and lots of blanking plugs. Not the neatest construction or silver soldering job in the world, but it's my first effort. It's a 1.5 scale (3 inch) version of Stan Bray's five-tube 2 inch design. The first air test was last night, to 10 psi. I discovered one very small leak where one of the fire tubes joins the top end plate (marked in the photo with a blue marker pen which you may be able to see). I wanted to avoid having to torch it again if possible, and certainly didn't want to add soft solder to the equation. To my relief I was able to mechanically close the leak by further flaring the end of the tube with my pipe expanding tool. This evening the boiler held 15 psi of air for an hour, submerged in water with no leaks apparent. Hope it stays that way... Next up is a water test to 90 psi (twice working pressure). Wish me luck...
Edited By gary.a.ayres on 13/06/2018 23:01:44 Edited By gary.a.ayres on 13/06/2018 23:03:33 |
| gary arthur | 13/06/2018 22:56:13 |
113 forum posts 706 photos | Just for fun, I thought I'd post a picture of the boiler with all of its attachments loosely fitted on a temporary basis. The top plate and smoke stack (which will be of brass) have still to be added, as does the firebox. Not perfect by any means, but at least I can be happy tonight as it held air under pressure for the first time with no leaks. The blower (top right) will be routed up the stack, as will the exhaust from the eventual engine(s). I may put a twist of copper down the central tube to help hold the heat where it belongs. When it's all working the way it should I'll clean up the worst excesses of silver solder on the barrel and give the whole thing a polish to make it nice and shiny.
Edited By gary.a.ayres on 13/06/2018 22:57:06 Edited By gary.a.ayres on 13/06/2018 23:10:54 |
| Gas_mantle. | 13/06/2018 23:23:47 |
359 forum posts 269 photos | Looks good Gary, I'll be interested to see how it performs Where did you get the plans from ? I'd quite like to have a go making something similar. |


Please login to post a reply.
Magazine Locator
Want the latest issue of Model Engineer or Model Engineers' Workshop? Use our magazine locator links to find your nearest stockist!
Sign up to our Newsletter
Sign up to our newsletter and get a free digital issue.
You can unsubscribe at anytime. View our privacy policy at www.mortons.co.uk/privacy
Latest Forum Posts
- hemingway ball turner
04/07/2025 14:40:26 - *Oct 2023: FORUM MIGRATION TIMELINE*
05/10/2023 07:57:11 - Making ER11 collet chuck
05/10/2023 07:56:24 - What did you do today? 2023
05/10/2023 07:25:01 - Orrery
05/10/2023 06:00:41 - Wera hand-tools
05/10/2023 05:47:07 - New member
05/10/2023 04:40:11 - Problems with external pot on at1 vfd
05/10/2023 00:06:32 - Drain plug
04/10/2023 23:36:17 - digi phase converter for 10 machines.....
04/10/2023 23:13:48 - More Latest Posts...
- View All Topics
Support Our Partners


Shopping Partners
Subscription Offer

Latest "For Sale" Ads
- Reeves** - Rebuilt Royal Scot by Martin Evans
by John Broughton
£300.00 - BRITANNIA 5" GAUGE James Perrier
by Jon Seabright 1
£2,500.00 - Drill Grinder - for restoration
by Nigel Graham 2
£0.00 - WARCO WM18 MILLING MACHINE
by Alex Chudley
£1,200.00 - MYFORD SUPER 7 LATHE
by Alex Chudley
£2,000.00 - More "For Sale" Ads...
Latest "Wanted" Ads
- D1-3 backplate
by Michael Horley
Price Not Specified - fixed steady for a Colchester bantam mark1 800
by George Jervis
Price Not Specified - lbsc pansy
by JACK SIDEBOTHAM
Price Not Specified - Pratt Burnerd multifit chuck key.
by Tim Riome
Price Not Specified - BANDSAW BLADE WELDER
by HUGH
Price Not Specified - More "Wanted" Ads...
Get In Touch!
Do you want to contact the Model Engineer and Model Engineers' Workshop team?
You can contact us by phone, mail or email about the magazines including becoming a contributor, submitting reader's letters or making queries about articles. You can also get in touch about this website, advertising or other general issues.
Click THIS LINK for full contact details.
For subscription issues please see THIS LINK.
Digital Back Issues


Donate

 Register
 Log-in
Model Engineer Magazine
- Percival Marshall
- M.E. History
- LittleLEC
- M.E. Clock

ME Workshop
- An Adcock
- & Shipley
- Horizontal
- Mill

Subscribe Now
- Great savings
- Delivered to your door

Pre-order your copy!
- Delivered to your doorstep!
- Free UK delivery!
All Forum Topics > Beginners questions > Vertical Boiler Fittings