Has anybody built the flame eater "Nick"?
This is another pre-milled kit from Bengs
| Brian John | 18/05/2016 14:28:46 |
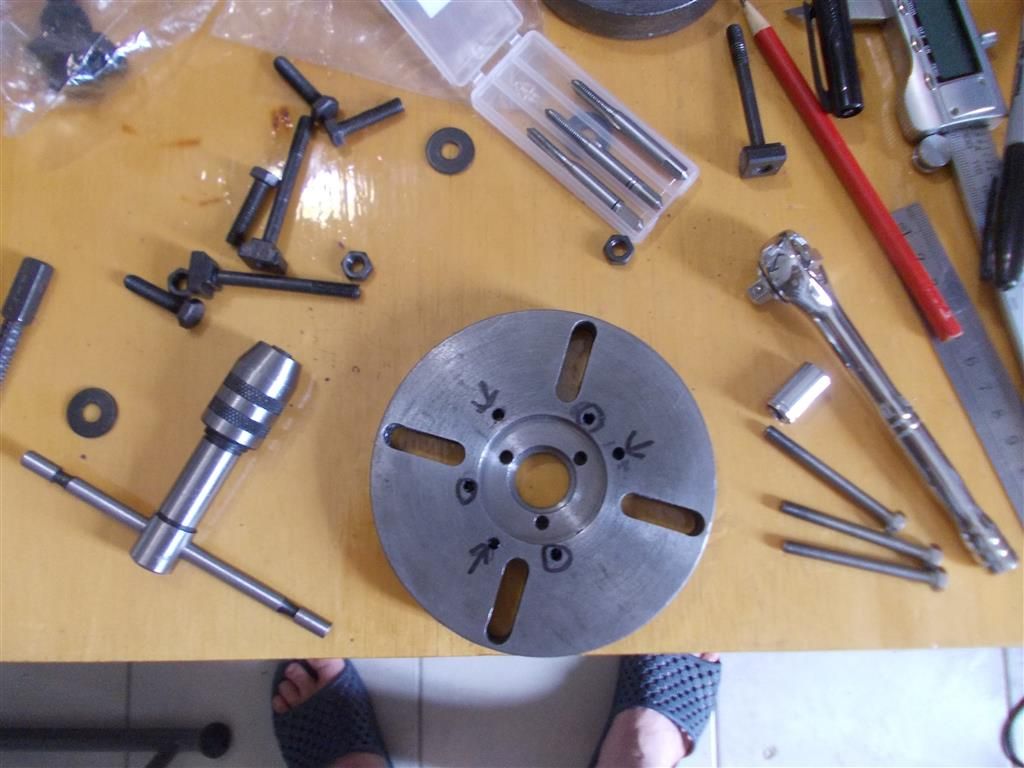
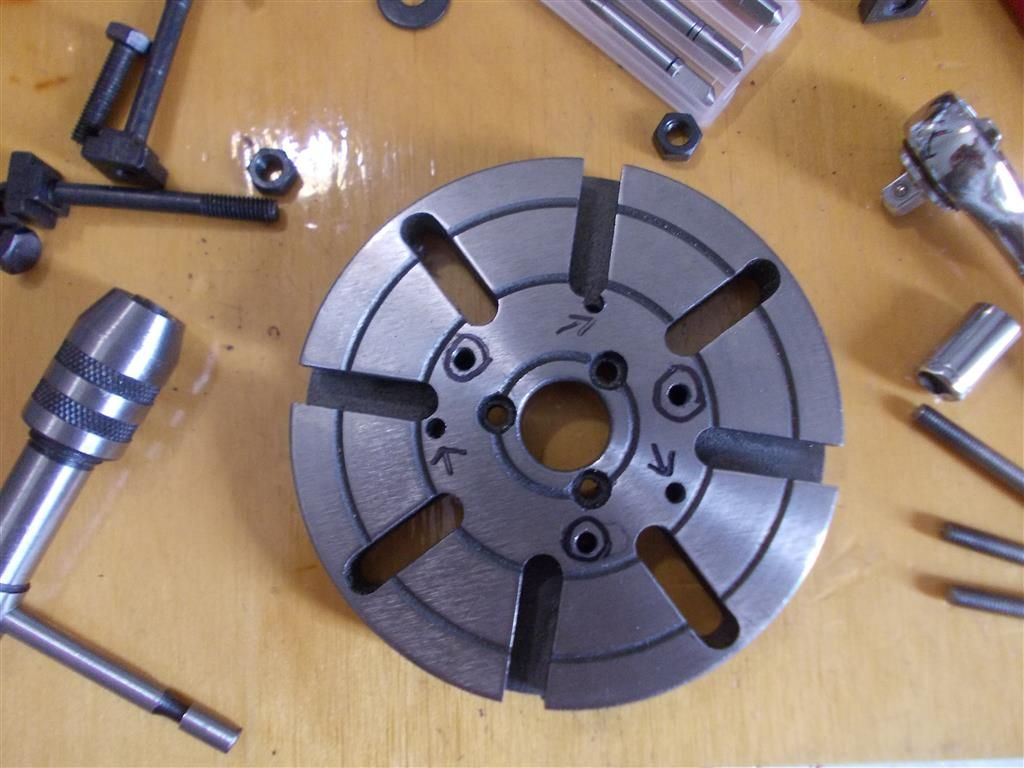
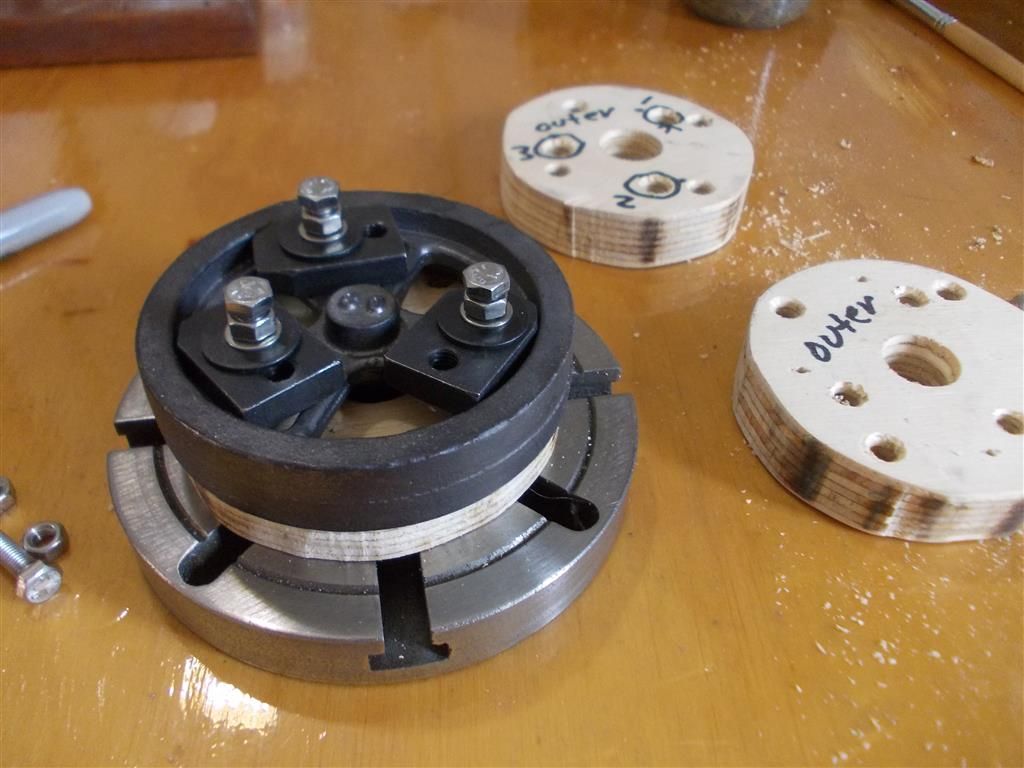
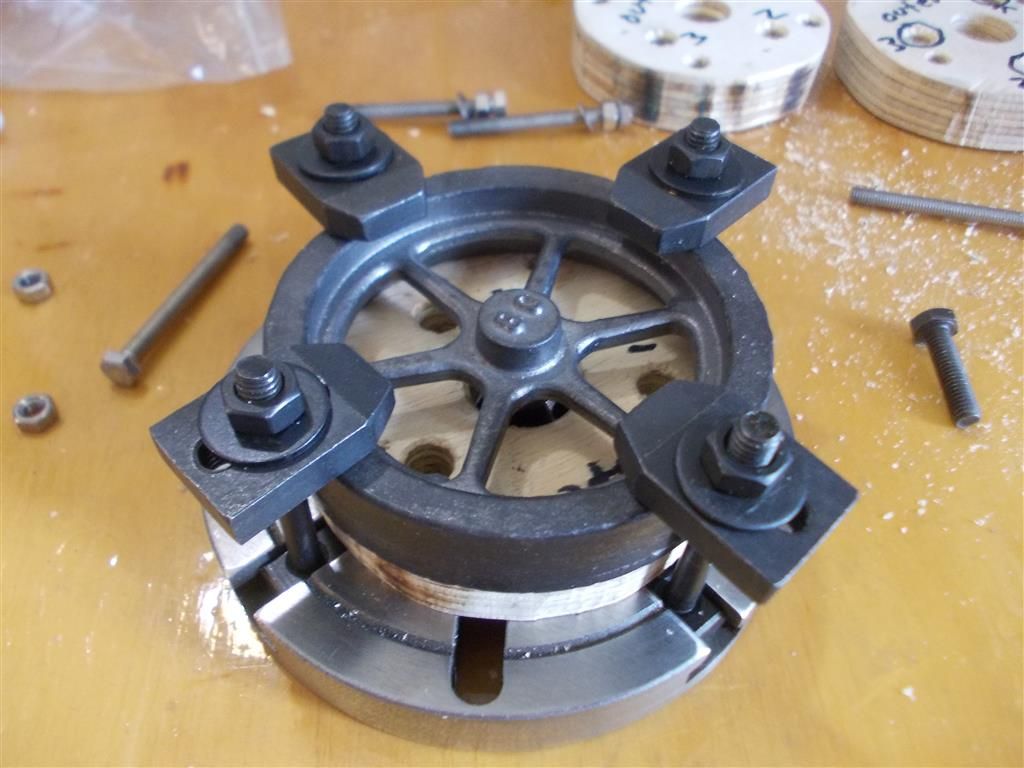
| 1487 forum posts 582 photos | I have drilled and tapped the face plate for M5. I made a mistake by drilling from the back in the first instance (holes with arrows). I was trying to avoid the recess on the back of the plate but I forgot about the recesses on the front. So I ended up drilling through the edges of some of those front recesses...not good for tapping. I drilled a second set of holes from the front ( holes with circles) and these were finally in the correct place for tapping. I used plenty of tap magic and there were no problems tapping into the cast iron face plate. I am still a bit confused how to go about this. There is not a lot of room once the clamping plates are added to the centres (photo 3) so I am not sure I can take a facing cut off the hub doing it this way. I may have to put the clamps on the outside (photo 4) and take a facing cut across the hub then drill/ream the centre hole that way. But having done that, I am not certain of maintaining concentricity when I remove the outer clamps. I may then have to use the mandrel to finish the outer surface and the rims. I think it is a case of not being able to see the forest for the trees !
Edited By Brian John on 18/05/2016 14:33:24 |
| JasonB | 18/05/2016 16:10:00 |
25215 forum posts 3105 photos 1 articles | With care you should just be able to face teh edge and stop the tool before it hits the clamp plates. Alternative would be to make some smaller and/or thinner clamping plates, may even find that just those large washers will do without the plates. |
| Brian John | 19/05/2016 09:54:30 |
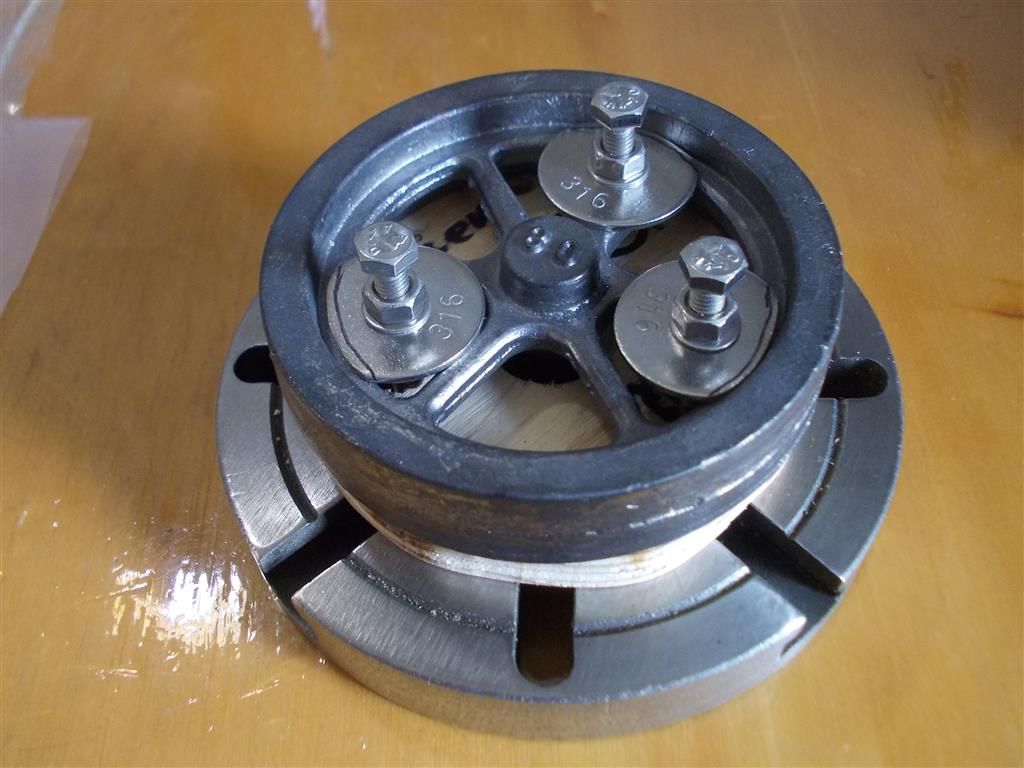
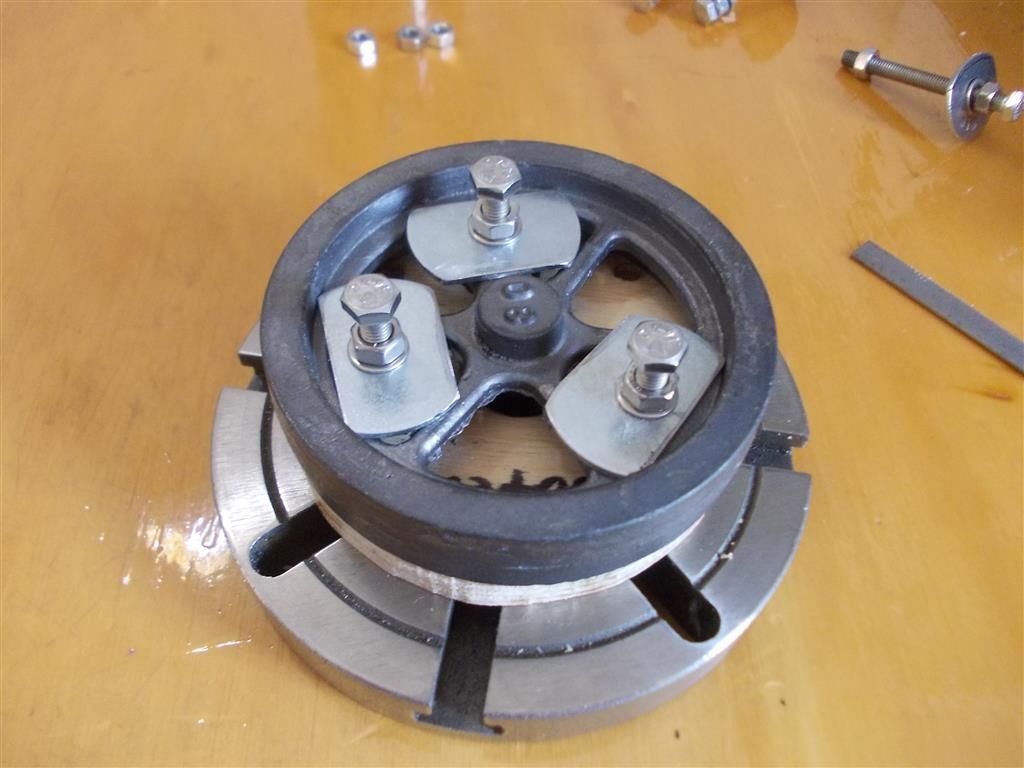
| 1487 forum posts 582 photos | I made up some clamping plates from 25mm M5 washers today by shaping them on the bench grinder (photo 1). I did not think they quite covered the spokes enough so I used some 31mm washers and cut some tangents off them with the angle grinder ( photo 2). That seems to be a better fit and I hope to give the face plate a tryout on the lathe tomorrow. |
| JasonB | 19/05/2016 15:29:02 |
25215 forum posts 3105 photos 1 articles | That should do the job. |
| Brian John | 20/05/2016 13:52:02 |
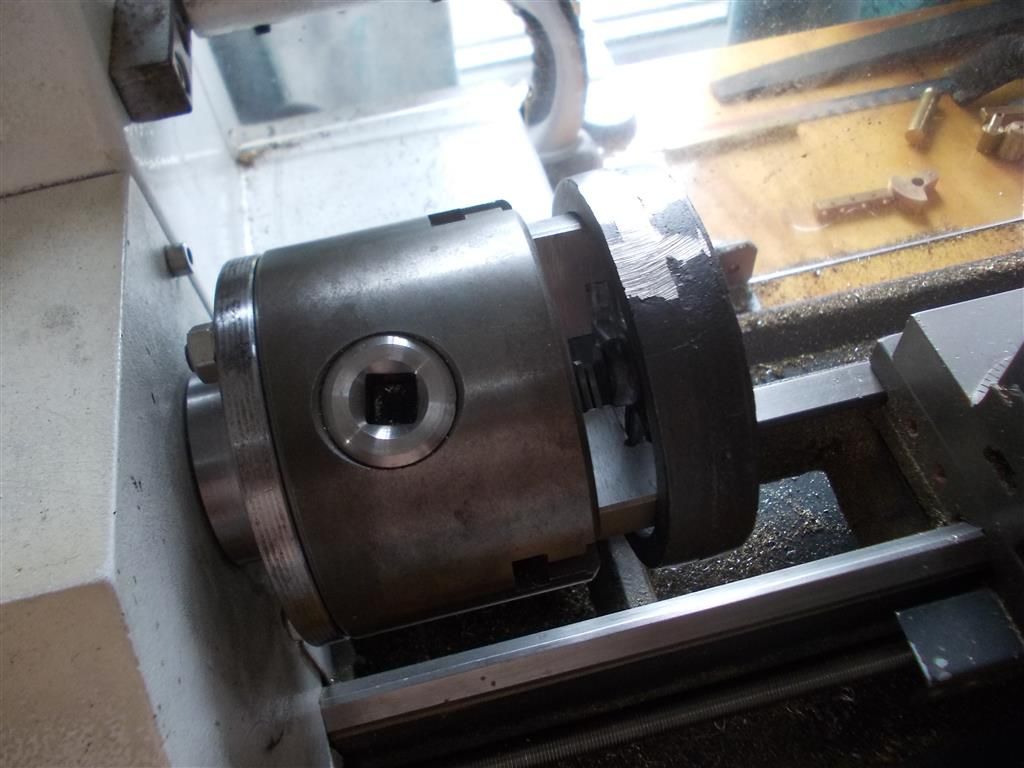
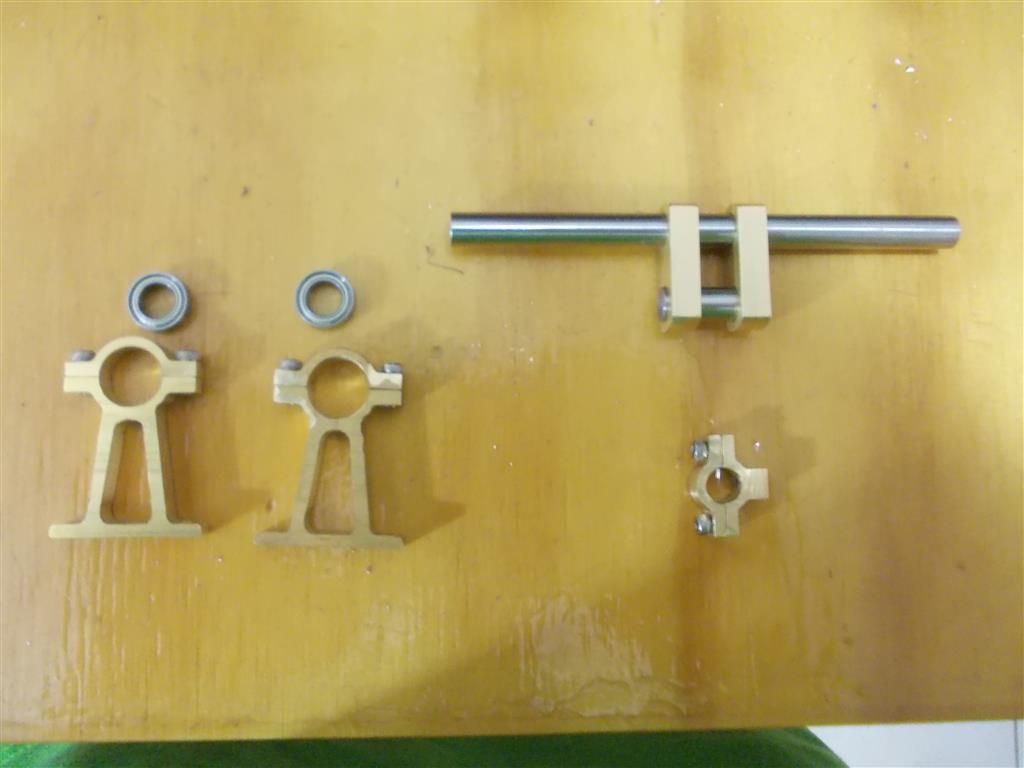
| 1487 forum posts 582 photos | I had no luck turning the flywheels. I just could not get them to run true on the face plate. I spent an hour mucking around but in the end I gave up. I then tried to grip it by the hub in the lathe chuck as I have done many times before but I just could not get it running right : either the hub was out or the outer rim was wobbly. I have never had so much trouble getting flywheels set up for turning. I did manage to grip it on the inner rim using the external jaws (photo 1) but this was not secure and it came loose as soon as I tried to centre drill it. Can I turn the internal jaws around and grip the inner rim of the flywheel this way ? I only thought of this now. I made a start on the smaller parts : more problems here too (photo 2). The bearing mounts are the same as the Stirling engines I have built. They are always a bit small and in the past I have spent ages filing them down so that the 10mm OD bearings fit snugly. This time I drilled and tapped the bearing supports then placed them in the vice to ream them out with a 10H7 reamer...bad mistake. I forgot that reamers are always a bit large so now the bearings pass right through. I may be able to salvage the situation by filing a bit off the flat mating surfaces. What should I have done to get a good fit for the bearings ? The parts of the crank have been cut, reamed and filed ready for assembly by soft soldering as per the instructions. I am thinking of drilling and tapping for grub screws so that nothing moves while soldering. They warn that this part should not be hard soldered due to the likelihood of distortion.
Edited By Brian John on 20/05/2016 13:58:21 Edited By Brian John on 20/05/2016 13:59:14 Edited By Brian John on 20/05/2016 14:00:18 Edited By Brian John on 20/05/2016 14:05:04 |
| Brian John | 22/05/2016 08:07:27 |
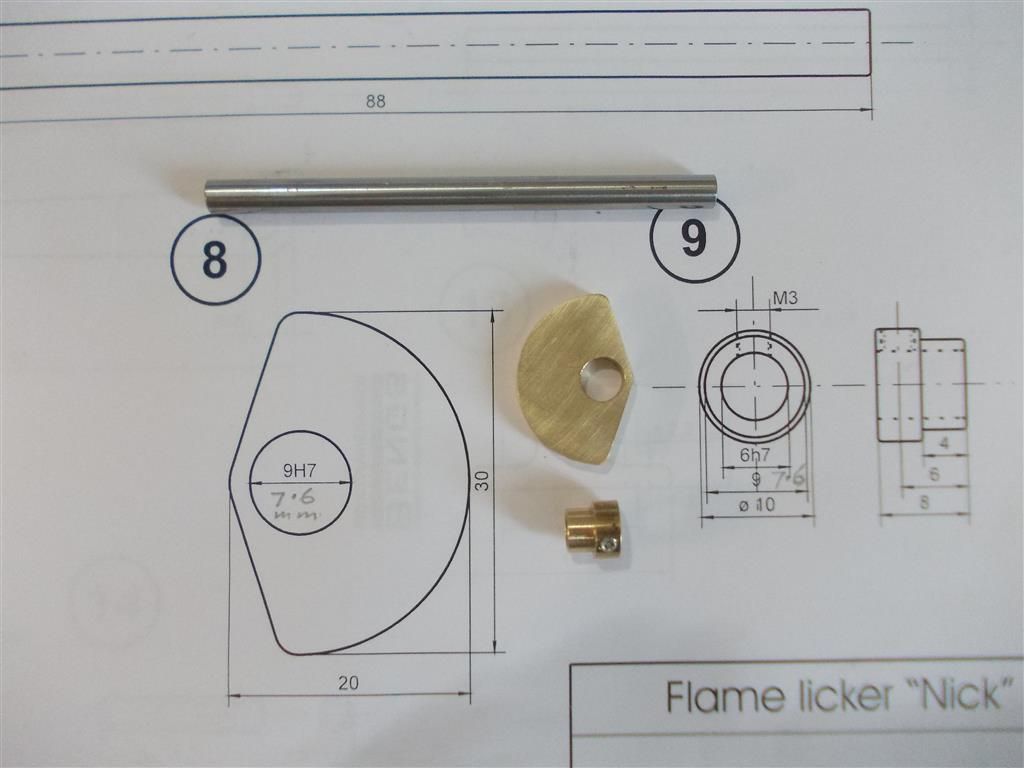
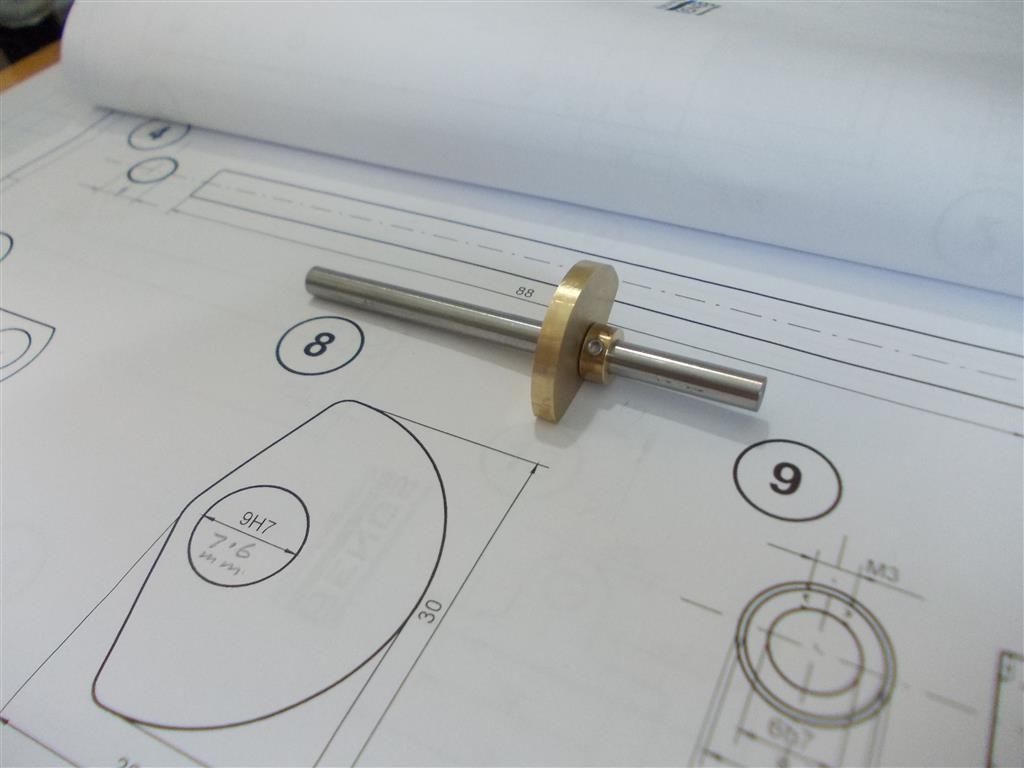
| 1487 forum posts 582 photos | I will leave the flywheels until later. At this stage I am not sure what to do but a solution will always present itself eventually. The bearings supports which were reamed out to 6H7 were sanded down a bit on the flats using a sheet of glass and 600 grit sandpaper until I could pick up the bearings by squeezing the two halves of the supports together with my fingers. The fit is now perfect : this will be my standard method of machining the bearing supports. I have encountered a problem with parts 8 and 9 : the eccentric and its bushing. The hole in the eccentric is marked as 9H7 on the plans ; it is already drill out to 7.6mm (very strange dimensions...where did they get this from ?) I was worried that drilling and reaming out to 9mm as per the plans would bring the hole too close to the edge. Anyway, I do not have an 8.8mm drill bit or a 9H7 reamer so I left the hole as it was and made the bush to fit the hole, Nothing has been soft soldered yet as it is raining here and I do all my soldering outside in the courtyard. I am thinking of making this bushing again but a bit larger ( OD 12mm) as there is not much for the M3 X 2mm grub screw to engage with here. Is 2mm of thread enough do you think ? Edited By Brian John on 22/05/2016 08:08:55 |
| steamdave | 22/05/2016 10:32:02 |
| 526 forum posts 45 photos | Posted by Brian John on 20/05/2016 13:52:02:
I made a start on the smaller parts : more problems here too (photo 2). The bearing mounts are the same as the Stirling engines I have built. They are always a bit small and in the past I have spent ages filing them down so that the 10mm OD bearings fit snugly. This time I drilled and tapped the bearing supports then placed them in the vice to ream them out with a 10H7 reamer...bad mistake. I forgot that reamers are always a bit large so now the bearings pass right through. I may be able to salvage the situation by filing a bit off the flat mating surfaces. What should I have done to get a good fit for the bearings ? You could have put a piece of shim brass (say 2 thou) between the faces of the bearing mounts, ream as you did and find the bearing is loose. Depending on how loose the bearing was, you might have been able to put the shim under just one side of the bolting flanges. Now, remove the shims and the bearings will be gripped. In effect what you did by sanding off the faces after reaming. Better than reaming would be to bore the hole; that way you could get the hole 'just right'. Dave |
| Brian John | 23/05/2016 10:05:20 |
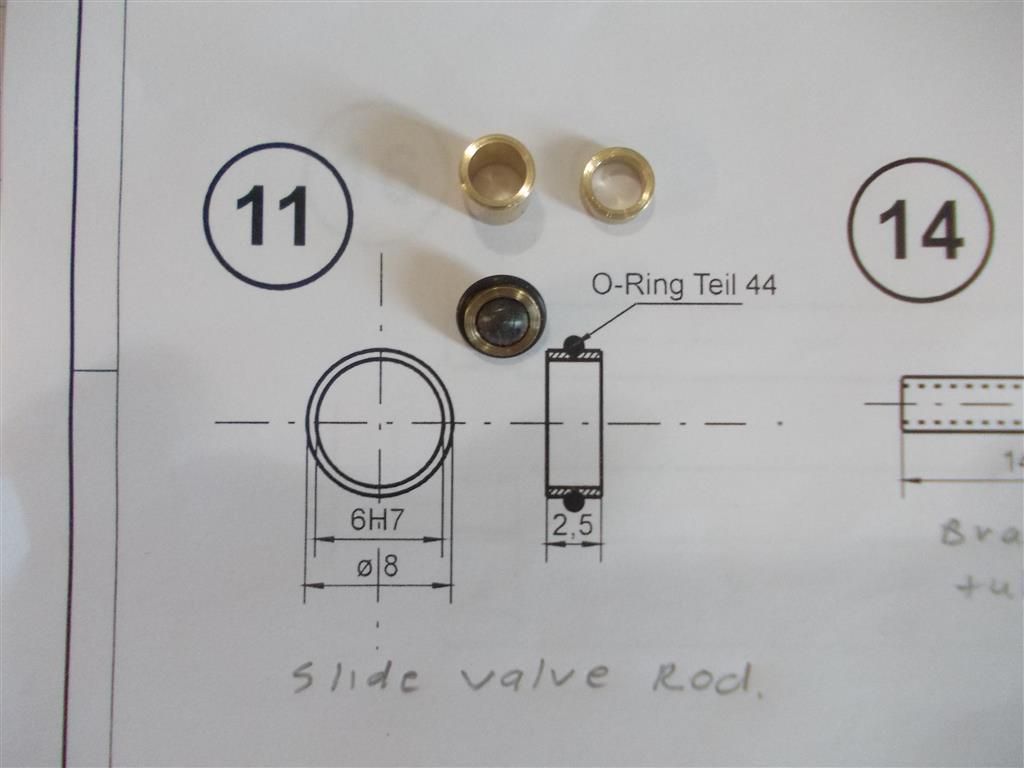
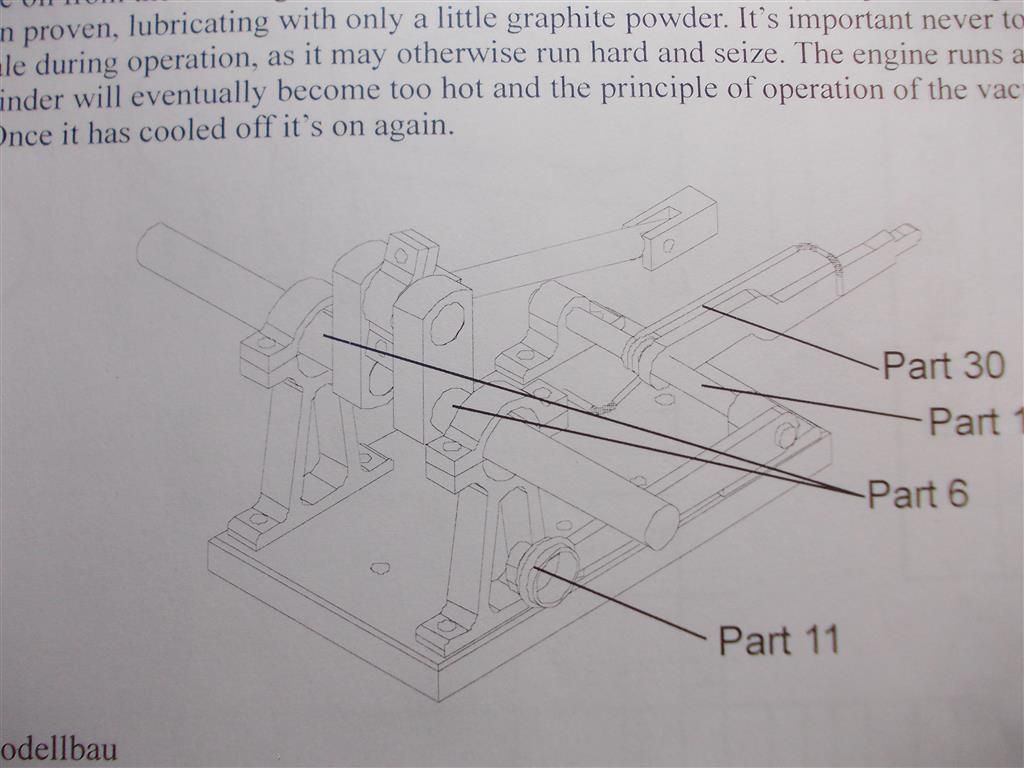
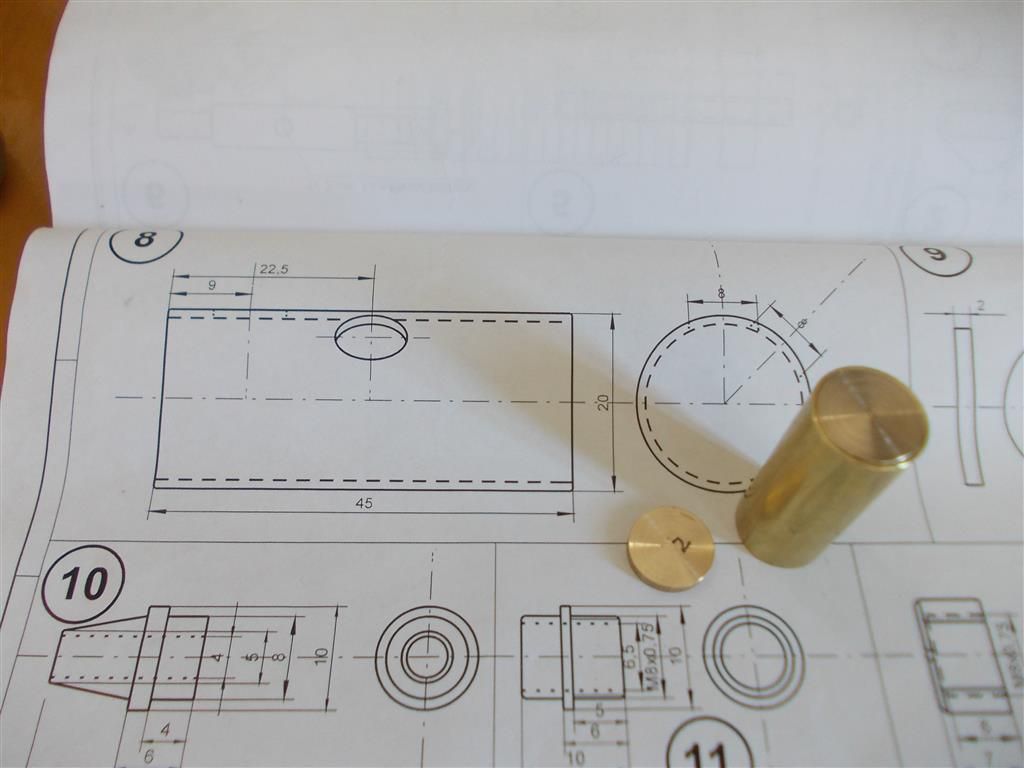
| 1487 forum posts 582 photos | Does anybody have any idea what this part does ? At this stage I am not actually sure where it goes or what function it performs but I am hoping things become clearer as I make up the other parts. I assumed that ''teil'' indicates that a shallow groove should be cut into the brass part to hold the O ring in place. How would you a drill a hole in the centre of this rubber ''ball bearing'' as per the instructions ?
Edited By Brian John on 23/05/2016 10:06:59 Edited By Brian John on 23/05/2016 10:07:40 |
| JasonB | 23/05/2016 10:19:35 |
25215 forum posts 3105 photos 1 articles | Part 11 may look a bit lost in your second photo but I think you will find that it follows the profile of the cam as it rotates thus moving the rocker arm up and down As for the hole, pop the o ring off the outside and push out the ball which will leave you with a ring that can be opened upto 6mm.
This thread may be of use |
| Andy Holdaway | 23/05/2016 10:24:55 |
167 forum posts 15 photos | Brian, 'Teil' is German for 'Part', so the plan says 'O-ring part 44'. |
| Brian John | 23/05/2016 12:45:48 |
| 1487 forum posts 582 photos | Andrew : it means '' part, separated into parts, to split or divide ''. Part 44 is the rubber ball bearing on the parts list. I do not know if it is clear on the drawing but it looks like a groove should be cut into the brass ring otherwise the O ring will keep sliding off. I may have got that wrong which is why I made two brass rings, one with a groove and one without. The instructions in this kit are not as clear as the Stirling engine kit. Jason : The ring of brass is already 6mm... I had to make that part then I cut the groove on the outside with a parting tool so the O ring could be located on it. What I want to know is how to drill a hole in the centre of the rubber ball ? I am not sure how to hold it ; I cannot put it in the vice because it will squash. Sorry for the confusion.
Edited By Brian John on 23/05/2016 12:48:25 Edited By Brian John on 23/05/2016 12:48:40 |
| JasonB | 23/05/2016 13:04:47 |
25215 forum posts 3105 photos 1 articles | So thats a 6mm dia rubber ball you have pushed into your brass sleeve with teh o ring on the outside? What size hole do you need to put in the ball, drawing of that part would help. |
| Brian John | 23/05/2016 13:54:09 |
| 1487 forum posts 582 photos | ''The ball bearing (43) is carefully pressed or glued into the bearing ring and screwed onto the slide-valve rod (11)using a model building screw.'' But I know that part 43 is the two roller bearings for the crank supports so there could be a misprint there. I have drilled and tapped the slide valve rod for an M2 screw as per the instructions but it does not give any further drawings on this. I think I will just have to keep on going and as the rest of the parts are made it may become clearer how this bit works. At the moment I have no idea and drilling a hole in the middle of a soft rubber ball will be a challenge ! MY MISTAKE : I think part 44 is a small roller bearing 7X3X2 (marked as ''ball bearing'' on the parts list : it is actually 6mm OD) and part 41 is grafi-sil ball valve. I think 41 is the rubber ball. I am still confused. Please note that there are no actual ball bearings as we know them in the kit. I will just keep on going......
Edited By Brian John on 23/05/2016 14:03:20 Edited By Brian John on 23/05/2016 14:06:22 |
| Andy Holdaway | 23/05/2016 14:07:31 |
167 forum posts 15 photos | Brian, I haven't seen the plans for this engine, but I read on another forum that the rubber ball sits in the exhaust stack base and acts as a one-way exhaust / pressure relief valve. Andy |
| Brian John | 23/05/2016 14:52:07 |
| 1487 forum posts 582 photos | Okay, thanks for the information. There is nothing in the drawings to indicate that but it does mention in passing a ball valve in the exhaust system. However they advise in the plans that the exhaust system should be hard soldered as the heat would melt soft solder and that makes me wonder how this ball will tolerate the heat. And I am even further confused now about part 11 above if that is not for the rubber ball ? Anyway, I will just keep moving on. Once I get all the parts made it might be a bit clearer how things work. |
| JasonB | 23/05/2016 15:00:47 |
25215 forum posts 3105 photos 1 articles | Brian
Part 11 is a brass ring with an groove for the O ring to fit around the outside which you have done. Into this ring you press the 6mm OD bearing and then a screw through the bearing attaches it all to the end of the rocker arm (slide valve rod). As the crank rotates the O ring runs against the cam and rotates on its bearing to reduce friction, the cam causes the rocker arm to move up and down and this in turn moves the valve up and down. |
| Brian John | 23/05/2016 18:08:02 |
| 1487 forum posts 582 photos | Aha, thank you Jason. That does make sense. But of course the bearing will not fit in the brass ring I have made ! I will try to polish the inside of the brass ring with some 1500 grit while spinning it in a drill chuck. The bearing is exactly 6.00mm OD so it must be very close to going in. I thought reaming it out would have produced a hole slightly over 6.00mm. |
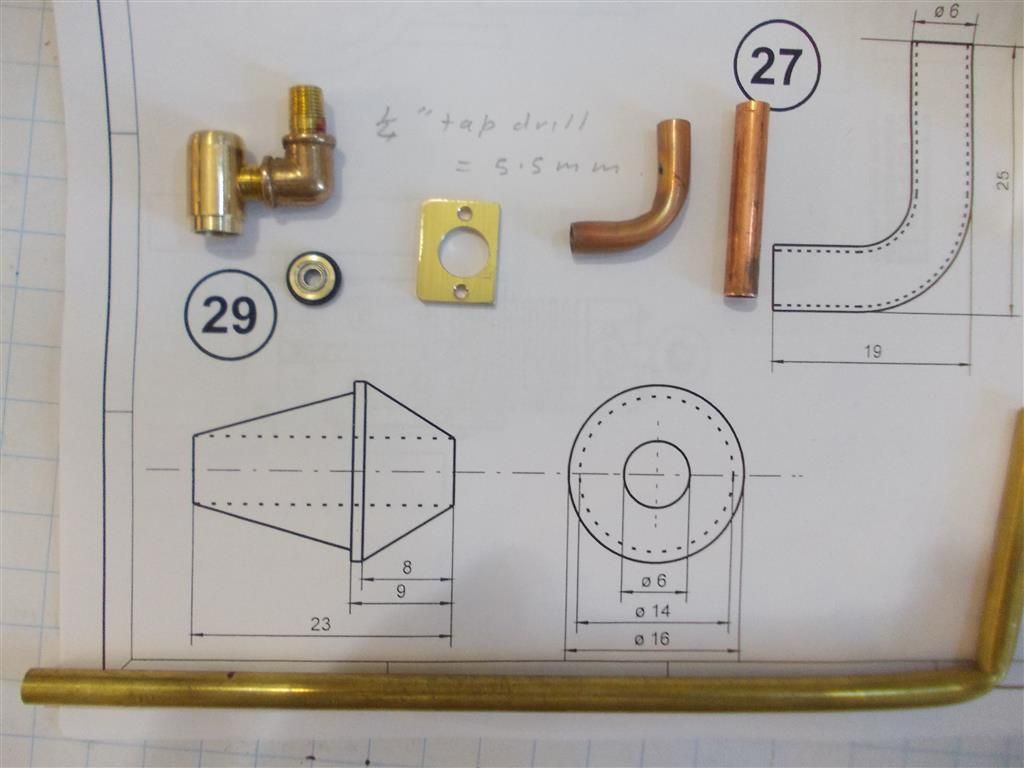
| Brian John | 24/05/2016 10:20:11 |
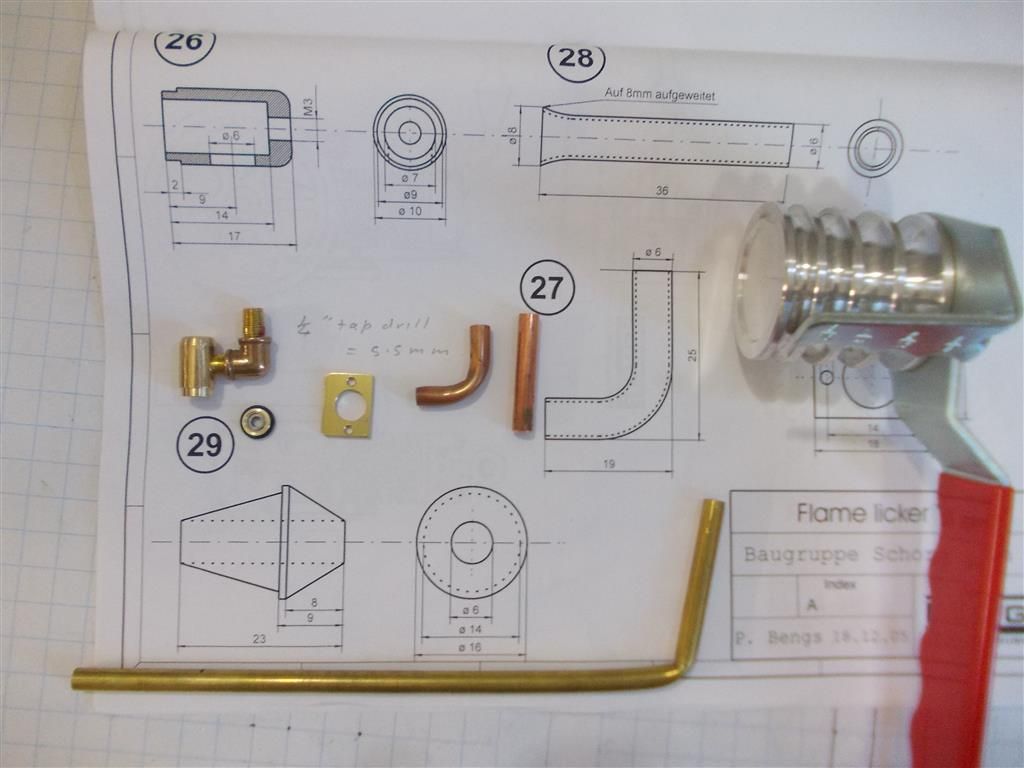
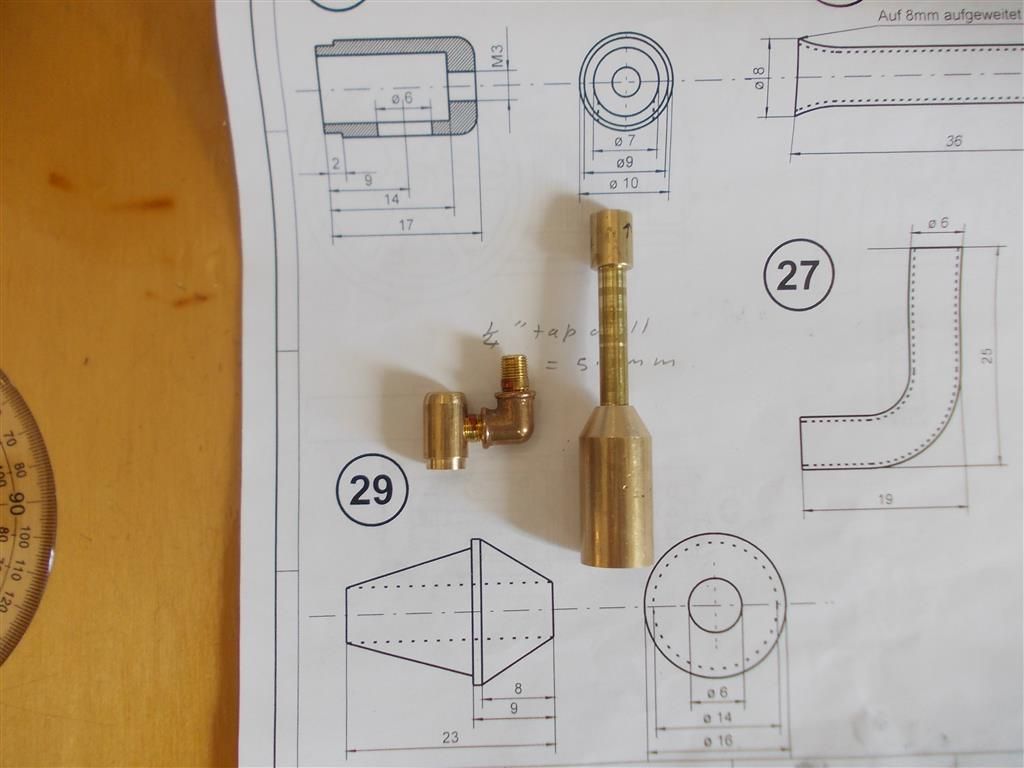
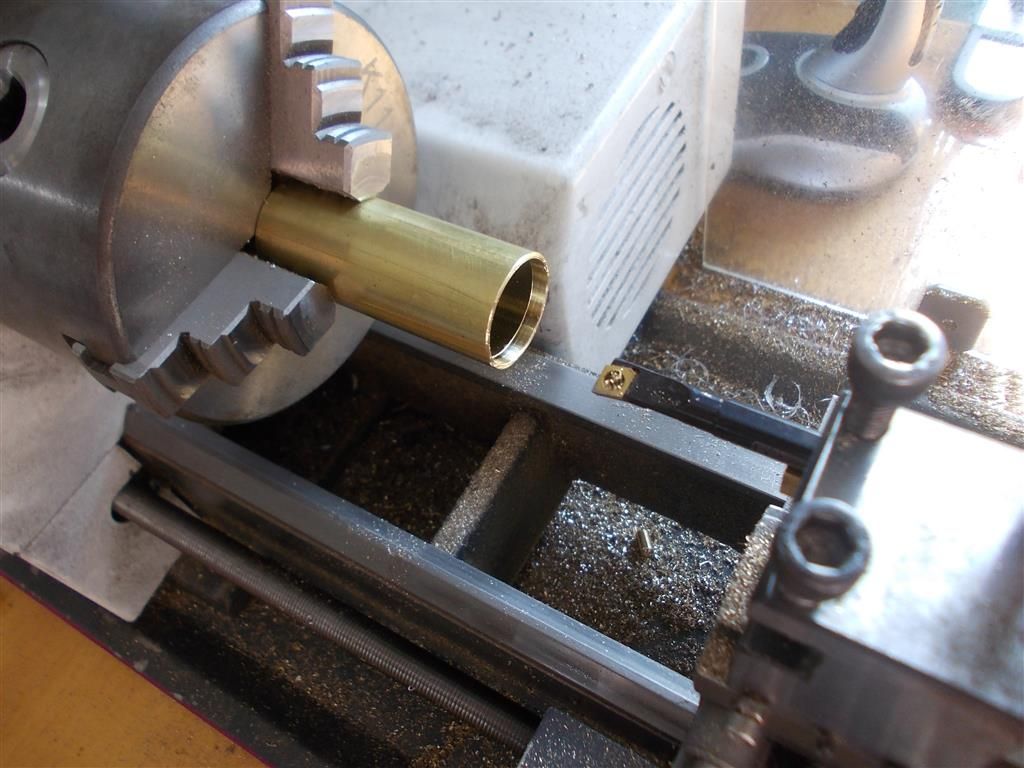
| 1487 forum posts 582 photos | Okay, that part is now complete and it can be seen in the photo beside the 29. I have made a start on the chimney (parts 25 and 26) and I have encountered a few problems. The 6mm copper pipe came already bent but it has not been done well : there is a kink in it. I cannot find a supplier of 6mm copper pipe/tubing to replace this but I already have some 1/4'' brass tubing in my box of bits. My first attempts at bending this were not successful so I dug out all the threaded pipe fittings I previously purchased from PM Research. The threaded pipe fittings hold everything in place while it is hard soldered although it does not look as neat. It may look better once it is soldered. I still wonder about the need for hard soldering the chimney as there is a rubber ball inside part 26. One would think anything above soft solder temperature would melt this ball ? What about that cone shaped part 29 ? Is that strange shape purely cosmetic as the hole goes straight through ? I also had a problem when making part 26. My boring bar will not go in a 7mm hole so how would you get a flat surface at the bottom of a blind hole ? I ended up filing off the tip of a spare 7mm drill bit and did it that way.
Edited By Brian John on 24/05/2016 10:21:32 Edited By Brian John on 24/05/2016 10:22:02 Edited By Brian John on 24/05/2016 10:23:40 |
| JasonB | 24/05/2016 10:30:00 |
25215 forum posts 3105 photos 1 articles | It's a typical exhaust silencer design found on a lot of German engines, in full size it would have been made in two halves from thin sheet so is more just a cosmetic thing in this scale. Grinding down the end of a drill is one option, 7mm milling cutter another or making a "D Bit" from silver steel is a third option. The main thing is that the ball seals the hole, try sucking air through part 26 with teh ball in place and it should act like a one way valve. 6mm brake pipe from a car shop or 6mm copper from refridgeration supplies should do but not easy to get a tight bend, annealing will help a swill filling with water and then freezing. |
| Brian John | 25/05/2016 10:13:27 |
| 1487 forum posts 582 photos | Further progress on the chimney has been stopped by an unexpected problem : how do you make the 15 degree angle part (LH side part #29) ? I think some sort of mandrel is required but I really have no idea at this point. I have drilled and tapped all the exhaust parts for 1/4-40 so that everything will screw together prior to hard soldering it. What about the tank ? I cleaned up the cylinder and the end parts but I had to use a boring bar to trim a bit off the inside rims of the cylinder so that the round ends would fit snugly prior to soft soldering it. Is this how you would have done it ? |
Please login to post a reply.
Want the latest issue of Model Engineer or Model Engineers' Workshop? Use our magazine locator links to find your nearest stockist!
Sign up to our newsletter and get a free digital issue.
You can unsubscribe at anytime. View our privacy policy at www.mortons.co.uk/privacy
- hemingway ball turner
04/07/2025 14:40:26 - *Oct 2023: FORUM MIGRATION TIMELINE*
05/10/2023 07:57:11 - Making ER11 collet chuck
05/10/2023 07:56:24 - What did you do today? 2023
05/10/2023 07:25:01 - Orrery
05/10/2023 06:00:41 - Wera hand-tools
05/10/2023 05:47:07 - New member
05/10/2023 04:40:11 - Problems with external pot on at1 vfd
05/10/2023 00:06:32 - Drain plug
04/10/2023 23:36:17 - digi phase converter for 10 machines.....
04/10/2023 23:13:48 - More Latest Posts...
- View All Topics
- Reeves** - Rebuilt Royal Scot by Martin Evans
by John Broughton
£300.00 - BRITANNIA 5" GAUGE James Perrier
by Jon Seabright 1
£2,500.00 - Drill Grinder - for restoration
by Nigel Graham 2
£0.00 - WARCO WM18 MILLING MACHINE
by Alex Chudley
£1,200.00 - MYFORD SUPER 7 LATHE
by Alex Chudley
£2,000.00 - More "For Sale" Ads...
- D1-3 backplate
by Michael Horley
Price Not Specified - fixed steady for a Colchester bantam mark1 800
by George Jervis
Price Not Specified - lbsc pansy
by JACK SIDEBOTHAM
Price Not Specified - Pratt Burnerd multifit chuck key.
by Tim Riome
Price Not Specified - BANDSAW BLADE WELDER
by HUGH
Price Not Specified - More "Wanted" Ads...
Do you want to contact the Model Engineer and Model Engineers' Workshop team?
You can contact us by phone, mail or email about the magazines including becoming a contributor, submitting reader's letters or making queries about articles. You can also get in touch about this website, advertising or other general issues.
Click THIS LINK for full contact details.
For subscription issues please see THIS LINK.
Model Engineer Magazine
- Percival Marshall
- M.E. History
- LittleLEC
- M.E. Clock
ME Workshop
- An Adcock
- & Shipley
- Horizontal
- Mill
Subscribe Now
- Great savings
- Delivered to your door
Pre-order your copy!
- Delivered to your doorstep!
- Free UK delivery!



 Register
 Log-in


