Member postings for Howard Jones
Here is a list of all the postings Howard Jones has made in our forums. Click on a thread name to jump to the thread.
| Thread: Pultra 17/70 drive setup |
| 22/10/2010 10:23:28 |
bogs why does my virus scanner see that second link as an attack page? |
| Thread: Tool tips |
| 19/10/2010 12:38:39 |
michael williams old sausage you have a lot to learn. (which is good because life will be interesting) the old dodges used by turners of old have a lot going for them. they tend to be less error prone when the user is in the faded stage before being aware of fatigue and packing it in for the night. the method I described also has the advantage of alerting you to a positional error in the tailstock well before relying on the accuracy for a drilling job. also I would make the point that methods that work on the myford with it's flat bedways often cant be used on a hercus or southbend because they use V ways.  the method I described doesnt use batteries, pencil , paper or a calculator. It uses the inherent accuracy of the machine tool. Bogs your ruler method will come unstuck on the first piece of irregular shaped bar that you try it on. on the stuff I seem to turn it would never work until a truing cut was made. I hope you all live long enough to have David tell stories about you and your accuracy. |
| 18/10/2010 15:51:15 |
I put a center in the morse taper of my headstock. then another centre in the tailstock. bought the two up together with a razor blade between them. the blade sat perpendicular to the bed confirming that the heights of both centers were the same. thereafter I just put the metabo keyless chuck in the tailstock. I have a 2mm chinese drill that I murdered by breaking the flutes off and grinding to a precise point. this gets set in the chuck (which is accurate). the tool is then placed against the pin point and adjusted to be a tad below centre to prevent rubbing. If I ever doubt the accuracy I put the centre in the headstock and check the height of the pin. been ok so far. works with boring bars, armstrong tool holders and hacksaw shimmed quarterinch hss tooling. measurements have errors. this method has none. but!!!! you go on doing what works for you. I'll do likewise. none of the techniques are wrong but how do you know your measurement is being made exactly vertical? |
| Thread: Finished model too good |
| 17/10/2010 14:14:58 |
I have come to a great grinding halt in my own model making because of this finish issue. although I have lots of photos and construction articles for many of the possibilities none of them really give much of an idea of what the original subject looked like in real life. I'm certain that a flaw creeps into many of the model engineer articles where they start as one small poorly reproduced black and white photo of the original a 3 view sketch and then launch into miles of the "interesting stuff". I do wish that the first article in a series dealt exclusively with what the original subject looked like so that you could be ceratin that your model would go beyond the toy and actually look like a working miniature of the real thing. the difference between a thousand hour wrong'un and a magic miniature isnt actually that much. I wish I knew what it was though so that I didnt invest 999 hours in a thousand hour model and get it wrong because of the miss applied last hour. how the hell does Cherry Hinds do it? |
| Thread: Hints and tips |
| 15/10/2010 14:16:19 |
you guys must take hours to setup a 4 jaw chuck. the way I do it is to get a close position before using the dial gauge. to do this place the work in the 4 jaw and just gently tighten the jaws. move any tool up near the work and rotate the chuck watching the job. work out by observation when the job is closest to the tool. move the chuck to place the nearest jaw level. move the tool up to almost touch the job. roll the tool down the lathe bed clear of the job. turn the chuck 180 degrees then bring the tool back near. TAKE OUT HALF THE ERROR. (only move the job half way to the tool) go back and do it again with the next high spot. takes about 4 iterations to get the job almost center. take off the toolpost and stick the dial gauge and its magnet holder on the carriage. then repeat the iterations using the dial gauge. the key to speed is to take out half the errror each time. |
| Thread: A strange fluid |
| 11/10/2010 14:55:59 |
can I just add to allans comments. the design should be modular so that changing aspects of the design as availability of components changes doesnt mean going entirely through the bowl of spagetti to get it working again. domestic use of the spark eroder is often quite different from industrial use. industrial savvy is a starting point for technique but isnt the whole banana. some info from my rocket scientist friend. because the spark craters the job, each time the electrode closes on the job the sparks occur in a different place on the workface. they occur on the nearest surface. each spark displaces a piece of crud from the workface. as this builds up between the surfaces the eroding becomes less effective. if you dont clear this crud regularly you end up with tide marks along the side of the cut. every few pecks of the electrode it needs to be backed right out and the eroded surface flushed to remove all crud. when the electrode contact is being made the working fluid needs to be still or it affects the evenness of the erosion. an eroder really needs to be able to be manually traversed down to the job or up and away from it. it needs to drive the stepper automatically during the pecking phase. it needs to have a backout action at some settable interval. it needs to be able to start and stop a coolant pump while backed out so that the workface can be flushed out. it needs to be able to stop the fluid circulation while the eroding sequence is running. ringing in the electrical circuit is the cause of electrode wear and probably the overloading of the chips. that'll do for now. |
| 10/10/2010 15:03:18 |
I have seen the title of the book in their cattledog but wasnt aware that it had a buildable design in it. I thought it was book on techniques. I will hunt out a copy. thanks. |
| 10/10/2010 03:12:46 |
alans comment "edm can be very precise" a friend who just recently passed away showed me a job he had done for a customer. it was a paper punch just on a meter in length. it had a platten with a little keyhole shaped aperture about every 5mm. mating with this was the punch which had raised tapered keyholes to punch through the paper to get the punch to function accurately at all the dimensional tolerance was a tenth of a thou (sandth of an inch) over the metre distance. the job was done with a wire eroder. utterly utterly stunning work. |
| 10/10/2010 03:02:16 |
alan has hit the very core of the problem I've faced. I have had a go at a few the spark eroder circuits and every time I encounter a chip or chips in the circuit that are utterly unobtainable. what is equally frustrating is that the manufacturers seem to lock the technical info regarding their circuits away so that it becomes near on impossible to locate a suitable workaround to a circuit. now I have electronically savvy friends who say that the problem is trivial and easily worked around but I notice that not one of them has built an eroder despite being well versed in what they are capable of. so I suspect that the circuit design isnt actually that trivial my friend the rocket scientist model engineer built amesbury's circuit and used it successfully for 3 years but I notice in his notes that after that period he gradually had to replace every component on the boards. I suspect that amesbury's circuit overloaded the components or drove them at their limits to achieve the result he obtained. we in model engineering really do need buildable spark eroder circuits. what can be achieved with a spark eroder and some talent is truely remarkable. btw my friend the rocket scientist solved his problem by buying a $25,000 commercial spark eroder and the work he has done on it is absolutely stunning. my pockets are somewhat shallower and I am really hanging out for a spark eroder circuit I can build. alan you could really do model engineering a service by designing a buildable circuit that didnt over drive the components. |
| 08/10/2010 16:07:17 |
god no! the model engineer postbag will be filled with letters of woe. I'd build the spark eroder if only there wasnt a typo..... wail, gnash, weep. if only there wasnt a tyop..... hey guys. see the big picture not the bloody punctuation in life. in attonement you all owe the editor a decent interesting article on how you use the spark eroder. btw one of our local expert spark eroder users swears by the orange citronella fluid for his dielectric. keeps the mozzies away too he says. |
| Thread: Metric vs Imperial - Practical or Traditional? |
| 05/10/2010 14:26:44 |
I grew up metric. years involved in aviation made me footric. in model engineering I use the dimension with the simplest number. however I've become convinced that we need to keep both systems (or if you use BA, all three) I've never seen the metric tapping drills ever in the shops. most metric tapping drills are the nearest imperial equivalent. in drilling holes I use a combination of number drills, imperial 64ths sizes and metric. all metric rulers with just millimeters on them are useless! there must be nearly a foot between graduations. no, keep all the standards. they all miss out somewhere and by combining all of them you can get the job done. |
| Thread: Has anyone experience of building both the engine and paddle steamer? |
| 05/10/2010 13:12:26 |
I've noted with interest the elaborate engine setups for paddle steamers in Model Engineer articles. I can assure you that Australian Paddle Steamers follow entirely different practise. Australian Paddle Steamers are all based on a stationary steam engine mounted on huge angle irons along the hull timbers. the output from the stationary engine is connected via huge spur reduction gears or an equally huge reduction chain drive to the stub axles of the paddles. So if you want to build a real australian paddle steamer first build your Ransome and Sims stationary engine (a typical engine used) then fit your hull around it. I can post some photos if you want. |
| Thread: Lathes?? |
| 05/10/2010 10:57:40 |
I use an Australian Hercus of 1954 vintage. This Hercus is I believe a parts interchangeable licence built clone of the Southbend Lathe. I find it to be one of the most wonderfully ergonomic pieces of tooling I've ever experienced. I notice that the english love their Myford's but the ML7 is a dinky toy compared to the more capable Hercus/SouthBend. 4 1/2inch or 9 inch swing depending on whether you speak radius or diameter makes this lathe far more useful than the smaller Myford. There is a Southbend advertised on the ME website for 750. gods if you guys dont snaffle that one up you're missing something good. but .... any lathe is better than no lathe. all of them can be repaired or modified to make them useful. if the lathe you have is missing something make it. |
| 05/10/2010 10:55:21 |
I use an Australian Hercus of 1954 vintage. This Hercus is I believe a parts interchangeable licence built clone of the Southbend Lathe. I find it to be one of the most wonderfully ergonomic pieces of tooling I've ever experienced. I notice that the english love their Myford's but the ML7 is a dinky toy compared to the more capable Hercus/SouthBend. 4 1/2inch or 9 inch swing depending on whether you speak radius or diameter makes this lathe far more useful than the smaller Myford. There is a Southbend advertised on the ME website for 750. gods if you guys dont snaffle that one up you're missing something good. but .... any lathe is better than no lathe. all of them can be repaired or modified to make them useful. if the lathe you have is missing something make it. |
| Thread: Motor oil as lubricant - corrosion? |
| 05/10/2010 10:32:53 |
the castrol gtx oil I used for a while on my lathe certainly leached out zinc. my brass oilers all went slowly a red shade of copper. I now use shell tellus 46 which leaches silver but since there isnt any on the lathe causes no problems. wd40 *causes* corrosion!!! it seems that after a period the chemical makeup deteriorates and becomes hydroscopic. I have fought a corrosion problem for years in my workshop and it became proven that the wd40 I was using was the actual cause. I now oil with the tellus and have had no further problems. |
| Thread: Beyond Tich- a Haine StPierre 0-4-0 2ft gauge loco to model |
| 03/10/2010 13:16:25 |
I went back out to the WA Rail Preservation Society museum to see if I could catch Bob Thornton again but no such luck. The Peak Hill mine history mentions a new loco being imported from
england in 1901. I dont know if the Haine St Pierre was the one but this
opens the possibility that it had been in use in england and was bought
second hand. maybe a photo exists of it in england?? it is interesting that the history account differs from the government boiler history record. Bob could we obtain a copy of the photo of the loco that you mentioned? btw I appreciate you taking the time to hunt out the details. thanks. Dave, sorry didnt realise the query was from you, I was looking through my notes on the second last night in Meekatharra and, as you did, saw that the wheel flange was huge. I thought I'd made an error as well. it measures as 42mm taken from one end of the flat of the tread and 50mm if taken from the tread at very inside of the wheel (roughly). ...I'm still on the hunt for more details. there just must be photos of it working out there. |
| Thread: Lathe oiling |
| 03/10/2010 12:25:17 |
you may just have too big a nozzle. I use an old rega pressure oil can with shell tellus 46 as the oil. there is a slight weep as the oil is squirted in but it works ok 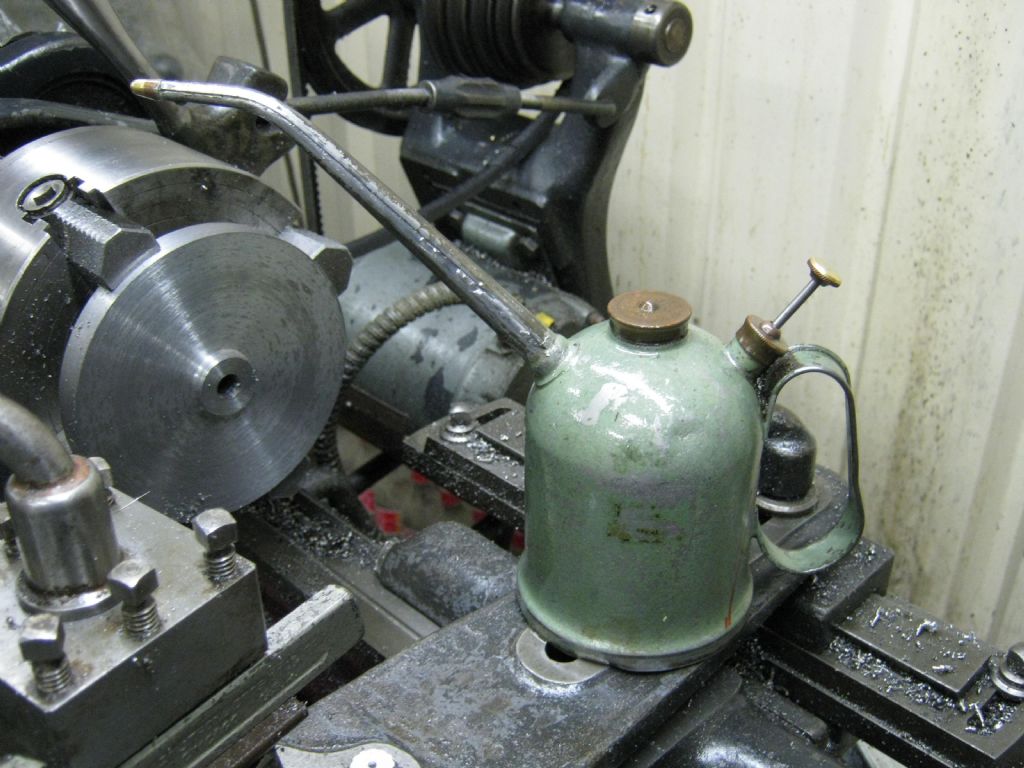 thats what it looks like |
| Thread: Boring problems |
| 01/10/2010 10:19:59 |
howard the easiest way to the final solution is to ply dusty with grog for the effort and arrange to have the bit he made posted to you. ...that is another way of doing it. another Howard |
| Thread: Beyond Tich- a Haine StPierre 0-4-0 2ft gauge loco to model |
| 17/09/2010 13:31:55 |
my fellow club member Jim has been asking me whether I'd looked in the Battye Library, our state historical repository. well I went in and had a look today. there is a single book on the history of Peak Hill goldmine. in the book is a single photo of the loco probably many years after it had ceased being used.  now I am a total neophyte when it comes to valve gears so I looked it up in a book. ...but I'm still not much wiser. doesnt the valve gear look to be simpler than walscharts? couldnt it be something like Hackworth that was used on industrial locos? then I noticed the absence of brake actuating gear. I wonder how many years the loco was used without brakes good grief.notice though the type of safety valve used. very like tich. for the chap who questioned the wheel flange size. I posted the scanned notes made at the time to prevent transcription errors. there is a clear shot of the wheel showing tread and flange angles. you should be able to scale off the photo to confirm. I think my figures are right though. it has hefty flanges. howard |
| 16/09/2010 15:31:41 |
well gentlemen, I've uploaded over 90 images and 10 dimensioned sketches of this rare little loco. what is missing are the details of the steam fittings and boiler internals. if you can crack what they are and work out what valve motion was used you are well on the way to a minor Model Engineer fame and fortune. if any australian modeller has photos of this loco during its service life please post them. it was supposedly used on the Peak Hill gold mine during its working life. I'd love to know what it's coal or wood tender looked like and what the ore carriages it hauled look like. it has been 5 years since I spent a few afternoons measuring and recording the details and in the period since I've drawn a total blank. I can find no mention of this little loco anywhere. (doesnt mean that I havent stopped looking though) Dave the editor believes that the collective wisdom of the model engineering community can crack the mystery. I'd love it if he was right. 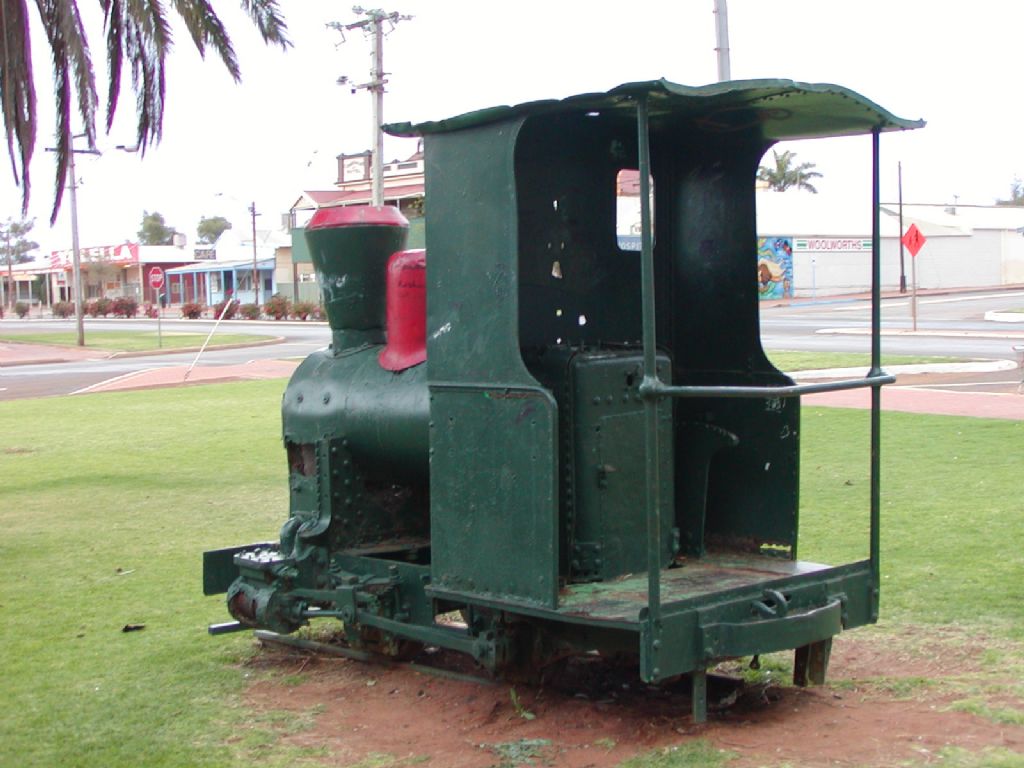 over to you guys... Many Thanks to Model Engineer for allowing me to post all the photos. |
Magazine Locator
Want the latest issue of Model Engineer or Model Engineers' Workshop? Use our magazine locator links to find your nearest stockist!
Sign up to our Newsletter
Sign up to our newsletter and get a free digital issue.
You can unsubscribe at anytime. View our privacy policy at www.mortons.co.uk/privacy
Latest Forum Posts
- *Oct 2023: FORUM MIGRATION TIMELINE*
05/10/2023 07:57:11 - Making ER11 collet chuck
05/10/2023 07:56:24 - What did you do today? 2023
05/10/2023 07:25:01 - Orrery
05/10/2023 06:00:41 - Wera hand-tools
05/10/2023 05:47:07 - New member
05/10/2023 04:40:11 - Problems with external pot on at1 vfd
05/10/2023 00:06:32 - Drain plug
04/10/2023 23:36:17 - digi phase converter for 10 machines.....
04/10/2023 23:13:48 - Winter Storage Of Locomotives
04/10/2023 21:02:11 - More Latest Posts...
- View All Topics
Support Our Partners


Shopping Partners
Subscription Offer

Latest "For Sale" Ads
- Reeves** - Rebuilt Royal Scot by Martin Evans
by John Broughton
£300.00 - BRITANNIA 5" GAUGE James Perrier
by Jon Seabright 1
£2,500.00 - Drill Grinder - for restoration
by Nigel Graham 2
£0.00 - WARCO WM18 MILLING MACHINE
by Alex Chudley
£1,200.00 - MYFORD SUPER 7 LATHE
by Alex Chudley
£2,000.00 - More "For Sale" Ads...
Latest "Wanted" Ads
- D1-3 backplate
by Michael Horley
Price Not Specified - fixed steady for a Colchester bantam mark1 800
by George Jervis
Price Not Specified - lbsc pansy
by JACK SIDEBOTHAM
Price Not Specified - Pratt Burnerd multifit chuck key.
by Tim Riome
Price Not Specified - BANDSAW BLADE WELDER
by HUGH
Price Not Specified - More "Wanted" Ads...
Get In Touch!
Do you want to contact the Model Engineer and Model Engineers' Workshop team?
You can contact us by phone, mail or email about the magazines including becoming a contributor, submitting reader's letters or making queries about articles. You can also get in touch about this website, advertising or other general issues.
Click THIS LINK for full contact details.
For subscription issues please see THIS LINK.
Digital Back Issues


Donate

 Register
 Log-in
Model Engineer Magazine
- Percival Marshall
- M.E. History
- LittleLEC
- M.E. Clock

ME Workshop
- An Adcock
- & Shipley
- Horizontal
- Mill

Subscribe Now
- Great savings
- Delivered to your door

Pre-order your copy!
- Delivered to your doorstep!
- Free UK delivery!