Member postings for Andrew Johnston
Here is a list of all the postings Andrew Johnston has made in our forums. Click on a thread name to jump to the thread.
| Thread: New Blocks on the Block |
| 16/11/2011 23:25:39 |
........and not a farthing more. Personally I'd take the £3.87p, it's worth more.  Andrew |
| Thread: Effect of red heat on 316 and 321 stainless tube. |
| 10/11/2011 08:59:10 |
Hmmmm, the boiler failures may be due to stress corrosion cracking (SCC)? Austenitic stainless steels are particularly prone to SCC involving chlorine; do you treat your water before use or just use tap water? It may well be that the structure of the tubing has changed enough to alter the strength of the subsequent weld. Of course the prep and welding techniques can also affect the structure and strength of said weld. Some interesting information in this link: Regards, Andrew |
| Thread: Milling from a sheet |
| 09/11/2011 16:48:51 |
Posted by The Merry Miller on 09/11/2011 15:03:09: Anyone remember the "Goscut", that could manage 1.0mm bms easily. Len. P. No, never 'eard of it; obviously not old enough! What is it then? Regards, Andrew |
| Thread: Reaming in the Lathe/Drilling M/C |
| 09/11/2011 11:24:44 |
Posted by Alan Worland on 08/11/2011 23:21:36: Is it not the done thing to use these under power? It's certainly not convention, but there's nothing to say you cannot use a hand reamer under power. However, if you are locating/holding the reamer as described then I fear you may have some problems using power, particularly when trying to withdraw the reamer. Letting it rub, or turning it backwards, is death to reamers. Regards, Andrew |
| 08/11/2011 22:48:52 |
Alan; it sounds like you're talking about a hand reamer, which is just that. It is intended to be used at the bench, by hand, with a tap wrench. For use in a lathe or mill you need a machine reamer, which is used under power. The general rule of thumb is half the speed and twice the feed of an equivalent size drill. A machine reamer cuts on the leading edge only, it does not cut on the flutes like a hand reamer. You also need to leave a decent amount for the reamer to cut, at least 8-10 thou, and more for larger reamers, eg, 20 thou for a 1" machine reamer. Regards, Andrew |
| Thread: Milling from a sheet |
| 08/11/2011 22:40:04 |
Well shiver me timbers, is that a square deal, or just a pine in the ash? I surely hope it wood be, so it will be plane sailing for yew.  Andrew |
| Thread: Crankshaft construction |
| 06/11/2011 14:19:55 |
Hi John, Thanks for the information. Don't worry about posting the G-code, I'm not about to start CNC machining crankshafts. However, it is an interesting technique, which I shall store away for future reference. I tried a quick programming exercise for something similar in my CAM software. It failed miserably, so it looks like hand coding if I need to use the technique. I guess one could ameliorate the 'barrel' shape of the pin by doing some final passes with the cutter offset from the centre of the pin in Y, or alternatively stop every 'n' degrees in A and make a pass of the cutter in Y. Both would improve the shape of the pin but neither would make it a true cylinder. My gut feel is that offsetting the cutter in Y would give an acceptable shape with fewer moves. Regards, Andrew |
| 03/11/2011 20:58:14 |
Hold tight, never mind astray, we're about to go off-road! Wow, the CNC crankshaft looks great. I think I've understood the toolpath; is it like this sketch, looking along the axis of the crankshaft: 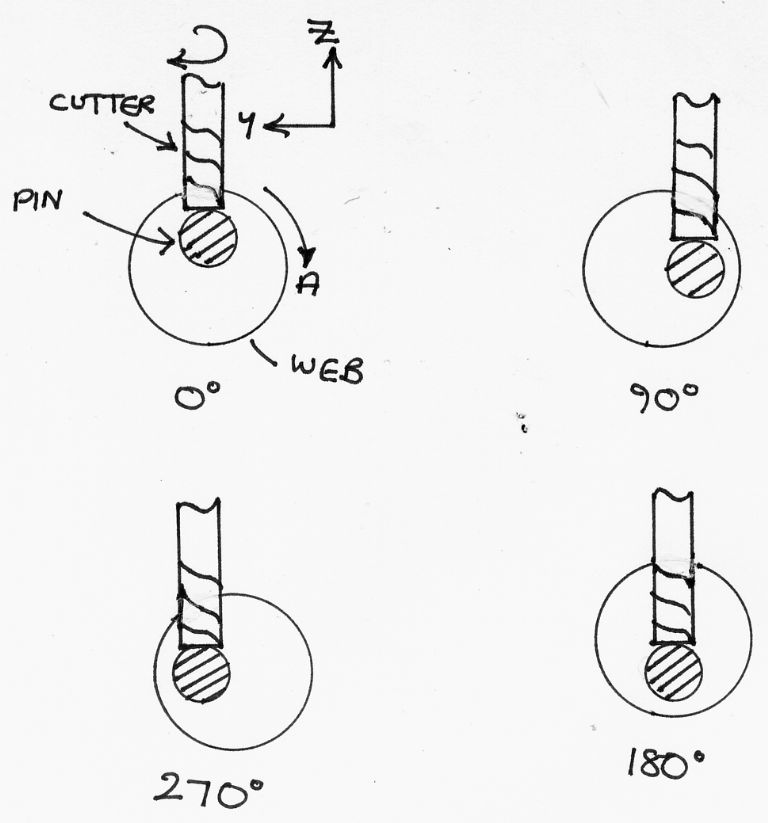 I have two technical questions for John. One, is the repeated G-code a series of G01 moves in Y, Z & A, or is it possible to use G02/G03 in Y & Z with a rotation in A as well? Second, if we assume that the centre cutting endmill is actually ground slightly concave on the end will this result in a barrel shaped pin? I have built a crankshaft for a hit 'n' miss engine using loctite and pinning. However, the engine hasn't run yet, so may be I'm in for a surprise at a later date! Regards, Andrew |
| Thread: Drilling deep holes - 10x drill diameter - Runout? |
| 30/10/2011 20:39:02 |
Right, flameproof overalls on; here are my thoughts! If runout of the hole is critical I wouldn't use the lathe. I'd drill the hole in the vertical mill and then machine the rest of the part using said hole as the reference for set up. The problem with using the lathe is that it relies on the drill being perfectly aligned axially and dead parallel to the rotation axis of the headstock. The one thing you can gaurantee is that it won't be. I agree with Ramon that the 5.5mm drill is too large, the reamer will be rubbing or not even cutting. I wouldn't bother with a pilot size drill, just go straight through with 5.3mm. Larger drills will tend to follow any 'wander' of smaller drills so why not start with the largest, and stiffest, drill. Less 'pecking' needed too. Also, keep the feedrate up, that minimises any errors due to slight asymmetries in the chip size. I also think that 400rpm is a bit slow; I'd be up at about 2000rpm for drilling, and half the speed, twice the feed for reaming. My sequence would be; start the hole with a carbide spot drill, drill through with 5.3mm, ream 7/32". Here's a thought, you could consider a carbide drill; like for like carbide is much stiffer than HSS. Regards, Andrew |
| Thread: Machining Titanium |
| 30/10/2011 11:24:50 |
As far as machining goes, use the same techniques as for stainless steel. I'll reinforce what Tony says; don't let the cutters rub, positive feedrates all the time. Some titanium alloys can be welded at home; but with two caveats. One, you will need a decent DC TIG welder. Two, the main problem is that titanium has great affinity for oxygen and nitrogen when it is hot. So you will need to be innovative in organising gas shielding while the metal is hot. This is similar to stainless steel, but more elaborate. The main safety issue with titanium is that the fine dust or swarf from machining can spontaneously combust. This isn't very likely, but if it does burn you are not going to be able to put it out unless you are prepared. The official means is a class D fire extinguisher; but these are  expensive. About £200 last time I looked, before turning down a titanium machining job. The basic class D extinguishers, suitable for titanium, contain sodium chloride (salt!) plus other ingredients. An alternative (but don't quote me) is a bucket of dry sand; essentially you need to prevent oxygen getting to the fire. expensive. About £200 last time I looked, before turning down a titanium machining job. The basic class D extinguishers, suitable for titanium, contain sodium chloride (salt!) plus other ingredients. An alternative (but don't quote me) is a bucket of dry sand; essentially you need to prevent oxygen getting to the fire.Regards, Andrew |
| Thread: Bore and stroke ratio in steam engine. |
| 30/10/2011 10:58:22 |
Posted by Stub Mandrel on 30/10/2011 10:48:31 This is why Watt's condensing engines were such a revolution. That's a shocking pun. I thought that the main advantage of Watt's condenser was that it was separate from the cylinder. Hence it increased efficiency as there was no need to heat and cool the whole mass of the cylinder every cycle? Regards, Andrew |
| Thread: Tapmatic Help |
| 29/10/2011 20:13:59 |
Hugh, you're not being nuisance at all; we all have to start somewhere. I might earn my living from engineering, but I'm definitely not a professional machinist. Sound advice from Versaboss to try a few test holes first in a piece of scrap; and he has also captured the essence of using the device. First, a note on tapping drill sizes. Generally I aim for a thread depth of 60-65%; so for M6 I'd use a tapping drill of 5.3mm. In general the shear strength of a material exceeds the tensile strength. In simple terms the bolt will break before the thread in the hole strips. Now some notes from my experiences of using Tapmatic style tapping heads. The first thing you need for the Tapmatic is a stop bar; on the Bridgeport I either use a round bar in the hole in the convenient lug at the bottom of the quill housing on the right, or a convenient lump of metal bolted to the table. The stop bar counteracts the torque from the Tapmatic, it does not need to be attached to the stop arm at the bottom of the Tapmatic. I set my depth in a similar way to Versaboss; through holes are less critical than blind holes. The important point is that you want the clutch in the Tapmatic to dis-engage before the tap gets to the bottom of the hole. You do not want to rely on the torque limit on the Tapmatic kicking in because the tap has hit the bottom of the hole. Torque setting on the Tapmatic is a case of trial and error; think about the size of the tap relative to the range of the Tapmatic and the material to be tapped. Start low and try it out in a piece of scrap; if it slips up the torque a bit. I tend to use speeds about half those recommended by Tapmatic; for M12 in EN1A I'd be running at about 250rpm. The hole is tapped by using the quill feed handle, just like a pillar drill. The feed is fairly quick. The important point is that when the clutch has dis-engaged at the bottom of the hole you need to reverse the Tapmatic by moving the quill feed handle upwards sharply; don't dilly-dally or in time you'll wear out the clutches in the Tapmatic! On low carbon steel I don't tend to bother with cutting fluid, may be a little WD40. You certainly don't need fancy coatings on the tap for EN1A, HSS will be fine. It's more a question of what you can buy, as a lot of machine taps will come with a coating anyway. Here's a picture of the Edelmatic unit tapping blind M10 threads on my Bridgeport. The machine vice and large lump of hot rolled steel was just a convenient stop bar; it doesn't need to be that big! 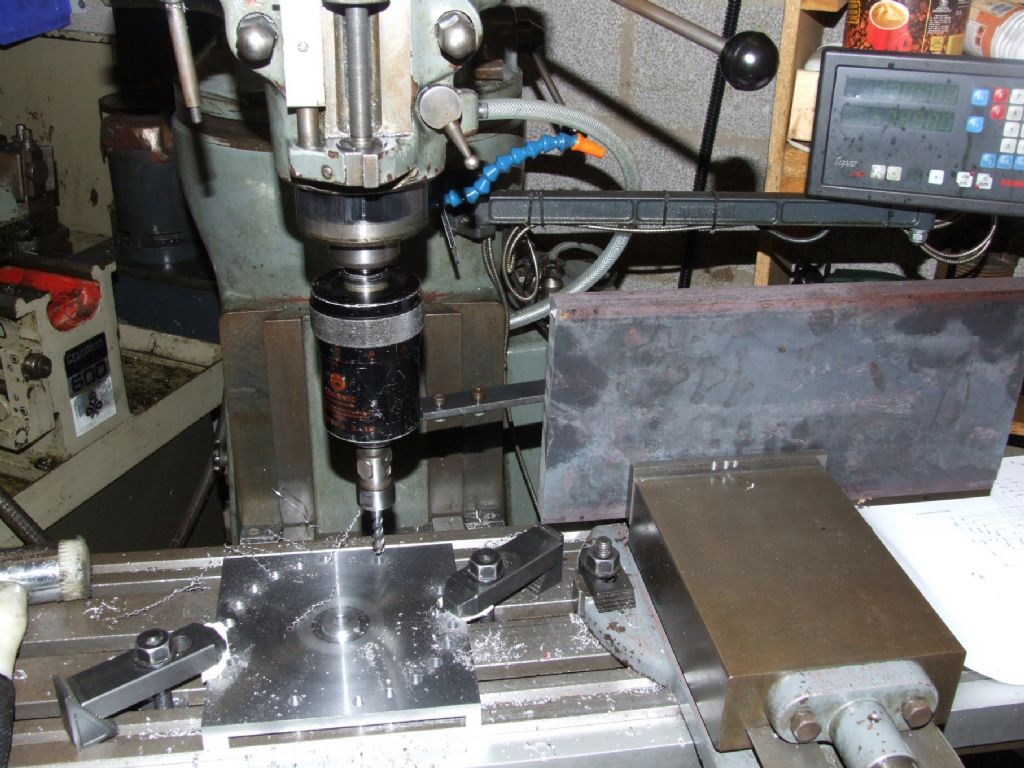 Anything I've forgotten, just ask. Regards, Andrew |
| 28/10/2011 19:27:11 |
Sort of; I've used it's baby brother, the Tapmatic 30X, and a larger, but similar, unit from Edelmatic to tap thousands of holes from M2 to M12 in brass, aluminium, EN1A and EN3. You might get away with using a second tap for the through holes, but I doubt you will be able to use a plug tap for the blind holes. Just to be clear, each hole is tapped in one operation; there is no guarantee that the tap will pick up the thread correctly if you try a second time on the same hole. In essence Mick is correct, spiral flute taps for blind holes and spiral point taps for through holes. However, if you want to minimise expense it is fine to tap through holes with a spiral flute tap, but not vice versa. Again, as Mick says, the torque limit is adjusted by rotating the ring at the top of the unit, against an arbitrary scale. One hint, the ring is normally locked by a non-obvious set screw. If it is stiff, find the screw, don't force the ring. I don't want to teach you to suck eggs; let us know if you need further details. Regards, Andrew |
| Thread: 5 CC CI engine (and a bit of a Grump) |
| 28/10/2011 09:05:31 |
Posted by Steve Withnell on 26/10/2011 21:33:43: I tell you what, this thread has convinced me never to submit anything for publication! That's a shame, I'm sure it would be an interesting read. Regards, Andrew |
| Thread: Drill Sharpening Jigs - Advice please. |
| 28/10/2011 08:59:27 |
Chris, Thanks for the exposition. Funny that you should mention stainless steel. The only problem I have had with the Dormer drills is in stainless (316). I've blunted a few drills by pussyfooting around with the feedrate. If I need to drill more than the odd hole or two in stainless steel I tend to buy a specialist drill from my local tool supplier. I've just looked at the last one I bought (6.2mm) and guess what, it's a Guhring! It worked fine, so the practicalmachinist thread notwithstanding I shall to continue to buy them as needed. Regards, Andrew |
| 27/10/2011 22:52:57 |
I think the company is German, but they are multi-national, so who knows where the drills are actually made. Probably in several worldwide locations. Have a look at this thread, for an interesting discussion of the brand: Regards, Andrew |
| 27/10/2011 11:52:10 |
Posted by chris stephens on 26/10/2011 19:16:59: J&L catalogue a 3mm Guhring cobalt drill (the best quality drills I have come across) £2.95 +VAT. Dormer TiN coated HSS A002 (£0.75 +VAT which is slightly cheaper than Greenwood) just do not compare! Dormer's A777 Cobalt drills are 60p cheaper than Guhring, but I like to buy the best when I can afford it, which unfortunately isn't as often as I would like  Oeeeer, I use Dormer A002 drills for my normal drilling in metric sizes. So far I've been very pleased with them. May be I'm stuck in a rut though. Chris: I'd be interested to know in what area(s) the Dormer drills do not compare with Guhring. If the extra cost is justified economically it might be worth buying selected drills that I commonly use; mainly metric tapping and clearance sizes. Regards, Andrew |
| Thread: Why not Make Two? |
| 24/10/2011 23:09:06 |
That's why I'm making two identical (well nearly, E&OE) 4" scale traction engines. I was sold the idea on the grounds that it only takes 30% longer to make two. I suspect it's nearer 40%, and it can get a bit tedious when there are lots of long slow cuts. But, as Steve says, most of the time actually goes in thinking, designing, CAD drawing, CNC programming (am I allowed to say that?), finding/buying tools, making jigs and setting things up. The actual machining is often over in a matter of minutes. I won't mention the cost though, in case anybody has a seizure. Regards, Andrew |
| Thread: Drawing Quality |
| 23/10/2011 22:39:17 |
Posted by John Stevenson on 23/10/2011 22:25:20: I think it boils down to the fact that fag packets are not what they used to be. Quite right; now that they've got government warnings all over them that severely limits the space available for the all important sketches. Regards, Andrew |
| Thread: Flat bottom holes |
| 23/10/2011 22:31:45 |
Conversely, I've never had a problem using slot drills in the lathe and vertical mill to make flat bottomed holes. The only caveat I would add is that in bronze a positive rake slot drill may have a tendency to get dragged into the work, in similar fashion to a twist drill. This can be ameliorated by ensuring that the setup is rigid and, more importantly, keep the feedrate up. Use a fairly aggressive feedrate, stop at depth and immediately back out. Regards, Andrew |
Magazine Locator
Want the latest issue of Model Engineer or Model Engineers' Workshop? Use our magazine locator links to find your nearest stockist!
Sign up to our Newsletter
Sign up to our newsletter and get a free digital issue.
You can unsubscribe at anytime. View our privacy policy at www.mortons.co.uk/privacy
Latest Forum Posts
- *Oct 2023: FORUM MIGRATION TIMELINE*
05/10/2023 07:57:11 - Making ER11 collet chuck
05/10/2023 07:56:24 - What did you do today? 2023
05/10/2023 07:25:01 - Orrery
05/10/2023 06:00:41 - Wera hand-tools
05/10/2023 05:47:07 - New member
05/10/2023 04:40:11 - Problems with external pot on at1 vfd
05/10/2023 00:06:32 - Drain plug
04/10/2023 23:36:17 - digi phase converter for 10 machines.....
04/10/2023 23:13:48 - Winter Storage Of Locomotives
04/10/2023 21:02:11 - More Latest Posts...
- View All Topics
Support Our Partners


Shopping Partners
Subscription Offer

Latest "For Sale" Ads
- Reeves** - Rebuilt Royal Scot by Martin Evans
by John Broughton
£300.00 - BRITANNIA 5" GAUGE James Perrier
by Jon Seabright 1
£2,500.00 - Drill Grinder - for restoration
by Nigel Graham 2
£0.00 - WARCO WM18 MILLING MACHINE
by Alex Chudley
£1,200.00 - MYFORD SUPER 7 LATHE
by Alex Chudley
£2,000.00 - More "For Sale" Ads...
Latest "Wanted" Ads
- D1-3 backplate
by Michael Horley
Price Not Specified - fixed steady for a Colchester bantam mark1 800
by George Jervis
Price Not Specified - lbsc pansy
by JACK SIDEBOTHAM
Price Not Specified - Pratt Burnerd multifit chuck key.
by Tim Riome
Price Not Specified - BANDSAW BLADE WELDER
by HUGH
Price Not Specified - More "Wanted" Ads...
Get In Touch!
Do you want to contact the Model Engineer and Model Engineers' Workshop team?
You can contact us by phone, mail or email about the magazines including becoming a contributor, submitting reader's letters or making queries about articles. You can also get in touch about this website, advertising or other general issues.
Click THIS LINK for full contact details.
For subscription issues please see THIS LINK.
Digital Back Issues


Donate

 Register
 Log-in
Model Engineer Magazine
- Percival Marshall
- M.E. History
- LittleLEC
- M.E. Clock

ME Workshop
- An Adcock
- & Shipley
- Horizontal
- Mill

Subscribe Now
- Great savings
- Delivered to your door

Pre-order your copy!
- Delivered to your doorstep!
- Free UK delivery!