Member postings for David Haythornthwaite
Here is a list of all the postings David Haythornthwaite has made in our forums. Click on a thread name to jump to the thread.
| Thread: Rear mounting parting-off tools |
| 15/10/2009 20:12:07 |
OK Meyrick we shall have to agree to differ on this one. I am still convinced that the effect shown on the attached illustration has a lot to do with it. I rest my case. David H 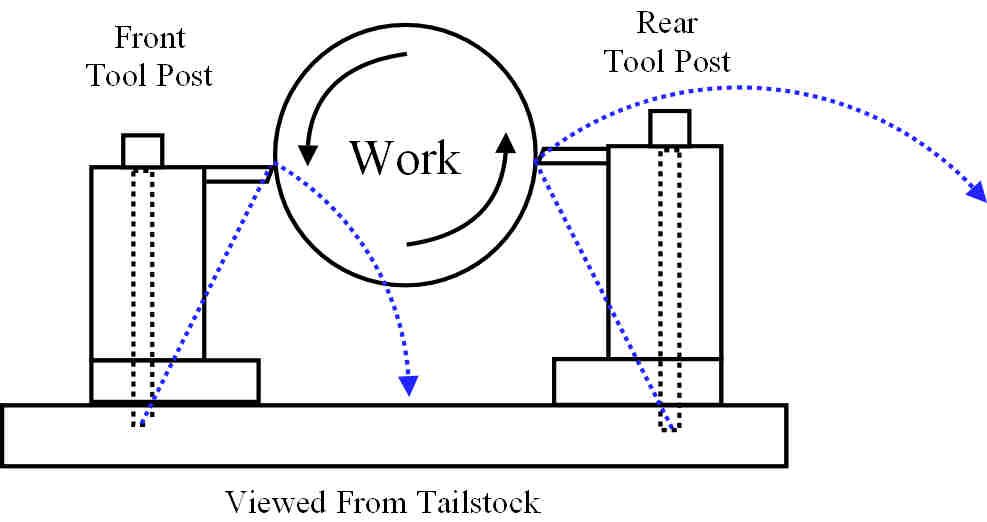 |
| 14/10/2009 17:08:20 |
Regarding Ian's comments, yes of course all rear mounted tools are normally mounted upside down. I am using the Q cut upside down on a REAR MOUNTED QCTP hence the need to mount it lower in a QC holder. I agree with you that it is simply a matter of geometry. At the front, any dig in forces the tool downwards, but as the fulcrum for this movement is further away from the work than is the tool tip then the downward movement also forces the tool forwards into the work making the dig in worse. With a rear mounted tool. a dig in lifts the tool and as the fulcrum is now nearer the back of the machine than is the tool tip, the lifting action is now causing deflection AWAY from the work, releasing the dig in. I do not agree with Chris Stephens that at centre height the effect is the same front or rear. He asks if there is PROOF. I would say a resounding YES The proof is that it simply does work better at the rear. If you have a Colchester or something of similar rigidity, the effect is less noticable, but certainly on lighter type of lathes like Myford. It simply works better. David H |
| 12/10/2009 22:52:12 |
I Have tried them all for parting off on my Myford Super ML7B. Normal parting tool at the front often dug in. Rear Tool Post improved things greatly. Made GHT rear blade type tool post worked fine. Kit Q cut at front - even better. Finally fitted rear mounted QCTP from RDS tools and mounted kit Q cut upside down on a QC holder. Absolutely magic. Can part off washers under cross slide power with no problems. However it required me to make a stepped holder for the Q cut in order to get the blade height down to centre height. QCTP at the back stops the rear blade getting in the way of work and knuckles. Also allows chamfer tool to be fitted. Hope this helps. David |
| Thread: Wilf Baker's variable feed for mill |
| 12/10/2009 20:31:38 |
Hi Fred, Just a thought - Are you sure that one side of the output from the mini speed controller is not grounded to the case and therefore earthed? if this is so then you may have a dead short causing the overload protection to activate. Edited By David Haythornthwaite on 12/10/2009 20:32:21 |
| Thread: Myford ML7 spindle nose dimensions |
| 30/09/2009 10:21:01 |
If it helps, I made a collet adapter as you are making and I kept the measurements that I used for this. I will email you and attach a Jpeg of the details. If you can get hold of MEW Feb 99, Giles Parkes details the dimensions of an adapter, but if you use this BEWARE - the boss needs boring out to 1.018" for screwcutting NOT 1.108" as printed in the article. |
Magazine Locator
Want the latest issue of Model Engineer or Model Engineers' Workshop? Use our magazine locator links to find your nearest stockist!
Sign up to our Newsletter
Sign up to our newsletter and get a free digital issue.
You can unsubscribe at anytime. View our privacy policy at www.mortons.co.uk/privacy
Latest Forum Posts
- *Oct 2023: FORUM MIGRATION TIMELINE*
05/10/2023 07:57:11 - Making ER11 collet chuck
05/10/2023 07:56:24 - What did you do today? 2023
05/10/2023 07:25:01 - Orrery
05/10/2023 06:00:41 - Wera hand-tools
05/10/2023 05:47:07 - New member
05/10/2023 04:40:11 - Problems with external pot on at1 vfd
05/10/2023 00:06:32 - Drain plug
04/10/2023 23:36:17 - digi phase converter for 10 machines.....
04/10/2023 23:13:48 - Winter Storage Of Locomotives
04/10/2023 21:02:11 - More Latest Posts...
- View All Topics
Support Our Partners


Shopping Partners
Subscription Offer

Latest "For Sale" Ads
- Reeves** - Rebuilt Royal Scot by Martin Evans
by John Broughton
£300.00 - BRITANNIA 5" GAUGE James Perrier
by Jon Seabright 1
£2,500.00 - Drill Grinder - for restoration
by Nigel Graham 2
£0.00 - WARCO WM18 MILLING MACHINE
by Alex Chudley
£1,200.00 - MYFORD SUPER 7 LATHE
by Alex Chudley
£2,000.00 - More "For Sale" Ads...
Latest "Wanted" Ads
- D1-3 backplate
by Michael Horley
Price Not Specified - fixed steady for a Colchester bantam mark1 800
by George Jervis
Price Not Specified - lbsc pansy
by JACK SIDEBOTHAM
Price Not Specified - Pratt Burnerd multifit chuck key.
by Tim Riome
Price Not Specified - BANDSAW BLADE WELDER
by HUGH
Price Not Specified - More "Wanted" Ads...
Get In Touch!
Do you want to contact the Model Engineer and Model Engineers' Workshop team?
You can contact us by phone, mail or email about the magazines including becoming a contributor, submitting reader's letters or making queries about articles. You can also get in touch about this website, advertising or other general issues.
Click THIS LINK for full contact details.
For subscription issues please see THIS LINK.
Digital Back Issues


Donate

 Register
 Log-in
Model Engineer Magazine
- Percival Marshall
- M.E. History
- LittleLEC
- M.E. Clock

ME Workshop
- An Adcock
- & Shipley
- Horizontal
- Mill

Subscribe Now
- Great savings
- Delivered to your door

Pre-order your copy!
- Delivered to your doorstep!
- Free UK delivery!