Member postings for gary arthur
Here is a list of all the postings gary arthur has made in our forums. Click on a thread name to jump to the thread.
| Thread: Vertical Boiler Fittings |
| 20/12/2018 12:11:58 |
Aha... yes indeed Paul. You'll see in my post above (the one with the pictures) that I say 'the bottom half of the firebox needs to be fixed back on'. What you are looking at above is only the top half of the firebox, which I took off to drill and tap the bolt circle for the top plate. The bottom half (which I'll be putting back on as soon as I have made some finishing touches to the top plate) has the bottom half of the firehole plus an opening for the ashpan below the grate already roughly cut out. This is all currently in very rough form for a test firing to see if the boiler will actually run on solid fuel, but it will have a makeshift cover to close the firehole as you describe. I'll post pictures once it's back together, and if it all works I'll tidy up all the openings etc which are just roughly cut out at present, and fit a proper door. Cheers, gary |
| 19/12/2018 06:55:45 |
Thank you for this, Bazyle. I was planning on trying charcoal first, but in response to your advice will speak to my friend about some steam coal. |
| 18/12/2018 23:32:53 |
I spotted through the holes in the top plate then drilled and tapped (M4) the bolt circle in the top half of the firebox body:
I then took the firebox top plate off again and silver soldered the spigot for the bottom of the boiler on to it. Believe it or not my Sievert torch started playing up (again) during this operation and would not heat enough to melt the silver solder (which was cut into small pieces laid around the join), so I put the assembly into the woodburner in our living room - which had the assembly red hot and the silver solder flashing round the joint in no time. Dubious practice, but I got away with it! The join isn't the best, but it's actually better than it looks in this photo:
And here's where it's at currently - the bottom half of the firebox needs to be fixed back on, a few more tweaks made and it will be ready for another try with solid fuel:
And if I just can't persuade this little boiler to run on solid fuel, none of this work will be wasted as the firebox will easily convert into a meths burner housing. |
| 11/12/2018 22:35:07 |
The firebox top plate and spigot are now done and are ready to be brazed together and fixed to the main firebox body with M4 screws:
Edited By gary.a.ayres on 11/12/2018 22:35:44 |
| 11/12/2018 00:32:43 |
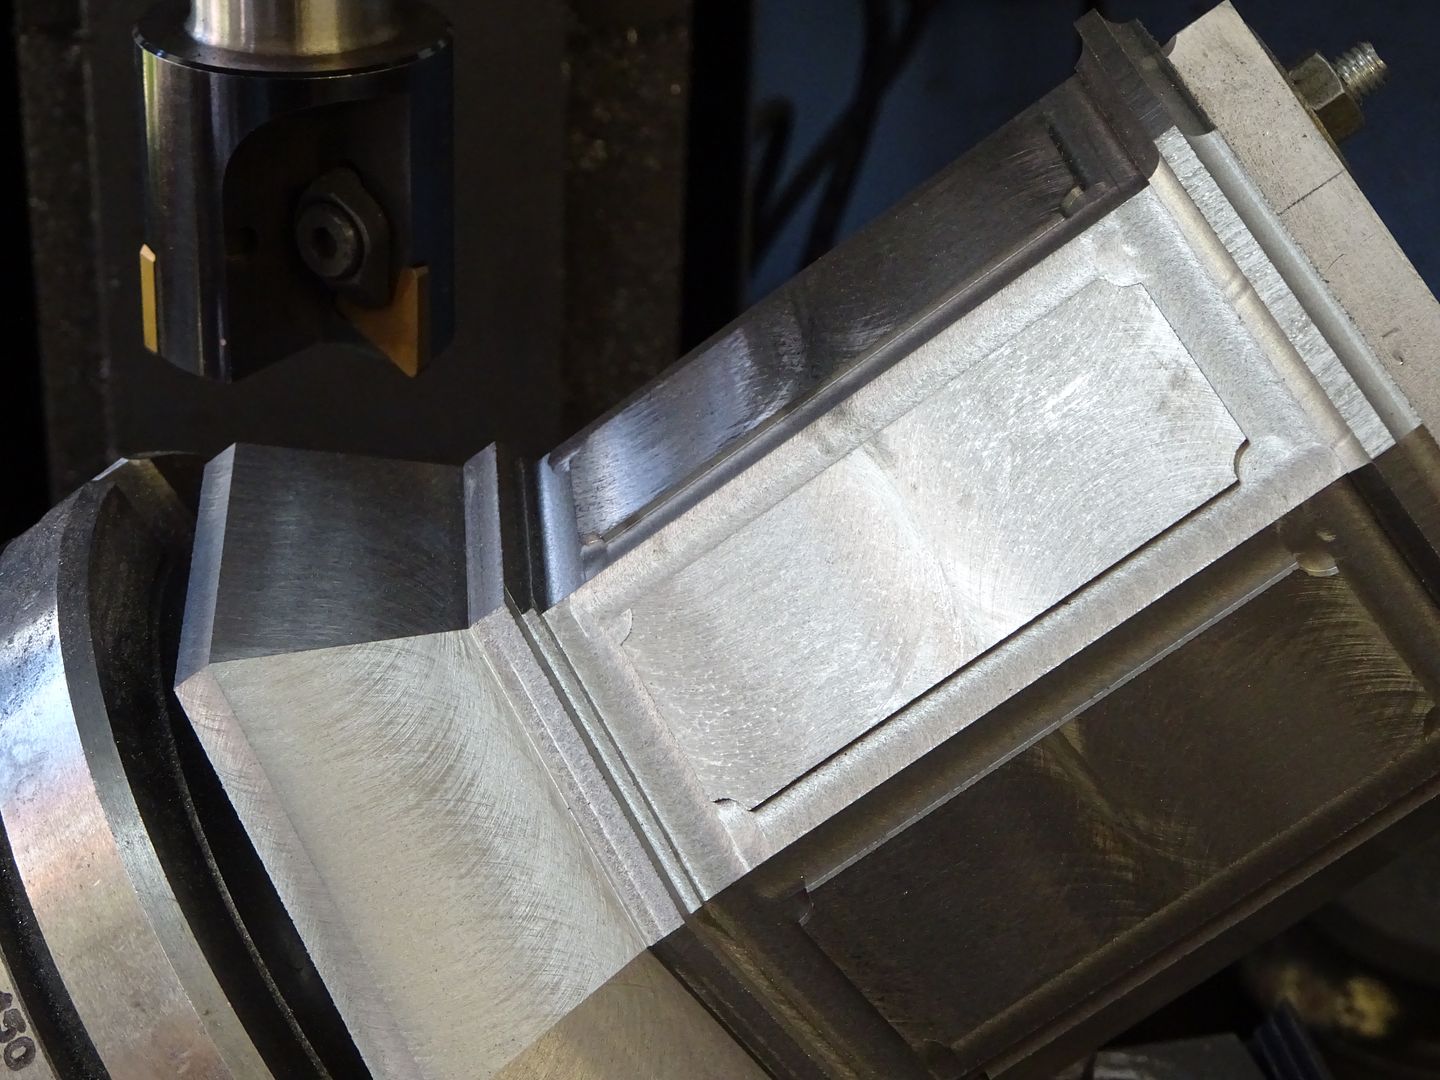
So... Back on the boiler. Or I should say the firebox as the boiler itself is pretty much finished. The test firings on gas and methylated spirits went well and raised a good head of steam. However, not so the solid fuel test using small pieces of hardwood in a roughed-out firebox, which failed to produce enough heat. Not to be deterred (not yet, at least), I'm now in the process of modifying the firebox to make it smaller and more compact to keep the heat near the base of the boiler, where it should be. Again, I'll start with a rough trial version in case it doesn't work. No point in wasting time! However, in such a scenario the top plate of the firebox could be repurposed for use on a meths burner so there's no reason not to make a proper job of that from the outset. That's what I'm doing - or trying to do - now. First, I cut a small piece off an empty oxygen cylinder from a portable oxy-mapp kit to form a short spigot (it can be seen in rough form in the first picture below). This will be brazed on to the firebox top plate and will fit up inside the bottom collar of the boiler as the conduit of heat from the firebox. A strip of carbon gasket material wrapped around the spigot will form a cushion and seal between it and the boiler. The top plate is made of 5mm mild steel plate. I used a hole saw to make the initial hole for the spigot then proceeded to bore it to size with a boring head. I plugged the boring head into my new Sieg SX2.7L mill using a 2MT to R8 adaptor, only to realise that the thread on the drawbar of the machine didn't fit the arbour of the boring head. It was Sunday night, and I had neither the wherewithal nor the inclination to make a new drawbar. Rather optimistically, I gave the setup a go anyway. It worked at first, but as the hole enlarged and the radius of the boring head extended, the lateral forces generated pulled the boring head out of the quill. Not good. Fortunately, my customized 'drill press milling attachment' (with a drawbar which fits the boring head) saved the day:
This contraption has raised an eyebrow or two in its time, but it has on more than one occasion got me out of a pinch and is actually quite good, especially as the drill press which powers it now has a three phase motor. And there are occasions when a bit of belt slippage is no bad thing... For details of its workings, see this video: With the central hole bored to size, I roughly sliced off some of the steel plate with my Evolution Rage mitre saw (wouldn't be without it) to make it manageable, and then back to the Sieg SX2.7L to cut the top plate to just over external diameter using a rotary table and small endmill. I'm finding I really like this mill - for a smallish machine it fairly hogs the metal:
Cheers, gary |
| 08/11/2018 22:56:29 |
It's 88.4% denatured ethyl alcohol - in other words, I think, methylated spirits. It's clear and colourless and smells quite sweet rather than the more mineral smell of meths. It's billed as for use as a cleaner, degreaser, solvent and fuel for spirit lamps such as those in fondues. I tried it out on one of the mamods and it did the job but I haven't fired that one on meths yet so can't make a side by side comparison. I'll try it on my boiler at the end of the year when I have the 'pre-Christmas' out of the way. I'm guessing it will be pretty much the same as meths bearing in mind the active ingredient is the same. The main thing is that at 1 euro 92 cents per litre it's a fraction of the cost of meths in the UK, so I bought four litres of it... |
| 26/10/2018 00:04:17 |
I'm part way through altering the firebox to a design which I *hope* will make it more conducive to running on solid fuel.   They will need some restoration work at some point - as though I don't have enough projects on my plate already!
|
| 17/10/2018 08:06:31 |
Thanks Jason - Yes. Amazingly, I still have some lumpwood charcoal left over after a Summer of endless barbecues, which should fit the bill nicely with paraffin to start as you say. Will think about your air line suggestion, and how I might adapt it to my own peculiar ways. You have given me an idea... Cheers |
| 17/10/2018 06:41:57 |
Paul - thanks for this. I'm aware of the issues you have outlined. I didn't use an electric blower. What I did use was a small mouth-blown blowpipe (like the 'boufadou' which is used for the household fire in Southern France) which flared up the fire when I was using it but it didn't last and the fire soon went down again. I just thought I'd try it to see if it worked. I have in fact now installed a steam blower which showed some signs of working and it did pull the fire but the whole thing just didn't get hot enough. I am reluctant to go down the electric blower route but I can see that one might make all the difference. Once I have modified the firebox (and a better grate is part of my plan) I'll try again but I can see that I may have to decide between getting an electric blower or just using meths, which I already know works well. That said, with a better-designed firebox, the right choice of fuel and a bit of perseverance I may be able to coax enough heat into the fire using the blowpipe to get the steam blower to kick in. We shall see... Cheers, gary Edited By gary.a.ayres on 17/10/2018 06:42:25 Edited By gary.a.ayres on 17/10/2018 06:46:05 Edited By gary.a.ayres on 17/10/2018 06:47:18 |
| 16/10/2018 23:23:51 |
Not so good today. I tried firing the boiler on small pieces of dry hardwood, but it didn't burn well. I'm pretty sure this was down to the firebox design (different from that seen in the video above) given the small size of the boiler and the fact that it only has five tubes. The boiler just didn't get hot enough. I'd like to be able to use solid fuel so I will persist, and I have already begun with some radical modifications to the firebox which I think should help. Not the end of the world if I can't sort this, as it runs fine on meths, but I'll carry on for now and see how it goes... |
| 10/10/2018 00:12:03 |
I did a test firing on methylated spirits this morning. It seemed to go quite well: |
| 08/10/2018 10:26:55 |
@ Paul - Many thanks for your kind comments. The basic design is from Stan Bray, but I scaled it up to x1.5 and there were areas on the original plans which were unclear so a bit of creativity (and consultation) was necessary. Yes, it does feel good, especially after all the trials and tribulations! Maybe it isn't priming that can be seen in the video... I have seen one of Keith Appleton's videos in which he shows a boiler priming, and I thought it looked kind of similar. I'll look into it a bit more... On the quick release of pressure - yes, I did wonder afterwards if I should have done that! Next time I'll release it more slowly, but now I'm glad I did it this way just the once (assuming the boiler wasn't damaged by it) as I'll be able to watch that spectacular whoosh of steam on the video whenever I like.
@ Geoff - Yes, I have noticed that many more people build engines than boilers. I can certainly understand that - I found this process quite stressful, worrying about leaks and so on. Also, the heat required for silver soldering it all together is not pleasant to work with. However, it's satisfying when it's done and there's something alchemical about the transformation of water into all that powerful steam. I encourage you to go for it. I haven't built any engines yet - that's next up after I get the firebox for the boiler sorted out. The only reason I started with the boiler is that I hated the thought of building an engine and not being able to run it on steam!
Edited By gary.a.ayres on 08/10/2018 10:27:27 Edited By gary.a.ayres on 08/10/2018 10:28:14 Edited By gary.a.ayres on 08/10/2018 10:29:07 |
| 07/10/2018 21:13:02 |
Julian and Neil - thank you both! It was sometimes fun, and sometimes stressful, but experiencing those blasts of steam has made me very happy. Thank you both for the advice you gave me along the way...
Edited By gary.a.ayres on 07/10/2018 21:14:00 |
| 07/10/2018 20:18:50 |
A major staging post achieved. First steam! Edited By gary.a.ayres on 07/10/2018 20:19:54 |
| 02/10/2018 23:05:57 |
Second water pressure test at 1.5 x WP successful All fittings were in situ apart from the steam pressure gauge and the safety valve. On to the first steam test next, using gas to fire it with. |
| 30/09/2018 22:42:31 |
Chimney silver soldered on to cap:
|
| 18/09/2018 22:56:29 |
A little bit of progress this evening after a major episode of DIY in the house. |
| Thread: 2 inch face mill problems |
| 09/09/2018 01:01:00 |
Posted by JasonB on 07/05/2018 07:08:35:
I'll give it another go with a higher feed rate but as my other cutters produve a good finish at about 150mm/min and the machine complains above that I have a feeling it is more down to the rigidity of the machine not being able to push the relatively blunt edge of these tips through the work hence the tool riding up over the work. This is the sort of finish I can get with the 40mm 3 tip tool which is far better than the Bangood gives as similar feeds
Lots to think about here as someone who has just bought a Banggood facemill with 'blue nano' cutters but not tried it yet. Meanwhile, slightly off-topic but Jason that is a beautiful piece of machining. gary Edited By gary.a.ayres on 09/09/2018 01:16:17 |
| Thread: Vertical Boiler Fittings |
| 04/09/2018 22:06:47 |
To answer my own question above - I went to a local suppliers and found this:
It's carbon gasket material, rated at 500 degrees centigrade. I reckon that will do! The stuff is very expensive but he had an offcut which cost me a fiver. It's plain black on the other side, and surprisingly easy to work. I scribed it with dividers, cut it with scissors, drilled it, and cleaned up the edges as best I could on a small drum sander chucked in the drill press. All very easy. Here's the finished set:
Here are the top gaskets in situ: And here's the one under the cap, viewed from below:
The gaps appear to be closed and I have no reason at this stage to think it won't do the job. When I was cutting the bush extensions to height, I forgot to take into account the thickness of the gaskets. This turned out to be a blessing in disguise because rather than make new extensions I just skimmed the nuts down to size in the lathe, making them look slimmer and (imho) better. gary |
| 02/09/2018 00:34:15 |
Progress has been slow due to hot weather (barbie season) followed by a major renovation of our living room which is currently ongoing. However, I took today off and spent some time in the workshop. Stan Braye (on whose design this boiler is based) has little to say about he configuration of the cap, smoke stack and steam stop and safety valves, so I found myself having to figure it out myself. It was necessary to make extensions for the bushes on the top of the boiler so that the valves will sit above the cap. The first picture below shows the internal thread on one of them being tapped in round bronze bar in the lathe using a piloted spindle (which is a godsend - no more squint threads!):
I figured it would be easier to gauge the required heights for the extensions if I made the cap first. The photo below shows that the underside of the brass cap has a circular locating groove into which the top edge of the boiler fits. This was milled on my Dore Westbury Mk I using a rotary table. This is not the tidiest piece of milling in the world - a result of several issues which currently beset the mill (a situation which will be addressed in the near future...). It's not critical though as it won't be seen. You will also notice that the groove is a bit on the wide side - it's the size of the smallest endmill I currently have. Below you will see the cap (in which the hole for the smoike stack has not yet been made), the bush extensions, the cap retaining nuts (made from brass hex bar tapped M12), and the two valves:
The last photo shows a trial fit of the unfinished cap assembly. Unfortunately the two valves are out of perpendicularity with the top of the boiler. This happened either at the end plate forming stage or while silver soldering. They look squint but there is nothing I can do about it now other than put the fiery flame on it again and that isn't going to happen. It's not perfect but it shouldn't affect the functionality and will be good enough given it's my first effort. It does however mean that there is a small gap between one side of each nut and the cap. To prevent combustion gases from escaping via that route I would like to close this using some kind of soft washer or gasket which would have to be heat-resistant. Any suggestions from you good people regarding what I should use for this would be welcome. In the photo you will also see that most of the fittings are now in situ. They are sealed (hopefully) with Wellseal. Not so far away now from the second hydro test at 1.5 wp...! The picture shows the boiler in its current state sitting on the belt sanding attachment of my beloved Coronet Major woodturning lathe/all bells and whistles wood machining workstation:
gary Edited By gary.a.ayres on 02/09/2018 00:38:51 |


Magazine Locator
Want the latest issue of Model Engineer or Model Engineers' Workshop? Use our magazine locator links to find your nearest stockist!
Sign up to our Newsletter
Sign up to our newsletter and get a free digital issue.
You can unsubscribe at anytime. View our privacy policy at www.mortons.co.uk/privacy
Latest Forum Posts
- hemingway ball turner
04/07/2025 14:40:26 - *Oct 2023: FORUM MIGRATION TIMELINE*
05/10/2023 07:57:11 - Making ER11 collet chuck
05/10/2023 07:56:24 - What did you do today? 2023
05/10/2023 07:25:01 - Orrery
05/10/2023 06:00:41 - Wera hand-tools
05/10/2023 05:47:07 - New member
05/10/2023 04:40:11 - Problems with external pot on at1 vfd
05/10/2023 00:06:32 - Drain plug
04/10/2023 23:36:17 - digi phase converter for 10 machines.....
04/10/2023 23:13:48 - More Latest Posts...
- View All Topics
Support Our Partners


Shopping Partners
Subscription Offer

Latest "For Sale" Ads
- Reeves** - Rebuilt Royal Scot by Martin Evans
by John Broughton
£300.00 - BRITANNIA 5" GAUGE James Perrier
by Jon Seabright 1
£2,500.00 - Drill Grinder - for restoration
by Nigel Graham 2
£0.00 - WARCO WM18 MILLING MACHINE
by Alex Chudley
£1,200.00 - MYFORD SUPER 7 LATHE
by Alex Chudley
£2,000.00 - More "For Sale" Ads...
Latest "Wanted" Ads
- D1-3 backplate
by Michael Horley
Price Not Specified - fixed steady for a Colchester bantam mark1 800
by George Jervis
Price Not Specified - lbsc pansy
by JACK SIDEBOTHAM
Price Not Specified - Pratt Burnerd multifit chuck key.
by Tim Riome
Price Not Specified - BANDSAW BLADE WELDER
by HUGH
Price Not Specified - More "Wanted" Ads...
Get In Touch!
Do you want to contact the Model Engineer and Model Engineers' Workshop team?
You can contact us by phone, mail or email about the magazines including becoming a contributor, submitting reader's letters or making queries about articles. You can also get in touch about this website, advertising or other general issues.
Click THIS LINK for full contact details.
For subscription issues please see THIS LINK.
Digital Back Issues


Donate

 Register
 Log-in
Model Engineer Magazine
- Percival Marshall
- M.E. History
- LittleLEC
- M.E. Clock

ME Workshop
- An Adcock
- & Shipley
- Horizontal
- Mill

Subscribe Now
- Great savings
- Delivered to your door

Pre-order your copy!
- Delivered to your doorstep!
- Free UK delivery!