Member postings for Zebethyal
Here is a list of all the postings Zebethyal has made in our forums. Click on a thread name to jump to the thread.
| Thread: Prusa i3 Build |
| 18/04/2017 11:13:59 |
It seems an Ikea Lack table (£8) is just the right size to make a case!
Or you could even make a separate 3D printer out of one: Printtable I saw these in action at last year's TCT show last year, pretty rigid for a very low cost printer.
|
| Thread: cutting 8mm steel plate |
| 06/04/2017 08:26:48 |
Posted by Ady1 on 06/04/2017 00:35:09:
What we really need is an adaptor which turns an angle grinder into a circular saw for steel There are stands that turn the smaller angle grinders into a mini chop saw for around £20.00, I bought mine from Aldi a few years back, but they are available from other sources, this picture shows it cutting 8mm studding and 8mm stainless round bar for a 3D printer.
I have an Evolution Rage2 that I picked up on the bay for £60.00 second hand, still with plenty of life left in it, I last used this to remove about 1.5-2mm from the end of a 20x80mm aluminium extrusion, for my laser cutter, that was ever so slightly too long - perfectly square cut and hardly any burrs, I would not even consider trying this on my bandsaw. For cutting holes in stuff, depending on thickness of material and the shape I am trying to cut , I picked up a second hand Miller Spectrum 300 plasma cuttter for £200.00 at an auto jumble - no-one else seemed to know what it was. Alternatively I can use my 9" or 5" angle grinders freehand, then I have a 3" air cut-off saw, that cost about £20.00 at some car show, a pack of disks for this are about £7.00 for 25, or if you want to go really small, then I have a Dremel. Mike Cox also references a mini 110mm Rage style saw for about £30.00 from Aldi that he has used to cut 8mm sheet steel. Plenty of options for the OP to consider. Edited By Zebethyal on 06/04/2017 08:43:30 |
| Thread: Cost effective way for manufacturing a small plastic part |
| 29/03/2017 14:38:45 |
Might be worth obtaining a quote from someone like Proto Labs, they can do 3D printing, CNC machining or injection molding. They specialise in low volume injection molding, where it is often more cost effective than either of the other two methods they offer. |
| Thread: New pound coin |
| 29/03/2017 14:26:22 |
On the subject of legal tender, it is possible settle your annoying debt of say 10p that some previous energy supplier keeps hounding you for, by simply sending them a 10p stamp. |
| 28/03/2017 14:19:33 |
If the Sates have some kind of Law making it illegal to destroy coinage, does that not mean that any theoretical metal value is unavailable to him as he cannot convert the coins to metal without breaking the law.
I am not sure if they do, or not, I haven't checked, but I would think this law would be broken every time someone presses a 'penny' (1c piece) into a new shape in one of those machines in most amusement parks. Sure it is still a coin of some sort, but it is no longer legal tender as both sides have been pressed with a new image and its shape has distorted into a long oval. |
| 27/03/2017 10:24:32 |
I am not disagreeing with you with regards laundering of fake coins, 90p in the pound is indeed a resaonable return, I was not aware that the machines had already proven successful with regards laundering in this regard - begs the question why the producers bother putting them into circulation, just dump them straight into one of these machines for a suitable voucher. Although one has to question the return on investment for those counterfeiting £1 coins in the first place, you must need tens of thousands of them to just cover the equipment and manpower costs of producing them, and then you have to get them into circulation. £20 notes on the other hand, much faster ROI, but more people will bother to check them for being genuine. However with regards processing my own non fake coins, I would prefer to receive all of the funds, rather than be subject to an admin fee. |
| 27/03/2017 09:39:51 |
Posted by Michael Gilligan on 27/03/2017 07:55:23:
Posted by not done it yet on 27/03/2017 07:00:44:
Who exactly is going to take a thousand quids worth of counterfeit coins into a bank for exchange for good money? . Maybe only someone too thick to have noticed the 'turn your coin savings into cash' machines in the supermarkets. MichaelG. Edited By Michael Gilligan on 27/03/2017 07:56:44 Personally I would rather receive credit for all of my coins, rather than losing 9.9% as an 'admin fee' to Coinstar. The fee is reduced to 7% if donating your 'voucher' to charity - I am sure the charity of your choice would prefer to have that 7% as well, and sort the coins themselves. If attempting to cash in fakes, there is no guarantee that the Coinstar machine would accept the these either. |
| Thread: >Ouch< well, almost... |
| 10/03/2017 09:27:55 |
I was once using one of those segmented diamond cutting disks in my 6" angle grinder to cut a tile or something similar, for whatever reason, the disk caught on something and shattered throwing one of the segments directly at my fingers, fortunately I was wearing my welding gloves and it simply bounced off, it still gave my fingers one hell of a belt though, without the gloves I would almost certainly have lost some fingers. I was also wearing goggles, hearing protection and a respirator style dust mask, I am seriously contemplating a face shield for future use though. |
| Thread: Arduinos and Microcontrollers ref: Rotary Table Mew 249 |
| 23/02/2017 07:12:32 |
Posted by JasonB on 22/02/2017 16:16:01:
The one in your link is a 4x3 matrix so 7 pin socket Similar 4x4 pads do have 8 pins such as this My mistake - I meant to link to this one here, same price of £0.99 for 2 but 4x4 matrix. |
| 22/02/2017 15:02:50 |
Posted by Emgee on 22/02/2017 13:19:44:
Posted by Zebethyal on 22/02/2017 07:16:36:
These, and the press button ones, are simply a 4x4 matrix connected via 8 wires (4 across, 4 down). If you want a library for simple integration, there is one on the Arduino Playground, or you can write your own code to do the same thing (can make for smaller code, as you do not need to cater for different sized keypads). Thanks for the links but those keypads have a 7 pin socket, not 8. I was hoping to just have a plug and play keypad as I have no understanding of programming a sketch for Arduino. I see a 7 pin socket on the UNO and a further set of 9 upward facing pins adjacent to the socket, would the keypad connect to either of these ? Thanks, Emgee Just re-checked the picture on the Ebay listing I linked to - it definitely has an 8 pin connector. Most of the items marked as suitable for use with an Arduino are not plug and play, they are merely something mounted on a PCB, maybe with some extra electronics and a pin header to interface with it. The assumption is that someone is going to write a sketch to make use of it, or combine a number of libraries in a sketch if they don't feel like writing it all from scratch. I am sure you are aware that the Arduino is merely a microcontroller on a board with no intelligence other than what you upload via a compiled sketch to it - it is in effect a blank canvas. If you want to have, for example, an LED light up, it makes no difference to the Arduino if it is attached to pin 1, or pin 5, that is your choice, just so long as you tell it, in your scetch, which pin to send the voltage out of in order to light the LED. |
| 22/02/2017 07:16:36 |
Posted by Emgee on 21/02/2017 16:05:07:
John S, Have you got a link please to the £1-50 keypad for the Arduino, i've seen keypads but not certain they can be used with the Arduino. Emgee Here is a link to some Chinese membrane keypads on The Bay, 2 for £0.99 and free shipping. These, and the press button ones, are simply a 4x4 matrix connected via 8 wires (4 across, 4 down). If you want a library for simple integration, there is one on the Arduino Playground, or you can write your own code to do the same thing (can make for smaller code, as you do not need to cater for different sized keypads). |
| 21/02/2017 15:52:42 |
My Steve Ward style Division Controller cost me under £5.00 for the board and associated electronics, including the LCD, I chose to use 12mm tactile switches and covers (for a cost of £0.48 for 12 of each). I did also buy some Chinese keypads (2 for £0.99) but chose not to use them. If I had, I could have used a much smaller/cheaper perfboard as I would not have needed all of the space on the board for the button layout. My stepper driver was about £5.00 and good for 2.3A, the PSU was free (old laptop PSU) and a DC-DC Buck converter for £0.87. So the controller electronics cost me less than the cost of an LCD shield or even a clone Arduino, and it was not exactly a complicated layout - if I had gone with a Chinese keypad, the kit of parts would have been a board, a PIC microcontroller, some pin headers, an LCD, a keypad, 8 resistors and about 20 wires. OK I had to buy a PicKit 3 and a ZIF adapter to program the microcontroller (about £8.50 for the pair), but these can be used on any other PIC projects I may have in the future (unlike dedicating an Arduino to a project - I prefer buying the Atmel chips and programming these with a cheap reusable programmer as well). I applaud anyone who comes up with a new project for others to make use of, likewise using off the shelf items, but for ease of use and overall cost the Steve Ward one is hard to beat. |
| Thread: An interesting co-incidence of units |
| 30/01/2017 09:32:49 |
Michael, I believe part of the problem here may be that the connection you refer to, whilst obvious to you seems to be less so to others, myself included. I was reading your original post with interest, thinking there might me something new I could make use of, and whilst I agree that 1 1/4" is a relatively easy number to deal with and remember, I am really struggling to get my head around how 31.75mm or 31 3/4mm is useful, either as a standard, a multiple, or even to remember. I was hoping you were going point out some easy number in both metric and imperial, like you did at the beginning 5" = 127mm, both being whole numbers and easy to remember. Along with many others, I seem to have completely failed to grasp the concept in your original post, and would love a practical example where this co-incidence of units using 1 1/4" or 31.75mm can be used and show benefit over current methods of say multiplying by 25.4. |
| Thread: VAT criticisms? |
| 15/12/2016 12:00:31 |
Buying materials yourself avoids being overcharged for them by the tradesman who may just quote some random amount for materials, but at the same time not everyone has access to trade prices on building materials. The difference in prices between say Wickes (anyone) and Selco (trade only builders merchants) can be quite significant on things like plaster, plasterboard, bricks, cement, etc, even after adding the VAT on the Selco prices, less so on some other items. Many trades people do their best to avoid VAT and Income Tax by doing as many jobs as they can for cash and only declaring what they think they can get away with. |
| Thread: Rotary table locks |
| 15/12/2016 10:50:05 |
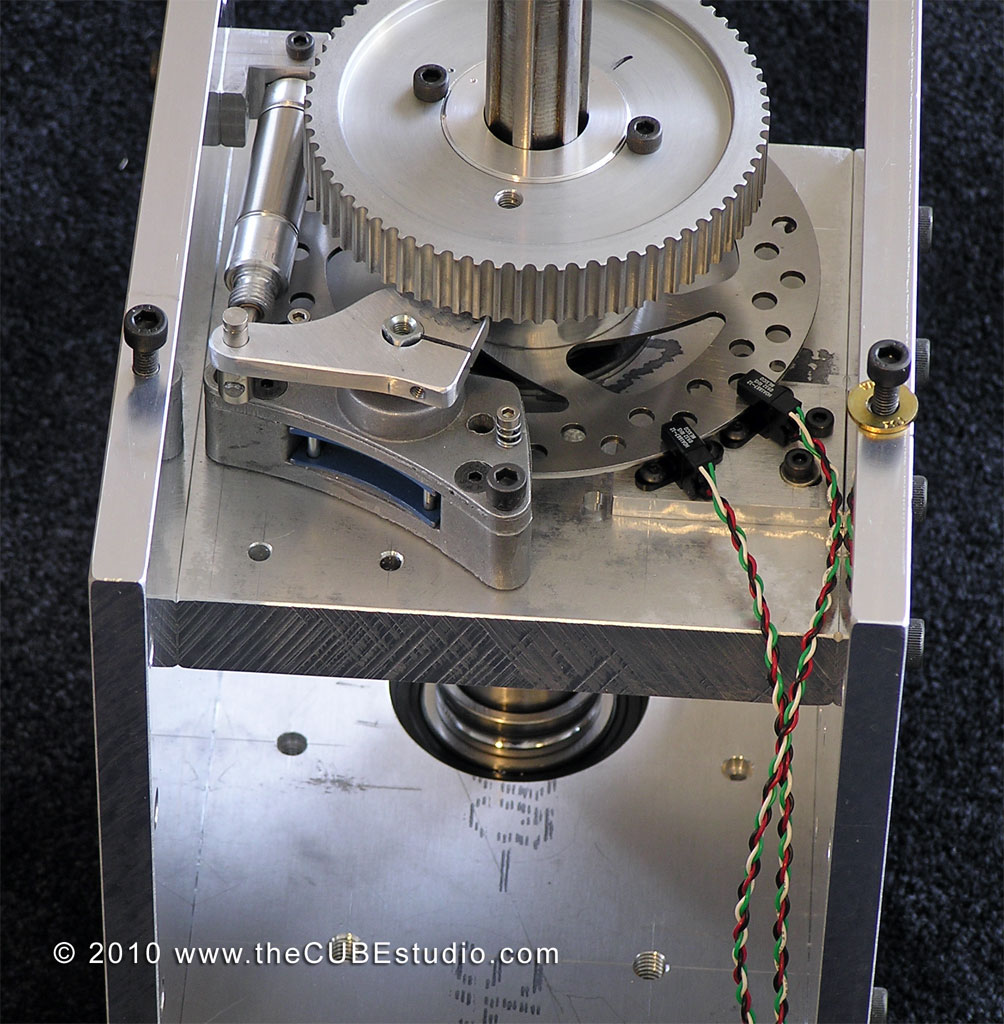
Not a rotay table but a CNC 4th axis for a milling machine, designed and built by simpson36, used a disk brake from a mini moto bike and a mini air solenoid to lock the spindle when using it for indexing:
Can be seen in action on Youtube Edited By Zebethyal on 15/12/2016 11:03:24 |
| Thread: VAT criticisms? |
| 15/12/2016 10:30:49 |
Just had a quick read of the VAT margin scheme, and it only appears to apply to a few select cases, second hand items being one of them. I believe the case being made by Clive implies a new item being resold as new by the vendor, in which case the second hand argument does not hold true and the VAT margin scheme cannot be used - otherwise every purchase of items used for resale could be argued to be second hand and therefore subject to the margin VAT of 16.67%. I had a similar issue a few years back where I was looking to re-sell items made by a colleague of mine. I was VAT registered, he was not, I could not make any profit on selling the item for the same price as him, even with the low price that he was selling items in bulk at to me, purely because I had to add VAT to all items that I sold, whereas he did not. A couple of years ago I worked out that for £2.00 of gross salary spent on petrol, £1.80 goes to the government as Income Tax, NI, VAT, duty, etc, £0.20 was the actual cost of the petrol (varied slightly dependant on the individual's tax band) - I am sure things have become much worse since then. |
| Thread: Gear help needed please |
| 15/12/2016 08:57:51 |
Not wanting to throw water on the bonfire, but with those dimensions, you may struggle to achieve decent tooth definition on the larger gear if 3D printed. With a diameter of 34mm, that means a circumference of about 106.8mm and tooth tip to tip distance of about 1.55mm. With a typical extruder diameter of 0.4mm and the fact that you will struggle to achieve a crest or valley that is not severely rounded at that resolution, I have my doubts as to how useable the print will be. The 8 or 9 tooth part stands more chance of success as the teeth are much more defined. I have printed several gt2 gears/pulleys that have 2mm tip to tip spacing, anything under 20 teeth was unuseable as the tooth definition was little more than a surface ripple and even with 75% of the teeth being wrapped by a belt, it still slipped. Pulleys of 40 or more teeth were useable, but only because of the high number of teeth being engaged by the belt - your application will be in a gear train, where only a few teeth will be engaged. With the original being injection molded, a replacement may be better being cast from epoxy/resin after making the two halves out of some other material and making a mold with them. Begs the question - how much is the replacement part vs cost of materials and time to produce a suitable replacement? Yes, 3D printing the part will be cheap, probably pennies in material costs, but will the printed part actually be useable? You stand a better chance of 3D printing if someone has a powder based printer as this will achieve the required definition on the teeth, but I would then worry about the strength of the individual teeth. Edited By Zebethyal on 15/12/2016 09:01:39 |
| Thread: Arduinos and Microcontrollers ref: Rotary Table Mew 249 |
| 08/12/2016 15:22:59 |
The Arduino AVR creates temporary files on all versions (I use the MAC one), but normally deletes them once it has finished with them. There is a an entry you can add to preferences.txt that will prevent it from deleting all of these temporary files, along with the hex files. export.delete_target_folder=false You only need pre-programmed chips (bootloader pre-installed) if you are using the bootloader to help load your program or you want to upload via the USB connection on the board. If you want to save the space used by the bootloader and/or program the chip directly, or buy blank chips and program them on your breadboard, you can do this via the ICSP connection and a suitable programmer like a USBasp, AVRISP or USBtinyISP, any of which can be bought for less than £3.00, some for less than £1.00. If you do put a bootloader on, you can then upload programs via the serial pins by resetting the chip at the right point during the compile, such that the bootloader is looking for new code as you are attempting to talk to it from the IDE, if you time it wrong, the bootloader simply loads whatever code is already programmed on the chip (if any). The first time you program a brand new chip, it may need some different fuse settings as it may be set to the factory default clock speed of 1MHz, which may not be supported by all programmers (some have an additional jumper to allow use at that clock speed). Edited By Zebethyal on 08/12/2016 15:30:24 |
| 06/12/2016 09:57:40 |
With regards the original topic of Rotary table controllers, I went with the PIC based Division Controller as designed by Steve Ward, but built it on a piece of double sided perfboard (here), which including PSU (old laptop supply), and LCD screen, had a total project cost of around £5.00, the stepper controller was an additional £4.25 (here).
Edited By Zebethyal on 06/12/2016 10:03:31 |
| 06/12/2016 08:54:55 |
@John Swift 1 - the non standard spacing is not with the pin headers themselves, these are a standard 0.1" pitch, the issue is with the spacing between the headers on each side. If the pins on one side are inserted into holes on some strip/vero board, then the pins on the other side fall half way between two rows holes, thereby preventing the use of cheap veroboard. Yes, it is possible to cobble something together to generate the correct offset, and I believe you can even buy stepped adapters, however I found it sufficiently annoying that I simply gave up on the boards and went to using the chips directly on breadboards and veroboard, programming via the ICSP interface. The only occasions I use the arduino boards is if I want say a capacitive touch screen LCD shield, or the protoneer style stepper shield, where it is simply quicker and cheaper to just buy the shield than fabricate it myself. All of my prototyping for additions to my 3D printer are done using an ATmega1284p on a breadboard, this includes my own panelolu alternative using I2C for the LCD (using 4 less pins than panelolu) and bluetooth connectivity (here).
Edited By Zebethyal on 06/12/2016 08:57:30 |


Magazine Locator
Want the latest issue of Model Engineer or Model Engineers' Workshop? Use our magazine locator links to find your nearest stockist!
Sign up to our Newsletter
Sign up to our newsletter and get a free digital issue.
You can unsubscribe at anytime. View our privacy policy at www.mortons.co.uk/privacy
Latest Forum Posts
- hemingway ball turner
04/07/2025 14:40:26 - *Oct 2023: FORUM MIGRATION TIMELINE*
05/10/2023 07:57:11 - Making ER11 collet chuck
05/10/2023 07:56:24 - What did you do today? 2023
05/10/2023 07:25:01 - Orrery
05/10/2023 06:00:41 - Wera hand-tools
05/10/2023 05:47:07 - New member
05/10/2023 04:40:11 - Problems with external pot on at1 vfd
05/10/2023 00:06:32 - Drain plug
04/10/2023 23:36:17 - digi phase converter for 10 machines.....
04/10/2023 23:13:48 - More Latest Posts...
- View All Topics
Support Our Partners


Shopping Partners
Subscription Offer

Latest "For Sale" Ads
- Reeves** - Rebuilt Royal Scot by Martin Evans
by John Broughton
£300.00 - BRITANNIA 5" GAUGE James Perrier
by Jon Seabright 1
£2,500.00 - Drill Grinder - for restoration
by Nigel Graham 2
£0.00 - WARCO WM18 MILLING MACHINE
by Alex Chudley
£1,200.00 - MYFORD SUPER 7 LATHE
by Alex Chudley
£2,000.00 - More "For Sale" Ads...
Latest "Wanted" Ads
- D1-3 backplate
by Michael Horley
Price Not Specified - fixed steady for a Colchester bantam mark1 800
by George Jervis
Price Not Specified - lbsc pansy
by JACK SIDEBOTHAM
Price Not Specified - Pratt Burnerd multifit chuck key.
by Tim Riome
Price Not Specified - BANDSAW BLADE WELDER
by HUGH
Price Not Specified - More "Wanted" Ads...
Get In Touch!
Do you want to contact the Model Engineer and Model Engineers' Workshop team?
You can contact us by phone, mail or email about the magazines including becoming a contributor, submitting reader's letters or making queries about articles. You can also get in touch about this website, advertising or other general issues.
Click THIS LINK for full contact details.
For subscription issues please see THIS LINK.
Digital Back Issues


Donate

 Register
 Log-in
Model Engineer Magazine
- Percival Marshall
- M.E. History
- LittleLEC
- M.E. Clock

ME Workshop
- An Adcock
- & Shipley
- Horizontal
- Mill

Subscribe Now
- Great savings
- Delivered to your door

Pre-order your copy!
- Delivered to your doorstep!
- Free UK delivery!