Member postings for John Baron
Here is a list of all the postings John Baron has made in our forums. Click on a thread name to jump to the thread.
| Thread: Milling spindle motor |
| 19/05/2020 11:44:59 |
Posted by not done it yet on 19/05/2020 09:29:07:
Critical, maybe, but here is my assessment of those videos. I watched his videos and was, frankly, appalled at his kit and methodology. And I’m not even a (proper) machinist. His drills clearly only really cut on one flute, the parts video was a blatant advert for his (probably freeby) digital micrometer, turning long large diameters without a fixed steady is decidedly poor practice, using a 3-jaw chuck and expecting concentricity between his two bearings is farcical, not turning his bar to ensure it was perfectly round all along its length as a starting point and not a dial indicator in sight, etc, etc. At the start he extolled the virtues of the 20mm parallel milled spindle, but only ‘measured’ it in inches, and at the final fitting of the bearings remarked on the apparent taper of that supposedly ‘precision’ shaft (likely another item sourced from his usual supplier?) I think an oil seal at each end of that housing might just have been a possibility. Am I being too harsh on him and his videos? I agree ! No I wouldn't say critical at all.
|
| Thread: Advice on lathe Threading tools |
| 19/05/2020 11:41:41 |
Posted by Jim Beagley on 19/05/2020 11:08:13:
Hi all. Is it reasonable to purchase some Glanze tooling now so I can make a start? Can I get some Top Tips for my first lathe threading Exercises? sorry for the long post, and thanks for any responses, Best, Jim Hi Jim, FWIW I buy and use carbide inserts for threading, only because it a right royal pain to grind HSS tool bits accurately. The only difference between insert tooling boring bars and threading bars is the shape and set angle of the carbide insert. Internal and external inserts have the cutting tip on opposite sides. Having said that, I also thread external threads using an internal threading insert on the rear of the work and run the lathe in reverse cutting away from the chuck. No danger of crashing into the chuck. For internal threads such as your face plate where you can thread right through, I use the same internal threading tool but thread in the conventional manner. For blind holes it is safer to use a lathe handle and wind the lathe backwards and using a normal external threading insert cutting from the inside away from the chuck. I also just plunge, no messing about setting the top slide at 29 degrees. One other recommendation I can add, is to make an accurate test thread so you can gauge the thread without having to remove the chuck to test the fit. Last thing make sure you use the correct thread angle, some are 60 degrees, some are 55 degrees and there are some others. Metric threads are usually 60 degrees. I don't know your lathe, but I would get some thread gauges and check it. HTH.
|
| Thread: Milling spindle motor |
| 18/05/2020 20:20:46 |
Hello Mark, I too am in the process of making a grinding spindle for a tool and cutter grinder that I am building. I haven't decided on a motor to drive it yet so I'm quite interested in your experiences. My spindle is going to use a 12 mm shaft with four slim line bearings type 61701ZZ which are 18 mm diameter and 4 mm thick. The body is made from EN1L steel 35 mm diameter and 125 mm long.
|
| Thread: Lathe work |
| 18/05/2020 20:02:45 |
Posted by old mart on 18/05/2020 19:04:33:
The pictures of the chuck jaws and the square are totally meaningless. The rear of the jaws has probably been linished to remove burrs at the edge of the teeth. The squareness that matters is between the slots and the jaws and only then if they are in the chuck body and are stressed in the clamping direction. There was mention of soft jaws being bored to fit the test bar. Did that confirm an error in the lathe bed? I can confirm that there is no twist in the lathe bed. The test bar in the soft jaws of the three jaw scroll chuck using the dial gauge showed just under a division 0.01 mm from one end to the other over 150 mm. I will before I start doing an work on the jaws check using parallels in the slots on the jaws. I do know that there is a few thou difference in the hight of the slot on one of the jaws which can be seen in one of the pictures. But I doubt that that will make any difference. I can tell you that the tailstock needs adjusting, its not quite point to point with a pair of centres. I would say a fraction high and slightly to the right. If I push the tailstock away from me it is just about spot on. This is using the steel rule method. But the tailstock doesn't concern me at the moment, but at some point I will run a between centres check and adjust it.
|
| 18/05/2020 19:38:22 |
Posted by Pete Rimmer on 18/05/2020 17:57:16:
John, Give me the jaw width, slot width and tooth pitch of your jaws. I'll check what I have. Also, a better check than using the square is to put two jaws on your surface plate with the gripping faces against each other, that way you aren't measuring any error in the square. Finally, if those two jaws really are touching at the tips whatever you clamp in them (lightly) should rock about in the chuck if you wrench the other end about with your hand. You should easily feel (or hear) this. Does it happen? Hi Pete, I'll PM later. At the moment SWMBO has got me clearing, painting and decorating the small bedroom. Had to go out this morning and buy some architrave ! Tomorrow she wants some paint and wallpaper. I'm sure you know how long that can take.
|
| Thread: Spot Facing With Slot Drill? |
| 18/05/2020 11:26:31 |
Posted by Dr_GMJN on 17/05/2020 16:01:35:
Posted by Hopper on 17/05/2020 02:54:09:
What rpm did you run that cutter at? You cant use HSS speeds with silver steel. Try taking it nice and slow on that cast iron hard skin. Maybe like 400 rpm or so. Or even less to start with. Edited By Hopper on 17/05/2020 02:55:03 Hopper, to be honest I was running at a lot more than 400rpm. But t's irrelevant; I made a mistake (or at least trusted a years old storage label) and used, I think stainless - it's not magnetic.I should have at least checked before, but lesson learned. I am ordering some silver steel and a few other bits later today from M-Machine, and will make new storage boxes and mark the pieces with fet tip. I will try again when I get them, and hopefully it will work. If its silver steel / drill rod, once you have got it to red heat and quenched it it will be glass hard ! If you use it like that without tempering, make sure that you wear safety specs.
|
| Thread: Lathe work |
| 18/05/2020 11:16:17 |
Hi Nigel, Guys, Actually I've had a conversation with a friend of mine who is the works forman at a major engineering works discusing the issue with my chuck jaws. Normally he would have said "bring them in and I'll sort it" but because of the current problems few of the staff are in and he says that they are pulled out with work that is late and urgently wanted. His advice is, because it is an independent jaw chuck, to use a toolpost grinder and true each jaw individually whilst in the chuck and to use a "G" clamp across a pair to stop any movement, also to lock the spindle with a block making sure that it was horizontal. He also told me that it didn't matter if each jaw was very slightly different from each other. He suggested that 20 thou gap on the inside was probably due to dirt or something underneath when it was ground. Which if you think about it, it doesn't, because each jaw can be moved independently of the others.
|
| Thread: 3 phase cable for a VFD |
| 18/05/2020 10:54:51 |
Thanks SOD, a concise explanation !
|
| Thread: Sharpening Fine tooth slitting Saws |
| 18/05/2020 09:14:32 |
Hi Guys, The eccentricity is caused by the wear on the grinding wheel as it is moved in and out of each tooth as it goes around the blade. It also gets worse as the blade is resharpened.
|
| Thread: Lathe work |
| 18/05/2020 08:57:43 |
Posted by Hopper on 18/05/2020 01:44:15:
Posted by John Baron on 17/05/2020 20:12:01:
Posted by Oven Man on 17/05/2020 17:44:18:
Should the slots in the jaws be the measuring datum rather than the base? Peter I wouldn't think it matters since the slot and the back are parallel, but I can check and measure it.
Needs to be checked for sure. Or put a parallel in the slot and sit the square on the parallel. Hi Hopper, Thanks for your suggestions. You and I seem to think alike
|
| 18/05/2020 08:51:05 |
Posted by Michael Gilligan on 17/05/2020 23:10:33:
Posted by John Baron on 17/05/2020 15:00:18:
[…] Anyway I believe I confirmed the results of the measurements from the dial gauge. […] I think these are horrible ! Nothing like I expected. […]
. If they are as bad as they look in your photos : My suggestion of using Plastigauge to check the grip wouldn’t be much use !! ... I was expecting you to find perhaps five thou’ variation along the gripping length of each jaw. MichaelG. Hi Michael, These look like what I would call "Friday night" work. Even if the chuck was second hand, I find it hard to believe that each jaw would be that bad. Using a spring clamp to hold the square I can pass a 20 thou feeler gauge through at the back on the worst one but only a 5 thou through the best one. Also I noticed when taking them out of the chuck the two worst ones were the loosest in the slots. Thanks for your suggestion. I do have some plastic strip that I was given that works like Plastigauge. But I've never used it.
|
| 17/05/2020 20:12:01 |
Posted by Oven Man on 17/05/2020 17:44:18:
Should the slots in the jaws be the measuring datum rather than the base? Peter I wouldn't think it matters since the slot and the back are parallel, but I can check and measure it.
|
| Thread: 3 phase cable for a VFD |
| 17/05/2020 20:00:19 |
Hi Guys, The only reason for connecting a screen at one end is so that it does not form an electrical loop which could allow a feedback voltage between points of unequal potential. Something usually found in audio equipment to avoid creating hum loops. As far as VFD's and three phase motors are concerned almost invariably the motor will be earthed for safety reasons and so would the rest of the machine. So leaving the VFD end open shouldn't matter. Some VFD's have an earth pass through connection, if so I would use it. The danger is that some of the older machines used the neutral (Common of the star) as an earth/ground connection which could leave the machine frame at some above ground potential. Particularly if there was a phase to frame leakage when using a VFD. With a normal 3 phase supply, this condition would trip the breakers.
|
| Thread: Lathe work |
| 17/05/2020 15:35:47 |
Hello Pete, First I must thank you for your very kind offer and your wise words. I'll do a cad drawing of the jaws later. But before I take up up on your offer I am going to put them back in reverse direction in the chuck and go through the process of measuring them again. There are a lot of sharp edges on these as well that could do with fettling. I wouldn't have noticed the issue if I hadn't been in the process of making a grinding spindle and had machined one end of the body, turned it around and discovered that it was no longer true. Fortunately I've not attempted to machine the other end. I suspect that it will become a piece of expensive scrap. To all that have offered their help and comments, Thanks Guys.
|
| Thread: Hello from new meber with an Axminster SC2 300 problem |
| 17/05/2020 15:06:35 |
Hi Rob, Guys, A similar thing happened to my mill, the plastic gear got some teeth knocked off.
I made a steel gear to replace it !
|
| Thread: Lathe work |
| 17/05/2020 15:00:18 |
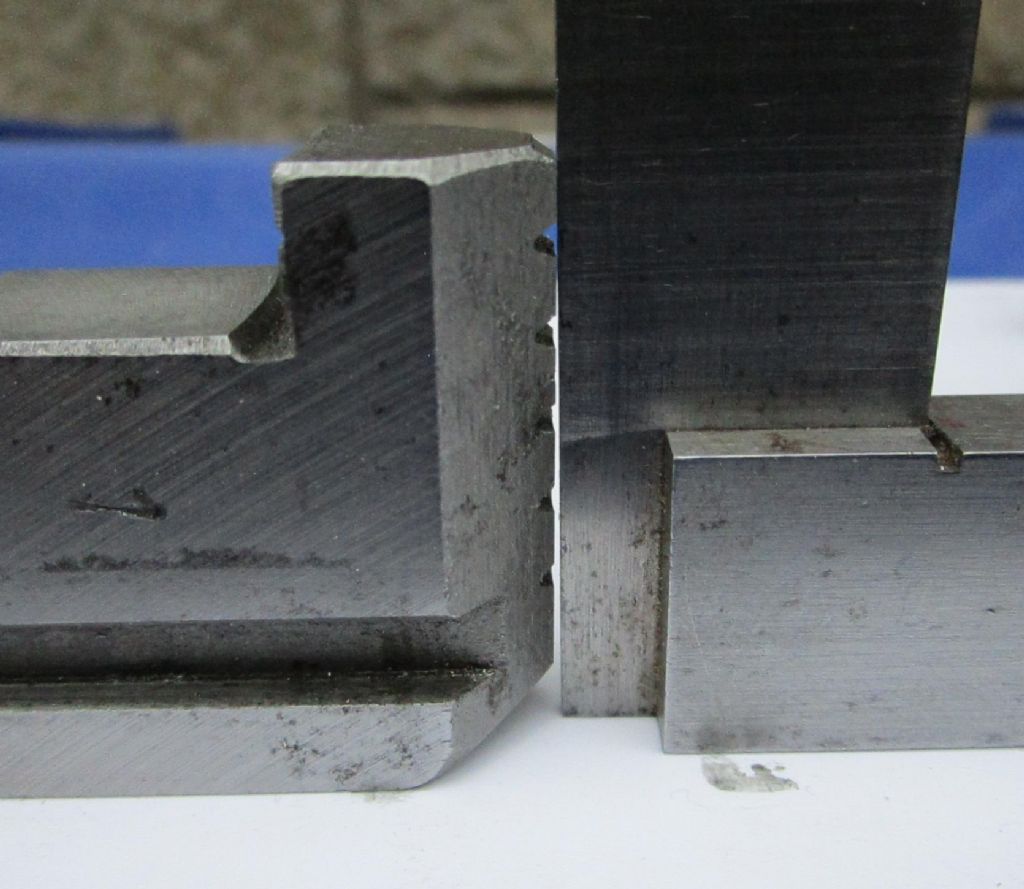
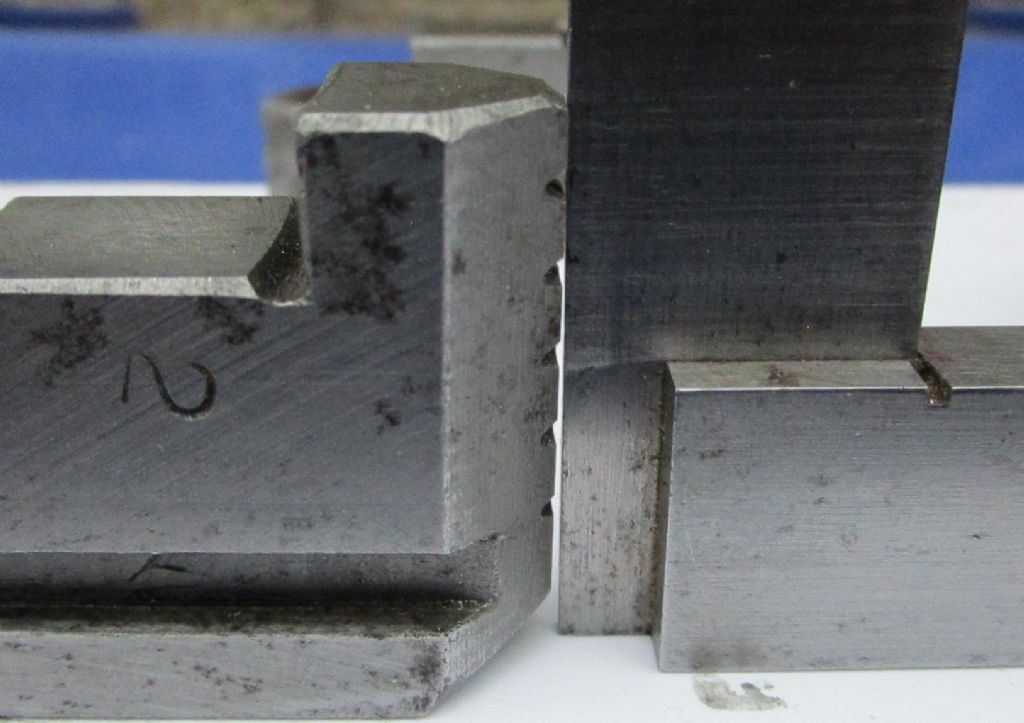
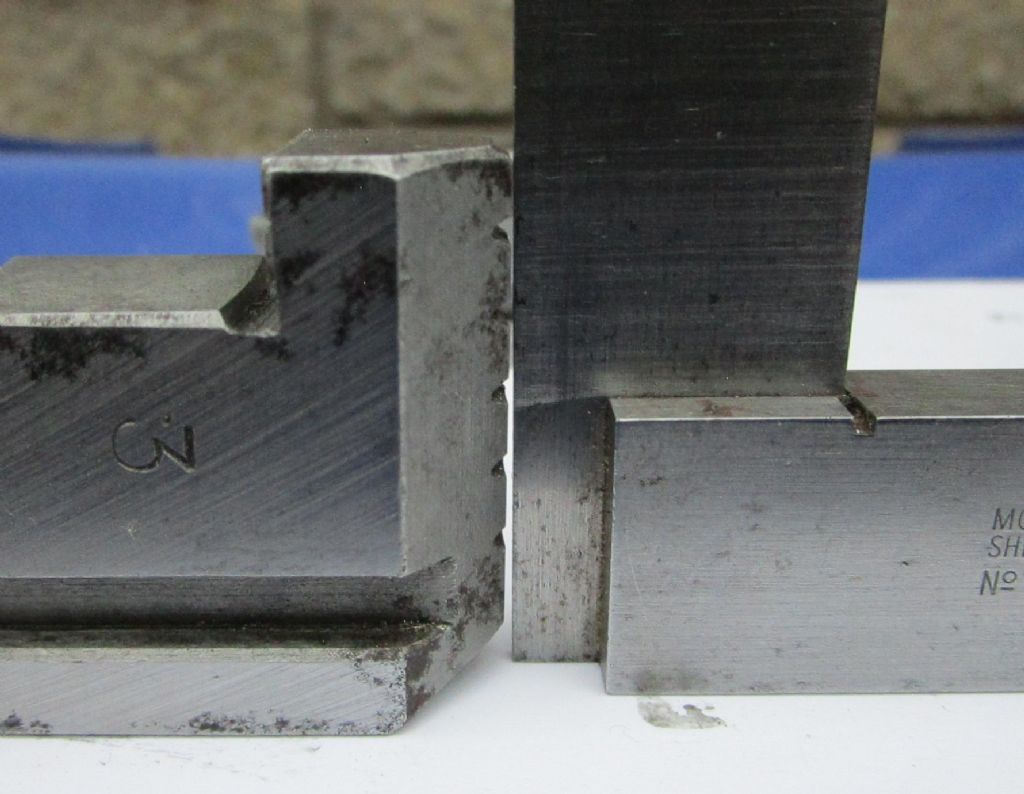
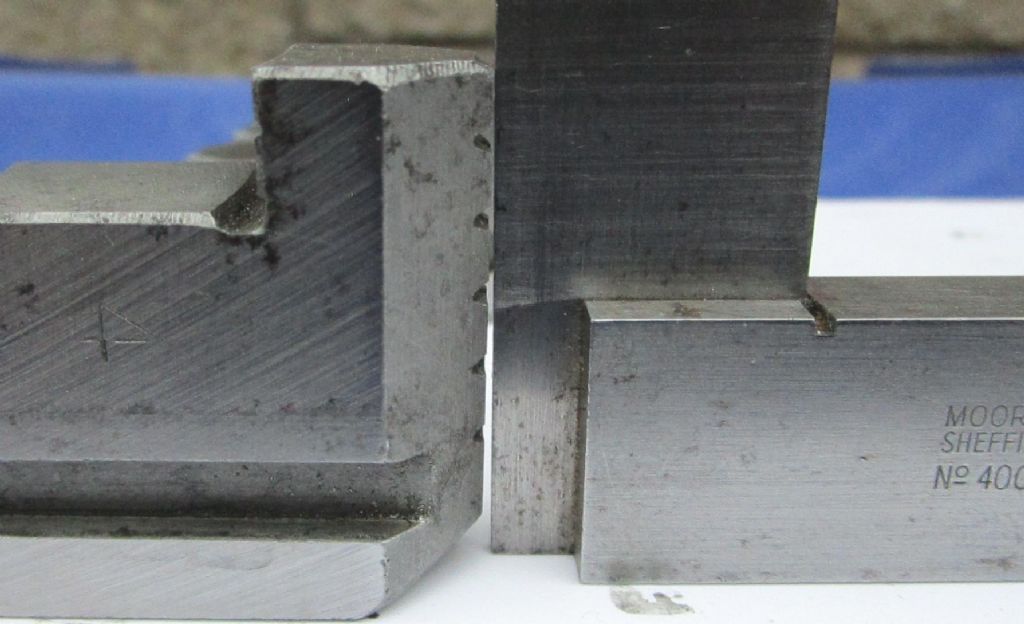
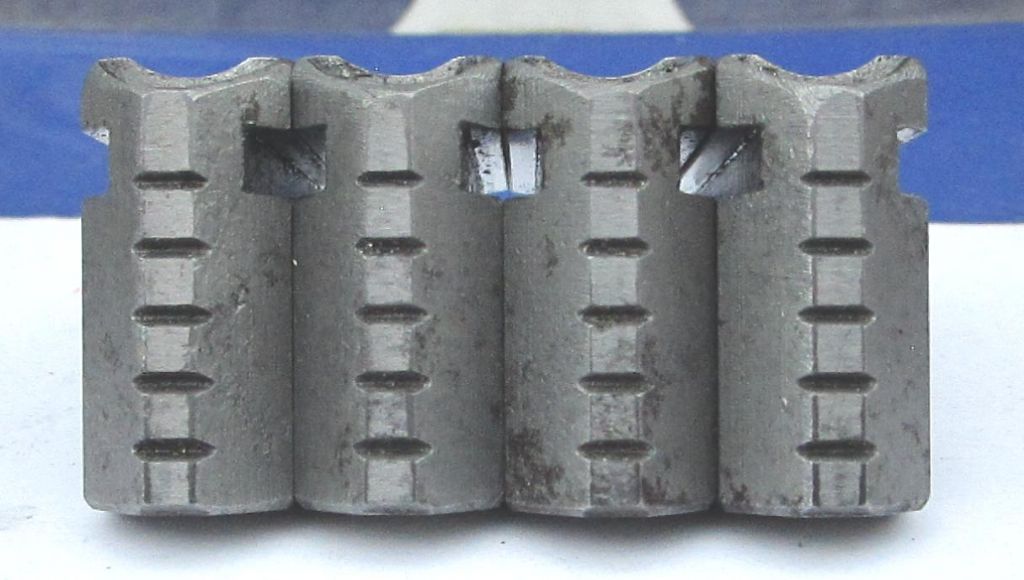
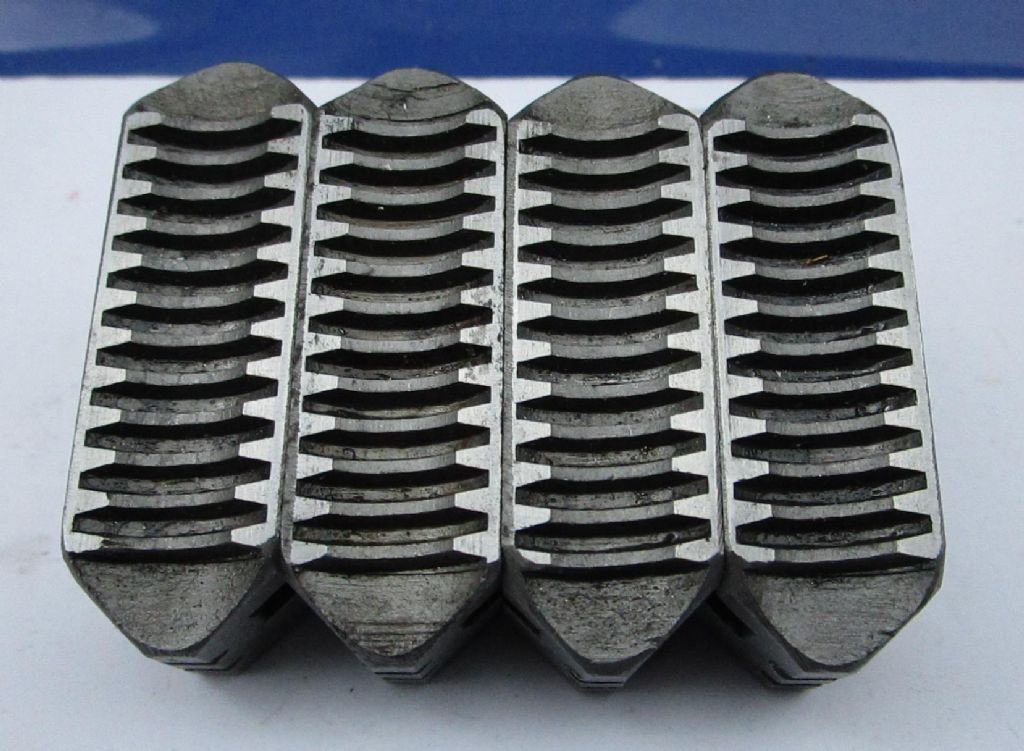
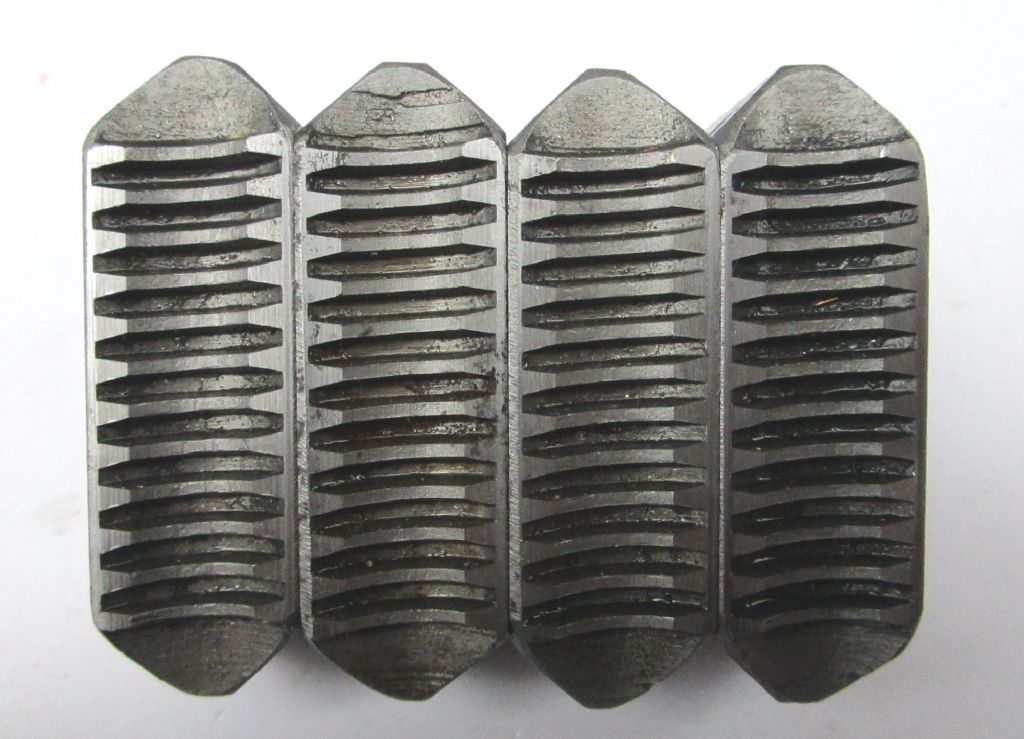
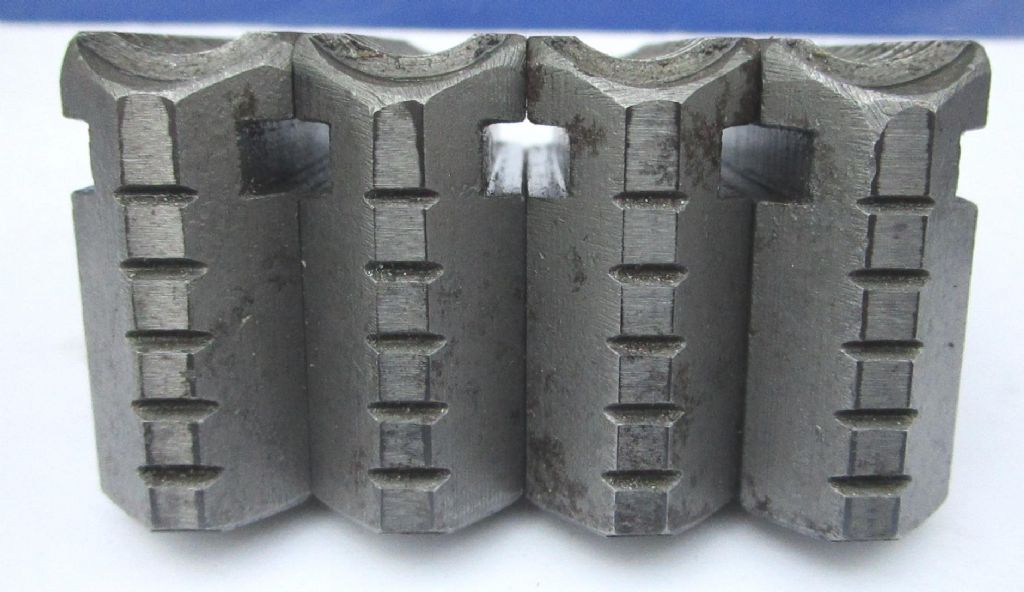
Hello Hopper, Guys, That is exactly what I have done ! The amount of muck and chippings that came out from behind the jaws surprised me. Thinking about it this is what I should have done in the first place. I've discovered that what I thought should be a matched set of jaws, isn't even though they are all stamped with the same number. Unlike the three jaw chuck where the three jaws have the same ID as the chuck. Anyway I believe I confirmed the results of the measurements from the dial gauge.
This is jaw number one set against a M&W engineers square. Jaw number 2. Jaw number 3. Jaw number 4.
Some more pictures. You can see that these are not even or parallel. If you look closely the third jaw is a fraction smaller and the ground edges are not symmetrical. A slightly different angle to get a better view. I think these are horrible ! Nothing like I expected. When I put them back in the chuck, I'm going to turn them round and check the other faces. My opinion is that these jaws are effectively worn out. They should all be the same hight and square. Thanks again.
|
| 17/05/2020 14:40:12 |
Posted by Neil Wyatt on 17/05/2020 12:53:13:
If both sides of the parallel run away from the tool holder then it isn't the chuck at fault. If the parallel is parallel then opposite sides should go in opposite directions. Something is not right with your test. Neil Sorry Neil, but your post makes no sense ! A parallel is parallel. The in the set up the parallel is only pressed up against the face of the jaw nearest to the gauge. There is a dowel pin on the other side to ensure that the opposite face isn't affecting it only holding it square.
|
| 17/05/2020 11:57:38 |
Hi Pete, I'm getting a bit lost now ! The idea behind that last run of checks with the parallel were intended to check that the face of the jaws was square to the axis of the lathe. Which they don't seem to be. I cant get my head around being able to swap to the three jaw and turn a bar parallel over roughly five inches in length with less than a couple of tenths variation from end to end. The thing that really bothers me is why then when I check each jaw the parallel seems to move away from the gauge. To me that suggests that the jaws have a taper running away towards the back of the chuck. I've checked the guides in the chuck for each jaw and they are virtually the same reading from the outer to the inner. Maybe a division at most. I'm going to take the jaws out and see what I can find, I did notice that the two jaws with the greatest deviation were the most loose in the guides. Thanks for your help. Its very much appreciated.
Edited By John Baron on 17/05/2020 11:58:53 |
| Thread: Yet another parting-off question |
| 17/05/2020 11:15:09 |
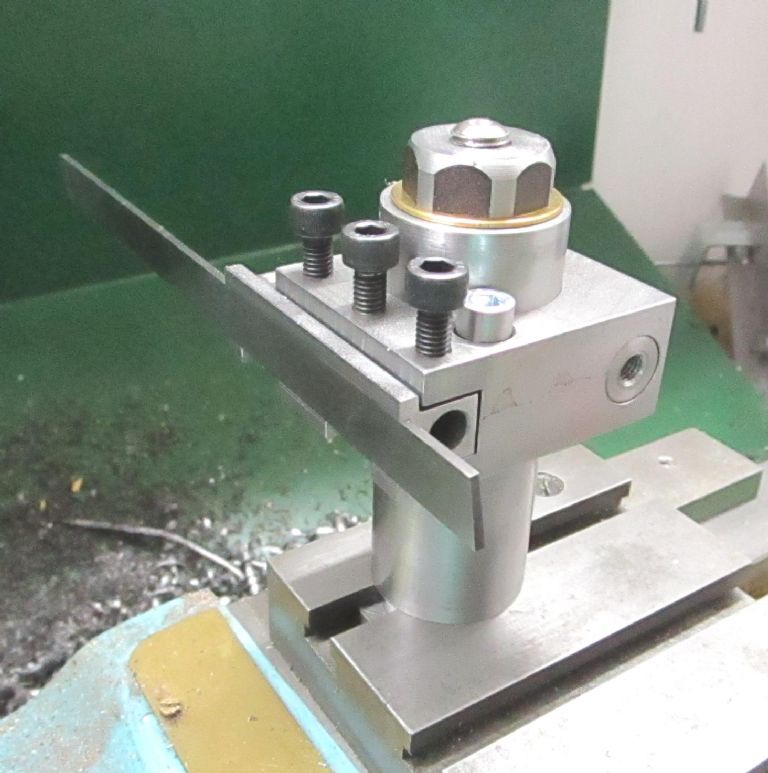
Hi Guys, Just to add my two pennyworth I have a Myford S7 and use a rear mounted tool post with a 2 mm thick 12 mm wide blade. I have parted 50 mm diameter EN1 with it but I wouldn't like to go any bigger even in aluminium. Ensuring that the tool is dead square in both directions is vital as is getting the blade hight so that its cutting on centre. The picture shows my rear tool post and parting blade.
|
| Thread: Lathe work |
| 17/05/2020 10:45:57 |
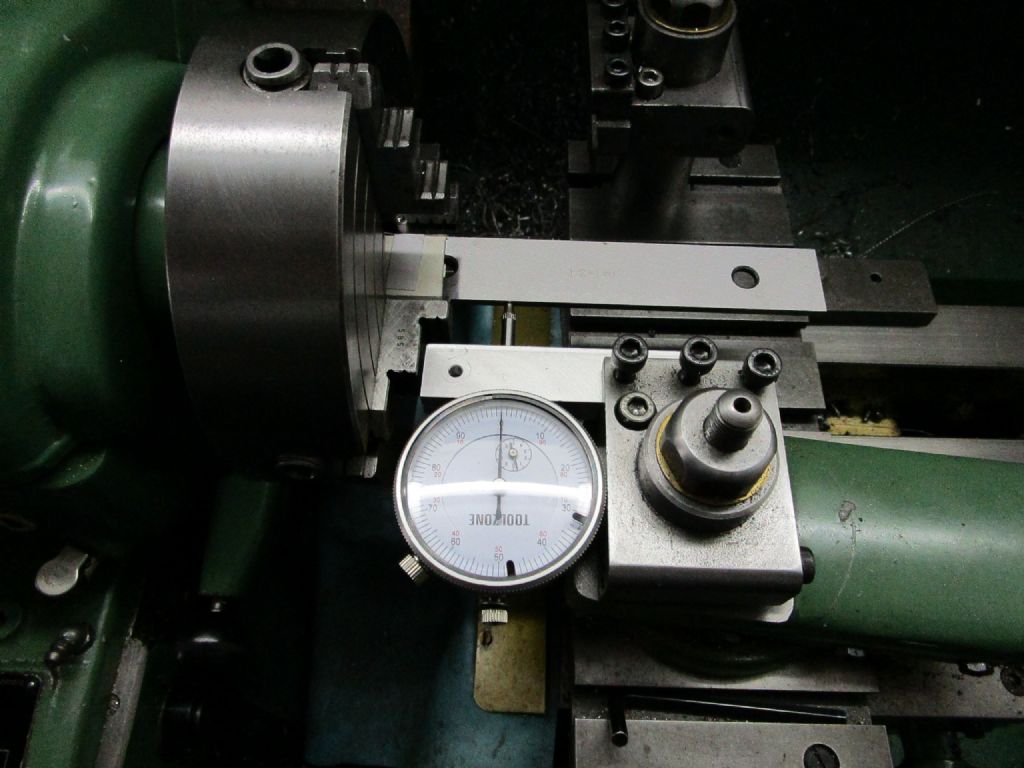
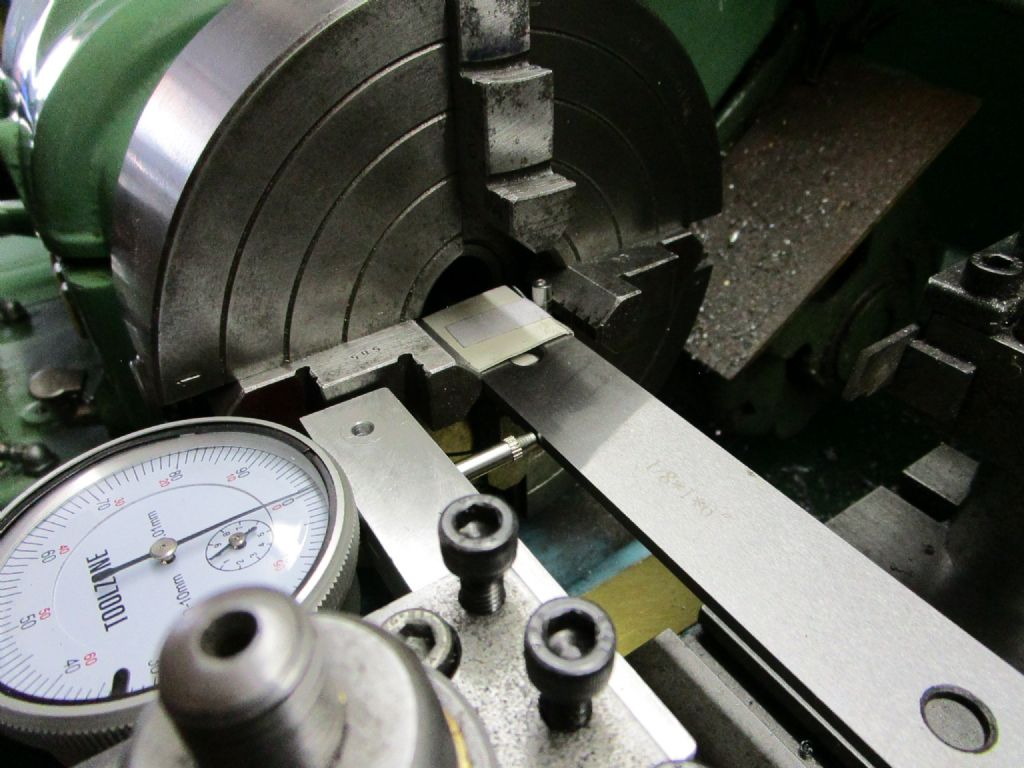
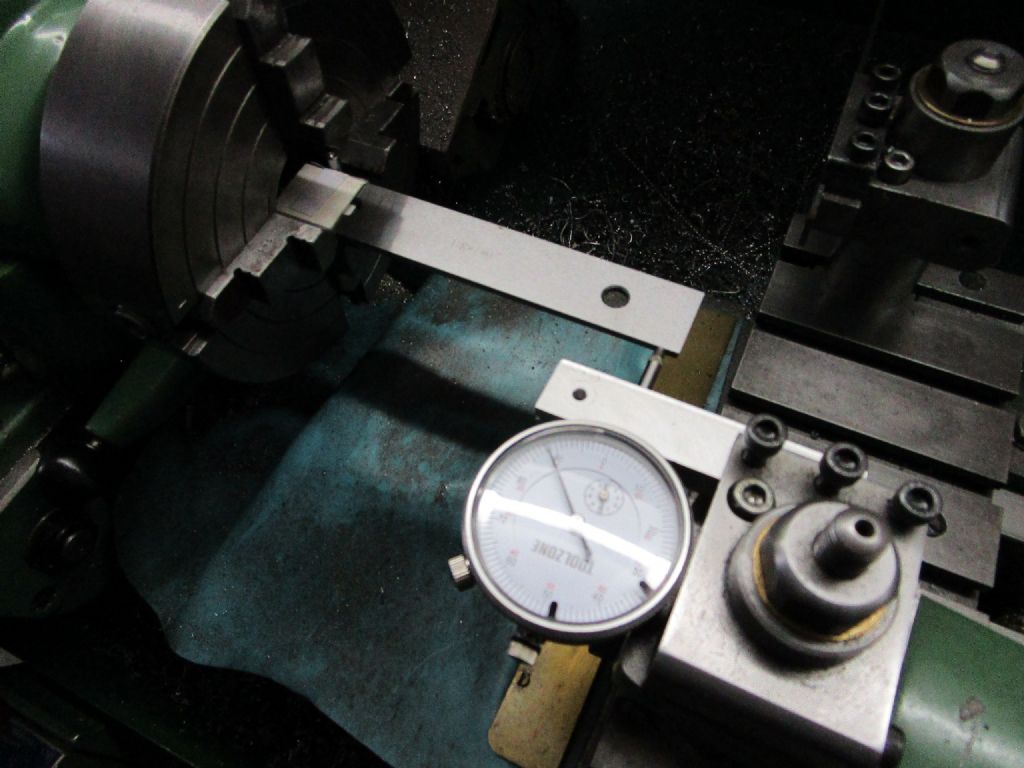
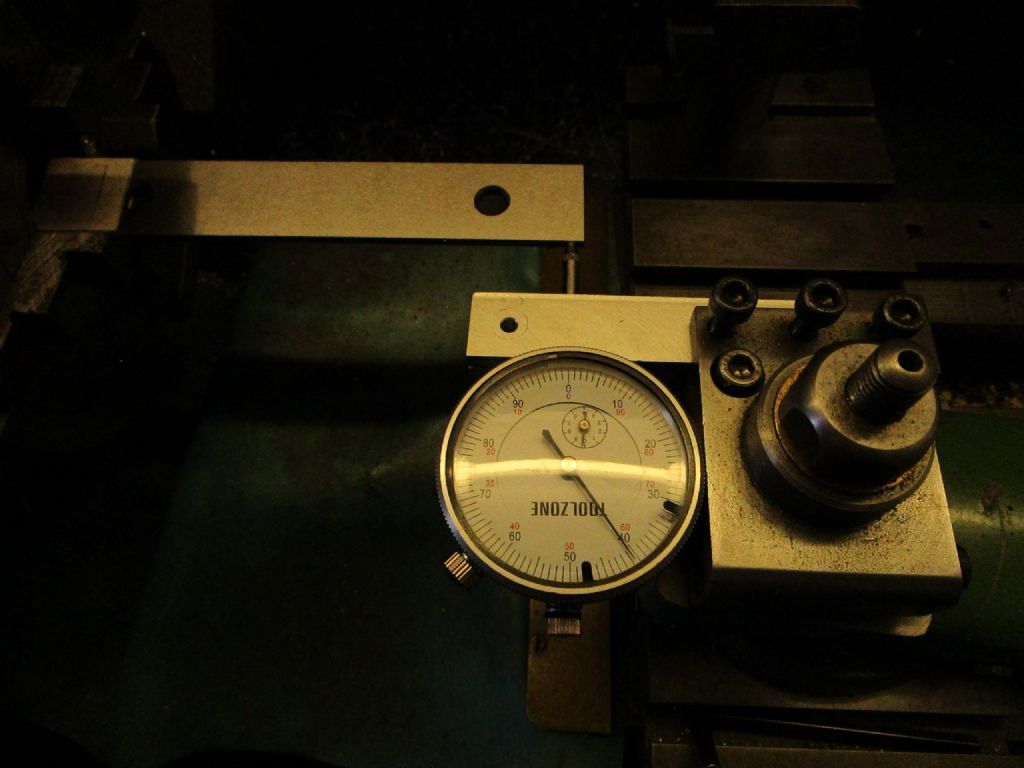
Hi Guys, Pete is the winner I think. [quote] The chuck body runs true but the jaws do not hold the part straight. If all of the above check out OK, this is the last option.[/quote] Comments below the pictures. By the way I somehow managed to take a video but the forum won't let me upload it. I used a 1" inch parallel to check how straight the jaw was. I used a piece of postcard and a small dowel to hold the parallel tight up against the jaw face. I set the dial gauge so that it was level with the edge of the parallel. In this picture you can see the arrangement. This is jaw No:4. I used the lower jaw to support the parallel. In this picture I've run the dial gauge down to the end of the parallel. It shows that its moved away by about 0.6 mm. Sorry about the colour, fluorescent lighting. This jaw No1 was the worst one. I stopped taking pictures at this point. All the jaws have some runout when measured in this way ! I'm not sure why but they all seem to run away from the tool holder. The worst ones were jaws 1 and 2. When I gripped the parallel by the flat sides you could see that the indentations in the cardboard were deeper on one side.
It also explains why I can set the work piece true at either end and its out at the other.
So it seems that I've got the source of the problem... badly or wrongly ground jaws. After all this time I doubt that there is any point in having a word with Pratt Burnard.
To answer some questions: Yes the chuck is the original slim body one that was supplied with the lathe when I bought it directly from Myford. They arranged with Denford to deliver and set the lathe up. At the time Denford made bridgeport mini mills that were badged and sold by Myford. Its had three homes since I bought it.
Thanks for all the comments and suggestions. Now to think about what I'm going to do about it.
Edited By John Baron on 17/05/2020 10:48:16 |
Want the latest issue of Model Engineer or Model Engineers' Workshop? Use our magazine locator links to find your nearest stockist!
Sign up to our newsletter and get a free digital issue.
You can unsubscribe at anytime. View our privacy policy at www.mortons.co.uk/privacy
- hemingway ball turner
04/07/2025 14:40:26 - *Oct 2023: FORUM MIGRATION TIMELINE*
05/10/2023 07:57:11 - Making ER11 collet chuck
05/10/2023 07:56:24 - What did you do today? 2023
05/10/2023 07:25:01 - Orrery
05/10/2023 06:00:41 - Wera hand-tools
05/10/2023 05:47:07 - New member
05/10/2023 04:40:11 - Problems with external pot on at1 vfd
05/10/2023 00:06:32 - Drain plug
04/10/2023 23:36:17 - digi phase converter for 10 machines.....
04/10/2023 23:13:48 - More Latest Posts...
- View All Topics
- Reeves** - Rebuilt Royal Scot by Martin Evans
by John Broughton
£300.00 - BRITANNIA 5" GAUGE James Perrier
by Jon Seabright 1
£2,500.00 - Drill Grinder - for restoration
by Nigel Graham 2
£0.00 - WARCO WM18 MILLING MACHINE
by Alex Chudley
£1,200.00 - MYFORD SUPER 7 LATHE
by Alex Chudley
£2,000.00 - More "For Sale" Ads...
- D1-3 backplate
by Michael Horley
Price Not Specified - fixed steady for a Colchester bantam mark1 800
by George Jervis
Price Not Specified - lbsc pansy
by JACK SIDEBOTHAM
Price Not Specified - Pratt Burnerd multifit chuck key.
by Tim Riome
Price Not Specified - BANDSAW BLADE WELDER
by HUGH
Price Not Specified - More "Wanted" Ads...
Do you want to contact the Model Engineer and Model Engineers' Workshop team?
You can contact us by phone, mail or email about the magazines including becoming a contributor, submitting reader's letters or making queries about articles. You can also get in touch about this website, advertising or other general issues.
Click THIS LINK for full contact details.
For subscription issues please see THIS LINK.
Model Engineer Magazine
- Percival Marshall
- M.E. History
- LittleLEC
- M.E. Clock
ME Workshop
- An Adcock
- & Shipley
- Horizontal
- Mill
Subscribe Now
- Great savings
- Delivered to your door
Pre-order your copy!
- Delivered to your doorstep!
- Free UK delivery!


 Register
 Log-in


