Forum sponsored by:

Processes

Three useful accessories
Last month, we levelled up the lathe and checked it for truth. I have had an email about this article asking what to do if the lathe turns out of true. The three Myford lathes I have set up have always been true when set up as suggested but in case your lathe needs adjusting, I will detail how to do it.
Firstly, set up the lathe as suggested last month. If the lathe wont turn true it is probably because the bed is twisted so we need to twist it back to correct it by adjusting the raising block nuts at the tailstock end. If the test piece is larger at the tailstock end, you will need to higher the adjusting nut at the front position. If the test piece is larger at the headstock end, you will need to higher the nut at the rear position. I have not had reason to adjust this so instructions are taken from the Myford Series 7 Manual available from www.myhobbystore.com. You will also need to realign the tailstock after aligning the bed.
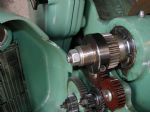
Myford series 7 bed stop
First up this month, I am giving details of a bed stop for the Myford 7 series lathe. This bolts onto the front of the lathe using the gearbox mounting screw holes. The rod is clamped by the locking handle at one end and acts as a dead stop on the carriage at the other end. The construction of the two main components is quite straightforward and nothing is particularly critical although you should try to get the two mounting holes reasonably accurate. The counterbores should be sized to suit the screws used. I would recommend using Allen cap screws.
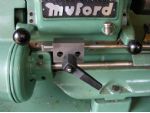
The two holes that mount the gearbox are usually 1/4in.BSF so I spent a few hours tidying up the storage shed and found the bag of screws, great, I can put the stop back on the lathe (it was removed to avoid damage in transit). Unfortunately, my Myford is quite a new model and Myford in their wisdom had changed the mounting screws to M6. Rather than spend any more hours in the shed, I drove to the nearest DIY store and bought a packet of M6 machine screws which have been used temporarily to bolt the stop on to illustrate this article. I will replace them with M6 when I find the box full.
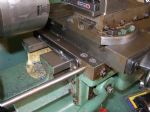
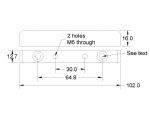
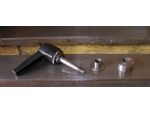
The support block
First, make the 102mm long block. The length is unimportant; I just measured my one and used that to make the drawing. Centre drill all four holes and drill and tap the centre pair M6 through. Drill through the two outer holes, 6mm or 1/4in. depending on your Allen screw size then counterbore to suit the screw head. If you dont have a counterbore, drill the hole out to full diameter a couple of mm deep then flat bottom the drill and finish to depth. Please use a drill vice clamped down so the work does not spin. Alternatively, leave the holes clearance size and use longer screws. Try the block on the lathe and hopefully it will fit. If the holes are slightly out, just open them up a bit until the block can be screwed to the lathe.

The main block
After reaming the 8mm (5/16in.) hole in the main block, check the location against the lathe to check for clearance. Although the dimensions worked out ok for my ML7R, there have been a number of variations to the size of the lathe back gear handle and you may have to lower the stop slightly so the rod clears the handle. As designed, the support block should be in the middle of the main block. If you need to lower the height of the stop rod, mark out the main block and drill to suit, otherwise drill so the main block is in the centre.
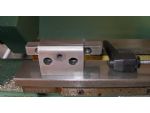
The counterbores may cut slightly into the stop bar hole but just take them lower past the rod diameter until the screw head is clear when the bar is fitted. The M6 tapped hole for the clamp screw should be drilled 5mm through and then drilled 6mm clearance as far as the slot and then just taken slightly past the slot to square the edge of the tapped hole up. Finally, tap m6 through.
I milled the slot in the vertical mill using a slitting saw but it would be acceptable to use a hacksaw but you use two blades in the hacksaw as this will cut a wider slot. The plastic handle is a standard M6 male threaded handle. The one I used is a large one. If a handle is not available, a bolt could be used instead.
A simple chuck back stop
Next, I will describe a simple chuck back stop. This stop is so simple that it does not even warrant a drawing. The components of the stop are shown in the photo below. The basis is a cheap two Morse taper collet readily available from many of the suppliers advertising in MEW. These collets are available in imperial and metric sizes. As long as the drawbar thread is metric any size will do. I have used an 8mm collet with an 8mm threaded hole in the end.
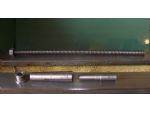
You need a length of 8mm studding and an 8mm nut. The only part you need to make is the top hat adapter. This is turned to fit the mandrel hole leaving a raised portion at the end and drilled through to take the studding. The bar in the collet can be turned to suit the job in hand and the length can be varied to suit the thickness of the work in the chuck.

A carriage lock
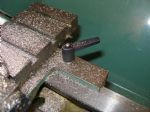 The final item is a replacement carriage lock. This is also simple to make. Again there is a top hat bush. This is turned to fit the hole in the carriage and drilled about 6.2mm for clearance on a 6mm thread. Leave the outside diameter about the same size as the diameter of the plastic locking handle.
The eccentric nut can be copied from the original. From memory it is 11/16in. diameter but check from your example. The quickest way to make it would be to spot through the original nut onto the new one and then drill and tap it M6. The plastic handle is a small M6 one but check that you get one with a long enough thread length. The plastic handle is serrated and spring loaded so you can pull it up, turn it to the position required and drop it back down. This simple accessory means never having to look for the carriage locking spanner in the swarf again.
Using the three items
Put a piece of bar into the chuck against the back stop, bring the tool up to the front of the bar and lock the carriage. Using the top slide, put on a cut sufficient to clean up the end of the bar and face the end. Turn the bar round in the chuck and bring the tool almost up to the front of the bar. Bring the stop bar up against the carriage and lock in position. Clean the end of the bar up using the top slide to put the cut on. Remove the bar from the chuck and measure it. Work out how much you need to remove to take the bar to length, put the bar back into the chuck, put the cut on with the top slide and face to length. Assuming you now want to turn say, a 3/8in. long spigot on the end of the bar, turn the topslide handle along .375 and you can then turn the spigot by traversing the carriage backwards and forwards to the stop.
This is a very useful technique for one offs but really comes into its own when you have a lot of identical parts to make. Face them all at one end then reset to face the second end and finally turn all the spigots. Once you have made these three simple items, you will wonder how you ever managed without them. Next month, I will show you how to fit a chuck to a back plate using only the lathe.
Magazine Locator
Want the latest issue of Model Engineer or Model Engineers' Workshop? Use our magazine locator links to find your nearest stockist!
Sign up to our Newsletter
Sign up to our newsletter and get a free digital issue.
You can unsubscribe at anytime. View our privacy policy at www.mortons.co.uk/privacy
Latest Forum Posts
- *Oct 2023: FORUM MIGRATION TIMELINE*
05/10/2023 07:57:11 - Making ER11 collet chuck
05/10/2023 07:56:24 - What did you do today? 2023
05/10/2023 07:25:01 - Orrery
05/10/2023 06:00:41 - Wera hand-tools
05/10/2023 05:47:07 - New member
05/10/2023 04:40:11 - Problems with external pot on at1 vfd
05/10/2023 00:06:32 - Drain plug
04/10/2023 23:36:17 - digi phase converter for 10 machines.....
04/10/2023 23:13:48 - Winter Storage Of Locomotives
04/10/2023 21:02:11 - More Latest Posts...
- View All Topics
Support Our Partners


Shopping Partners
Subscription Offer

Latest "For Sale" Ads
- Reeves** - Rebuilt Royal Scot by Martin Evans
by John Broughton
£300.00 - BRITANNIA 5" GAUGE James Perrier
by Jon Seabright 1
£2,500.00 - Drill Grinder - for restoration
by Nigel Graham 2
£0.00 - WARCO WM18 MILLING MACHINE
by Alex Chudley
£1,200.00 - MYFORD SUPER 7 LATHE
by Alex Chudley
£2,000.00 - More "For Sale" Ads...
Latest "Wanted" Ads
- D1-3 backplate
by Michael Horley
Price Not Specified - fixed steady for a Colchester bantam mark1 800
by George Jervis
Price Not Specified - lbsc pansy
by JACK SIDEBOTHAM
Price Not Specified - Pratt Burnerd multifit chuck key.
by Tim Riome
Price Not Specified - BANDSAW BLADE WELDER
by HUGH
Price Not Specified - More "Wanted" Ads...
Get In Touch!
Do you want to contact the Model Engineer and Model Engineers' Workshop team?
You can contact us by phone, mail or email about the magazines including becoming a contributor, submitting reader's letters or making queries about articles. You can also get in touch about this website, advertising or other general issues.
Click THIS LINK for full contact details.
For subscription issues please see THIS LINK.
Digital Back Issues


Donate

 Register
 Log-in
Model Engineer Magazine
- Percival Marshall
- M.E. History
- LittleLEC
- M.E. Clock

ME Workshop
- An Adcock
- & Shipley
- Horizontal
- Mill

Subscribe Now
- Great savings
- Delivered to your door

Pre-order your copy!
- Delivered to your doorstep!
- Free UK delivery!