Forum sponsored by:

Quick Adjusting Drill Depth Stop for RF-20/25 Mill?
| Jon Gibbs | 16/03/2016 11:50:48 |
| 750 forum posts | Does anyone have any neat ideas for a quickly adjustable drilling depth stop on a round column RF-20/25 mill please? The 2 lock nuts on the 1/2" x 20 TPI threaded scale take an age to adjust and aren't thick enough to make into tilt-nuts. I suppose I could make two new thicker knurled tilt-nuts but if anyone has any better ideas they'd be very much appreciated please. There is very limited space behind the threaded scale because of the quill-lock handle otherwise I had wondered about a sprung push-button lock engaging from the back onto the thread. Many thanks in advance Jon |
| Clive Foster | 16/03/2016 13:56:37 |
| 3630 forum posts 128 photos | On my square column Lux style mill I replaced the screw adjustment system completely with a simple D section rod having plain collar sliding up and down it. A wing headed screw locked the collar onto the column once set. The machine already had a simple ruler scale with 1/8" and 1 mm graduations printed on the front face of the head. Theoretically less accurate than the screw system but the implementation on my mill was so bad that any accuracy gain from the screw was swamped by general flippity-flopping about. If I really needed accuracy I used to measure the actual travel and lock the collar hard up aganst the stop. Good excuse to get one of the cheap vertical digital scales. I have seen devices where the collar is in two parts with a screw device for fine adjustment. The collar has a number of preset positions on the rod, a dimple for the screw tip would probably work here, and the calibrated screw device covers the intervals. Perhaps 1/4" to 3/8" or 5 to 10 mm on the screwed part. Overcomplication for little benifit here in my view but it can work well. Clive.
|
| Clive Foster | 16/03/2016 17:30:40 |
| 3630 forum posts 128 photos | Jon Just remembered that I had a picture of the modified depth stop on my old square column mill.
Obviously the head layout is very different to yours but it should be possible to do something similar by adding a plate with suitable slot to the front of yours. Laser print and laminate makes a good ruler scale for this sort of thing. Collar was actually a Tee nut shape running nicely in the slot. Part of the original system with an internal thread so it could be driven up and down the threaded rod by a knob at the bottom. I just drilled it out for the new rod. Going by picture it looks as if I may have just used a plain round rod with copper slug under the lock screw rather than a proper D section rod. From memory my front plate was around 2 or 3 mm thick. Made a good solid stop. Clive. Edited By Clive Foster on 16/03/2016 17:30:56 |
| Muzzer | 16/03/2016 19:05:17 |
 2904 forum posts 448 photos | Perhaps you want something like this. Could use the existing threaded rod. This one's for a Bridgeport but the principle is fairly obvious - spring loaded half nut. The BP has a sensitive feed trip arrangement requiring little force to trip so you'd need to either fit a beefier spring or lock it with a threaded element such as a wing nut for a machine like yours that requires a solid stop. Clive's suggestion is similar - but without any teeth to grip, the (split?) clamp needs to be pretty strong. Depends how much force you think it needs to withstand. PS - seems I was telling porcupines. In fact this Grizzly accessory seems to be for a Sieg(?) 6"x21" mill, so perhaps more beefy than I gave it credit for. Edited By Muzzer on 16/03/2016 19:16:34 |
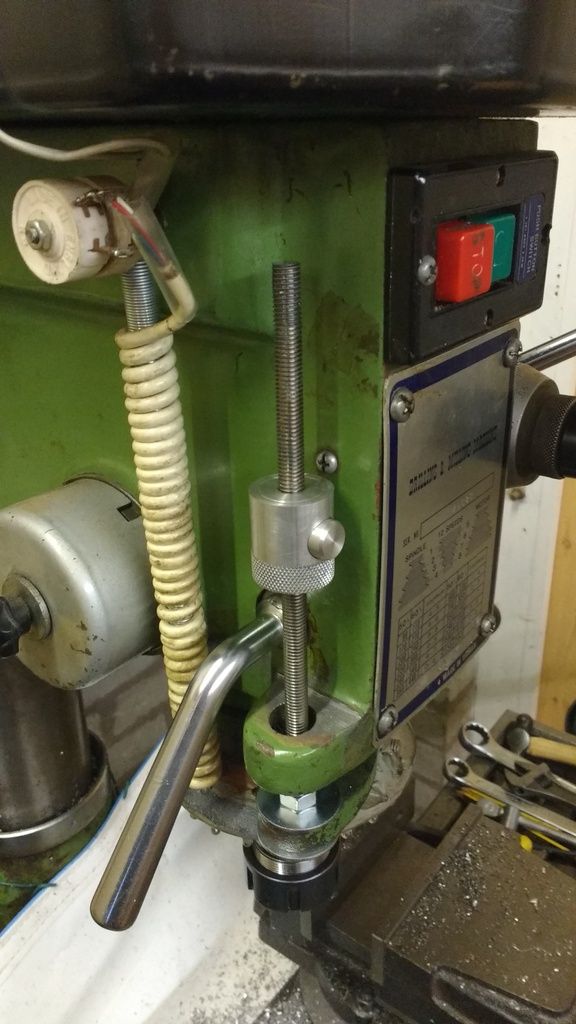
| Jon Gibbs | 17/03/2016 09:18:17 |
| 750 forum posts | Hi All, Thanks very much for the ideas and suggestions. I decided to follow Muzzer's recommendation in the end combined with a new M8 threaded rod. The old 1/2" one didn't leave enough space behind for the thread disengagement and spring and M8 is plenty rigid enough for a depth stop IMHO.
I haven't done anything about a scale yet but a cut-up cheap 6" steel rule glued to the front of the mill and a pointer joined to the threaded rod should be a lot more accurate than the original riveted to the threaded rod. Many thanks again Jon
|
| Howard Lewis | 17/03/2016 12:09:54 |
| 7227 forum posts 21 photos | A bit too late now, but was going to suggest a 1/2" or 12mm round with a short thread on the lower end, for fixing, and a moveable stop. But you've just done that with the M8 studding! Howard |

Please login to post a reply.
Magazine Locator
Want the latest issue of Model Engineer or Model Engineers' Workshop? Use our magazine locator links to find your nearest stockist!
Sign up to our Newsletter
Sign up to our newsletter and get a free digital issue.
You can unsubscribe at anytime. View our privacy policy at www.mortons.co.uk/privacy
Latest Forum Posts
- hemingway ball turner
04/07/2025 14:40:26 - *Oct 2023: FORUM MIGRATION TIMELINE*
05/10/2023 07:57:11 - Making ER11 collet chuck
05/10/2023 07:56:24 - What did you do today? 2023
05/10/2023 07:25:01 - Orrery
05/10/2023 06:00:41 - Wera hand-tools
05/10/2023 05:47:07 - New member
05/10/2023 04:40:11 - Problems with external pot on at1 vfd
05/10/2023 00:06:32 - Drain plug
04/10/2023 23:36:17 - digi phase converter for 10 machines.....
04/10/2023 23:13:48 - More Latest Posts...
- View All Topics
Support Our Partners


Shopping Partners
Subscription Offer

Latest "For Sale" Ads
- Reeves** - Rebuilt Royal Scot by Martin Evans
by John Broughton
£300.00 - BRITANNIA 5" GAUGE James Perrier
by Jon Seabright 1
£2,500.00 - Drill Grinder - for restoration
by Nigel Graham 2
£0.00 - WARCO WM18 MILLING MACHINE
by Alex Chudley
£1,200.00 - MYFORD SUPER 7 LATHE
by Alex Chudley
£2,000.00 - More "For Sale" Ads...
Latest "Wanted" Ads
- D1-3 backplate
by Michael Horley
Price Not Specified - fixed steady for a Colchester bantam mark1 800
by George Jervis
Price Not Specified - lbsc pansy
by JACK SIDEBOTHAM
Price Not Specified - Pratt Burnerd multifit chuck key.
by Tim Riome
Price Not Specified - BANDSAW BLADE WELDER
by HUGH
Price Not Specified - More "Wanted" Ads...
Get In Touch!
Do you want to contact the Model Engineer and Model Engineers' Workshop team?
You can contact us by phone, mail or email about the magazines including becoming a contributor, submitting reader's letters or making queries about articles. You can also get in touch about this website, advertising or other general issues.
Click THIS LINK for full contact details.
For subscription issues please see THIS LINK.
Digital Back Issues


Donate

 Register
 Log-in
Model Engineer Magazine
- Percival Marshall
- M.E. History
- LittleLEC
- M.E. Clock

ME Workshop
- An Adcock
- & Shipley
- Horizontal
- Mill

Subscribe Now
- Great savings
- Delivered to your door

Pre-order your copy!
- Delivered to your doorstep!
- Free UK delivery!
All Forum Topics > Manual machine tools > Quick Adjusting Drill Depth Stop for RF-20/25 Mill?