Member postings for Roger Mountain
Here is a list of all the postings Roger Mountain has made in our forums. Click on a thread name to jump to the thread.
| Thread: Warco VMC electrics |
| 08/10/2013 15:54:25 |
Hi Jason, Yes that is right the auto traverse will move when the microswitch is reset if you do not switch the auto traverse off first.The only way to solve this problem would be to power the auto traverse from the other side of of the no volts switch but this would mean getting into the internal wiring of the machine. Regards, Roger |
| 06/10/2013 23:33:20 |
It looks as if the simplest method is to interupt the mains feed to the milI. I have done this on my mill by by inserting a 40A microswitch in the live feed to the mill. This is operated by a strip of wood hinged to the mill base in easy reach. When operated this knocks out everything and resets the no volts switch. Please see attached photos. |
| Thread: Conversion Chart |
| 25/03/2013 15:03:42 |
Hi, I use a spread sheet, it is a bit of a work in progress as I add new threads as I come across them. I printed it out on A4 sheets as a wall chart before realising it was bigger than the available wall space so I just leave it on the lap top in the workshop now.
Regards, Roger
|
| Thread: Gasket Material for an Air Compressor |
| 03/01/2013 01:31:49 |
My compressor did the same, I cut one from copper sheet using a piercing saw. Anneal the gasket by heating to cherry red then quenching, check that the head is flat and if not address the matter with a flat surface and some wet & dry. Mine has given no trouble since.
Regards, Roger |
| Thread: Mashstroy C210T / Warco 220 help please |
| 16/06/2012 02:27:35 |
Hi Alan, Yes I would recommend a Dickson (think that's how it's spelt), see my photos. It makes setting the cutting tool on centre so easy I wouldn't be without mine. In order to fit it to the lathe you will need to make up a new threaded mounting bush for the top slide and if you want to use the standard tool post bolt you will have to bush the the top of the tool post. Also you may have to take a skim off the tool post bolt to clear the dickson locking cams. None of these mods are irreversible and you can easily refit the original 4 position tool post if required. Regards, Roger
|
| 14/02/2012 18:16:39 |
Hi Peter, Snap, your saddle lubrication point is exacly in the same spot that I drilled mine for a countersunk screw which I remove to lubricate the saddle. I don't have any problem with swarf getting down the screw holes in the cross slide as I normaly run with a home made boring table bolted down to the four theaded holes intended for mounting the vertical slide. This is due to the short length of the cross slide. The other screw hole on top of the saddle I use to mount my swarf tray. Looks like you are thinking of fitting the grub screw to your lathe, It seems straight foward, the only probem being finding material for the pad, mine looks like car brake lining material. Regards, Roger |
| 13/02/2012 13:01:56 |
Hi Peter, The reason I fitted slide locks was that some time ago I had planned to build a longcase clock movement and needed to lock my slides for the wheel cutting, never got round to it but still have the slide locks. I drilled the lubrication hole in the saddle is because my lathe is not fitted with any means of lubricating the saddle without removing the bed wipers. Ivy, Iam very impressed with the vice, remind not to annoy you. Regards, Roger |
| 12/02/2012 13:45:15 |
Hi Peter, I did my slide locks by drilling through the adjustable gib block. The lock consisted of an M6 allen screw bearing on to a brass pad cut at 55 degrees bearing on to the dovetail. Yes it must weaken the gib block to a certain degree but they only need to be little more than finger tight to lock the slide. Regards, Roger |
| 12/02/2012 13:28:15 |
Hi Folks, Here is page E17 from my manual Regards, Roger 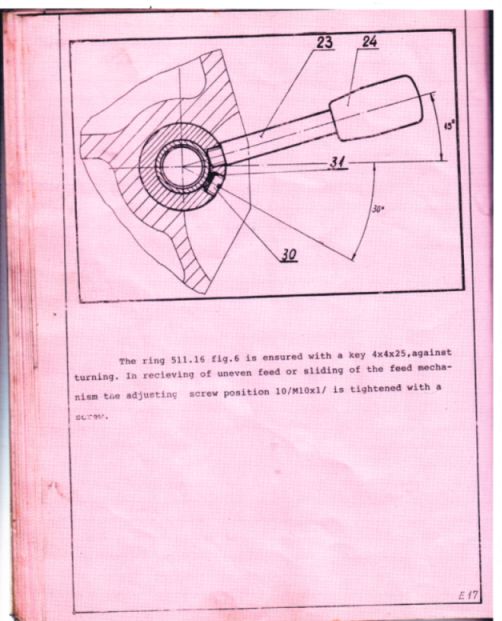 |
| 11/02/2012 22:27:23 |
Hi Folks, Sorry I have been so long in replying but I have been unsuccessfully battling a front door lock. Many thanks to Peter for his excellent desription of the workings of the auto feed and the accompanying photos. Yes I have had the auto feed out of my lathe and as I recall it was the same as Peter's apart from the extra grub screw (yes I did lose the key from the lead screw, the parts gremlin shot out from under the bench and made off with it, only returning it after I had filed up a new one from silver steel). The grub screw is threaded into the same cylindrical component as the feed lever it is also shown in the pink manual but the feed lever and the grub screw are transposed. Yes Peter I do have the same gib strips as you, they can be a pain to adjust but once done they don't seem to need touching for ages. I have drilled and tapped mine M6 in order to accomodate slide locks. 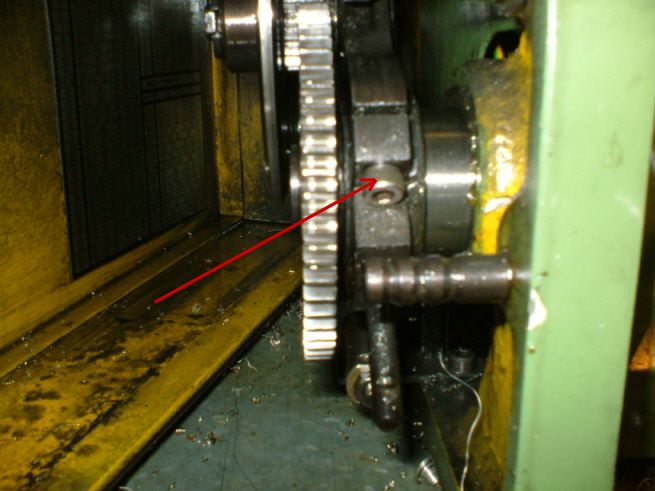 As regards jumping out of gear whilst screwcutting this can be avoided by tightening the screw indicated in the above photo, I don't bother as my lathe has never had this tendency. In order to better lubricate the saddle I have drilled and tapped the front of the saddle for a countersunk M6 screw, this is removed for a few squirts of machine oil every now & again. Just a tip for you Ivy make yourself a wooden bed protector so that when you drop the heavy 4 jaw chuck you don't mark the bed. Hope this has been of some use, Regards, Roger |
| 10/02/2012 17:35:17 |
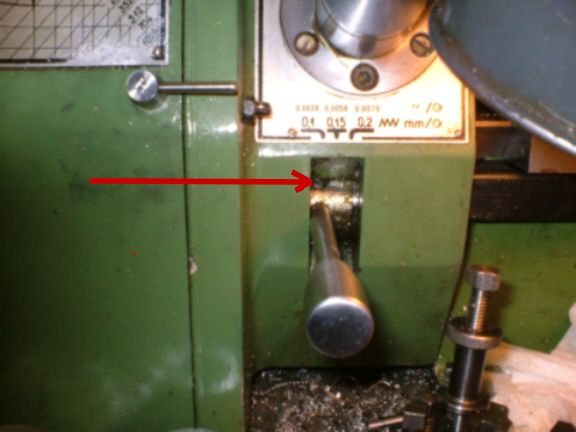 Hi Peter, I have photographed the screw in question you can just see it starting to emerge with 0.1mm/rev feed engaged. Sorry I can't get a better picture but I would have to remove one of the friction wheels in order to get the feed lever to drop down further. Incidentaly with the feed lever pushed down in this position the the auto feed is fully engaged and shows no tendency to jump out. Hope this is some use to you. Regards, Roger PS It looks like there are quite a few differences between these machines. |
| 10/02/2012 11:53:28 |
Hi Peter, It sounds like there may have been some production changes between our machines. The screw is not visible when the feed lever is in it's normal position, I will try and photograph it for you if I get time today. I have never inserted a photo into a posting do you know what size of image the site can cope with? Regards, Roger |
| 08/02/2012 20:46:14 |
Hi Ivy, Sorry for the abbreviation it means "In Accordance With". I damaged one of my headstock bearings and was faced with replacing them, because of the cost of precision bearings I replaced them with standard bearings from a good manufactuer (SKF or similar), I have had no problems with them. As for your poor finish when turning it could just be the material you are machining, there are in everybodies scrap box bits of steel that have defied attempts by generations of model engineers to machine. Try to get hold of some EN1A steel and an indexable knife tool (at least you tool angles will be right) set the tool on centre and I am sure things will improve. Regards, Roger |
| 08/02/2012 17:04:53 |
Hi Ivy, Iam sorry to hear about your problems with your Warco 220. I have run one for about 15 years and hardly recognize the descripion of the lathe. I do not have to hold the saddle feed lever down in any speed and have recently used an 1/8" indexable parting tool in my front tool post to machine 7" diam aluminium pulleys. To address the problems you are having might here are a few suggestions. Saddle feed. Open lathe cover and check that the large friction wheel is engaging centrally in the groove of the small friction wheel in all three speeds. I believe I had to add a thin washer behind one of the wheels to achieve this in my case. Do not shim away all the all the end float on the friction wheels as there should be plenty of end float to allow them to engage properly. Dismantle the automatic saddle feed mechanism to allow the feed lever to be depressed much further than normal. After you have depressed the lever you will see a screw by the base of the the feed lever, this screw bears on a pad and provides friction to prevent the feedlever dropping out of engagment. Tighten the screw, you will now find the feed lever much stiffer in opperation and not prone to drop out of engagment. Screw cutting. During screwcutting the automatic feed is dismantled and the appropiate gear train made up. The meshing of the gears is set by feeding a strip of computer paper between the gears and adjusting for no backlash, remove the paper and lock the feed lever using the allen screw located under the gear cover ( I don't bother and nothing has come loose yet). Parting off. Check the adjustment of the lathe slides and adjust as necessary. Check the spindle for smooth operation and end float, if the spindle operation is not smooth strip the headstock IAW the manual and replace the spindle bearings gease the bearings with LM grease (car wheel bearing grease). If the end float is out of spec adjust IAW manual. PS The headstock bearings will run warm to the touch after prolonged use at maximum speed. Hope this is some help, Regards, Roger |


Magazine Locator
Want the latest issue of Model Engineer or Model Engineers' Workshop? Use our magazine locator links to find your nearest stockist!
Sign up to our Newsletter
Sign up to our newsletter and get a free digital issue.
You can unsubscribe at anytime. View our privacy policy at www.mortons.co.uk/privacy
Latest Forum Posts
- *Oct 2023: FORUM MIGRATION TIMELINE*
05/10/2023 07:57:11 - Making ER11 collet chuck
05/10/2023 07:56:24 - What did you do today? 2023
05/10/2023 07:25:01 - Orrery
05/10/2023 06:00:41 - Wera hand-tools
05/10/2023 05:47:07 - New member
05/10/2023 04:40:11 - Problems with external pot on at1 vfd
05/10/2023 00:06:32 - Drain plug
04/10/2023 23:36:17 - digi phase converter for 10 machines.....
04/10/2023 23:13:48 - Winter Storage Of Locomotives
04/10/2023 21:02:11 - More Latest Posts...
- View All Topics
Support Our Partners


Shopping Partners
Subscription Offer

Latest "For Sale" Ads
- Reeves** - Rebuilt Royal Scot by Martin Evans
by John Broughton
£300.00 - BRITANNIA 5" GAUGE James Perrier
by Jon Seabright 1
£2,500.00 - Drill Grinder - for restoration
by Nigel Graham 2
£0.00 - WARCO WM18 MILLING MACHINE
by Alex Chudley
£1,200.00 - MYFORD SUPER 7 LATHE
by Alex Chudley
£2,000.00 - More "For Sale" Ads...
Latest "Wanted" Ads
- D1-3 backplate
by Michael Horley
Price Not Specified - fixed steady for a Colchester bantam mark1 800
by George Jervis
Price Not Specified - lbsc pansy
by JACK SIDEBOTHAM
Price Not Specified - Pratt Burnerd multifit chuck key.
by Tim Riome
Price Not Specified - BANDSAW BLADE WELDER
by HUGH
Price Not Specified - More "Wanted" Ads...
Get In Touch!
Do you want to contact the Model Engineer and Model Engineers' Workshop team?
You can contact us by phone, mail or email about the magazines including becoming a contributor, submitting reader's letters or making queries about articles. You can also get in touch about this website, advertising or other general issues.
Click THIS LINK for full contact details.
For subscription issues please see THIS LINK.
Digital Back Issues


Donate

 Register
 Log-in
Model Engineer Magazine
- Percival Marshall
- M.E. History
- LittleLEC
- M.E. Clock

ME Workshop
- An Adcock
- & Shipley
- Horizontal
- Mill

Subscribe Now
- Great savings
- Delivered to your door

Pre-order your copy!
- Delivered to your doorstep!
- Free UK delivery!