Member postings for Kim Garnett
Here is a list of all the postings Kim Garnett has made in our forums. Click on a thread name to jump to the thread.
| Thread: Is something missing |
| 13/08/2023 14:31:44 |
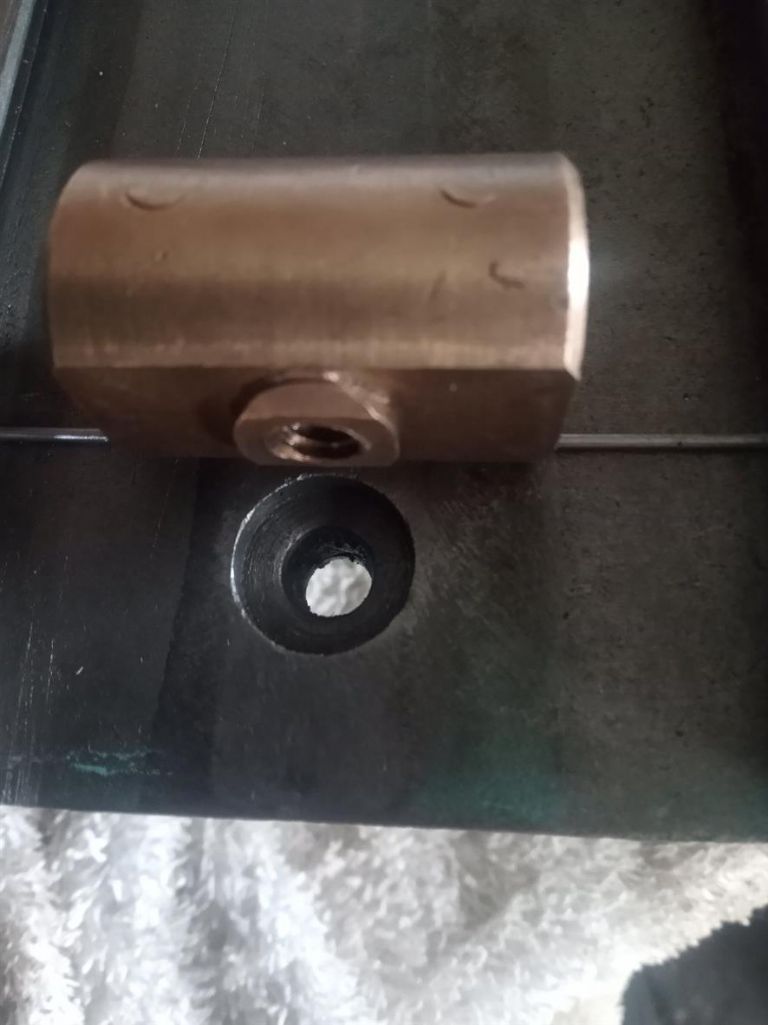
Hi I am making a new feed nut for a viceroy lathe and it appears to me that there is something missing currently the feed nut is only supported by the 1/4 bsw screw . there is a boss on top which is half an inch - 0.001 going by the drawing but currently fitting in a 19/32 counter bore see picture. Now should there be a collar of some sort that fits in the counter bore and on the boss of the feed nut. Now to the drawing it states that the fixing screw is marked out on assembly as the drawing shows the fixing screw on the same centre line as the screw and it would be easier to do when machining the boss. |
| Thread: Milling Vice Spec |
| 26/03/2023 15:26:13 |
Hi all that was my first thought , but I have a second vice which is 10 years newer which I purchased when I bought my bigger mill. I don't use this much as I do most of my vice work on the smaller mill with the above vice. Now if you had asked me which vice I preferred using I would have said the early one as it feels tighter. Today I have checked the newer one that I own which is the same vice and it is parallel not sure that it came like that as a toolmaker I use to work with checked it out and has reground most of the surfaces when I got it. That said when the vice is opened towards it limit it feels loose in comparison to the early vice. This is where I thought is the taper there on purpose and the fact it is in one plane and near perfect in the other. Kim |
| 26/03/2023 10:37:09 |
Hi All the question was is the taper on the base there for a reason limiting the top jaw lift as the vice is opened outward or is it just poor quality in manufacture ?. Kim |
| 25/03/2023 20:41:53 |
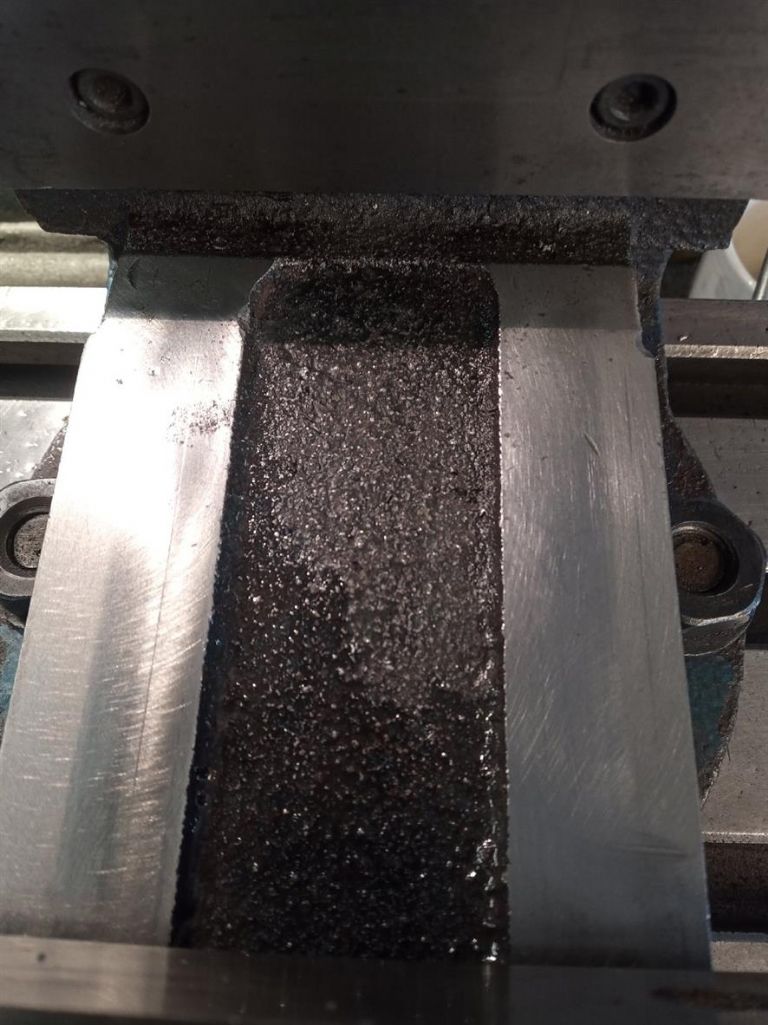
Hi Clive I can't agree more as stated earlier the vice is 28 years old and it was not expensive when I bought it and I have used it quite lot and done some decent stuff with it and had not many problems with at all. However this last project has been a right pain I did managed to a finish the parts but it was not easy with very little room for error due to the taper I did find some information on a machine vice they were stating 0.02 in 100mm which slightly better than what I have got . Jason information was very useful as it shows that the vice in the y direction can be better. so today I have stoned the working area of the vice base parallel in both x and y axis so these are parallel with the table which was tested with a 123 block sitting the base with jaws open and the block laying flat error was less than 0.01mm in x and y axis checking 3 inch long edge in both directions which gave a big improvement on what I had before in the Y axis no change in the X axis then checked It with the vice closed and the block tapped down and got almost the same result . I have been lucky as where the top jaw runs on the edge of this surface it was slight lower than middle part see photo which means I have not touched the area where the top jaw runs so if the taper is required to restrain the lift in the top jaw I have not touched it . |
| 25/03/2023 11:31:22 |
Hi Mike thanks for the reply the round bar may help with the jaw lift but i am not certain that the error is all to do with lift as the base to table has an error now is this taper trying to control the lift as the top jaw is opened fully in which case it may be compromise between controlling the lift and small error due to the taper. Kim |
| 25/03/2023 10:37:56 |
Hi Thank for the reply This helps if the base is tapered then tapping down with a hammer will not do any good as the bottom surface is not parallel with the bed .002" per 9 inches so there must be a tilt in the y direction now is this taper supposed to be in there as the jaw move backward there is less contact with the jibs but with the taper the top jaw tightens as the top jaw is opened? when I measured my first thought was the taper needed to be removed but thinking about I not so sure as the part i have just machined was 96mm long in the Y direction so the vice is nearly fully open which leaves quit a lot of over hang and not much contact on the jibs.
|
| 25/03/2023 08:42:27 |
Hi when clamping with a milling machine vice on parallel block how much tilt from the top jaw when clamping is the normal as looking at milling vices this specs is never given. I bought a 5 inch machine vice from J&L some 28 years ago which was made in china I think not sure and to be fair its not been a bad vice for 99% of the time.But using it on a part that I have just made where I had to have surfaces parallel to within 2 thou of each other which at first you think was easy but when i machined i got taper of about a thou in the Y direction over 40mm which is what I would expect as the top jaw pushes the part up this then only leaves me a thou tolerance on getting the height right.There is very little error in the X direction over 3 inches may be a couple of microns. After making the part I striped the vice put it on the surface table and measured the flatness of the surface which was out over the total length of about 9 inches and the error was about 2 to 3 thou from the hard jaw to the end of the vice. Now is this error correct as when you open the vice you have less contact with the jibs meaning that the top jaw is not as tightly held if they were parallel or is the taper there to tighten the jaw as moving up the taper compensating for the reduced contact area of the jib. Kim
|
| Thread: Naerok mill spindle runout |
| 28/12/2022 10:32:30 |
The manual is not much use it very generic it has 8 pages and 2 of these pages has the parts diagram and parts list I did manage to download a copy of this manual off the web I think I got the link from this site. there are no table slot dimension in it see link below
https://www.dropbox.com/s/7b1kz4lazup4o1p/Naerok%20RDM-350M%20Operation%20Manual.pdf?dl=0 Edited By Kim Garnett on 28/12/2022 10:45:21 |
| 26/12/2022 11:01:54 |
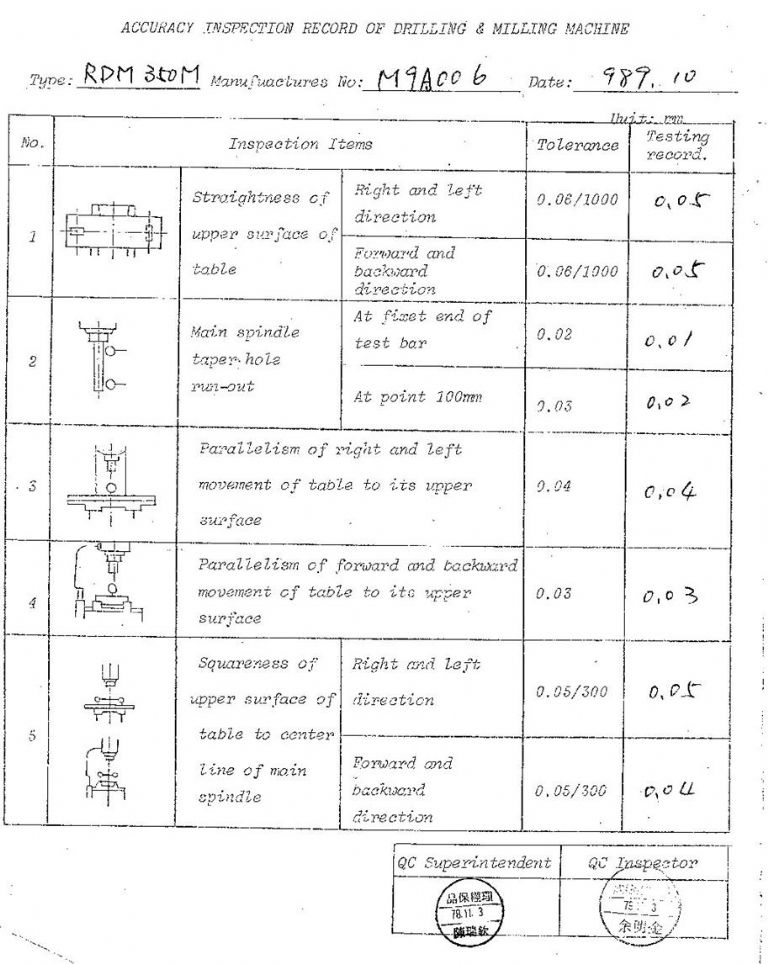
Hi Yes it did come with a manual and test report however the manual was for the rdm 400m/500m/500mf the manual has been edited in pen where there are differences I think the manual was the same for all as far as I can tell I think the main difference between the 350 and 400 was the table being slightly wider. I can't seem to upload an image of the test report which i have found useful in the past
Edited By Kim Garnett on 26/12/2022 11:08:40 Edited By Kim Garnett on 26/12/2022 11:10:28 |
| 25/12/2022 07:48:43 |
Hi I have the test report from the factory for my rdm350 with the specs that the mill should be when new the run out should be a max 0.02 at the top of the test bar and a max of 0.03 at a point 100mm below the first point. Hope this helps |
| Thread: Size of a Boxford metric Lead Screw |
| 27/04/2022 18:19:39 |
is it ABSSAC |
| Thread: New to Model Engineer |
| 27/04/2022 18:15:18 |
Hi Nigel The lathe I have owned for a least 25 years and it is used quite a lot where it was before that who knows The bed is starting to show its age but still cuts true which is a credit to those who built it after 60 years service and I have had very little trouble with it having just replaced the cross feed nut and half nuts which did not need replacing but did it any way. How many machines can that be said. |
| Thread: Size of a Boxford metric Lead Screw |
| 27/04/2022 17:21:40 |
Hi All Thanks for the help but appears that there are two sizes of lead screw on metric machines 19mm and 20mm I have just had a reply from boxford group where some has measured an Aud and has 19mm lead screw with acme thread 3mm pitch And Thanks again for the help Kim |
| 27/04/2022 16:45:55 |
Hi Nigel The reason I think that my boxford was made by denford is because it has a denford plate on the bed.
|
| 27/04/2022 13:31:31 |
Hi Nigel My lathe was made by denford before they were sold off its over 60 years old but it may be a change they made when they started making the viceroy lathe as a cost saving and I am wary that's why I ask the question in the first place it appears that it not be as straight forward as I first thought |
| Thread: New to Model Engineer |
| 27/04/2022 11:29:04 |
Hi Brian a lot boxford lathes came with metric dials as has mine its just the lead screw that's imperial. I did make a conversion gear 80/63 teeth which works well however it has its draw backs my outer lathe which is bigger than the boxford should coupe with the lead screw just, but I like a challenge |
| Thread: Size of a Boxford metric Lead Screw |
| 27/04/2022 11:13:51 |
Hi Hopper I have a drawing for a denford viceroy half nuts which seems to suggest that a viceroy lathe lead screw was 3/4" acme for both metric and Imperial lathes and just the pitch changed and as denford made both machines I was expecting it to be the same for the boxford but it seem not be the case. It would make the interchange between metric and imperial easy from a manufacturing point of view. The core depth would help determine the thread angle Would this mean that they used a different worm in the saddle which the lead screw passes through on metric boxford lathes from the imperial lathe as i said in a reply to Rex that's put a cat amongst the pigeons |
| 27/04/2022 09:13:36 |
Hi Thor No but it might worth a try. thanks |
| 27/04/2022 08:38:45 |
Thanks Rex That put the cat amongst pigeons |
| Thread: New to Model Engineer |
| 27/04/2022 07:42:34 |
Hi Brian Current project trying to make a Boxford BUD metric lead screw to fit to my Boxford Lathe which will be followed by a set of half nuts and thread dial indicator. |
Want the latest issue of Model Engineer or Model Engineers' Workshop? Use our magazine locator links to find your nearest stockist!
Sign up to our newsletter and get a free digital issue.
You can unsubscribe at anytime. View our privacy policy at www.mortons.co.uk/privacy
- *Oct 2023: FORUM MIGRATION TIMELINE*
05/10/2023 07:57:11 - Making ER11 collet chuck
05/10/2023 07:56:24 - What did you do today? 2023
05/10/2023 07:25:01 - Orrery
05/10/2023 06:00:41 - Wera hand-tools
05/10/2023 05:47:07 - New member
05/10/2023 04:40:11 - Problems with external pot on at1 vfd
05/10/2023 00:06:32 - Drain plug
04/10/2023 23:36:17 - digi phase converter for 10 machines.....
04/10/2023 23:13:48 - Winter Storage Of Locomotives
04/10/2023 21:02:11 - More Latest Posts...
- View All Topics
- Reeves** - Rebuilt Royal Scot by Martin Evans
by John Broughton
£300.00 - BRITANNIA 5" GAUGE James Perrier
by Jon Seabright 1
£2,500.00 - Drill Grinder - for restoration
by Nigel Graham 2
£0.00 - WARCO WM18 MILLING MACHINE
by Alex Chudley
£1,200.00 - MYFORD SUPER 7 LATHE
by Alex Chudley
£2,000.00 - More "For Sale" Ads...
- D1-3 backplate
by Michael Horley
Price Not Specified - fixed steady for a Colchester bantam mark1 800
by George Jervis
Price Not Specified - lbsc pansy
by JACK SIDEBOTHAM
Price Not Specified - Pratt Burnerd multifit chuck key.
by Tim Riome
Price Not Specified - BANDSAW BLADE WELDER
by HUGH
Price Not Specified - More "Wanted" Ads...
Do you want to contact the Model Engineer and Model Engineers' Workshop team?
You can contact us by phone, mail or email about the magazines including becoming a contributor, submitting reader's letters or making queries about articles. You can also get in touch about this website, advertising or other general issues.
Click THIS LINK for full contact details.
For subscription issues please see THIS LINK.
Model Engineer Magazine
- Percival Marshall
- M.E. History
- LittleLEC
- M.E. Clock
ME Workshop
- An Adcock
- & Shipley
- Horizontal
- Mill
Subscribe Now
- Great savings
- Delivered to your door
Pre-order your copy!
- Delivered to your doorstep!
- Free UK delivery!


 Register
 Log-in


