Member postings for Graham Meek
Here is a list of all the postings Graham Meek has made in our forums. Click on a thread name to jump to the thread.
| Thread: Adjusting an M&W level |
| 19/02/2020 17:19:35 |
There is an exploded drawing of these levels in the M&W Spare Parts list, page 17 that I think will help. Regards Gray, |
| Thread: Effect of Tensioning a Boring Bar |
| 18/02/2020 12:24:03 |
I managed to quantify the torque applied to the grubscrew on my boring bar yesterday. My 120 degree turn, produced by years of practice, produces a torque of 889 N mm. Unbrako recommend a torque of 1863 N mm on an M4 grubscrew, while HoloKrome recommend 2270 N mm. Unbrako even state this torque can be applied with a standard Allen Key. While my torque is just under a 1000 N mm less than the lowest recommended value, this does still equate to a loading of 1111 N on the push rod, in old money 250 lb(f). Regards Gray,
Edited By Graham Meek on 18/02/2020 12:25:09 |
| 14/02/2020 20:16:16 |
Hi Duncan, Unfortunately your email was in my Spam tray with a Google warning. Anyway I have managed to safely extract and open the dxf file. Which my version of AutoCAD did not like, it said there was an error and refused to open it. Finally using Autodesk DWG TrueView 2020 I was able to view the drawing. A couple of things wrong with the drawing, but only minor. The 3.2 diameter hole does not go all the way through, it stops 10 mm from the tool bit. The hole is then 3.05 mm from there to the tool bit, and it stops at the tool bit. It does not go all the way through the boring bar as drawn. Also the tool bit is 1/8" diameter not 3 mm. Regards Gray, |
| 13/02/2020 17:19:52 |
|
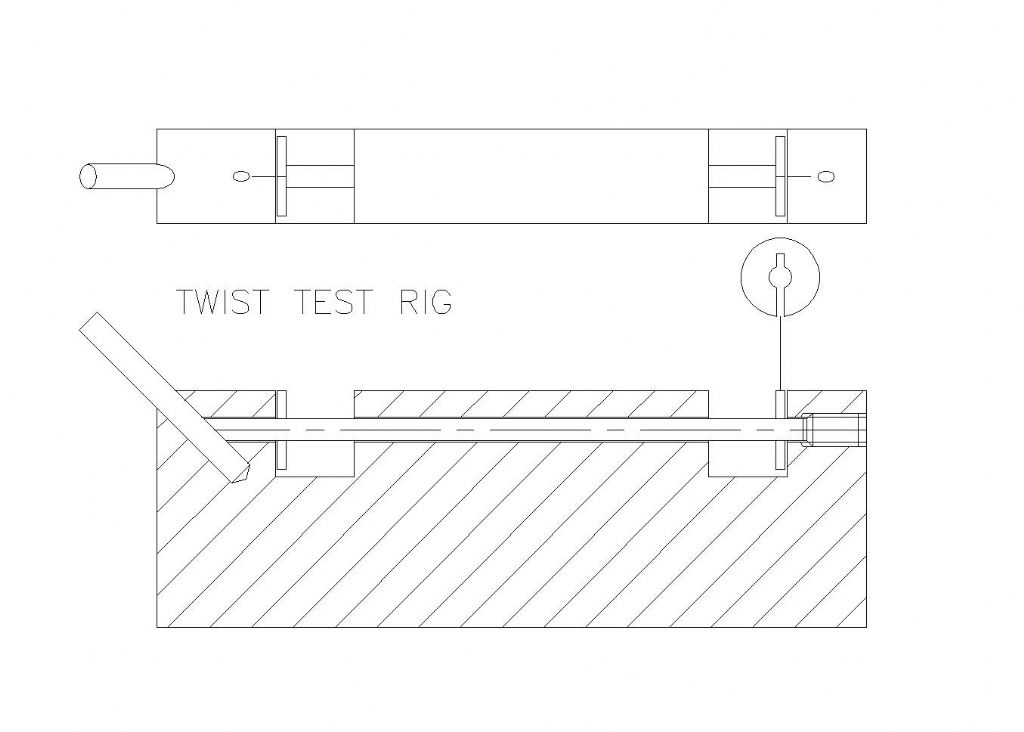
This afternoon I had a chance to make the Twist test rig I wanted to. The above drawing gives the set-up and the push-rod is the one from the Test Boring bar. The BMS block is 90 mm long by 12 mm wide and the two "C" shaped discs are 10 mm diameter and a friction fit on the push-rod. The discs have a Zero mark to coincide with one on the main block. The discs are not allowed to contact the faces thus eliminating any drag that might give a false reading. The discs are aligned with the Zero mark once all the slop has been taken out of the system, but the tool bit can just about be turned by hand. A x40 pocket microscope with a graduated graticule is used to align the Zero's. The M4 grubscrew is then tightened, which is about a third of a turn. While the disc at the tool bit end did move it was barely the width of the Zero line. This is what I would expect. The movement at the other end was more pronounced and equates to 3.436 degrees. This is approximately 3% of the tightening angle. The gap left between the disc and the test rig opened up about 0.25 mm which is in keeping with the screw thread displacement. Thus my supposition made earlier about the bar being in compression and in torsion is proven with this rig. No doubt with access to more sophisticated equipment like strain gauges it would be possible to quantify what is going on, but I am satisfied with my tests that there is a benefit to be had from this arrangement. Regards Gray, |
| 13/02/2020 10:50:21 |
The overall length of the boring bar was 90 mm, 30 mm was gripped in the toolpost, in a sleeve. The push-rod was 3 mm diameter and the hole through the bar 3.2 mm. The 1/8" cutter was on the extreme corner of the bar which itself was 10 mm diameter. The push-rod is locked by an M4 Allen grubscrew. This bar also had two flats running the full length of the bar and parallel to the cutter centre-line, (see initial post). The dimension across the flats was 9 mm. These flats are used to hold and orientate the boring bar in the Boring head. This boring bar has despite an L/D of 7 when in the boring head produced: dare I say, perfect holes, in a brass fabrication to take a radial bearing. The bending loads and the torsion loads were all applied 5 mm in from the cutter end of the boring bar using a screw tensioning device and an elderly spring balance. As all the readings were taken from the same balance then it should make no odds about its age. Ideally I would have preferred a force gauge but it was a case of horses for courses. Regards Gray, |
| 12/02/2020 16:35:18 |
I have been looking at the clamping end of the push-rod in my boring bars. While the 45 degree flat should exhibit a straight line wear pattern of contact with the round tool bit, it does not. Instead there is a wear pattern resembling a very shallow "X". The push-rod is obviously twisting as the Allen grubscrew is tightened. This then leads on to another condition that the push-rod is experiencing. Not only is it being compressed, but there is also a twisting moment being induced. Obviously the turning effort on the end of the grubscrew is being transferred to the push-rod. Due to the wedge action at the clamping face, the twist on the push-rod can only go so far. Once the wedge action has taken place. How much more of the torque applied to the grubscrew is being absorbed by twisting the push-rod beyond this point. I had better just add that the grubscrews I use are all Half Dog points so present a flat face to the end of the push-rod. The induced twist is also of an opposite sense to the force applied by the cutting tool. Tightening the grubscrew induces a clockwise moment on the push-rod looking on the back end of the boring bar. While the cutting tool puts a counter clockwise moment on the boring bar. Thus the push-rod has now become a pre-loaded Torsion bar, similar to some suspension systems used in the past. Unlike the suspension system where the torsion bar is only dealing with the up and down movement of the suspension arm and has no compression or tension end loading. The torsion bar in the push-rod system is under compression, as well as being constrained at either end. Unfortunately the days are long gone since as an apprentice I used to push numbers around on paper working out the stresses in under carriage legs at Dowty Rotol ltd. These were the days of the slide rule, and the Olivetti computer took half a day to programme. This is a system beyond my capabilities and needs some younger grey cells. As I said in my previous post, I was sure there was a lot more going on when the boring bar is under tension using a push-rod. Obviously Arnold and George knew this too, I do not think they just stumbled across this. I have another test in the pipe line to measure this twist, but it will have to wait for some warmer weather. "There is snow on them thar hills", (just across the border in Wales), and the workshop has temporarily become a no-go area. Regards Gray, Edited By Graham Meek on 12/02/2020 16:37:24 |
| 11/02/2020 10:37:14 |
Just to clear things up, the Plain Bar was just that, ie not hollow, and both tests were using the same material. As regards doing further work on Boring bars I can see little in the way of improvement. I am trying a larger push rod on the bars I am currently making for a new larger design of boring head. In time I may be able to do a back to back comparison on these to see if this makes it worse or not. It might just make it better? Regards Gray, |
| 10/02/2020 12:51:16 |
|
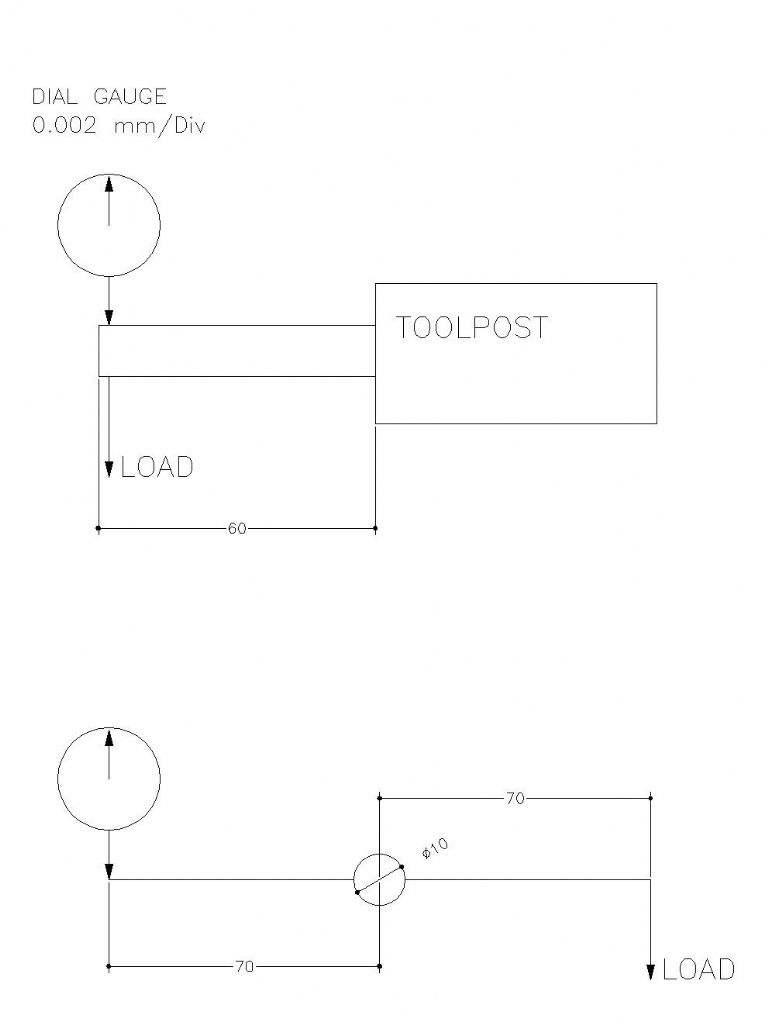
I am convinced the Boring bar problem cannot be treated as simple Bending Theory alone. There are several forces going on at the same time. Thus this morning I have carried out a few tests. The diagram above gives the outline of the two tests I carried out. One is testing the deflection of the Boring bar under load. The other is testing the boring bar in torsion. A standard deflection was chosen to simplify things and 10 results were obtained for each test. In the first test it took an average of 3.85 kg to deflect a Plain bar 0.05 mm, (0.002" approx). While the boring bar under a pre-tension took 4.53 kg to deflect the same 0.05 mm. An improvement of 15%. In the Torque test the plain bar took 1.13 kg to deflect the arm 0.05 mm, while the boring bar under a pre-tension took 1.59 kg. This time there was a much bigger improvement of 30%. These test were purposely carried out with above normal projection from the Toolpost and one would hardly have a tool tip 70 mm from the centreline, but I do think this does help to quantify what is happening. It is obvious to me the improvement under torsion is the key to the success I had in my initial post on the matter. The tool twisting in and out of the cut is what starts off the oscillations which causes the chatter. Regards Gray, Edited By Graham Meek on 10/02/2020 12:53:22 |
| 09/02/2020 11:09:36 |
Having been reading extensively some of the documents posted, and others. I have come to the following conclusion. Whether that conclusion is right or wrong, I cannot say, but it holds water for my way of thinking. The boring bar is a cantilever beam with a load on the extreme free end. There is also a torsional element that is trying to twist the cutting tool about the centre-line. This twisting element will be greater the further the tool tip is away from the centre-line Looking end on and using the points of the compass, with the tool bit in the East. As the tool starts to cut there will be a bending moment about the N-S axis pushing the tool away from the operator. There will also be a bending moment about E-W pushing the tool downwards. The resultant effect of these two loads will be to twist the cutting tip about the centreline. In both cases the bending moments are resisted by tension in the North side and East side of the bar. When this tensile stress is within the strength of the bar everything is dandy. However when the the tensile stresses exceed what he bar can handle then the twist in the bar becomes more prominent. The tool bit swings out of the cut, and as soon as there is no load on the bar immediately returns, or tries to return to the cut. The result of this is chatter or vibration. If the induced, or static tension, (pre-tension), in the bar exceeds the last condition, then the bar continues to cut as it would in the case prior to chatter. Whether there is a third element that alters the natural frequency of the bar or not, I have not been able to come to any conclusion on. Regards Gray, |
| 07/02/2020 11:09:16 |
Sandvik is a very good site for an insight into tips on the boring operation. Whilst biased more for industry there are a few gems of information hidden in the text. There were several things that I picked up on. One the L/D 4 bar protrusion for a standard bar. Another which GHT seems to have got right form the start, is that Sandvik recommend mounting bars in sleeves rather than just clamping them in the toolholder. Another thing I found interesting and one which I have found from experience. Was the size of the tip radius should not exceed the depth of cut. Lastly the diagram showing the tool forces during boring. These show, IF, the magnitude of the arrows is correct. That more of the cutting force is trying to push the bar out of the cut, ie along the diameter, than is trying to deflect the bar downwards. Obviously the resultant force will be combination of the two, (Vector Analysis). Regards Gray, |
| 06/02/2020 17:24:49 |
My initial post was done by way of a Practical Working example. All boring bars were the same length, diameter, cross section and material. As was the material being worked on and the same depth of cut and rate of feed used throughout. The hardened bar was by way of an example, that there was no real gain. Even though there is a small change in Young's Modulus during heat treatment. A change that is usually so small that it is ignored, but none the less a change. I don't think I was advocating every boring bar should be hardened. The only thing that changed was how the tool bit was held in the boring bar. In the final solution the push rod clamping the tool is in compression. What is resisting this compression load? There has to be an "Equal and Opposite" load somewhere, or Newton got it wrong. The opposite to compression is tension, therefore the outer wall of the boring bar is under tension. If not then the tool bit would just drop out. Whether this tension alters the resonant frequency, was not as far as I can see mentioned in my original post. However having worked with "Tuned" boring bars I suspect that this is what is really happening and was why I initially tried this type of boring bar. Thus as I mentioned earlier the results of a bar under tension is better than one which is not, given the same Working parameters. Regards Gray.
|
| 06/02/2020 12:24:20 |
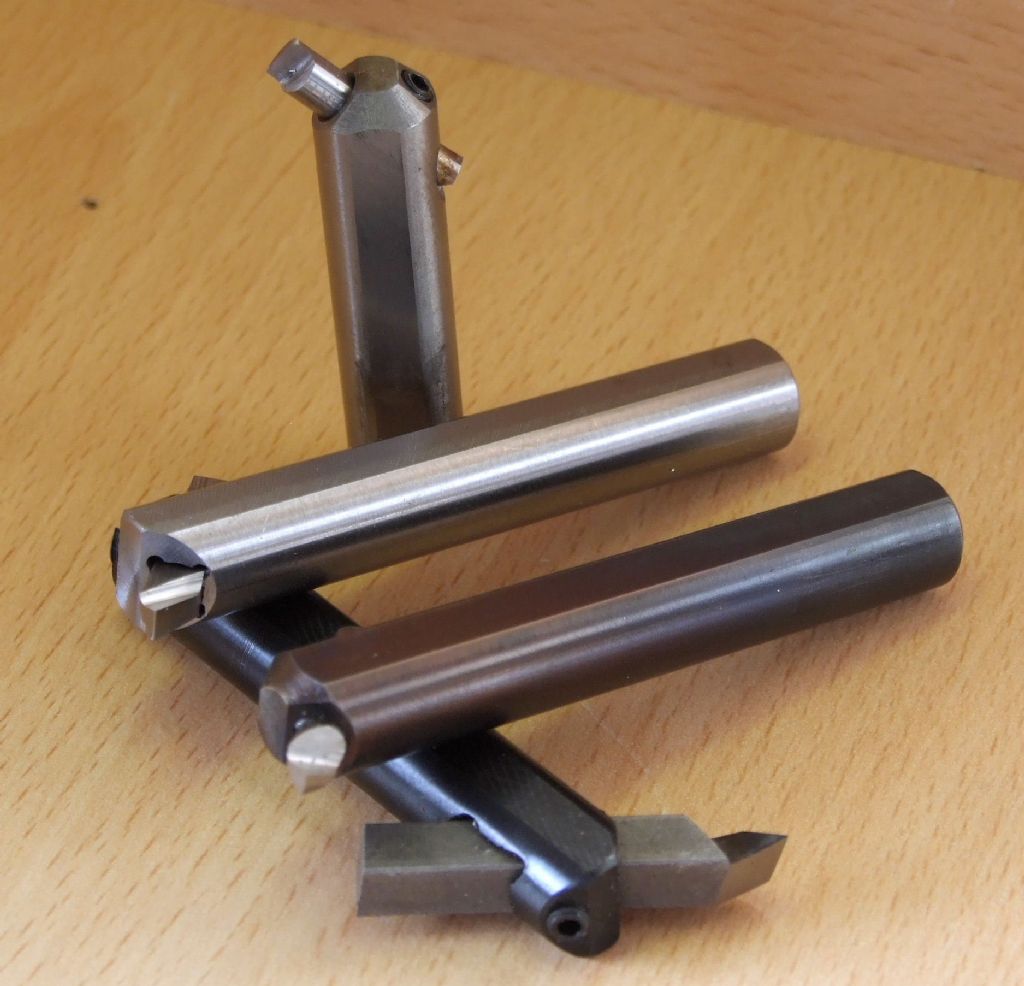
By way of the "Proof of the pudding is in the eating". I recently had a series of bored holes in a bronze job that was causing me problems with chatter. My FB2 Mill being a geared head is not the best for boring holes especially combined with a single phase motor. However I have managed to get a good finish with my boring heads and boring bars in the past on Mild steel, Brass, Cast Iron and Aluminium. The standard Emco design and my variations are shown above. All use an M4 grubscrew to lock the HSS tool bit. While all the boring bars are made from Silver Steel only one is hardened, and one might think this last version would give a better result as regards less chatter. Using this bar gave little improvement, but there was an improvement. After a lunch break I remembered I had some boring bars I made when I had my Unimat 3. These were made about the time George Thomas was writing a series of articles in ME on boring bars. His "design", (maybe cribbed from an earlier design), used a central push-rod to grip the tool bit. Again these bars are all made from Silver Steel, but left soft. Thus a bar of the same length was retrieved from the stores and the boring bit currently being used, (continuity) inserted. The difference straight out of the box took me by surprise. The job was then completed without further problems. I must conclude that in use the hollow boring bar under tension, does give a better result than a standard plain bar. Regards Gray,
|
| Thread: New member from Wales |
| 28/01/2020 18:16:31 |
Hello Mark, and welcome, From just across the border in the Forest of Dean, Regards Gray, |
| Thread: Driving Small Taps |
| 16/01/2020 10:48:00 |
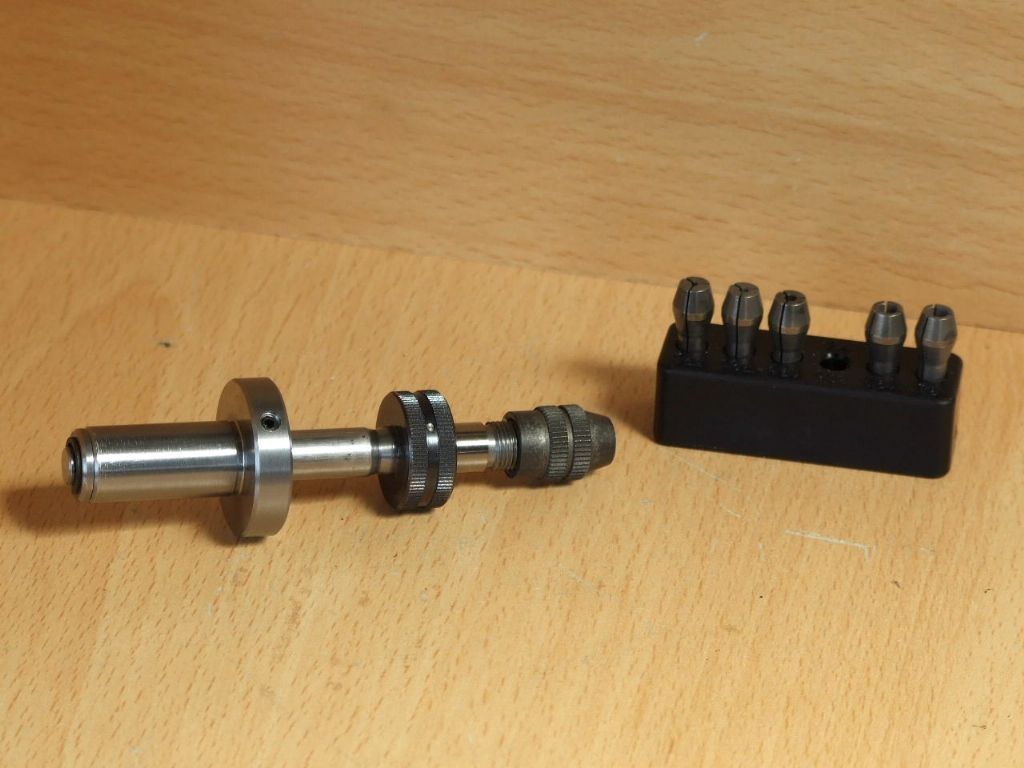
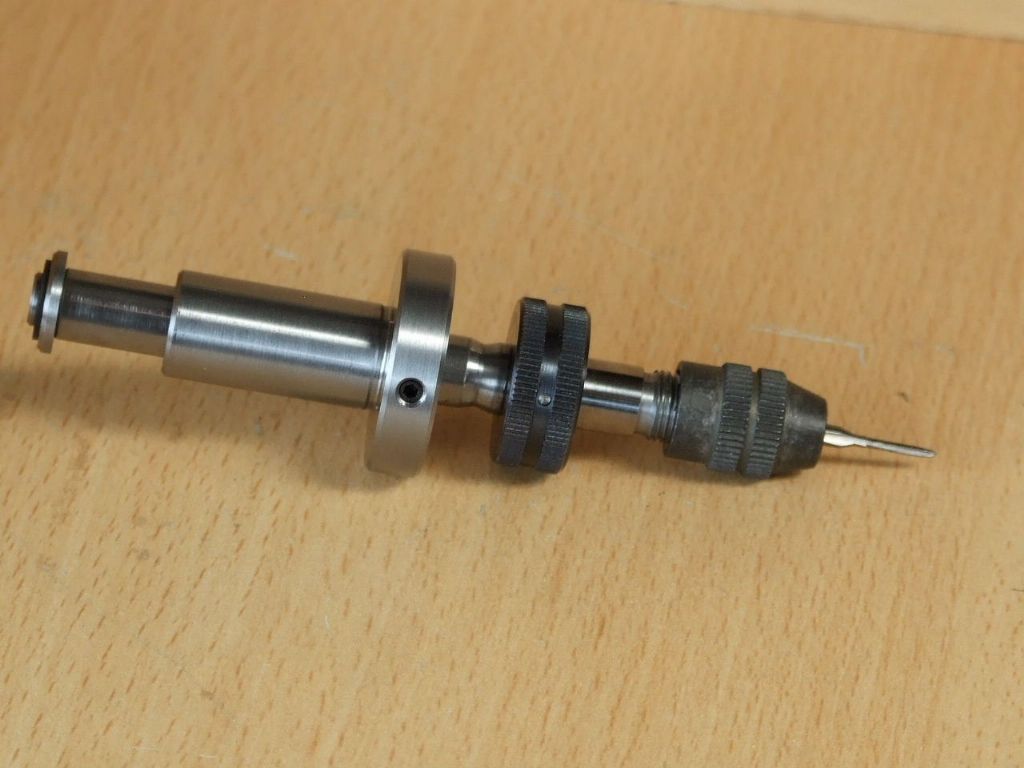
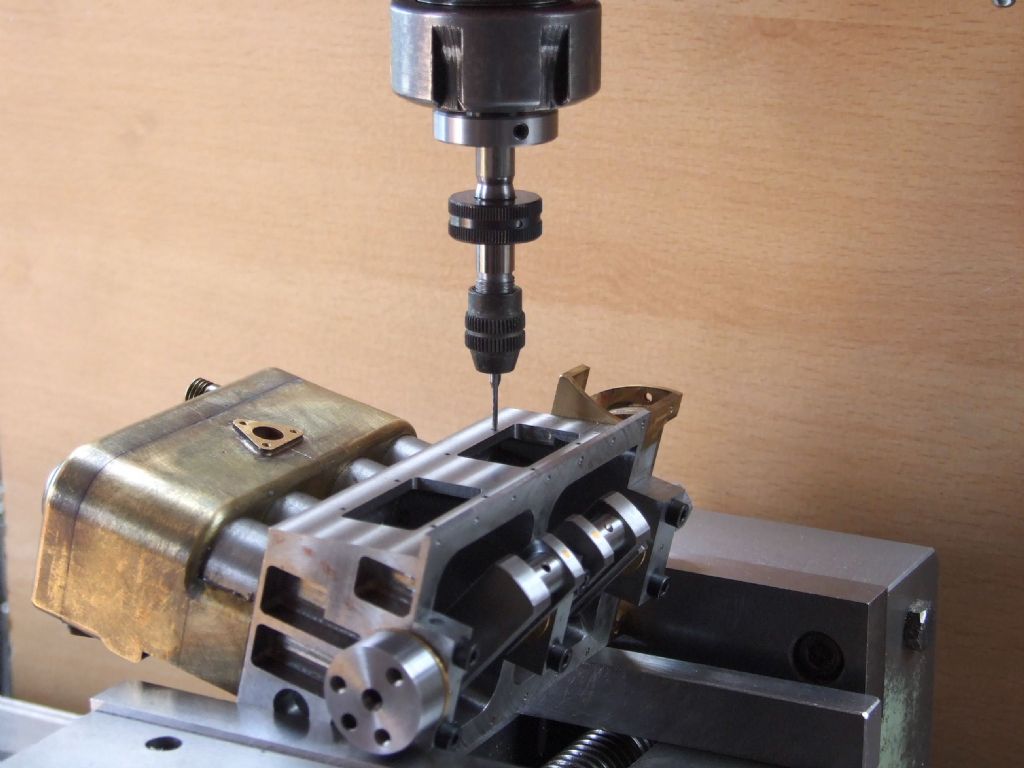
After breaking several 10 BA taps I decided I needed something to guide the taps, or face bankruptcy. The design here has the advantage that the collet can be set to allow the tap to spin if the tap meets an obstacle while the driven part, the larger knurled ring carries on rotating. The slider part of the design has a spring loaded clutch which stops the tap dropping when traversing from hole to hole. The design in full was described in HSM a short while ago.
Regards Gray, |
| Thread: Sent lathe back |
| 12/01/2020 11:18:39 |
Hi Dell, As I suspected the milling facility is not as Emco intended. In some ways not a bad thing as the motors were an Achilles heel. Regards Gray, |
| 11/01/2020 10:34:59 |
Posted by Derek Allum on 11/01/2020 09:07:30:
i have seen about the motor shortcomings and the one I have purchased has two motors one on the lathe and one on the mill so maybe they have had an easier life but we will see. Dell Hi Dell, As a long time Emco user I am confused. On the Unimat SL that I once owned the headstock was also the milling head. It was not until the introduction of the U3 that there was a separate milling head. Unless your machine has two headstocks, but I cannot see the point in that. As on the SL the headstock has to be removed to insert the pillar to set up for milling. Of the two machines the U3 was the better machine, I turned out some very good work on this machine. Do you have a photograph of your purchase? Regards Gray, |
| Thread: A Question on Bench Blocks |
| 26/12/2019 11:54:46 |
In Volume 100 of ME, on page 44-45, Duplex discusses the use of the Starrett Bench Block No. 129 as a useful tool for drilling cross-holes central in round bar. He shows a couple of sketches as to how to go about doing this. To quote his text, "The Starrett bench block No 129, illustrated in Fig 11, which is accurately machined and surface ground after hardening, could, without difficulty, be adapted to make a drilling jig of this pattern. The central hole is bored 5/8 in. in diameter and lies on the axis of the V-groove machined on the upper surface of the block. Moreover the recess in the underside of the base would provide ample space for housing the nut and washer fitted to the central clamp bolt". Further, this was one of my last items to be made in the apprentice training school at Dowty Rotol Ltd. This was without doubt a copy of the Starrett item, as Starrett ones were in use in the Toolroom. I well remember the difficulty setting up to grind the Vee. Not only was it to be central with the central hole but also the other two holes in the Vee. If that was not hard enough the Vee had to be a certain depth as well, checked with a roller, slips and a clock. The operation taking best part of a morning to achieve for an apprentice, but this put us in good stead for when we reached the shop floor. While the larger holes on the flat surface could be used with a simple attachment to make shim washers, as on our blocks these holes are on a common radius. The two holes in the Vee were merely for drifting out pins in shaft assemblies. My block has served me well over the years, especially when I was a Toolmaker, and I would not be without it. Regards Gray, |
| Thread: Metric screw cutting clutch for Myford ML7B as Graham Meek clutch |
| 18/12/2019 16:42:21 |
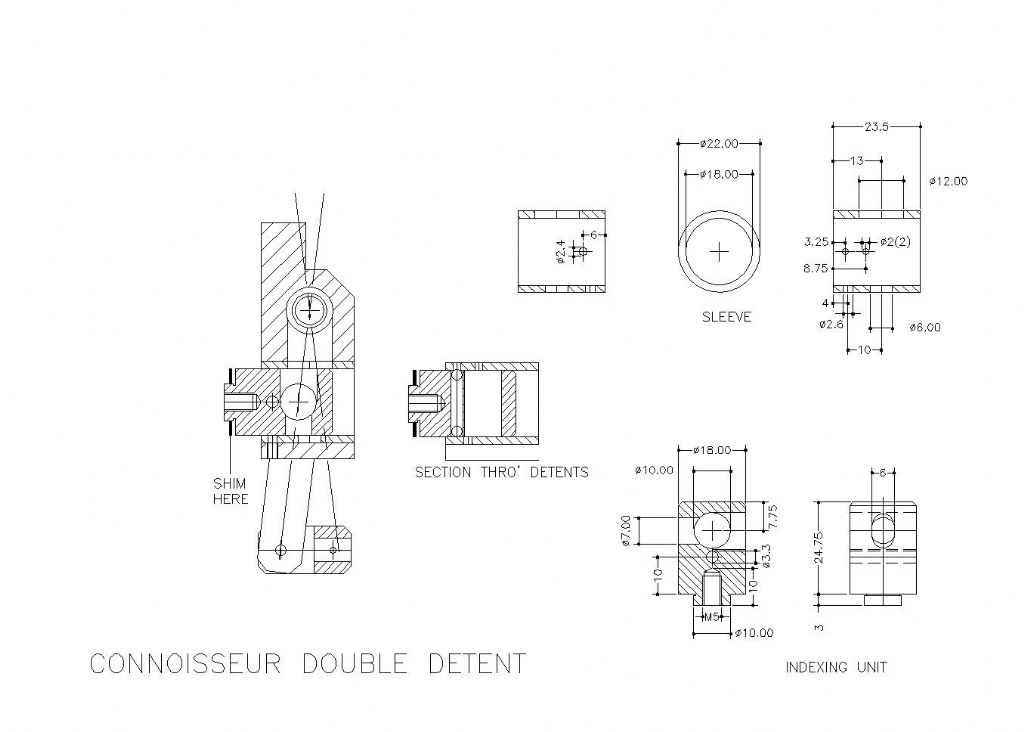
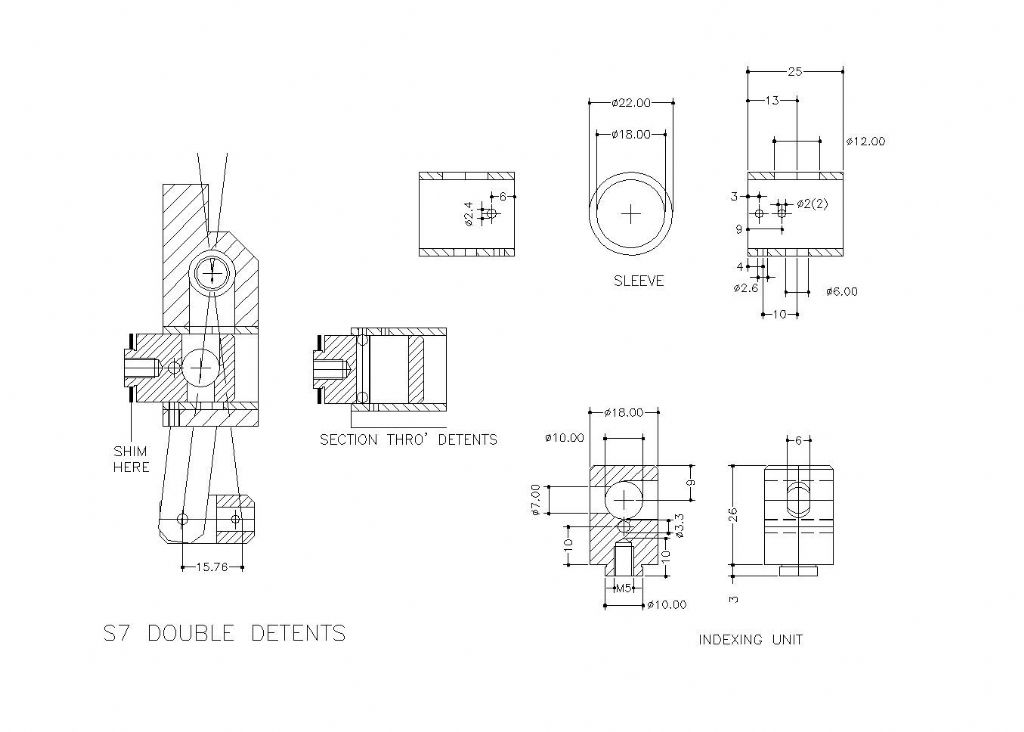
As promised here are the details for the Connoisseur, or Big Bore Double Detent Regards Gray, |
| 18/12/2019 11:28:54 |
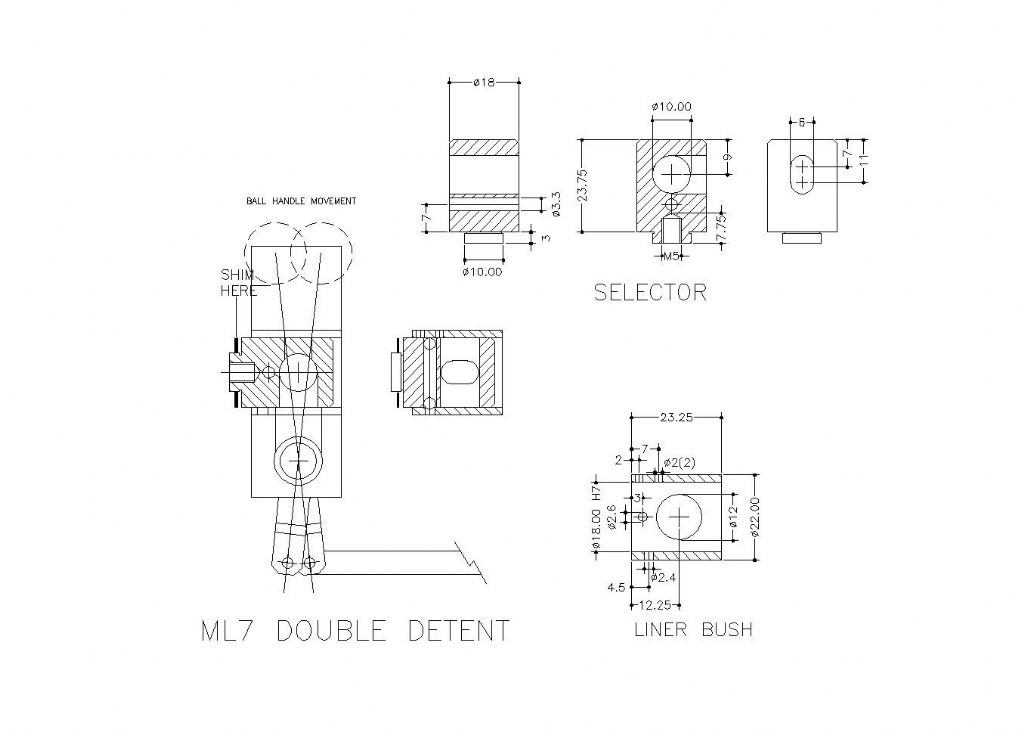
Hello David, Fortunately the work did not take that long, once I had gathered my thoughts from 30 years ago. Just to make things a little clearer. The Detent balls, and the Indexing holes in the sleeve, are both in the horizontal plane, ie parallel to the top surface of the Bedways. If you compare the cross sectional view of the assembly above with the original drawing in the book. The original long hole for the spring loaded ball is no longer there, so you can leave this out. Regards Gray, (Connoisseur or Big Bore version to follow later today.) |
| 17/12/2019 15:55:21 |
After having a look at applying the Double Detent to the ML7 this morning. It was not as easy as it might seem at first glance and has required that the detents be placed a 90 degrees to their original position. This will stop them getting in the works once and for all. While I was modifying the ML7 parts I did the S7 as well.
If I get chance over the next couple of days I will take a look at the Big Bore version, from memory, which is not good these days, it should follow the S7, but it always pays to check. Regards Gray, |
Want the latest issue of Model Engineer or Model Engineers' Workshop? Use our magazine locator links to find your nearest stockist!
Sign up to our newsletter and get a free digital issue.
You can unsubscribe at anytime. View our privacy policy at www.mortons.co.uk/privacy
- *Oct 2023: FORUM MIGRATION TIMELINE*
05/10/2023 07:57:11 - Making ER11 collet chuck
05/10/2023 07:56:24 - What did you do today? 2023
05/10/2023 07:25:01 - Orrery
05/10/2023 06:00:41 - Wera hand-tools
05/10/2023 05:47:07 - New member
05/10/2023 04:40:11 - Problems with external pot on at1 vfd
05/10/2023 00:06:32 - Drain plug
04/10/2023 23:36:17 - digi phase converter for 10 machines.....
04/10/2023 23:13:48 - Winter Storage Of Locomotives
04/10/2023 21:02:11 - More Latest Posts...
- View All Topics
- Reeves** - Rebuilt Royal Scot by Martin Evans
by John Broughton
£300.00 - BRITANNIA 5" GAUGE James Perrier
by Jon Seabright 1
£2,500.00 - Drill Grinder - for restoration
by Nigel Graham 2
£0.00 - WARCO WM18 MILLING MACHINE
by Alex Chudley
£1,200.00 - MYFORD SUPER 7 LATHE
by Alex Chudley
£2,000.00 - More "For Sale" Ads...
- D1-3 backplate
by Michael Horley
Price Not Specified - fixed steady for a Colchester bantam mark1 800
by George Jervis
Price Not Specified - lbsc pansy
by JACK SIDEBOTHAM
Price Not Specified - Pratt Burnerd multifit chuck key.
by Tim Riome
Price Not Specified - BANDSAW BLADE WELDER
by HUGH
Price Not Specified - More "Wanted" Ads...
Do you want to contact the Model Engineer and Model Engineers' Workshop team?
You can contact us by phone, mail or email about the magazines including becoming a contributor, submitting reader's letters or making queries about articles. You can also get in touch about this website, advertising or other general issues.
Click THIS LINK for full contact details.
For subscription issues please see THIS LINK.
Model Engineer Magazine
- Percival Marshall
- M.E. History
- LittleLEC
- M.E. Clock
ME Workshop
- An Adcock
- & Shipley
- Horizontal
- Mill
Subscribe Now
- Great savings
- Delivered to your door
Pre-order your copy!
- Delivered to your doorstep!
- Free UK delivery!


 Register
 Log-in


