Member postings for Bob McDougall
Here is a list of all the postings Bob McDougall has made in our forums. Click on a thread name to jump to the thread.
| Thread: ward 2A lathe |
| 19/10/2018 23:10:35 |
three screws, not sure this is the right post. Latest problem is the capstan slide is so worn it sits low centre height by about 1mm. so thinking of shimming the whole capstan head rather than the slide.
|
| 12/10/2018 22:31:28 |
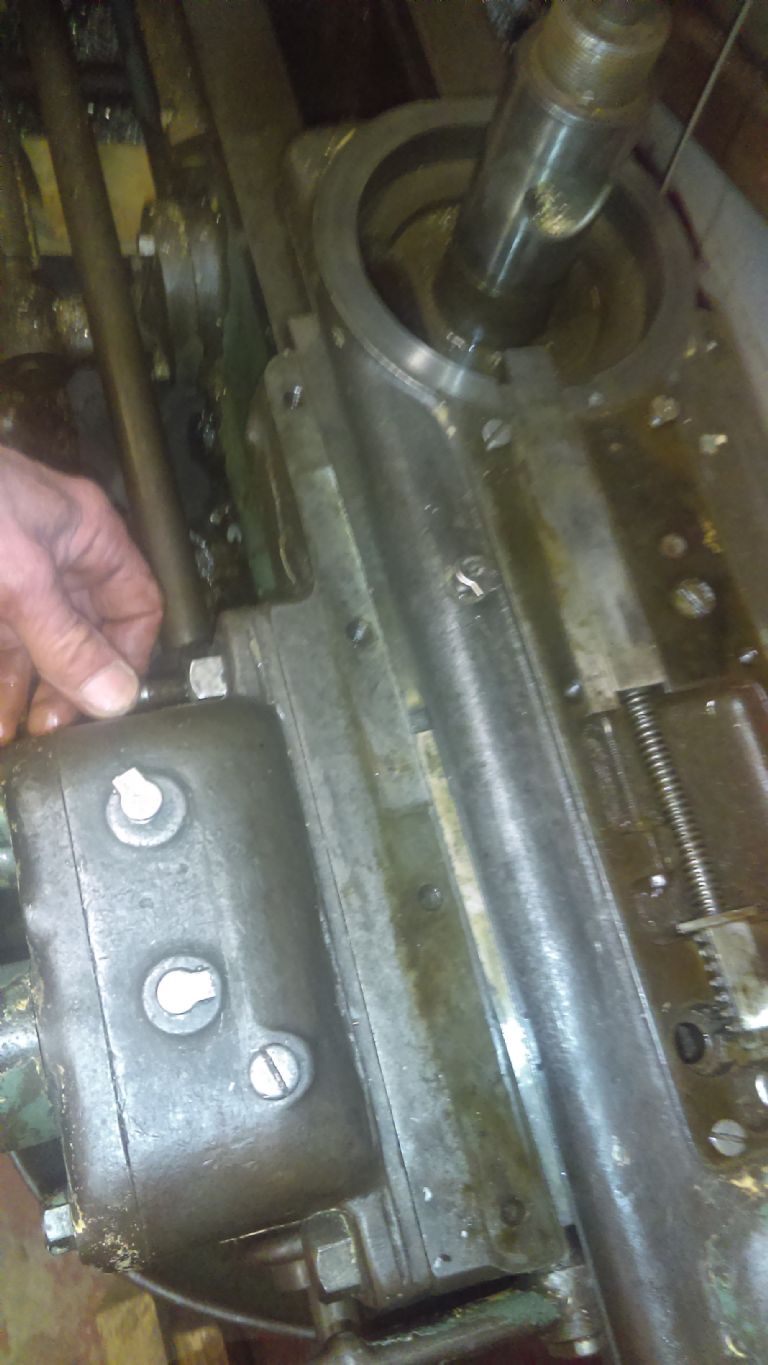
Found an assembly error on the capstan feed that makes the feed jam. There is an arm inside the capstan saddle that engages with the capstan turret lower sprocket to push the head to its nest location. There is a button which can move this lever out of position so the turret doesnt auto turn when you move the mechanism back. This lever has an underside peg which needs to be on the INSIDE of the flanged button rod. we assembled it on the outside and it worked for a while then jammed. Image 1 is the outside button, image 2 is the lever in its incorrect position outside the plunger head. it should be on the inside. . After we fixed it we drilled 1 inch holes in 5mm steel plate with no pilot drill. Nice.
|
| Thread: All things Beaver Mill |
| 14/07/2018 23:09:46 |
Hi Peter_H, glad your Bever is coming together. Yes the top bearing on the spindle was a common ball race , only the lower two were angled. Although there are different angles you can buy, I guess the larger the angle helps if you cut more drilling than side to side milling ??? I use fusion 360 CAD which has a free version for non commertial use and can also make stl files for 3D printers. |
| Thread: ward 2A lathe |
| 07/07/2018 01:08:31 |
New brake pads fitted by Villiers Services in Birmingham . nice job £19.50. re fitting the drum . should have been easy........ first fit. the cam arm was in the wrong position. second fit , the cam arm was in the wrong position. at this point we realised the cam arm was on a spline that had moved during the origional dissasembly. what we thought was a 10 minute job is now next weeks job. She is hard mistress.
Edited By Bob McDougall on 07/07/2018 01:11:03 |
| Thread: All things Beaver Mill |
| 07/07/2018 00:58:34 |
Hi Peter, I replaced the spindle bearings deep side in . but as you say there is very little confirmed data about the correct method. The upper bearing was a straight ball with no tilt . I have since sold the beaver as it was too large for me and bought a Downham mini jig borer for light precision milling. hope that helps.
|
| Thread: ward 2A lathe |
| 08/06/2018 22:53:34 |
Home straight, just the Brake on the opposite end of the headstock from the chuck to look at, removing three deep grub screws holding the outer housing to the inner shaft reveals the brake shoe levers and the cam at the top. There's plenty of shoe left on one lever.
One missing shoe, and the three screws ! holding it in. |
| 02/06/2018 00:13:25 |
So now we have a very solid 1950's lathe . BUT I want CNC, at least DRO , I used to have a Harrison L5 with screw cutting, This machine is very different and has no topslide but with CNC we only need the saddle and cross-slide as long as they are solid. So It will be a while but the next plan is to CNC it. Its a way of making it a 21st century machine. not just a part of history. First I need to CNC my Downham mini borer which is amazingly better than i expected for milling steel with cheap Chinese cutters. I should get some carbine. Before that we are cleaning up a Smart and Brown L4 capstan lathe to sell for funds for the great Dorset steam fair. went on the mill at work today and used the DRO to cut 10 holes at 20mm spacing. didn't know dro's could do that. |
| 04/05/2018 23:22:53 |
Cutting a lead weight for my Lehman seismometer. . The oil pump still only feeds a drip onto the clutches . I recut the piston on my myford and overcut it, doh! , not as bad as the first time, but by 0.1mm dia. and it still doesnt really pump fully. we will ream the cylinder and take more care next time. The pump CAM also has a rim on it so might be worn so not really pumping to full capability. The cam is on a tapered spline so options are to replace whole or build up from weld and regrind. Once the gearbox is at full speed the oil splashes pretty freely anyway. The tin cast lead weight in the Jacobs 3 Jaw chuck with new jaws, not shamfer cut for small bars.
Parting it off obviously too fast, it melted the lead and ripped it from the jaws. But tonight we ran the lathe through all combinations of clutches and gearbox settings. fast forward, fast reverse, slow forward, slow reverse. for all three gearbox settings. and it behaved beautifully. The oil feed is still a concern . BUT now we can move on from input to reward ! . what can it do for us !!! well we need tooling. , the Turret has 1" holes with a larger diameter recess I assume is the tolerance part. we have two kinds of turret fixings. only one has a boss that engages with the recess in the turret .
Does anyone know the name of this fixture, with the boss. we would like to put morse taper 2 and 3 drills in, live centres, etc. . Bill asked me if we has spent £1000 8 months ago could we have bought a machine that has the same capability as this one. well yes a colchester , ect.ect. but we would not be where we are today ,And with DRO and CNC and a new cross slide this machine can do anything we want .It might cost £1000 to add those things but we will have a one hell of a machine. And our machine might have made spitfires. |
| 04/05/2018 00:55:57 |
Posted by colin brannigan on 28/04/2018 09:57:45:
To adjust the clutch the gearbox has to rebuilt and ready to run, it's a simple case of withdrawing the plunger and turning the adjusting ring as if tightening a nut, return the plunger to fit in nearest hole then move the clutch lever to engage the clutch, if there is no click as it engages the clutch then its too slack, if the lever wont engage the clutch its too tight. You will soon understand it when you try. Have to go out now but will return later if you have any questions.
Thanks Colin, Michael, Stuart, Its been a labour of love. Bill and I have been working on this every Friday evening. After last Friday we thought the clutches were worn but on Saturday morning I filed down the clutch lever pins so they no longer caught on the plates and re-assembled, adjusted all the clutches, the forward reverse first which were on the input shaft. and then the fast slow and I finally got full functionality. It was a Eurika moment. The oil pump still needs a new plunger, but basically its working , a beautiful moment. I drank several beers. I put a 2inch brass bar in the newly discovered 3 jaw chuck and cut 1/8 inch cuts. the belts on the motor were slipping as we had only put two belts on. It spat chips about 5 feet across the floor. Heven. happy days. I used to have a Harrison L5 which was a fantastic machine so to get some similar functionality I thought of putting a cross slide onto the ward. and with a DRO there is not much it couldn't do. Thank you all for your comments and support. |
| 27/04/2018 22:59:03 |
The parts all back together we started her up with the two top inspection plates of the gearbox open to watch the four clutches in action. A few adjustments . and a few more. The forward clutch was at one adjustment tight and at the next notch not engaging. . .... strip it back down ! It seemed like the clutch plates might be worn ? it was the forward clutch .
The clutch plates are compressed by three hooked levers , two visible above they compress the first black ring which should slide back when the levers are open but the ring was catching on the lever pins so not disengaging properly . When measured one was 1mm longer than the others.
Would like to hear from anyone who knows how to adjust the clutches to the correct grip/slip. Not sure if the plates are supposed to have friction material on the surfaces , all these ones are absolutely smooth. Thought we had it running this week but no.
|
| 20/04/2018 23:42:23 |
WARD 2A CHUCK. It finally was found in the same shed the gearbox had been stored in. Covered in rust. No makers marks. but it has very abused soft jaws marked as TEC JA6, THAME jaw JA06, for a Coventry /Tudor chuck. The chuck is 6 1/2" which makes it a TUDOR. serrations on the jaw 1/16 which is very slightly over the new metric 1.5mm. 10 teeth measured 15.8mm. 90 degree cut not modern 60. but as a consumable they were available and I had a new set of jaws in my hand this morning. Fantastic . the backplate on the ward is a 5 1/4" with two sets of 120 degree fixings at slightly differnent diameters. The Tudor chuck pins into the outer set. but the 5 1/1/4 is the concentric seat. . All going well and a happy week .
Edited By Bob McDougall on 20/04/2018 23:43:57 |
| 20/04/2018 23:26:27 |
Thought I only needed two new levers but when testing the other clutch pair found I needed another three. Tangi-flow gave me a very good offer after discussion. So we started the re-assembly. stripped the input shaft to knock out the broken pin in one of the fixed bars
replaced the pin and re asssembled the clutch with new levers.
put the clutch housing back on the shaft and pinned it in.
put the clutch plates back on
then put the levers back in. the new levers were tight on the pins so had to emery them out a bit to be free.
the outer clutch adjustment ring assembly. ! we didnt know the function of this ring or the sprung pin until we looked at the gearbox cover. JESUS! . since the dissasembly the cover had been upside down and we never saw this and had no idea what the sprung pins were for. it was only as i said, well why are there two access hatches in the gearbox cover we looked. The four clutch assembly was so alien we just thought the pins were to do with the clutch engaging automatically. But they are a manual means to adjust a screw thread to a locked position to allow for wear. Beautiful. And the full gearbox gear and clutch system is re-assembled. I adjusted the four clutches with the sprung pins for bite and release. . lets see what happens under power !
|
| 12/04/2018 23:50:45 |
profile scanned the broken lever thanks to kind work colleauge .
Thought I could get it water jet or wire erode cut but tangi-flow ward spares contact came through with origional spares.
|
| 06/04/2018 23:54:31 |
Further dismantling of the second clutch on the power input shaft, the sliding pin in the outer ring had sheared . The outer ring unscrews but the clutch doesnt come out over the middle . the taper pin must be knocked out and the clutch assembly pushed out from the shaft centre away from the woodruff key not over it.
broken lever arms and a sheared pin on the square bar fell out . All replaceable. we were getting close!. just the end bearings to replace. This end fell off whilst we were braying the other end. LOL.
So this end bearing was inserted from the outside as opposed to the other end which was inside so the end cap just popped off. This had an externally removable cap that we could'nt get off in the vice so we re-assembled it into the gearbox housing to get best purchase then the cap gave in. The bearing was onto a groove so cant be pulled off without removing the double nuts. One end bearing was really chewed up and Im amazed it hadnt broken the cage. The bearings are 7/8 inner, 2 1/4 outer 11/16 . MS9, ordered 3 for £21.
The oil pump ! well half of it is missing. its not in the sump. The main body is there but the piston and spring are nowhere to be found.
Not sure if this is the correct pump, the internals are there with the double ball bearing valves but the piston and spring are missing. Also there are two holes in the housing that dont hatch any fixings. Does anyone remember the oil pump ? |
| 30/03/2018 23:12:57 |
The oil pump runs off a cam (below) on the main input feed shaft the cam pushes a lever which rocks onto the oil pump via a shaft that was seized. So possibly in its past the oil pump seized then the clutch overheated and spat out a plate. The clicky worn bearings will be replaced and a new clutch plate (err.. ) made . local CNC shop will spit one out in a day. grit my teeth and pay. |
| 30/03/2018 22:57:12 |
Unfortunately the gearbox had problems and when we looked into it (through an inspection hatch) there was lateral movement one one of the shafts and one clutch appeared seized.
The the motor pulley bearing housing was sunk into the gearbox so the case needed to be loosened to release it. Once inside we found this four clutch system. used for rapid fast /slow, forward/reverse. One has clearly overheated and bits of metal were in the gearbox gunk. The end bearings were shot and one was stamped Germany so I assume it was replaced during its 1961 referb and not an original 1950 part. The whole shaft assembly is an amazing bit of work. the clutches are taper pinned to the shaft and run on spiral grooved roller bearings. All the pictures in my album.
and some bits in the gearbox.
Edited By Bob McDougall on 30/03/2018 23:01:50 |
| Thread: Jig Borer in the home workshop |
| 17/03/2018 23:57:03 |
Although it has the full origional collet set . none have screw heads for threaded milling cutters so I am very interested in the collet dimensions . they have 00 printed on them. The collets look very similar to ones for my WARD 2A but the ward ones are huge. For my work I think the collets will be ok as I just want to cut brass gears and lock parts. I will start a new thread on my CNC conversion
|
| 17/03/2018 21:01:25 |
The Downham Hoover motor was stamped as 220/440 and sure enough under a very dust filled plate probably never removed on the motor were six terminals. It had been run on 440 3PH.
The origional 440V star configuration 1-3-4 as the centre, 2,5,6 as the 3 phase.
The new 220V delta configuration. 1-6, 2-3, 4-5. with the 3 phase on 2,5,6 or could be any of the three bars.
Next problem the 240V lamp was on a transformer so I just disconnected it from the rear terminal box. next problem the side on/off switch was a solenoid overload current trip but was a 440v solenoid so just buzzed at 220. So I just jumped the blue-blue, white-white, red-red, the inverter handles overload currents so this is not needed. AND I was cutting metal !
Yes I will use as centre drill when Im less excited. |
| 17/03/2018 00:15:32 |
Just had delivery of this beautiful Downham mini borer machine from a very nice Rob in Norfolk. Full set of collets and 2 axis DRO. Compared to the huge Beaver Ive just sold this is a much more suitable machine for me. to make clock and lock parts on. My intention is to CNC convert it which the beaver was just overwhelming to do. This only took four big men to get out of a van. The beaver needed a 2ton crane on a lorry. First impressions are very good. Once on the workshop floor two of us could manouver it by hand. Hoover motor. will have to see if its 400V or 220 as only have 220 3PH but its a foot mount not flange so should be easy to change. happy .
|
| Thread: ward 2A lathe |
| 16/03/2018 23:50:17 |
When viewed through the top inspection hatch one of the shafts in the gearbox was moving sideways when th egear selector was moved and one of the four clutches was obviously siezed so further work was needed. The gearbox pulley was removed . The bearings for the shaft were in a housing external to the main gearbox . the first roller bearing held in by a ring which was held by a grub screw we missed.
The grub screw came out unharmed after we hammered the ring clear of it. DoH!. The bearing housing was held to the main body of the gearbox by four studs, two came out , two nuts came off. but it wasn't free. It had a collar which enters the gearbox along the caseing split we found out when we loosened the case bolts and the end bearing covers.
We had a break when my Downham Mini Borer arrived. It only took four of us to get it out of the Van and upright. |


Magazine Locator
Want the latest issue of Model Engineer or Model Engineers' Workshop? Use our magazine locator links to find your nearest stockist!
Sign up to our Newsletter
Sign up to our newsletter and get a free digital issue.
You can unsubscribe at anytime. View our privacy policy at www.mortons.co.uk/privacy
Latest Forum Posts
- *Oct 2023: FORUM MIGRATION TIMELINE*
05/10/2023 07:57:11 - Making ER11 collet chuck
05/10/2023 07:56:24 - What did you do today? 2023
05/10/2023 07:25:01 - Orrery
05/10/2023 06:00:41 - Wera hand-tools
05/10/2023 05:47:07 - New member
05/10/2023 04:40:11 - Problems with external pot on at1 vfd
05/10/2023 00:06:32 - Drain plug
04/10/2023 23:36:17 - digi phase converter for 10 machines.....
04/10/2023 23:13:48 - Winter Storage Of Locomotives
04/10/2023 21:02:11 - More Latest Posts...
- View All Topics
Support Our Partners


Shopping Partners
Subscription Offer

Latest "For Sale" Ads
- Reeves** - Rebuilt Royal Scot by Martin Evans
by John Broughton
£300.00 - BRITANNIA 5" GAUGE James Perrier
by Jon Seabright 1
£2,500.00 - Drill Grinder - for restoration
by Nigel Graham 2
£0.00 - WARCO WM18 MILLING MACHINE
by Alex Chudley
£1,200.00 - MYFORD SUPER 7 LATHE
by Alex Chudley
£2,000.00 - More "For Sale" Ads...
Latest "Wanted" Ads
- D1-3 backplate
by Michael Horley
Price Not Specified - fixed steady for a Colchester bantam mark1 800
by George Jervis
Price Not Specified - lbsc pansy
by JACK SIDEBOTHAM
Price Not Specified - Pratt Burnerd multifit chuck key.
by Tim Riome
Price Not Specified - BANDSAW BLADE WELDER
by HUGH
Price Not Specified - More "Wanted" Ads...
Get In Touch!
Do you want to contact the Model Engineer and Model Engineers' Workshop team?
You can contact us by phone, mail or email about the magazines including becoming a contributor, submitting reader's letters or making queries about articles. You can also get in touch about this website, advertising or other general issues.
Click THIS LINK for full contact details.
For subscription issues please see THIS LINK.
Digital Back Issues


Donate

 Register
 Log-in
Model Engineer Magazine
- Percival Marshall
- M.E. History
- LittleLEC
- M.E. Clock

ME Workshop
- An Adcock
- & Shipley
- Horizontal
- Mill

Subscribe Now
- Great savings
- Delivered to your door

Pre-order your copy!
- Delivered to your doorstep!
- Free UK delivery!