Member postings for Peter_H
Here is a list of all the postings Peter_H has made in our forums. Click on a thread name to jump to the thread.
| Thread: All things Beaver Mill |
| 28/09/2019 10:39:08 |
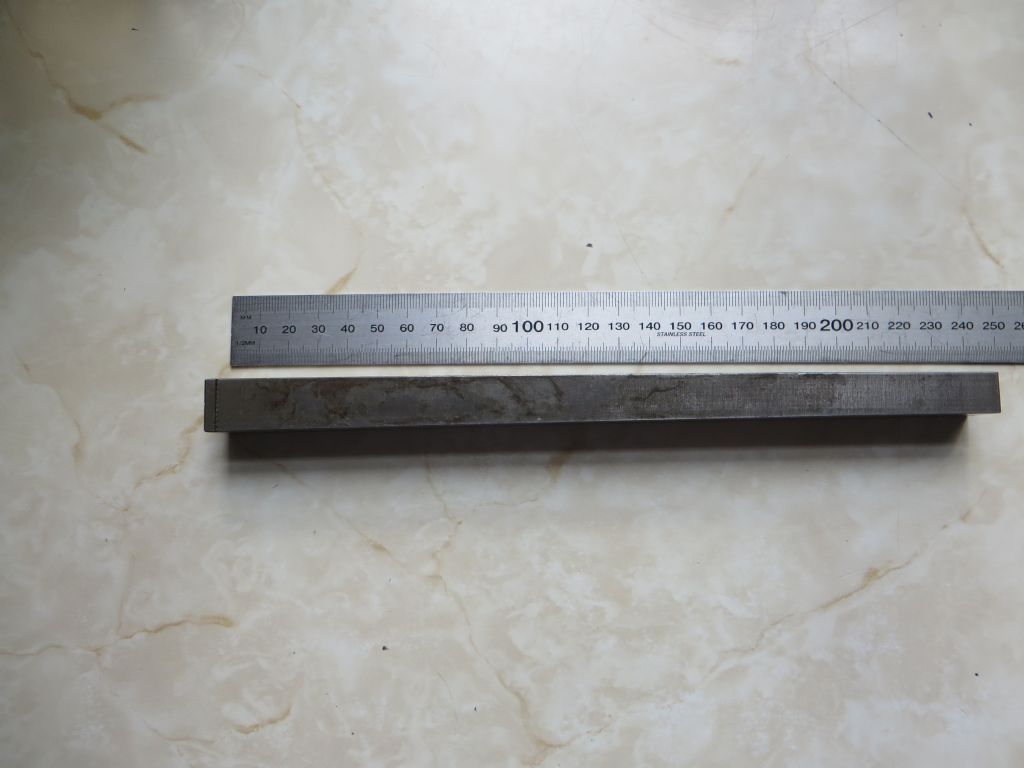
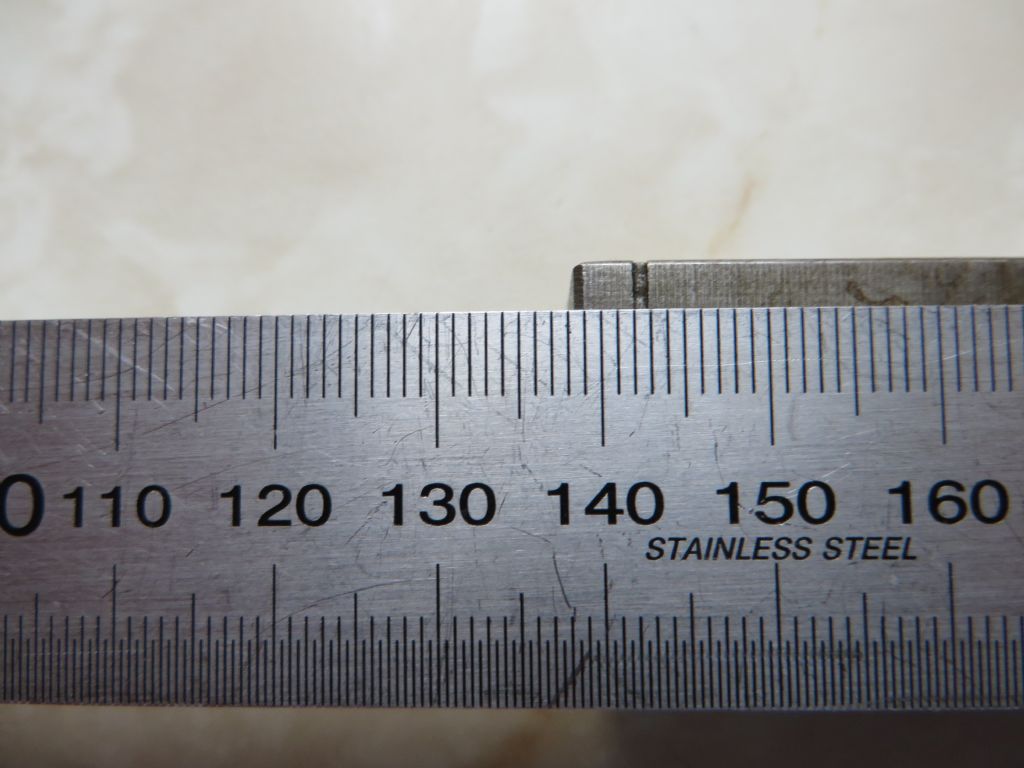
Definitely original. It is my spare so my machine isn't disassembled. Can you explain a bit more what you want photos of please?. Meanwhile, is there anything in the other thread that helps?.
|
| 27/09/2019 11:38:15 |
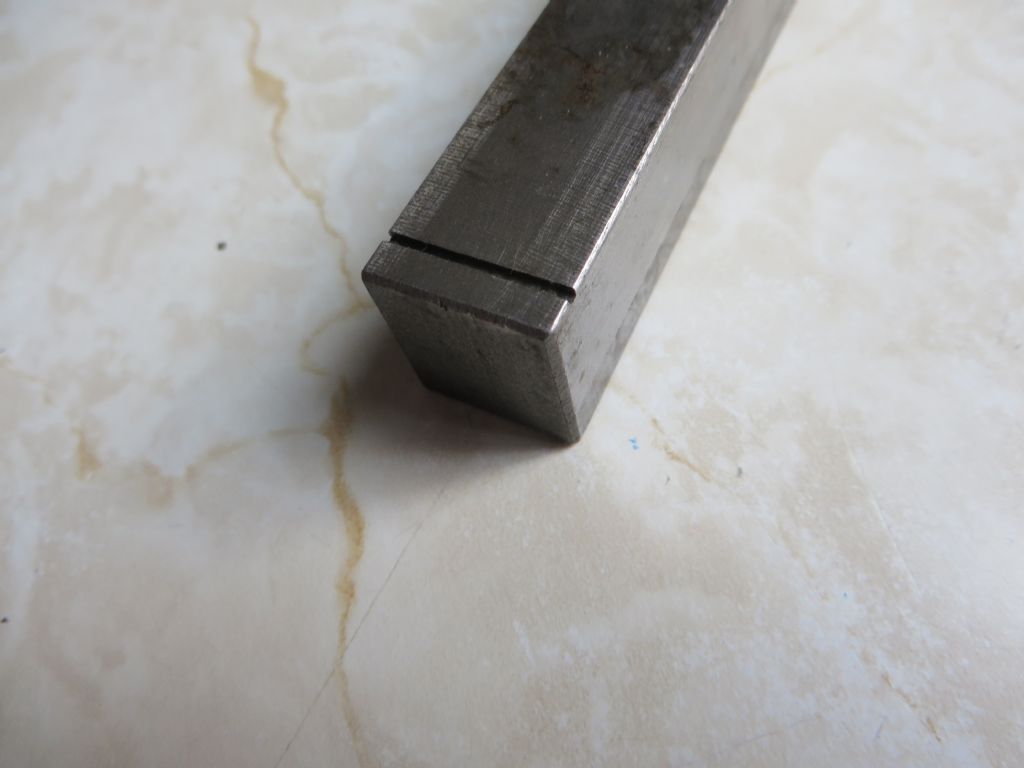
You're right. I had a look yesterday and was reminded that there is (obviously) another screw the other end of the apron, so the gib is adjusted between the two screws. The slot remains a mystery. It is small, less than a millimeter I would say, unlike the X axis gibs which both have a much wider and deeper slot for adjustment.
|
| 26/09/2019 12:38:48 |
I honestly don't know Lex. Could possibly be a channel for lubricant. The exploded diagram shows almost nothing of that area, and it doesn't really show up in any of the photos posted by rebuilders. Thinking about it, it probably engages with the gib adjusting screw at the front. I believe that screw has a flange on it and that flange could engage in the gib key slot.
Edited By Peter_H on 26/09/2019 12:55:20 |
| 25/09/2019 12:58:59 |
I'm assuming you mean axis moving toward and away from you. There was a thread about this around here where I measured one and described it thus : The gib has a single simple taper. It is rectangular with parallel sides 0.745ins (18.923mm) apart. The tapered sides are 0.496ins (12.598mm) at the narrow end and 0.658ins (16.713mm) at the wide end. The two parallel side are machined and the two tapered faces are ground and scraped. Hardened steel again IMO. There is a small groove about 30 thou wide and 30 thou deep across the top parallel face at the wide end, about 0.15ins in from the end. The gib is 241mm long overal ... And later replied to Martin :
Given that the original part was probably Imperial, and allowing for wear, my guess of original dimensions are : length = 9.5ins = 241.3mm parallel height = 0.75ins = 19.05mm narrow part of taper = 0.5ins = 12.7mm wide part is 0.5 + (9.5*sin(1)) = 0.66579ins which is consistent with 1 degree taper
Edited By Peter_H on 25/09/2019 13:00:02 Edited By Peter_H on 25/09/2019 13:02:24 |
| 20/08/2019 13:40:25 |
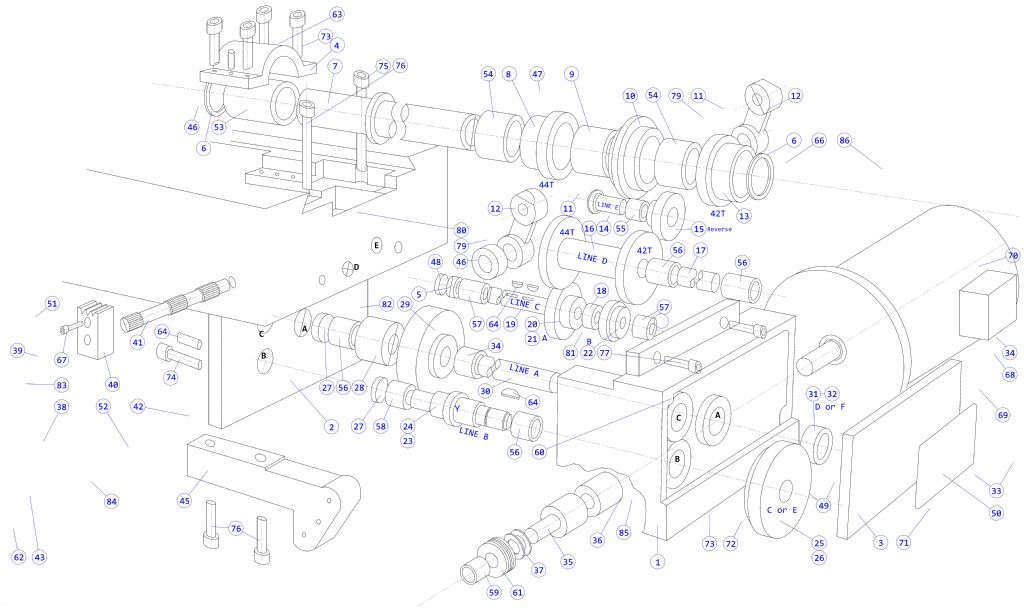
Here is an uncompleted QCAD drawing/tracing of the expoloded view of the VBRP II table (X) gearbox. On later MkII's a modified version of this gearbox was used on the (Y) carriage. It's an exported boitmap but anybody with registered QCAD is welcome to the DXF for their own use. The table drive version is shown being stripped down in the VBRP MkII restoration thread. Yes, I know the perspective of the caphead screws is wrong, nothing looks right however I do them! Peter |
| 17/07/2018 22:49:08 |
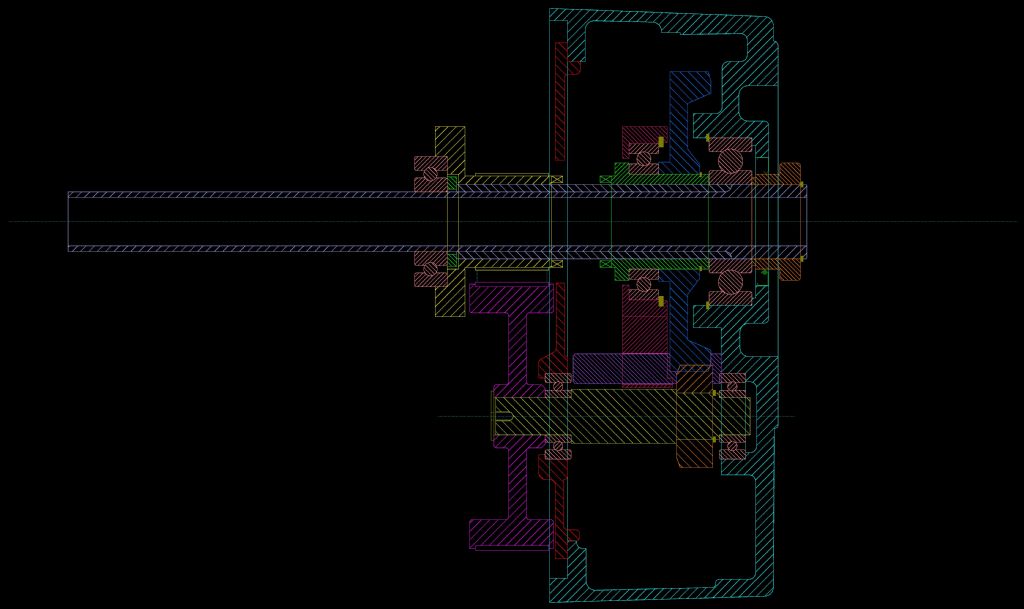
I think we'll have to agree to disagree Dave I've done some more tracing of the Beaver MK2 head section, I'm actually rather enjoying it, though had tremor doesn't help much. That could be why snap to grid is important to me. I havent got the hang of the 'album' on here yet. The pictures I've posted are coming out very dull and very small, even when clicked on. Edited By Peter_H on 17/07/2018 22:50:54 |
| 15/07/2018 09:42:30 |
Bob - it seems to be more common in spindles to use pairs or triples of the 15 degree angular contacts with a degree of preload. It's a trade off between stiffness, axial and radial load capacity, and maximum speed.There is some good information in the SKF Super Precision Angular Contact Bearing manuals, including some section drawings through various examples of spindle design. Mark - I've found up the old bearings I exchanged when I partially renovated the Beaver. The lower pair were the original Hoffmann 130ACDEP's and even had the Beaver specification number N1093a engraved on them. I couldn't find any other old angular contact bearings butI did find a 6206, so it looks likely this mill had a deep groove radial bearing as well. I used a pair of Fafnir ABEC-9 2MMV207WI CR DUL Edited By Peter_H on 15/07/2018 09:44:11 Edited By Peter_H on 15/07/2018 09:44:52 |
| 14/07/2018 22:31:25 |
So what is the grid?. Is it a 1mm grid or a 10mm grid?. If I want to snap the cursor to a specific grid multiple, I want it to be defined by me. The whole idea of a grid that changes is an anathema to me. If I want to snap to a 1mm grid, I want exactly that, I don't want it to change to 10mm or 0.1mm depending on zoom level. I cannot see how there is any application for that. The only thing that comes to mind is that maybe you see the grid as some sort of visual aid, where the normal in my experience is that it is something to magnetically snap the cursor to. The snap settings don't seem to be very stable either. I have twice lost application grid settings between program runs, and whether the grid icon and the auto icons, under the snap menu, are on or off at any particular time seems completely random. However many times I turn Auto off and click Grid on under that menu, they just revert at what feels like random intervals. Either there are some big bugs around this area, or, more likely, I'm missing some setting. Other than that quirk, it's the best 33EU I ever spent. Excellent piece of software, I'd use it for 2D work by preference.
|
| 14/07/2018 18:40:56 |
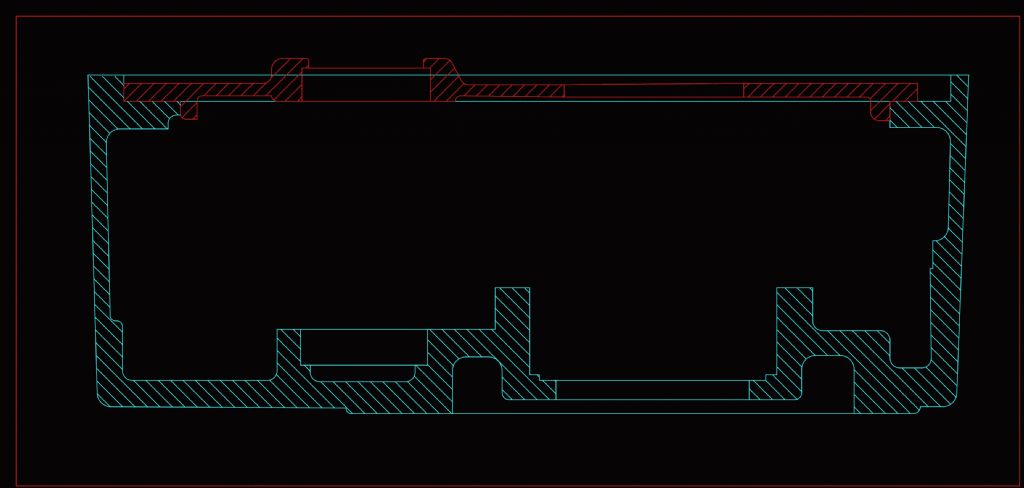
Well, it seems to work with a 1mm grid now, and the image is almost 10:1, so good enough. I'm reasonably happy with my first attempt, a cross section of the backgear case and cover, traced from the sectional view of the variable speed MK2 head in the parts manual, using QCAD in the manner suggested by Dave (SOD) |
| 14/07/2018 13:17:23 |
No, I haven't touched any setting in graphics view, only the snap grid size under "Grid", which I changed to 0.1mm in all viewports. I still have the same problem though, this time with a different BMP of similar scale. Auto grid setting sounds insane. I've worked with CAD for decades and always used the grid as something to snap the cursor to when needed and I've never seen it used any other way by anuyone I've worked with. What would you use an Auto grid for?. I fail to see what use it is if it's size continually changes.
Anyway, the bitmaps I am importing are around 1652 x 2152. They are photocopies of sectional views from the Beaver parts manual with a scale of around 10 pixels per mm. What I am seeing after import is X and Y coord readings in QCad showing 4 decimal places of mm moving linearly with cursor movement, even though grid is set to 0.1mm, and not auto. If I zoom in close enough to see the 0.1mm grid, then the cursor is snapping to 1mm increments (NOT 0.1mm), but the coords change from (1372.1252, 795.2162) to (1373.1252, 796.2162) when moving the cursor up and right by one grid snap. Note, not only is the grid 10x too big, but there is an unwanted four decimal places hanging on the end of each coord. When I imported the BMP, I zoomed right in and put it's origin on the drawings origin.
|
| 10/07/2018 18:31:45 |
I could set the application preferences and change the setting for all new drawings, but I couldn't change it on the drg I had started. In fact, I could start a new drawing, observe the grid snap setting was ok, import the bitmap, and the grid snap just vapourized. Seems it was because of the scale of the drawing being so huge interacting with this setting : Application Settings->Graphics View -> Grid->Minimum Grid Spacing (pixels) It appears you can't snap to a grid that is too small to see, which seems a bit odd to me.
|
| 10/07/2018 13:03:37 |
> take a photo and import it into Layer 0. Then create Layer 1, and trace lines over the photographic image Am doing exactly that now in QCAD, with a sectional view from the VBRP Mk2 manual. Pro version is 33 Euros, per year if you want updates. Ie, 33Eu gets you updates for 1 year, there after it's 33Eu per year for continuous updates. Excellent program, I am very impressed. It's the way Autocad should have gone 20 years ago instead of the horrible office-like toolbar. The heirachical buttons on QCAD are so easy to use. If only I could find out how to set the grid size for snap to grid!
|
| 09/07/2018 18:53:10 |
Many thanks all, I'll have a look at that software.
> So you can't do a straight tracing and automatically get good results, > rather you have to translate the photo into sensible CAD dimensions > So you can't do a straight tracing and automatically get good results, > rather you have to translate the photo into >sensible CAD dimensions
Yes, I'm aware of that problem. I've looked at photgrammetry a bit over the years, and it can be done from a single unknown camera, but only if you have some markers at known coordinates. Otherwise, you need several photos from different angles and ideally a known calibrated camera. In this case, the source images I'm referring to are the section diagrams in the Beaver parts manual. There are several good sectional drawings, and from my experience so far, they seem to be mostly to scale. But aside from dimensional info, which would be great, the section drawings could be vastly improved and made much easier to view and interpret. The only releiable source of dimensions we have is to measure parts as they are stripped. But there are other cluse, such as a bearing type being known from the parts list - you immediately know the bore and shaft dimensions, and they can be used as calibration points in a useful small program called "Screnn Calipers" from Iconico. They do more or less what they say, and can store several different calibrations, so you can read directly in mm or inches after calibrating against a known length object in the drawing. Obviously doesn't work well if perspective is involved. BTW, I saw there is an open source program called FreeCAD - is that related to LibreCad?.
PS - I keep checking "send me email notifications when someone replies.." but I'm not receiving them.
|
| 09/07/2018 13:27:01 |
That helps a lot Bob, thak you. If it worked for you it will do me I would dearly love to make some better drawings for this mill, particularly the head, leadscrews and gearboxes. Does anybody know of a software package that can import a photo/scan, show it faint in the background and let you construct lines, circles, arcs etc over the top of it but as a separately saveable drawing file?. Maybe a DXF. Software eqivelant of tracing. At least you could end up with a drawing with fine, staright lines and maybe remove some ambiguities at the same time. Scaling would be useful, as would snap to a settable imperial or metric grid. Anybody know of such a program?. Preferably feeware
|
| 28/06/2018 18:45:53 |
Bob McDougall : Did you ever find a definitive answer to whether the pair of 7207 bearings are fitted DB - thick side inward, or DF - thin side inward in the Beaver quill?. Also, if you had the 7206 angular contact bearing for the top (third) bearing and not the earlier deep groove, do you recall how it was fitted?. Ie, which way round and how it was seated and preloaded. Looking at what drawings I can find I can't really make any sense of it. I've almost reached the stage of removing and disassembling the spindle assembly, it's gnawing at me that much. It needs a new felt seal anyway so I may just strip it and draw up the parts if nobody knows the answers. TIA.
|
| Thread: Restoring Beaver VBRP Mill |
| 23/06/2018 11:05:35 |
I would call it a Sine Bar. Yes, dimensions sounds very similar. The wear on the part I have would count for some discrepancy. Given that the original part was probably Imperial, and allowing for wear, my guess of original dimensions are : length = 9.5ins = 241.3mm parallel height = 0.75ins = 19.05mm narrow part of taper = 0.5ins = 12.7mm 0.5 + (9.5*sin(1)) = 0.66579ins which is consistent with 1 degree taper |
| 21/06/2018 16:13:56 |
I can't remember the details of how that one is fitted, I think it is pushed in as far as necessary against the taper by the screw in Martins photo, and locked by several gib screws on the right of the casting. It is over ten years since I last stripped it though. I do have a spare however, which I just measured. The gib has a single simple taper. It is rectangular with parallel sides 0.745ins (18.923mm) apart. The tapered sides are 0.496ins (12.598mm) at the narrow end and 0.658ins (16.713mm) at the wide end. The two parallel side are machined and the two tapered faces are ground and scraped. Hardened steel again IMO. There is a small groove about 30 thou wide and 30 thou deep across the top parallel face at the wide end, about 0.15ins in from the end. The gib is 241mm long overall. |
| 20/06/2018 17:26:44 |
It seems that the two parallel faces, 0.7351 ins apart, sit horizontally in the machine. The scraped face then slopes back from the table and fits under Vee of the table. So moving the gib along the direction of table movement will move the scraped face closer or further from the Vee of the table, thus adjusting clearance. In that attitude, the slot is on the outer end of the gib and cut vertically into the top edge facing the operator. The previously mentioned blind hole and witness mark are in the unscraped sloping face of the gib closest to the operator. This is very difficult to describe in words!.
Hang on... erm, I have described the table gibs. Your picture looks like you are missing a carriage gib. Which is it?
Edited By Peter_H on 20/06/2018 17:31:09 |
| 20/06/2018 16:32:44 |
Beaver/Baldings closed down around about 30 years ago. I am almost certain that I got a pair of spare table gibs when I first had my VBRP Mk2. They are complex double tapered, odd looking things. A thread rod emerges from one end, and this locked with a pair of nuts either side of a fixed part, so they are positively held in both directions after adjustement. I also think they are a right and left handed pair. I could try to take some dimensions from it if you want, and maybe photograph it. Best would be if sommeone could put it on CAD. Later... I have found them, they are a matching pair. Cross section is parallelogram with angles 35/55 degrees. The section is constant height, but tapered width. They are 10 ins long (254mm) At the fat end, the parallellogram is 0.6317 ins (16.045mm) by 0.7351 ins (18.671mm) At the thin end it is 0.4911 ins (12.474mm) by 0.7351 ins (18.671mm) The fat end has a slot 7.4mm wide by 8.81mm deep, 8.34mm from the end. It is the slot that is used to lock the adjustment. The threaded stud I mentioned must be the stationary part. There is a blind hole about 6mm diameter 77.5mm in from the fat end in one face. The part seems to be made of carbon steel and hardened after machining all over. One side looks to be ground then hand scraped flat. There is a witness mark on one face where the table locking screw has pinched on it.
I'll follow up with photographs when I get a chance.
Edited By Peter_H on 20/06/2018 16:34:49 Edited By Peter_H on 20/06/2018 17:13:30 |
| Thread: Beaver VBRP MKII Mill missing spindle seal |
| 28/10/2017 10:41:51 |
Thanks, yes, it can be a problem with larger seal, although it's rare to go over 1200 rpm on this machine, and it is well heatsunk, but it is a big seal. I've been looking at PTFE seals recently, I'll see if they are available that size (when I know the size!). Not knowing the size is the sticking point to contacting a seal company about felt seals. Some spare part suppliers (you know who you are) stock many old Beaver parts, new and old, but the prices are astronomical. This is why I asked if anbody had any section drawings or had maybe made a note of the various dimensions. I'll happily do a CAD drawing/model of the spindle assembly if anyone has the dimensions, or maybe is in the middle of a strip down and can get their calipers out.
Peter
|
Want the latest issue of Model Engineer or Model Engineers' Workshop? Use our magazine locator links to find your nearest stockist!
Sign up to our newsletter and get a free digital issue.
You can unsubscribe at anytime. View our privacy policy at www.mortons.co.uk/privacy
- hemingway ball turner
04/07/2025 14:40:26 - *Oct 2023: FORUM MIGRATION TIMELINE*
05/10/2023 07:57:11 - Making ER11 collet chuck
05/10/2023 07:56:24 - What did you do today? 2023
05/10/2023 07:25:01 - Orrery
05/10/2023 06:00:41 - Wera hand-tools
05/10/2023 05:47:07 - New member
05/10/2023 04:40:11 - Problems with external pot on at1 vfd
05/10/2023 00:06:32 - Drain plug
04/10/2023 23:36:17 - digi phase converter for 10 machines.....
04/10/2023 23:13:48 - More Latest Posts...
- View All Topics
- Reeves** - Rebuilt Royal Scot by Martin Evans
by John Broughton
£300.00 - BRITANNIA 5" GAUGE James Perrier
by Jon Seabright 1
£2,500.00 - Drill Grinder - for restoration
by Nigel Graham 2
£0.00 - WARCO WM18 MILLING MACHINE
by Alex Chudley
£1,200.00 - MYFORD SUPER 7 LATHE
by Alex Chudley
£2,000.00 - More "For Sale" Ads...
- D1-3 backplate
by Michael Horley
Price Not Specified - fixed steady for a Colchester bantam mark1 800
by George Jervis
Price Not Specified - lbsc pansy
by JACK SIDEBOTHAM
Price Not Specified - Pratt Burnerd multifit chuck key.
by Tim Riome
Price Not Specified - BANDSAW BLADE WELDER
by HUGH
Price Not Specified - More "Wanted" Ads...
Do you want to contact the Model Engineer and Model Engineers' Workshop team?
You can contact us by phone, mail or email about the magazines including becoming a contributor, submitting reader's letters or making queries about articles. You can also get in touch about this website, advertising or other general issues.
Click THIS LINK for full contact details.
For subscription issues please see THIS LINK.
Model Engineer Magazine
- Percival Marshall
- M.E. History
- LittleLEC
- M.E. Clock
ME Workshop
- An Adcock
- & Shipley
- Horizontal
- Mill
Subscribe Now
- Great savings
- Delivered to your door
Pre-order your copy!
- Delivered to your doorstep!
- Free UK delivery!
 . The good thing is that it seems to cater for either way of working.


 Register
 Log-in


